Triton Systems Argo Owner's manual

Category
Car kits
Type
Owner's manual

Triton Systems Argo is a versatile and reliable device designed to enhance your business operations. With its advanced features, Argo offers efficient cash handling, secure transaction processing, and seamless integration with various payment systems. From retail stores to financial institutions, Argo provides a comprehensive solution for managing cash transactions.

Triton Systems Argo is a versatile and reliable device designed to enhance your business operations. With its advanced features, Argo offers efficient cash handling, secure transaction processing, and seamless integration with various payment systems. From retail stores to financial institutions, Argo provides a comprehensive solution for managing cash transactions.

HCDU HanDle/Bill Tray replaCmenT
TDN 07103-00265 Rev A. July 30, 2015
Corporate Headquarters
21405 B Street
Long Beach, MS 39560
Phone: (800) 259-6672
Fax: (228) 868-9445
COPYRIGHT NOTICE
© 2015 Triton. All Rights Reserved. TRITON logo is a
registered trademark of Triton Systems of Delaware, LLC
HCDU H/B T R I
2
Document Updates
July 30, 2015 Original ECO 1030600
Required Tools Ratchet with 7/16 inch socket
#2 Phillips head screwdriver
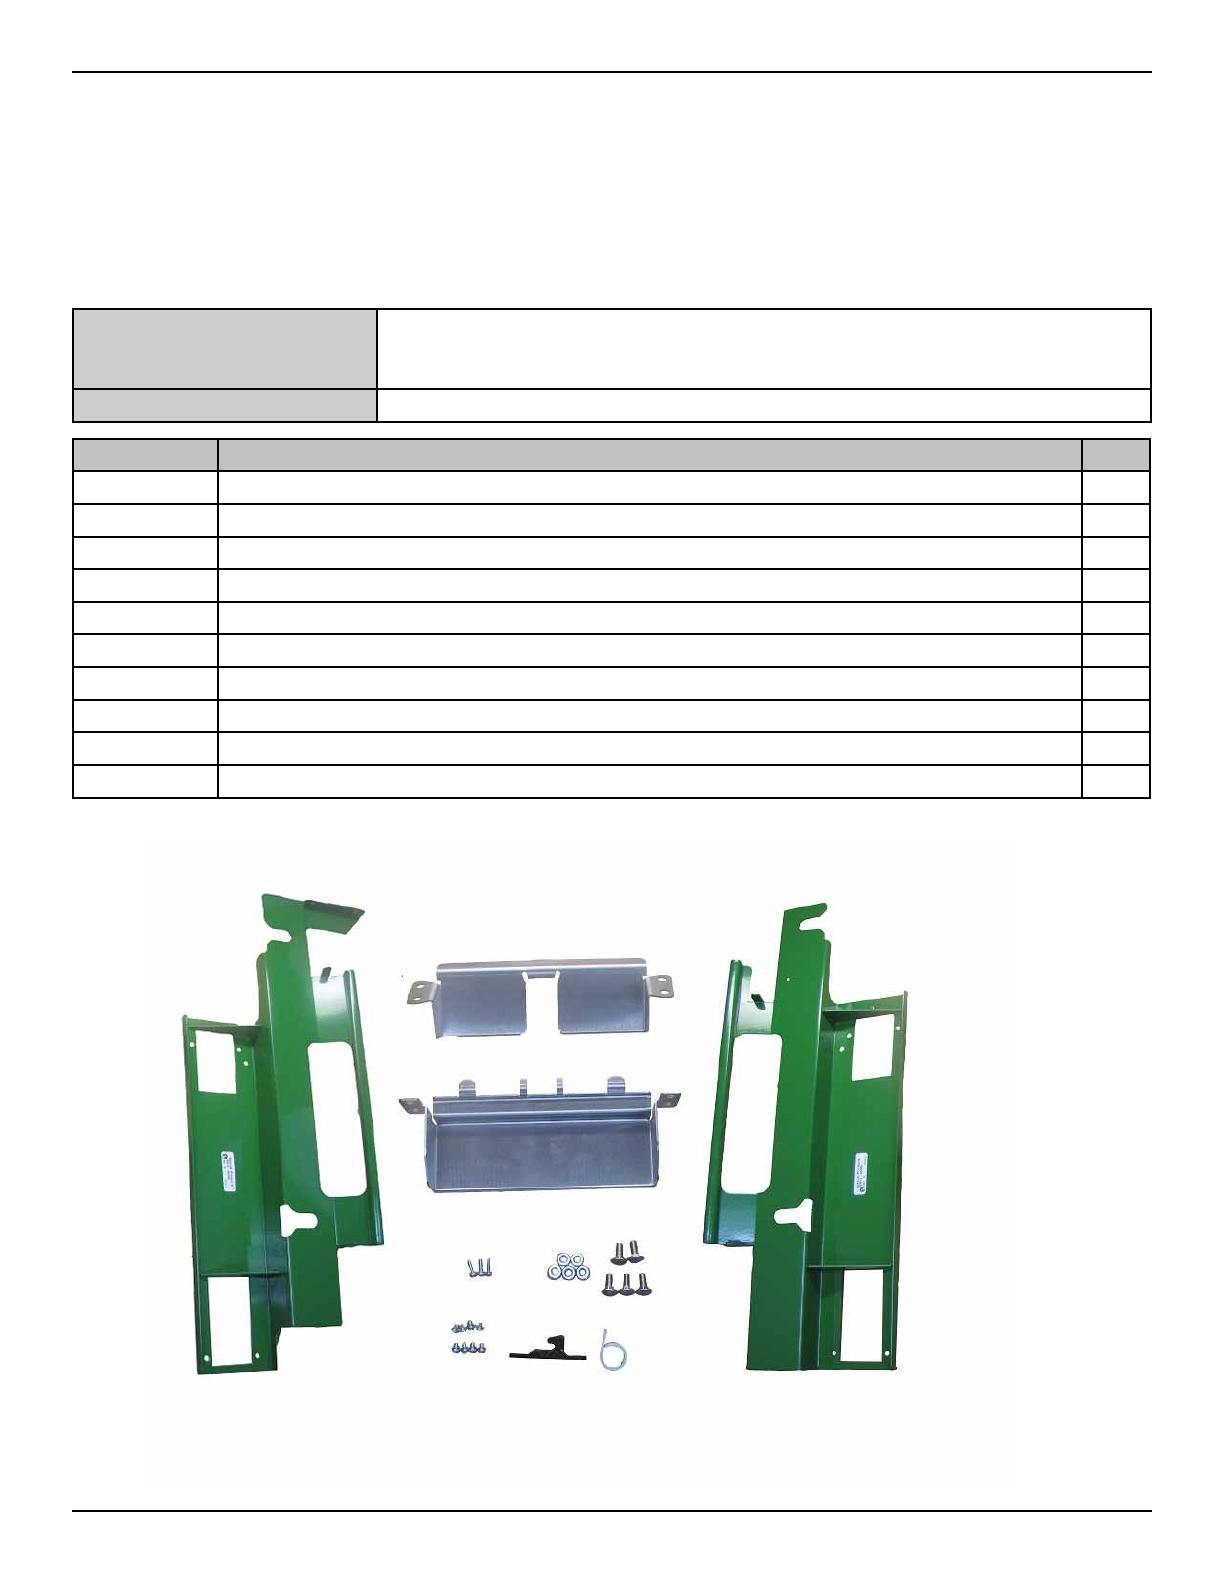
Kit 6100-00135 HCDU Handle and Bill Tray Replacement.
reqUireD parTs anD Tools
Part # Description Qty
1 Bill Tray Top, HCDU, BH 1
2 Bill Tray Bottom, HCDU, BH 1
3 Handle, Latch Side, HCDU Forward 1
4 Handle, Hinge Side, HCDU Forward 1
5 Screw/M4x. 7x6// with Star Washer///ROHS 8
6 Screw/ #6-32/ 1/2”///Pan Phil Head w/ Ext Tooth Wash//ROHS 3
7 Cable Clip/ 3/4” Round, Screw-in/Quick Release/ROHS 1
8 Bolt/ 1/4 - 20 x 5/8/ Stainless Steel Carriage/ ROHS 5
9 Part B of Depository Bin Latch/ Switch 1
10 Nut|1/4-20|||Kep Nut ROHS 5
1
2
4
8
7
9
5
6 10
3
HCDU H/B T R I
3
NOTE: Before starting the upgrade, perform proper shut down procedures and disconnect the power to the unit.
Refer to Users Manual for procedures on opening the cabinet door.
1. Remove the 5 nuts and carriage bolts holding the top and bottom bill trays in place. Remove the top and bot-
tom bill trays.
2. Disconnect the power cable, data cable, and ground wire from the HCDU. Remove the wires from the cable
clip.
Power cable
Data cable
Ground wire
Cable clip
HCDU H/B T R I
4
3. Grab the HCDU by the handles and li it o the rails. Set the HCDU on the oor.
4. Remove the 8 screws (4 on each side) holding the handles in place.
HCDU H/B T R I
5
5. Obtain the new top and bottom bill trays. Insert the top and bottom bill trays with the bottom bill tray going
in rst.
6. Insert the carriage bolts from the front one at a time installing the nuts on the back as you go but do not
tighten. Make sure the ground wire is installed in the top right corner as shown. en tighten the nuts.
7. Obtain the new hinge side handle and part B of the bin latch. Install part B of the bin latch to the hinge side
handle with 2 of the #6-32/ 1/2” screws provided in the kit. Make sure the hook is facing up exactly as shown.
HCDU H/B T R I
6
8. Install the hinge side handle to the le side of the HCDU with 4 of the M4x. 7x6 screws provided in the kit.
9. Obtain the new latch side handle and the cable clip. Install the cable clip on the latch side handle with the
remaining #6-32/ 1/2” screw provided in the kit as shown.
HCDU H/B T R I
7
10. Install the latch side handle to the right side of the HCDU with the remaining 4 M4x. 7x6 screws provided in
the kit as shown.
11. Gripping the HCDU by the handles, li the HCDU. Set the HCDU on the rails with the standouts on the rails
tting into the notches on the handles.
HCDU H/B T R I
8
12. Attach the power cable, data cable and ground wire to the HCDU as shown. Make sure that the wires are
routed through the cable clip and carefully tucked behind the latch side handle.
13. Carefully slide the HCDU into the cabinet. Make sure no wires will be caught or damaged.
14. Power up the unit. Run a transaction to ensure the unit is working properly.
Power cable
Data cable
Ground wire
Cable clip
  • Page 1 1
  • Page 2 2
  • Page 3 3
  • Page 4 4
  • Page 5 5
  • Page 6 6
  • Page 7 7
  • Page 8 8

Triton Systems Argo Owner's manual

Category
Car kits
Type
Owner's manual

Triton Systems Argo is a versatile and reliable device designed to enhance your business operations. With its advanced features, Argo offers efficient cash handling, secure transaction processing, and seamless integration with various payment systems. From retail stores to financial institutions, Argo provides a comprehensive solution for managing cash transactions.

Ask a question and I''ll find the answer in the document

Finding information in a document is now easier with AI