Sunco Lighting LED Ceiling Panel Light User manual

Type
User manual

Sunco Lighting LED Ceiling Panel Light offers a sleek, modern design that can elevate the ambiance of any room. With its energy-saving LED technology, it provides bright, flicker-free illumination while reducing energy consumption. Its versatility allows for recessed, cable suspended, or surface mounting, making it suitable for various applications such as offices, commercial spaces, and residential areas.

Sunco Lighting LED Ceiling Panel Light offers a sleek, modern design that can elevate the ambiance of any room. With its energy-saving LED technology, it provides bright, flicker-free illumination while reducing energy consumption. Its versatility allows for recessed, cable suspended, or surface mounting, making it suitable for various applications such as offices, commercial spaces, and residential areas.

LED SPECTRA PANEL
INSTALL INSTRUCTIONS
!WARNING DISCONNECT POWER BEFORE INSTALLING OR SERVICING.
GENERAL WIRING
WARNING, CAUTIONS AND OPERATING INSTRUCTIONS
To reduce the risk of death, personal injury or property damage from fire,
electric shock, falling parts, cuts/abrasions, and other hazards read all
warnings and instructions included.
Installation, service and maintenance of luminaires should be performed
by a qualified licensed electrician.
If you are unsure about the installation or maintenance of the luminaire,
consult a qualified licensed electrician and check your local electrical
code.
To prevent wiring damage or abrasion, do not expose wiring to edges of
sheet metal or other sharp objects.
Do not make or alter any open holes to the enclosure of wiring or
electrical components during installation.
Not use scouring powder, abrasive powder, oil or acid alkaline type
detergent on luminaire.
Do not spray air fresheners, disinfectants, cleaning solvents directly on
light-emitting surface.
Wire connectors should not come in contact with water.
WARNING: RISK OF FIRE OR ELECTRICAL SHOCK
Turn o electrical power at fuse or circuit breaker box before wiring to the
power supply.
Turn o the power when you perform any maintenance.
Verify that supply voltage is correct by comparing it with the luminaire
label information.
Make all electrical and grounded connections in accordance with the
National Electrical Code and any applicable local code requirements.
All wiring connections should be capped with UL approved wire
connectors.
CAUTION: RISK OF INJURY
Avoid prolonged eye contact with light while it is on.
Account for small parts and destroy packing material, as these may be
hazardous to children.
Suitable for Damp locations, Type IC
LED DRIVER
Black (Line)
White (Neutral)
Green (Ground)
TO SOURCE
100-277V
Yellow (Dim +)
Red (Dim -)
PLEASE FIND A QUALIFIED ELECTRICIAN FOR INSTALLATION. Please read the instructions before you install and use the luminaire.
1. Carefully unpack unit and properly inspect for
defects before installing. Wear work gloves to
prevent dirt and oil from being transferred to the
luminaire. If cleaning is needed, use gloves and
a dry cotton cloth. It is not recommended to use
hazardous chemicals.
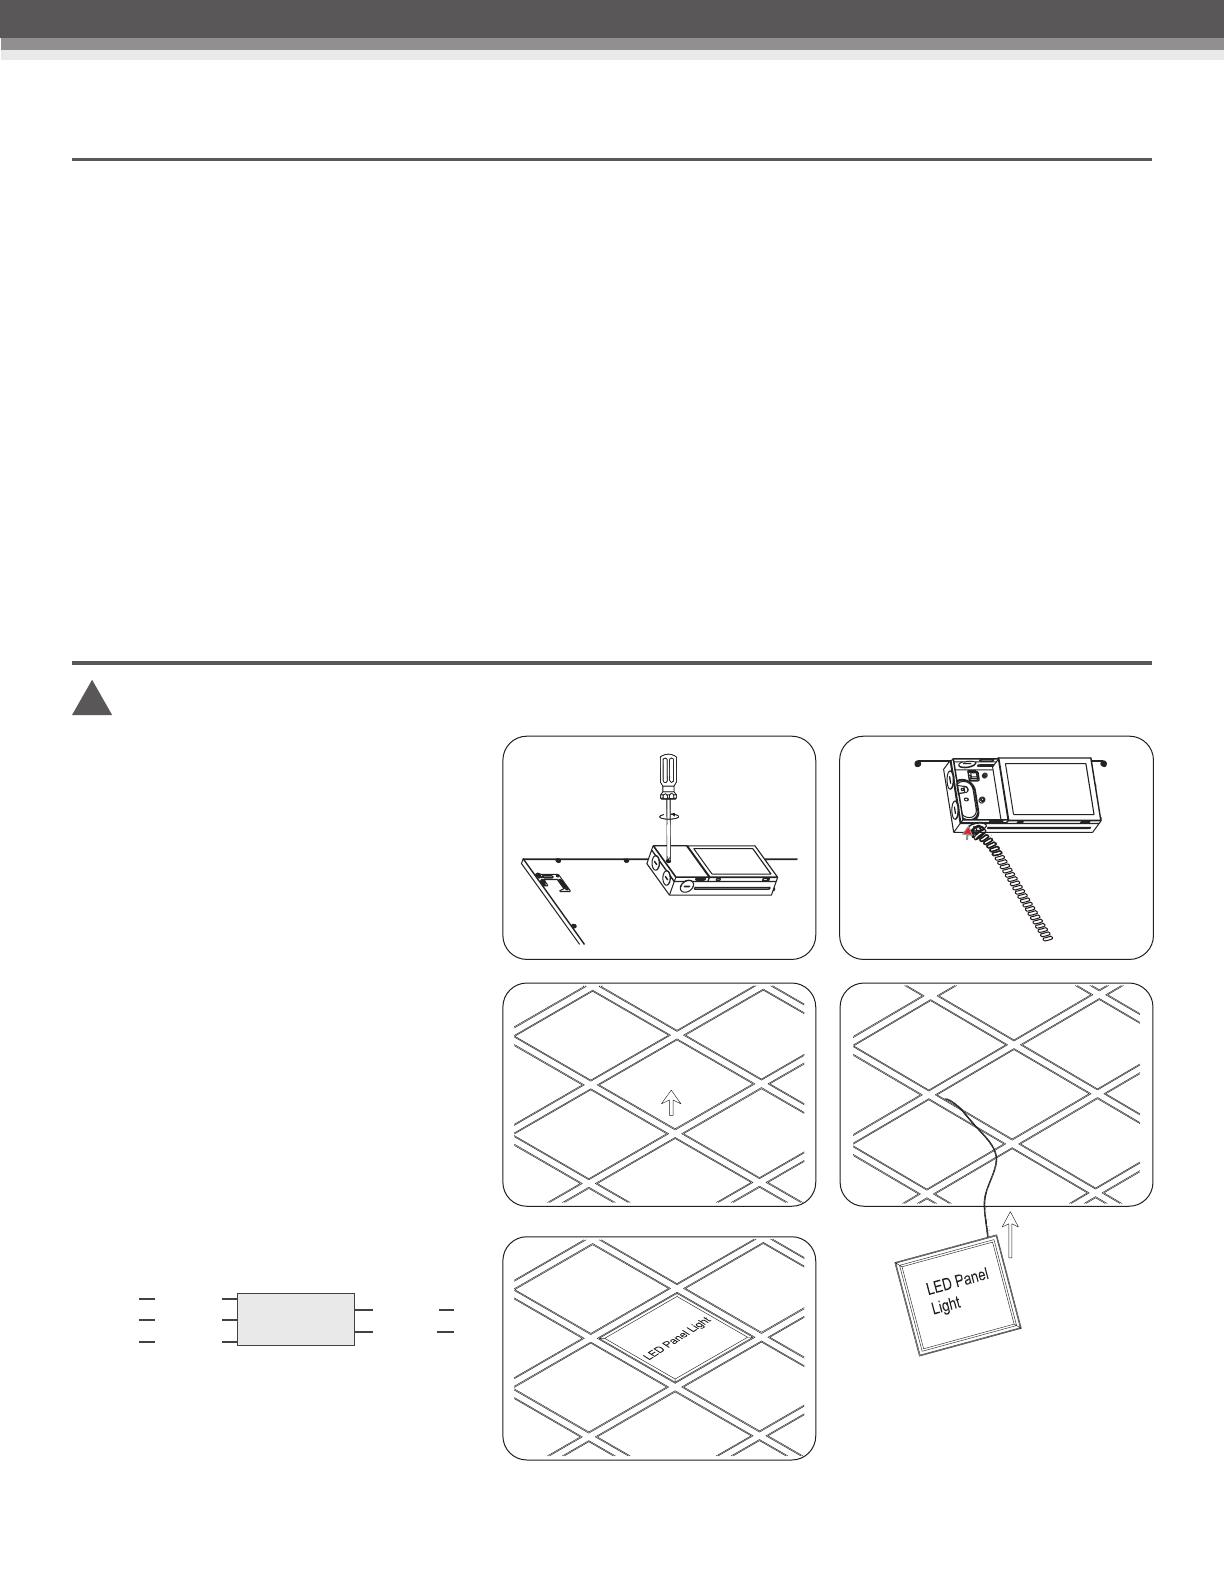
2. Open the cover of the junction box. (Fig. 1) Choose
the knock hole in the junction box cover and open
it.
3. Connect the power wire to the junction box. (Fig.
2) Use the line pressing board clamp on the power
cord, then tighten the screw. Replace and secure
the cover of the junction box using the screw.
4. Remove the ceiling plate, then arrange the wire.
(Fig. 3)
5. Put LED panel light on the ceiling screens. (Fig. 4)
6. Check LED panel is mounted properly and securely.
(Fig. 5)
Fig. 1 Fig. 2
Fig. 3 Fig. 4
RECESSED MOUNTING
Fig. 5
Note: If using the handheld remote (#55399) or wireless wall dimmer
(#55398) with the Spectra panel, they cannot be used directly as the
only on-o switch it should be used together with the switch. The
fixture needs to be turned o for the night with a standard hard-wired
wall switch (or at the breaker panel).
LED SPECTRA PANEL
INSTALL INSTRUCTIONS
1. Replace the existing earthquake tabs with the
provided brackets which are used for fixing
adjustable cables. (Fig. 6)
2. Pull the end cap of cable A through the provided
flange and make sure the end cap is positioned in the
flange. Attach the flanges to the ceiling by the self-
tapping screws. (Fig. 7)
3. Insert the end of cable A into the hasp attachment on
cable B then adjust cable A to the desired height and
adjust cable B to the desired angle. (Fig. 7)
4. Hook the luminaire up to the hooks attached to the
ends of cable B and make final adjustments. (Fig. 7)
5. Connect LED driver to AC main power. (Fig. 5)
Fig. 6
CABLE SUSPENDED MOUNTING (Kit Sold Separately)
Fig. 7
top ceiling
espansion screw
flange
flexible metallic conduit
self-tapping screw
steel cable
cable A
cable B
hasp
Fig. 8 Fig. 9
Fig. 10 Fig. 11
1. Assemble the mounting frame with the screws and
the connection plate. (Fig. 8)
2. Mount the frame on the ceiling with screws. (Fig. 9)
Make sure that the wire is long enough for Step 4.
3. After mounting the frame onto ceiling, remove one
side of the mounting frame. (Fig. 10)
4. Connect the wires from main to the LED driver, then
slide in the LED panel unit into the frame. (Fig. 11)
5. Replace the side frame back on.
SURFACE MOUNTING KIT (Kit Sold Separately)
CEILING
DIMMER PANEL LIGHT PANEL LIGHT
Black (Line)
White (Neutral)
Green (Ground)
L
IN
L
OUT
N
IN +
0-10V DIM
+
DIM
DIM
+
DIM
L N GND L N GND
X PANELS
WIRING OF MULTIPLE PANELS
Follow dimmer capacity guidelines; do not exceed
dimmer wattage capacity.
Specifications subject to change without notice. Photos and line
drawings may not be to scale and are for general reference only.
  • Page 1 1
  • Page 2 2

Sunco Lighting LED Ceiling Panel Light User manual

Type
User manual

Sunco Lighting LED Ceiling Panel Light offers a sleek, modern design that can elevate the ambiance of any room. With its energy-saving LED technology, it provides bright, flicker-free illumination while reducing energy consumption. Its versatility allows for recessed, cable suspended, or surface mounting, making it suitable for various applications such as offices, commercial spaces, and residential areas.

Ask a question and I''ll find the answer in the document

Finding information in a document is now easier with AI