AML LDX10 User manual

Type
User manual
1
AML
RevA
800.648.4452
www.amltd.com
User Manual
DC Console is an easy-to-use, application design software developed specifically to work in
conjunction with AMLs DC Suite.
Create. Distribute. Collect.
Every LDX10, TDX20 and Striker mobile computer comes with DC Suite, which includes seven
pre-developed applications for common data collection tasks. Now AML mobile computer
users can use DC Console to modify these applications, or create their own from scratch.
2
AML
RevA
800.648.4452
www.amltd.com
Contents
Contents ................................................................................................................ 2
1 Get Started ....................................................................................................... 4
1.1 DC Console 4
1.2 DC Sync 4
2 DC Console ...................................................................................................... 4
2.1 Creating a New Suite 4
2.2 Load an Existing Suite 4
2.2.1 Loading Suite from File 4
2.2.2 Loading Suite from Device 4
2.3 Apps Tab 4
2.3.1 Create a Suite App 8
2.3.2 Edit a Suite App 8
2.3.3 Deleting a Suite App 8
2.3.4 Copying a Suite App 8
2.3.5 Copying a Suite App to Another Suite 9
2.4 Admin Tab 9
2.4.1 Settings Password 9
2.4.2 Delete Data File Password 9
2.4.3 DC Uplink Settings 9
2.5 Send Suite to Device 10
2.6 Sync Tab 10
2.6.1 USB Tab 10
2.6.2 Network Tab 11
2.7 Fetching Files from a Device 12
2.7.1 USB Mode 12
2.7.2 Network Mode 12
3 DC Sync .......................................................................................................... 13
3.1 Sync Tab 13
3.1.1 USB Tab 13
3.1.2 Network Tab 13
3.2 Fetching Files from a Device 13
3.2.1 USB Mode 13
3.2.2 Network Mode 13
4 DC Suite ......................................................................................................... 14
4.1 Application 14
3
AML
RevA
800.648.4452
www.amltd.com
4.1.1 Suite Apps 14
4.1.2 Creating App Data File 14
4.1.3 Editing App Data File 14
4.1.4 Input Data 15
4.1.5 View Data 15
4.1.6 Edit Data Entries 15
4.1.7 Compare App 16
4.1.8 DC Uplink App 16
5 Troubleshooting ............................................................................................ 17
5.1 Troubleshoot Scepter/Striker Connection 17
5.1.1 Check Communication Type 17
5.2 Troubleshoot LDX10 and TDX20 Connection 18
5.2.1 Determine Communication Mode 18
5.2.2 Troubleshoot Serial Communication Mode 18
5.2.3 Troubleshoot Windows Communication Mode 18
5.3 Troubleshoot DC Uplink 19
6 Revision History ............................................................................................ 19
7 End User License Agreement ......................................................................... 21
4
AML
RevA
800.648.4452
www.amltd.com
1 Get Started
1.1 DC Console
1. Download DC Console at https://www.amltd.com/Software/DC-Software/
2. Locate the downloaded package in your file system and double click on it to start install.
3. Follow the instructions of the installation wizard to complete installation.
IMPORTANT: If you are prompted to install an AML Driver during the installation process, click Install
to install the driver. This is important for device communication.
1.2 DC Sync
1. Download DC Sync at https://www.amltd.com/Software/DC-Software/
2. Locate the downloaded package in your file system and double click on it to start install.
3. Follow the instruction of the installation wizard to complete installation.
IMPORTANT: If you are prompted to install an AML Driver during the installation process, click Install
to install the driver. This is important for device communication.
2 DC Console
2.1 Creating a New Suite
1. Click on the New Suite button in the Open Suite Options
2. Type a name to save the Suite in the File Explorer popup
3. You can now start editing the new Suite (see 2.3)
2.2 Load an Existing Suite
2.2.1 Loading Suite from File
1. Click the File button in the Suite Popup Menu
2. Select the Suite file you would like to load
3. You can now start editing the existing Suite (see 2.3)
2.2.2 Loading Suite from Device
1. Connect an AML device with DC Suite on it to DC Console
2. Click the Device button in the Suite Popup Menu
3. You can now start editing the existing Suite (see 2.3)
2.3 Apps Tab
Note: Make sure you have the Suite you want to edit loaded before starting (see 2.1 and 2.2)
5
AML
RevA
800.648.4452
www.amltd.com
Suite Popup Menu
File option loads a Suite from a
file on your PC. Factory option
loads the default Suite. Device
option loads the Suite from a
connected device.
Suite App List
Lists the apps in the currently
loaded Suite.
Save Suite Options
Saves the currently loaded
suite to the PC.
Open Suite Options
New Suite creates a new blank
Suite for editing. Open Suite
opens a saved Suite for editing.
Suite App Options
New App creates a new app in the currently loaded
Suite. Delete App deletes the selected app from the
Suite. Copy App creates a copy of the selected app to
the Suite. Copy App To creates a copy of the selected
app to a Suite that is selected from the file system on
the PC.
Send To Device
Sends the currently loaded
Suite to a connected device.
Currently Loaded
Suite
The name of the currently
loaded Suite.
App Name
Set the name of an app.
Custom Colors
Set the primary and selection
colors for an app. Select colors
from the dialog box that
appears.
6
AML
RevA
800.648.4452
www.amltd.com
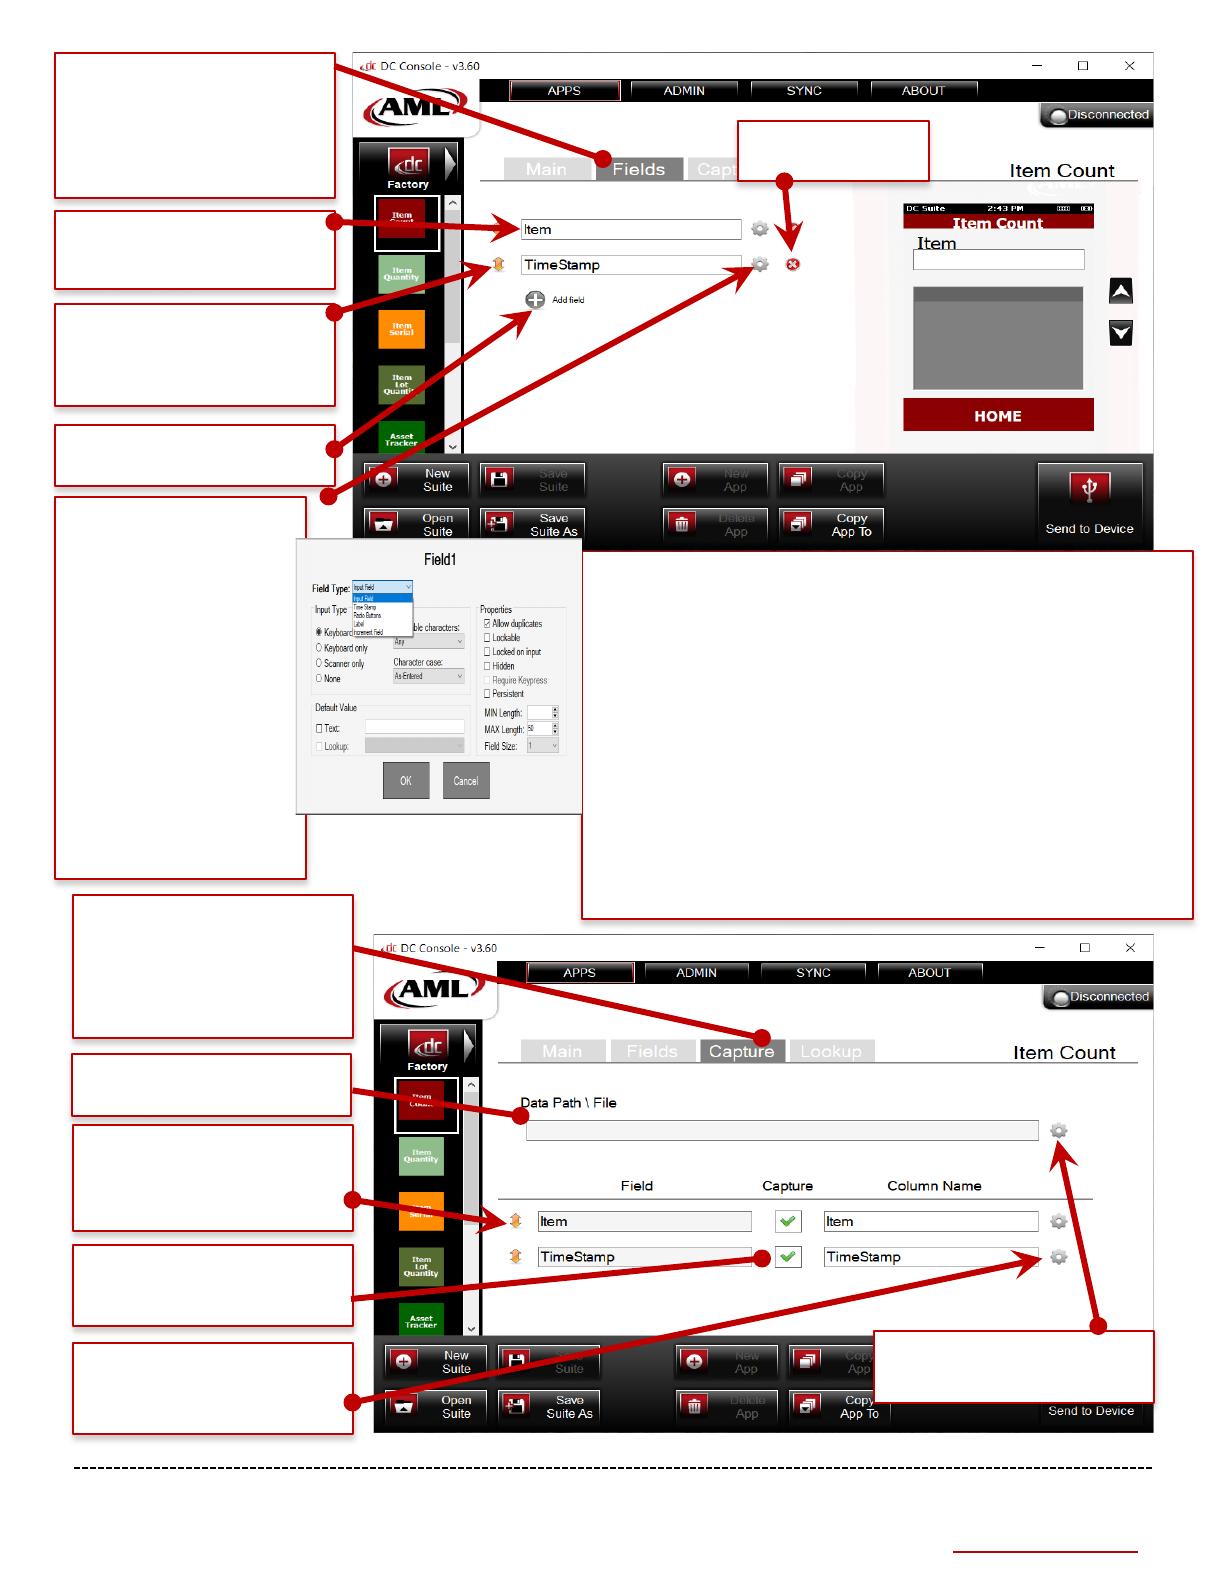
Field Types (dialog box on left)
Input Field: The default input method that gets its input from the user,
from a lookup file, or have some predefined text assigned to it.
Time Stamp: Input is a defined text format representation of the date
and or time as read from the operating systems current date/time.
Radio Buttons: Any number of 2-6 predefined text values assigned to
the input that is selected by tapping on one (and only one) of the defined
check boxes. These were originally radio button types of objects that
were changed to be more like check boxes.
Label: This is just a text box that displays on the screen. It does not
accept input and is not stored with any of the collected data.
Increment Field: This is used in conjunction with an input field and is
an ‘addition of associated quantities’ type of input. For example, if the
user collected an input of abc123 and gave it a quantity of 1, then abc123
and 1, then abc123 was collected with a quantity of 3, there would be two
records collected. One record of abc123 with a quantity of 4 and one
record of abc123 with a quantity of 1.
Fields Tab
Under the Fields tab, users can
add and remove fields. Also,
users can set the name and
order of each field within the
app.
Field Name
Set the name of each
individual field.
Field Order
Click and drag the up/down
arrow icon to change the field
order.
Add Field
Add a field to the app.
Remove Field
Delete the field.
Field Settings
Set ‘Field Type’ to a text
field, radio button or label.
Select the input method to
receive data from the
keyboard, scanner, or both.
Format the data by setting
allowable characters,
character case, and default
value. Other properties
include setting a lockable
field, ‘lock field on data
entry’ behavior, hiding a
field, and field length.
(Field Settings dialog box
seen on right)
Capture Tab
Under the Capture tab, users
can link data columns to the
appropriate fields, set the data
file path, sort the data file
columns, and more.
Data File Path
Set the path of the data file.
Capture Link
Set whether the field data
should be captured.
Field Settings
Add a prefix or suffix to the
field data and column name.
Sort Data
Click and drag the up/down
arrow icon to move fields or
columns within the data file.
Data File Settings
See image on next page.
7
AML
RevA
800.648.4452
www.amltd.com
Data File
Name
Predefine the
name the file is to
be saved as.
Data File
Format
Set the file format
the collected data
is to be saved as.
File Name Tags
Click and drag a compass icon to the file name field to
include pre-defined tags.
Predefine the path to which the data file
will be saved on the PC or network.
Data File
Properties
Choose optional
output file
properties.
Lookup Tab
Under the lookup tab, users
can set a lookup file for the
Suite app to compare input
fields with items in the
lookup file.
Input Field
The input field you would
like to match against your
lookup data.
Lookup Data
The data in your lookup file.
Lookup Field
The lookup data column
your Input Field will
compare against.
Lookup Settings
Import or delete a lookup file.
8
AML
RevA
800.648.4452
www.amltd.com
2.3.1 Create a Suite App
1. Click on the New App button in the Suite App Options
2. A new app is now created that can be edited (see 2.3.2)
2.3.2 Edit a Suite App
1. Click the app that you want to edit in the Suite App List
2. The selected app is now in view and can be edited
2.3.2.1 App Name
1. Type a name for the app. This can be anything, but it cannot have the same name as another app in the
Suite.
2.3.2.2 Custom Colors
1. Select the primary color for your app. This will be the main color of the app.
2. Select the selection color for your app. This will be the secondary color of the app.
2.3.2.3 App Fields
Note: Field names must be unique in the app that you are editing.
1. To add a field to your app, click the Add field button.
2. To delete a field from your app, click the Remove Field icon.
3. To configure the settings for a field, click the Field Settings icon to edit.
2.3.2.4 Capture
2.3.2.4.1 Data File Settings
1. Click the Data File Settings icon to configure the Data File Properties.
2.3.2.4.2 Field Settings
1. Click the Field Settings icon to configure the field properties.
2.3.2.5 Lookup
2.3.2.5.1 Lookup Settings
1. Click the Lookup Settings icon to configure the lookup settings.
2. Click the Import button in the Lookup Settings to select a lookup file to import.
3. Set the Input Field.
4. Set the Lookup Field.
5. The Suite is now configured to use this lookup feature.
2.3.3 Deleting a Suite App
1. Click on the app you want to delete in the Suite App List.
2. Click the Delete App button in the Suite App Options.
2.3.4 Copying a Suite App
9
AML
RevA
800.648.4452
www.amltd.com
1. Select the app you want to create a copy of in your Suite from the Suite App List.
2. Click the Copy App button in the Suite App Options.
3. A copy of the app will be made in the Suite with a modified App Name.
2.3.5 Copying a Suite App to Another Suite
1. Select the app you want to copy from the Suite App List.
2. Click the Copy App To button in the Suite App Options.
3. Select the Suite file that you want to copy the app to from the file explorer.
4. The App will be copied to the selected Suite file.
2.4 Admin Tab
2.4.1 Settings Password
1. Type a password in the Settings Password box.
2. This sets a password for the user to exit DC Suite on the device.
2.4.2 Delete Data File Password
1. Type a password in the Delete Data File Password box.
2. This sets a password for the user to delete a data file from DC Suite.
2.4.3 DC Uplink Settings
1. To configure DC Uplink for the device Suite, check the box that says Use DC Uplink.
2. Click the gear icon to open the DC Uplink configuration.
3. Select an IP address from the list of available IP addresses.
4. Type a port number.
5. The Suite is now setup for DC Uplink.
Settings Password
Create a password to
protect devices from
tampering.
Delete Data File
Password
Create a password to
protect data files from
tampering.
DC Uplink Option
Check this to use DC Uplink
for wireless file transfer.
DC Uplink Settings
Configure the IP address
and port the device will use
to communicate with the
PC for file transfer.
10
AML
RevA
800.648.4452
www.amltd.com
2.5 Send Suite to Device
1. Connect an AML Device with DC Suite on it to DC Console.
2. Click the Send to Device button at the bottom of DC Console.
3. Sending a Suite to a device will erase all DC Suite data files on the device.
2.6 Sync Tab
2.6.1 USB Tab
DEVICE USB MODE:
AML Serial USB: Keep this selected if you want your device to communicate over Serial USB.
WMDC Legacy: Keep this selected if you want your devices to communicate over Windows Mobile Device
Center Legacy (not recommended)
Device Data Files
Select the data files to be
queued for transfer.
Move to Queue
Move selected device data files
to transfer queue on right.
Move All to Queue
Move all device data files to
transfer queue on right.
Clear List
Click to clear transfer queue
on right.
Refresh
Click to refresh the device
data file list.
Save to Path
Set the path to save the
queued
data files. Also, set
other
procedural options like
deleting
or overwriting data
upon transfer.
Fetch
Once the
proper files are
in the transfer
queue, click
‘Fetch’ to
download the
files.
Transfer
Queue
List of data files
queued for
transfer from
the connected
device.
Update Device
DC Suite
Check if you want DC
Console to update
DC Suite on the
device when it is
connected.
Device USB Mode
Select the USB mode that
your devices use to
communicate. Either AML
Serial USB or WMDC
Legacy.
11
AML
RevA
800.648.4452
www.amltd.com
2.6.2 Network Tab
Device Connection
History
Lists the device connection
history, status, serial number,
IP address, and last time
connected.
Device File History
Lists the files received from
the selected device.
Clear Views
Clears the Device File History
List.
Delete History
Clears the Device Connection
History List.
Server Settings
Configure the IP address and
Port for the server.
Start/Stop Server
Click to start the server so it
can receive incoming device
files.
12
AML
RevA
800.648.4452
www.amltd.com
2.6.2.1 Server Settings
2.7 Fetching Files from a Device
2.7.1 USB Mode
1. Run DC Console and navigate to the Sync Tab
2. Make sure you have a Default Save Path selected and file options configured.
3. Connect a device via USB cable
4. When the device is connected, DC Console will Sync the device files into the Device Data Files list.
5. Click the Move All to Queue arrow button to move the files into the Transfer Queue
6. Click the Fetch button.
7. When the process is finished, you will get a report on the success of the fetch process.
2.7.2 Network Mode
1. Run DC Console and navigate to the Sync Tab
2. Click on the Network tab
3. Make sure you have the correct IP address and Port configured in the Server Settings
4. Make sure you have a Default Save Path selected and file options configured.
5. Click the Start Server button if it is not already running.
6. See Section 4.1.8.3 to initiate the file sync from the device. Once you complete this process, the
Device Connection History and Device File History in DC Console Network tab should be populated
with a progress report.
Available IP
Addresses
Lists the available IP addresses
that can be used for the server.
Check Port Usage
Checks if the port is available
for use with the server.
Save Server Settings
Saves the entered server
settings.
13
AML
RevA
800.648.4452
www.amltd.com
3 DC Sync
3.1 Sync Tab
3.1.1 USB Tab
Note: See Section 2.6.1
3.1.2 Network Tab
3.1.2.1 Server Settings
Note: See Section 2.6.2.1
3.2 Fetching Files from a Device
3.2.1 USB Mode
Note: See Section 2.7.1
3.2.2 Network Mode
Note: See Section 2.7.2
Device Connection
History
Lists the device connection
history, status, serial number,
IP address, and last time
connected.
Device File History
Lists the files received from the
selected device.
Clear Views
Clears the device file history.
Delete History
Clears the device connection
history.
Auto Start
Starts the DC Sync server on
computer startup.
Server Settings
Configure the IP address
and port for the server.
Start/Stop Server
Click to start the server so it can
receive incoming device files.
14
AML
RevA
800.648.4452
www.amltd.com
4 DC Suite
4.1 Application
4.1.1 Suite Apps
4.1.2 Creating App Data File
4.1.3 Editing App Data File
DC Suite Apps
The apps that are in your
device Suite.
Settings Button
Navigates to the app settings
page.
App File List
Create or select a data file.
Delete
Deletes selected data file.
Home
Navigates back to Suite Apps
page.
Open
Opens selected data file.
Clear
Clear selected data file and
start fresh.
Append
Keep data in selected file and
add data to it.
15
AML
RevA
800.648.4452
www.amltd.com
4.1.4 Input Data
4.1.5 View Data
4.1.6 Edit Data Entries
Input Field
The input field that for the
data that will go in the data
file.
File Data List
List of data entries in the data
file.
Record Count
The number of data entries in
the data file.
View
Navigate to the View Data
page.
Scroll Data
Scroll the data entry list.
Selected Index
The selected record indexes.
Edit
Edit the selected record.
Data Entry to Edit
The data entry to edit.
Delete
Delete the data entry.
Save
Save the edited data entry.
16
AML
RevA
800.648.4452
www.amltd.com
4.1.7 Compare App
4.1.8 DC Uplink App
Note: Make sure your Suite holds the correct IP address and port to use with DC Uplink. If this
has not been configured, follow the directions in Sections 2.4.3 and 2.5 to send a Suite to the
device with DC Uplink configured.
4.1.8.1 DC Uplink License (Windows Only)
To license DC Uplink for your device, you will need to scan the activation barcode when clicking on the DC
Uplink app in DC Suite. You will be prompted to scan the activation barcode if your device is not already
registered. If you do not have an activation barcode, contact AML Sales or your AML distributor to obtain one.
4.1.8.2 Select Files
Lot Item
Entry to compare against Item.
Compare Type
Equals or Not Equals.
Compare Result
Green if the comparison
returns true, otherwise it is
red.
Item
Entry to compare with Lot
Item.
File List
List of data files on the device.
View
Toggle File List view between
Data Files and Lookup Files.
Sync
Start syncing the selected data
files to the PC server.
17
AML
RevA
800.648.4452
www.amltd.com
4.1.8.3 Syncing
5 Troubleshooting
5.1 Troubleshoot Scepter/Striker Connection
5.1.1 Check Communication Type
1. While the device is connected to the PC via USB, scroll down from the notification bar to display the
notifications.
2. Make sure there is a notification that says “Android System USB for file transfer”
3. If the notification says, “Android System USB charging this device”, click on the notification to open
the Android USB Menu
4. Click the option that says “Transfer Files”
DC Uplink Sync Status
Display of the status report.
Cancel
Stop the DC Uplink Sync process.
Notification
Needs to say “Android System USB
for file transfer” to communicate with
DC Console and DC Sync.
Android USB Menu
“Transfer files” needs to be selected to
communicate with DC Console and
DC Sync.
18
AML
RevA
800.648.4452
www.amltd.com
5.2 Troubleshoot LDX10 and TDX20 Connection
5.2.1 Determine Communication Mode
1. Connect the device to your PC via USB cable
2. Navigate to Device Manager on your PC
3. The device will show up in Device Manager in one of the following ways:
Serial Communication Mode:
Windows Communication Mode:
5.2.2 Troubleshoot Serial Communication Mode
1. Navigate to the Control Panel on the device.
2. Click on the Remove Programs button.
3. Make sure both AML DC Suite and AML Suite Communication are listed in the Remove Programs List.
If either one is not installed, go to Step 4, otherwise skip to step 5.
4. If AML Suite Communication is not listed, then it is not installed, and the device will not communicate
with DC Console or DC Sync. To install it, follow these steps:
a. Make sure “Support Updating DC Suite” is checked in the Sync tab of DC Console/Sync
b. Make sure “AML Serial USB” is selected in the Sync tab of DC Console/Sync
c. Connect a device and let it connect to DC Console/Sync
d. If you are prompted to update DC Suite, go ahead, and click yes to update that as well
e. AML Suite Communication will be auto installed
f. Reboot the device (see 5.4.2) and see if the issues are fixed. If not, follow the next steps.
5. Try rebooting (see 5.4.2) the device and see if that fixes communication issues. If not, follow the next
steps.
6. Navigate to the Control Panel on the device
7. Click on the Freescale USB driver button.
8. Select ActiveSync from the popup and click Apply.
9. Connect the device to the computer running DC Console.
10. Once connected, select WMDC Legacy in the USB Mode in the Sync tab.
11. Now select AML Serial USB in the USB Mode in the Sync tab. This resets the comm mode. Now reboot
the device (see 5.4.2) and see if the issues are fixed.
5.2.3 Troubleshoot Windows Communication Mode
1. Make sure Windows Mobile Device Center is installed on your PC. If not, follow this link to install:
https://junipersys.com/data/support/drvupdate-amd64.exe
2. After installing, try to connect the device again to see if the issues are fixed. If not, follow next steps.
3. Navigate to the Control Panel on the device.
4. Click on the Freescale USB driver button.
5. Make sure ActiveSync is selected in the popup and click Apply.
6. Try to connect the device again to see if the issues are fixed. If not, follow next steps.
7. Unplug any Windows CE device from your computer.
8. On your PC, navigate to Services.
9. Find the two services shown in the picture below:
19
AML
RevA
800.648.4452
www.amltd.com
10. Right click on each service and click the Stop option to stop the services.
11. Click on each service to open the properties popup page and navigate to the Log On tab.
12. Make sure Local System account is selected and Allow service to interact with desktop is not selected.
13. Click the Apply button and close the properties page.
14. Right click on each service and click the Start option to start the services.
15. Try to connect the device again to see if the issues are fixed.
5.2.4 Updating to Serial Communication Mode with SD Card
NOTE: This section is for those who were on WMDC Legacy communication mode but cannot get the device
connected to update DC Suite and want to switch to Serial Communication mode. A MicroSD card less than or
equal to 32 gig in size is required for this procedure.
1. On your PC, make sure you have the latest version of DC Console/Sync installed. If not, follow Section
1 to install it.
2. Switch the USB Mode to AML Serial USB in USB Mode section of DC Console/Sync after install.
3. On your PC, navigate to \Program Files (x86)\AML\DC Console
4. Find the files DCSuite.CAB and SuiteCommunication.CAB
5. Load the two files onto your SD Card
6. Put the SD Card in the device and navigate to the SD Card folder in the file explorer
7. Double click on each cab file to manually install
8. Once they are both installed, reboot the device (see 5.4.2) and it will now be in serial comm mode
9. Connect to your PC and verify the mode with Section 5.2.1
5.3 Troubleshoot DC Uplink
1. If you are getting a “Missing Server IP/Port” message when clicking on DC Uplink in DC Suite, follow
the steps in Sections 2.4.3 and 2.5 to send a Suite to the device with DC Uplink configured.
2. If you are getting a “License Error” message when clicking on DC Uplink in DC Suite, follow the steps in
Section 4.1.8.1 to license your device.
3. If you the device returns a result message of “Unsuccessful Syncing, Server is not set up properly” when
trying to Sync files to the PC in DC Uplink, you may have mismatching IP addresses and ports set up.
a. Make sure the IP address and port you have set up in your device Suite (Section 2.4.3) is the
same as what is set up for the server (Section 2.6.2.1) and ensure the green light is on in the
Start/Stop Server button in DC Console/DC Sync
b. Check your network connection to make sure it is active and connected.
5.4 Rebooting
5.4.1 Scepter/Striker
1. Press and hold the Red power button until the device reboots.
-OR-
2. Click and hold the red power button until a popup appears. In the popup, select either Restart or Power
Off.
5.4.2 LDX10/TDX20
1. Press and hold the Red power button for 15 seconds, release, and press once to power the device back
up.
-OR-
20
AML
RevA
800.648.4452
www.amltd.com
2. Use the reset button. With the USB cable disconnected, depress the reset button located on the right
side of the device with its rubber boot removed. (See the image below)
6 Revision History
RevA (4-1-2022):
- Initial document.
  • Page 1 1
  • Page 2 2
  • Page 3 3
  • Page 4 4
  • Page 5 5
  • Page 6 6
  • Page 7 7
  • Page 8 8
  • Page 9 9
  • Page 10 10
  • Page 11 11
  • Page 12 12
  • Page 13 13
  • Page 14 14
  • Page 15 15
  • Page 16 16
  • Page 17 17
  • Page 18 18
  • Page 19 19
  • Page 20 20
  • Page 21 21
  • Page 22 22

AML LDX10 User manual

Type
User manual

Ask a question and I''ll find the answer in the document

Finding information in a document is now easier with AI