Extron Extender Plus User manual

Category
Motorcycle Accessories
Type
User manual

This manual is also suitable for

STORE
50
Hz
0
1
2
3
4
5
6
7
8
9
A
B
C
D
E
F
60
SELECT
EDID
AB
C D
Extender Plus Series • Setup Guide
NOTE: Installation and service must be performed by authorized personnel only. These
products must be used with UL approved, grounded electrical boxes.
Step 1
Configure EDID Minder at the display device. The Extender Plus models offer two ways of
conguring EDID:
EDID Record — Enables the device to record EDID
directly from a display.
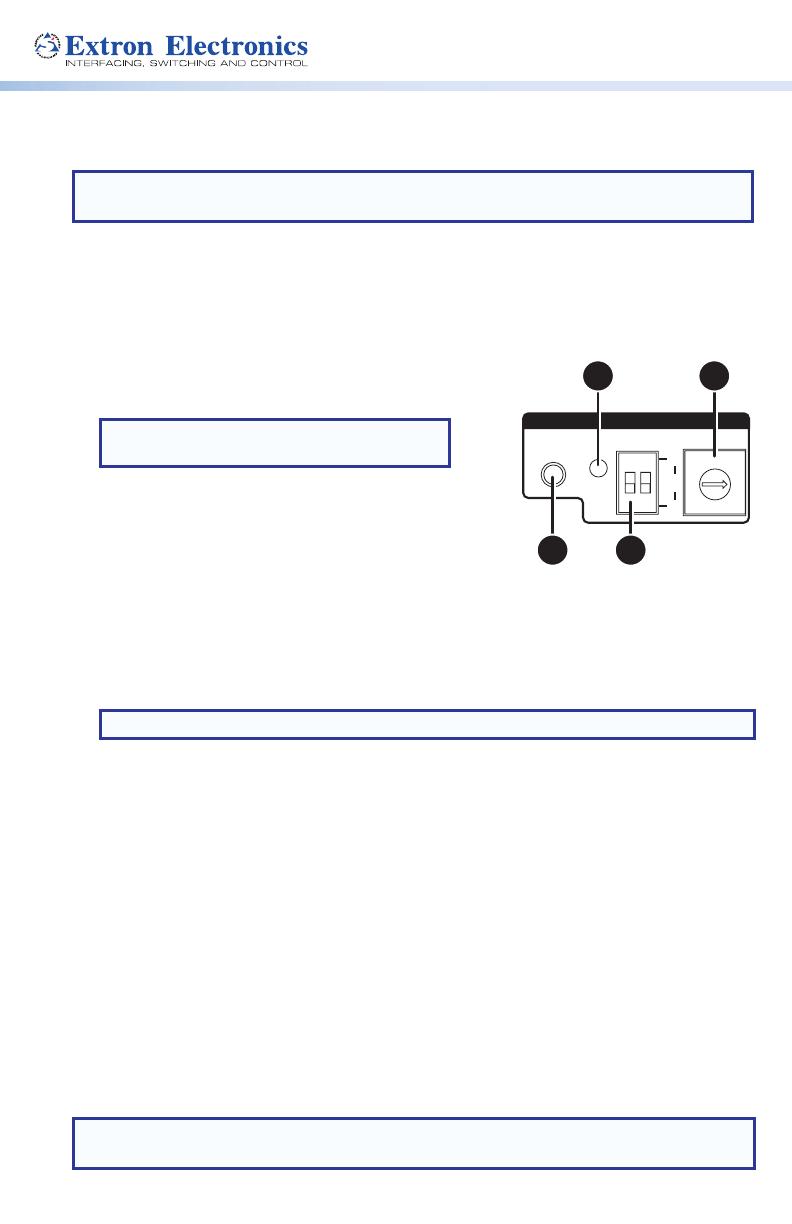
1. Turn the rotary switch (
A
) to position 0.
NOTE: The DIP switch positions have no
effect in this mode.
2. Apply power to the Extender by connecting the
12 VDC power supply. The green LED (
B
) lights when
power is available.
3. Connect the display device to the input of the
Extender using a VGA cable.
4. Power on the display device.
5. Press and release the recessed EDID store button (
C
). The LED ashes red while
storing the EDID, then it turns solid green when the EDID data has been stored. The
display can now be disconnected.
NOTE: If an external supply was used for recording, it can now be disconnected.
Pre-programmed EDID — The Extender Plus models contain pre‑programmed EDIDs with
the most common display native resolutions for both 50 and 60 Hz.
1. See Table 1 on page 9 of the Extender Plus Series User Guide to see which resolution
corresponds to each rotary switch (
A
) position. Set the rotary switch to the native
resolution of the display.
2. Set the rst DIP switch (
D
) to the vertical refresh frequency of the display (default is
ON, 60Hz).
Step 2
Turn all of the equipment off and disconnect the power cords from the power source.
Step 3
Select the installation location and install the electrical wall box (see Installation
Instructions on page 2 of the Extender Plus Series User Guide for details on installing the wall
box and cables).
NOTE: The Extron Extender Plus AAP does not require a wall box if it is installed into an
Extron HSA 400 Series or HSA 800 Series surface access product.
Extender Plus Series • Setup Guide (Continued)
Extron Headquarters
+1.800.633.9876 (Inside USA/Canada Only)
Extron Asia
+65.6383.4400
Extron China
+86.21.3760.1568)
Extron Australia
+61.8.8113.6800
Extron Europe
+31.33.453.4040
Extron Japan
+81.3.3511.7655
Extron Middle East
+971.4.299.1800
Extron India
+91.80.3055.3777
© 2017 Extron Electronics — All rights reserved. All trademarks mentioned are the property of their respective owners. www.extron.com
68-2320-50
Rev. B
04 17
Step 4
Attach and wire the cables as shown in the image below. The Extender Plus D has the same
circuit board configuration (see Rear Panel Features and Cabling in the Extender Plus Series
User Guide for more details).
NOTE: If the Extender Plus AAP is installed in an Extron HSA 400 Series or 800 Series
surface access product, install the Extender into the faceplate before attaching the
cables.
Step 5
Connect power and turn the equipment on.
Step 6
Test the system and set the gain switch. Ensure that all devices
receive power. Check and adjust cabling and gain as needed.
Step 7
Disconnect power from all the devices.
Step 8
Mount the line driver into the electrical box or the Plus AAP model into the body of the HSA.
For the Extender Plus D, install the decorator‑style faceplate.
Step 9
Restore power to the devices.
COMPUTER
OUT
EXTENDER Plus D
L R
NORM
MED
HIGH
STORE
60
Hz
1 2
ON
50
SELECT
POWER
12V
0.2 A MAX
AUDIO OUT
GAIN
EDID
0
1
2
3
4
5
6
7
8
9
A
B
C
D
E
F
Audio
Unbalanced Output
Left Tip
NO Ground Here
Sleeve (s)
Right Tip
NO Ground Here
Balanced Output
Sleeve (s)
Left Tip
Right Tip
Left Ring
Right Ring
Sleeve (s)
Left Tip
Right Tip
Left Ring
Right Ring
L
Audio
R
L
Audio
R
12 VDC
Power
Do not tin the wires!
NOTE: Horizontal sync = black
Vertical sync = yellow
NORM
MED
HIGH
GAIN
Gain Switch
(viewed
from front)
ATTENTION:
For unbalanced audio,
connect the sleeves
to the ground contact.
DO NOT connect the
sleeves to the negative
(–) contacts.
Pour l’audio
asymétrique, connectez
les manchons au
contact au sol. Ne PAS
connecter les manchons
aux contacts négatifs (–).
  • Page 1 1
  • Page 2 2

Extron Extender Plus User manual

Category
Motorcycle Accessories
Type
User manual
This manual is also suitable for

Ask a question and I''ll find the answer in the document

Finding information in a document is now easier with AI