Crestron CCS-UC-1 Configuration Guide
- Category
- Networking
- Type
- Configuration Guide
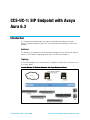
Crestron CCS-UC-1 is a complete solution for conference rooms. It acts as an all-in-one touch screen, speakerphone, and AirMedia® product for conference rooms that integrates microphones and speakers into the user interface at the table.
Key Features:
- All-in-one design: Combines a touch screen, speakerphone, and AirMedia® product into a single device.
- Easy to use: The user interface is designed to be simple and intuitive, making it easy to use for everyone in the room.
- High-quality audio: The built-in microphones and speakers provide excellent sound quality for both voice and video conferencing.


-
 1
1
-
 2
2
-
 3
3
-
 4
4
-
 5
5
-
 6
6
-
 7
7
-
 8
8
-
 9
9
-
 10
10
-
 11
11
-
 12
12
-
 13
13
-
 14
14
-
 15
15
-
 16
16
-
 17
17
-
 18
18
-
 19
19
-
 20
20
-
 21
21
-
 22
22
-
 23
23
-
 24
24
-
 25
25
-
 26
26
-
 27
27
-
 28
28
-
 29
29
-
 30
30
-
 31
31
-
 32
32
-
 33
33
-
 34
34
-
 35
35
-
 36
36
-
 37
37
-
 38
38
-
 39
39
-
 40
40
-
 41
41
-
 42
42
-
 43
43
-
 44
44
-
 45
45
-
 46
46
-
 47
47
-
 48
48
-
 49
49
-
 50
50
-
 51
51
-
 52
52


Crestron CCS-UC-1 Configuration Guide
- Category
- Networking
- Type
- Configuration Guide
Crestron CCS-UC-1 is a complete solution for conference rooms. It acts as an all-in-one touch screen, speakerphone, and AirMedia® product for conference rooms that integrates microphones and speakers into the user interface at the table.
Key Features:
- All-in-one design: Combines a touch screen, speakerphone, and AirMedia® product into a single device.
- Easy to use: The user interface is designed to be simple and intuitive, making it easy to use for everyone in the room.
- High-quality audio: The built-in microphones and speakers provide excellent sound quality for both voice and video conferencing.
Ask a question and I''ll find the answer in the document
Finding information in a document is now easier with AI
Related papers
-
Crestron CCS-UC-1 Configuration Guide
-
-
-
-
-
-
-
-
-
Other documents
-
Avaya one-X 9600 Series Application notes
-
Avaya B5800 Overview
-
-
-
-
-
Hewlett Packard Enterprise J9407B Datasheet
-
-
Kofax Communication Server 10.3.0 User guide
-