Page is loading ...

How to uninstall the original linkage and install the YETI linkage on your JK Wrangler.
YETI linkage Installation Instructions
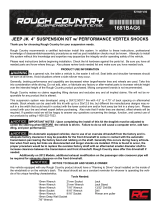
1. Remove the damper from the
tie rod steering assembly. (See page
5 for special considerations before
removing)
Yeti Installation Instructions
99085000 AA 1
•See page 5 for special considerations before beginning linkage installation.
•Tie rod installation: Start at step 1
•Drag link Installation: Start at step 7
•Drag link top mount installation: Start on page 4
Drag link Outer End Drag link Pitman End
Tie Rod Passenger Side Tie Rod Driver Side
Damper
YETI Tie Rod Assembly Installation Instructions
10/27/2015

5. Remove plastic seal shipping
protective covers and install your new
Yeti tie rod assembly to both knuckles.
Proceed to tighten the ball stud nuts
to a torque of 63 ft.-lbs using a 21mm
socket.
4. Once the tie rod assembly is removed,
measure the distance between the
ball studs. Set the distance of the
YETI linkage to match by turning the
adjusting tube. This will get
you close to the correct toe and
wheel center distance. Keep driver side
and passenger side tie rod threads equal
within 2-3 exposed threads.
Yeti Installation Instructions
99085000 AA 2
2. Loosen, without removing,
the ball stud nuts on the tie
rod assembly using a 21mm
socket.
3. Unscrew the nuts until the top
of the nut is above the end of the ball
stud to prevent damage to the ball
stud. Using a hammer, break the two
stud tapers loose separating the studs
from the knuckles.
10/27/2015

Yeti Installation Instructions
99085000 AA 3
6. Make sure that the articulation on the tie
rod ball stud, drivers side, is centered.
To achieve this , turn the drivers side tie rod
end from one side to the other and then
center between the two sides . The seal will
look evenly centered when the socket is
centered (IMPORTANT). If installing tie rod
assembly only, grease all zerks until grease
purges around boot seal; wipe off excess
grease.
8. After setting toe with the tie rod, and clear vision (straightness of steering
wheel while wheels are in the straight ahead position) with the drag link; tighten
the clamps on the assemblies to a torque of 40 ft.-lbs using 18mm and 15mm
sockets. The Tie rod clamp ears should point toward the ground as shown, while
the drag link clamp ears should point towards the front of the vehicle to prevent
interference between the drag link and tie rod assemblies during operation.
Grease all tie rod and drag link assembly sockets until grease purges around the
boot seal; wipe off excess grease. Turn the wheels all the way to the right in order
to grease the passenger side drag link socket.
7. Repeat steps 2 thru 6 to remove the original drag link assembly and install your
new Yeti drag link assembly. Torque the drag link to pitman arm nut to 77 ft.-lbs and
the draglink to knuckle nut to 63 ft.-lbs using a 21mm socket. Center the articulation
of the drag link at the pitman end of the linkage. To achieve this , turn the pitman
side drag link from one side to the other and then center between the two sides. The
seal will look evenly centered when the socket is centered. (IMPORTANT)
Top of seal is parallel to bottom of seal
with wheels in straight ahead position.
YETI Standard Mount Drag Link
Assembly Installation Instructions
Adjusting
Tubes
10/27/2015

Yeti Installation Instructions
99085000 AA 4
1. If you’re installing a top mount
draglink using our patent pending
reverse taper mount, twist the self-
locking tapered sleeve into the bottom
of the knuckle mounting hole as shown
(The self-locking tapered sleeve is
stored between the seal and the plastic
seal shipping protective cover on the
drag link outer end.)
2. Install the top mount draglink into
the knuckle hole from the top side and
tighten the nut until the nylock on the
nut engages.
3. Hold the hex, using a 10mm wrench, on
the end of the ball stud to keep the stud
from turning in the socket while tightening
the ball stud nut using a 21mm wrench.
Tighten until approximately 40 ft. lbs of
torque is achieved. Once the 40 ft. lbs of
torque is achieved, the nut is to be
tightened to 100 ft.-lbs using a 21 mm
socket.
YETI Top Mount Drag Link Installation Instructions
4. Make sure toe and clear vision (straightness
of steering wheel) are set correctly and all
nuts are tightened to the specified torque. For
the top mount the clamp ears on the tie rod
can point up while the clamp ears on the drag
link should point towards the ground for
greater ground clearance as shown. The last
step is to grease both drag link sockets
through the zerks until grease purges around
the boot seal; wipe off excess grease.
Clamps
10/27/2015

Torques for all Nuts in Linkage
•Tie Rod Assembly:
•Driver side – 63 ft. lbs.
•Passenger side – 63 ft. lbs
•Drag Link Assembly:
•Pitman side – 77 ft. lbs
•Knuckle side – 63 ft. lbs
•Drag Link Top Mount Assembly:
•Pitman side – 77 ft. lbs
•Knuckle side – 100 ft. lbs
•Adjuster Tube Clamps:
•Tie rod clamps – 40 ft. Lbs
•Drag link clamps – 40 ft. lbs
Yeti Installation Instructions
99085000 AA 5 10/27/2015
Special Considerations
1. When installing a complete Yeti linkage; install the drag link before
the tie rod for easier access to the drag link outer end ball stud nut
for tightening.
2. For top mount drag link installation only, it may be necessary to turn
the wheels fully right to gain access to the drag link outer end ball
stud nut for tightening. If the clearance gained is insufficient, the
passenger side tie rod may need to be disconnected.
3. Given the numerous aftermarket configurations, the drag link and tie
rod clamp orientations will need to be checked for interference by
turning the wheels from full left to full right turn. If interference is
found, loosen and turn/adjust the clamps as needed to eliminate the
interference.
4. An aftermarket damper assembly kit for an 1 5/8” diameter tie rod is
required to replace the original equipment damper.
/