Lenovo Tab M8 4th Generation User manual
- Category
- Tablets
- Type
- User manual

Lenovo Tab M8 (4th Gen)
Lenovo Tab M8 (4th Gen)
User Guide
User Guide
TB300FU
TB300FU
TB300XU
TB300XU
All information labeled with * in this guide refers only to the WLAN+LTE model
All information labeled with * in this guide refers only to the WLAN+LTE model
(TB300XU).
(TB300XU).

Basics
Basics
Before using this information and the product it supports, be sure to read the following:
Before using this information and the product it supports, be sure to read the following:
Quick Start Guide, Safety & Warranty
Quick Start Guide, Safety & Warranty
Regulatory Notice
Regulatory Notice
"Important safety and handling information" in "Appendix".
"Important safety and handling information" in "Appendix".
The
The Quick Start Guide, Safety & Warranty
Quick Start Guide, Safety & Warranty and the
and the Regulatory Notice
Regulatory Notice are available on the
are available on the
website at http://support.lenovo.com.
website at http://support.lenovo.com.
Note: All pictures and illustrations in this guide are for your reference only and may
Note: All pictures and illustrations in this guide are for your reference only and may
differ from the final product.
differ from the final product.
Technical specifications
Model
Model TB300FU
TB300FU TB300XU
TB300XU
CPU
CPU MediaTek
MediaTek®
® A22
A22 MediaTek
MediaTek®
® A22
A22
Battery
Battery 5100mAh
5100mAh 5100mAh
5100mAh
Wireless
Wireless
communication
communication
Bluetooth 5.0;
Bluetooth 5.0;
WLAN 802.11 a/b/g/n/ac;
WLAN 802.11 a/b/g/n/ac;
GPS
GPS
Bluetooth 5.0;
Bluetooth 5.0;
WLAN 802.11 a/b/g/n/ac;
WLAN 802.11 a/b/g/n/ac;
GPS/A-GPS/GLONASS;
GPS/A-GPS/GLONASS;
FDD-LTE/TDD-LTE/UMTS/GSM
FDD-LTE/TDD-LTE/UMTS/GSM
Note:
Note: TB300XU supports LTE Bands 1,2,3,4,5,7,8,19,20,26,28(a+b),38,40,41, but in some
TB300XU supports LTE Bands 1,2,3,4,5,7,8,19,20,26,28(a+b),38,40,41, but in some
countries LTE is not supported. To know if your device works with LTE networks in your
countries LTE is not supported. To know if your device works with LTE networks in your
country, contact your carrier.
country, contact your carrier.
Learn about gestures
Your tablet supports
Your tablet supports Gesture navigation
Gesture navigation and
and 3-button navigation
3-button navigation.
. Gesture navigation
Gesture navigation is
is
enabled by default.
enabled by default.
To change the navigation style, go to
To change the navigation style, go to Settings
Settings >
> System
System >
> Gestures
Gestures >
> System navigation
System navigation.
.
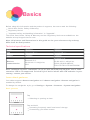
Basic gestures
Tap
Tap
Selecting or opening an item.
Selecting or opening an item.
Tap and hold
Tap and hold
Accessing frequently used functions of the app.
Accessing frequently used functions of the app.
Customizing your home screen.
Customizing your home screen.

Swipe
Swipe
Swiping up to open the list of all apps.
Swiping up to open the list of all apps.
Swiping down to open the Notifications panel.
Swiping down to open the Notifications panel.
Swiping down twice to open the Quick Settings panel.
Swiping down twice to open the Quick Settings panel.
Hold and drag
Hold and drag
Moving an app to where you want to place it.
Moving an app to where you want to place it.
Removing or uninstalling an app.
Removing or uninstalling an app.
Spread and pinch
Spread and pinch
Zooming in and out on websites, photos, maps, or other
Zooming in and out on websites, photos, maps, or other
items.
items.
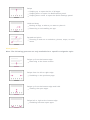
More gestures
Note:
Note: The following gestures are only available for a specific navigation style.
The following gestures are only available for a specific navigation style.
Swipe up from the bottom edge
Swipe up from the bottom edge
Returning to the home screen.
Returning to the home screen.
Swipe from the left or right edge
Swipe from the left or right edge
Switching to the previous page.
Switching to the previous page.
Swipe up from the bottom edge and hold
Swipe up from the bottom edge and hold
Viewing the open apps.
Viewing the open apps.
Swipe left or right at the bottom edge
Swipe left or right at the bottom edge
Switching between open apps.
Switching between open apps.

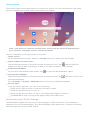
Home screen
The home screen is the starting point for using your device. For your convenience, the home
The home screen is the starting point for using your device. For your convenience, the home
screen is already set up with some useful apps and widgets.
screen is already set up with some useful apps and widgets.
Note: Your device's features and the home screen may be different depending on
Note: Your device's features and the home screen may be different depending on
your location, language, carrier, and device model.
your location, language, carrier, and device model.
You can customize your home screen at any time.
You can customize your home screen at any time.
Home screen
Home screen
On the default home screen, there is a
On the default home screen, there is a Google
Google search bar and some useful apps.
search bar and some useful apps.
Add a widget to home screen
Add a widget to home screen
Tap and hold anywhere on the home screen except the icons. Tap
Tap and hold anywhere on the home screen except the icons. Tap , tap and hold the
, tap and hold the
widget you want to add, then drag it to where you want to place it, then release.
widget you want to add, then drag it to where you want to place it, then release.
Entertainment Space
Entertainment Space
On the left of the default home screen, tap
On the left of the default home screen, tap to open the Entertainment space.
to open the Entertainment space.
Change the wallpaper
Change the wallpaper
Tap and hold anywhere on the home screen except the icons, tap
Tap and hold anywhere on the home screen except the icons, tap , and then choose your
, and then choose your
preferred wallpaper.
preferred wallpaper.
Go to
Go to Settings
Settings >
> Display
Display >
> Wallpaper
Wallpaper and choose your preferred wallpaper.
and choose your preferred wallpaper.
Recent apps
Recent apps
From the recent apps list, you can do the following:
From the recent apps list, you can do the following:
Swipe left or right to switch to the app you want to open.
Swipe left or right to switch to the app you want to open.
Swipe an app window up to close it.
Swipe an app window up to close it.
Swipe an app window down to lock it, and swipe down again to unlock it.
Swipe an app window down to lock it, and swipe down again to unlock it.
Tap
Tap Clear all
Clear all to stop running all the apps except the locked ones.
to stop running all the apps except the locked ones.
Notifications and Quick Settings
The Notifications panel informs you of new messages, USB connections, and activities in
The Notifications panel informs you of new messages, USB connections, and activities in
progress such as file downloading. The Quick Settings panel allows you to access frequently-
progress such as file downloading. The Quick Settings panel allows you to access frequently-
used settings such as the WLAN switch.
used settings such as the WLAN switch.

You can do any of the following:
You can do any of the following:
To see notifications, swipe down from the top of the screen.
To see notifications, swipe down from the top of the screen.
To close the Notifications panel, swipe up from the bottom of the screen.
To close the Notifications panel, swipe up from the bottom of the screen.
To dismiss a notification, swipe left or right across the notification.
To dismiss a notification, swipe left or right across the notification.
To dismiss all notifications, tap
To dismiss all notifications, tap Clear all
Clear all at the bottom of the Notifications panel.
at the bottom of the Notifications panel.
To open the Quick Settings panel, swipe down from the top of the screen twice.
To open the Quick Settings panel, swipe down from the top of the screen twice.
To close the Quick Settings panel, swipe up from the bottom of the screen.
To close the Quick Settings panel, swipe up from the bottom of the screen.
Force shutdown
Press and hold the power button and the volume down button for about 8 seconds until the
Press and hold the power button and the volume down button for about 8 seconds until the
device turns off.
device turns off.

Split screen mode
Split screen mode
Using split screen mode
Open the list of recently used apps, tap and hold a selected app icon for one second,
Open the list of recently used apps, tap and hold a selected app icon for one second, then tap
then tap
Split screen
Split screen.
.
Notes:
Notes:
Not all applications or tablet configurations support split screen mode.
Not all applications or tablet configurations support split screen mode.
Split screen settings
In split screen mode you can do the following:
In split screen mode you can do the following:
Adjust the split screen size
Adjust the split screen size
Slide the
Slide the
in the middle of the two screens to adjust the split screen size.
in the middle of the two screens to adjust the split screen size.
Replace the second app
Replace the second app
Back to
Back to home screen and choose another app.
home screen and choose another app.
Exiting split screen mode
You can exit split screen mode by:
You can exit split screen mode by:
Sliding the
Sliding the
to the edge of the screen.
to the edge of the screen.
Choosing an app that doesn't support split screen mode.
Choosing an app that doesn't support split screen mode.

Multi-User
Multi-User
Multi-User Preferences
There are three user types:
There are three user types:
Owner:
Owner: An owner has full control over all user permissions and manages all user accounts.
An owner has full control over all user permissions and manages all user accounts.
Guest:
Guest: There is only one Guest account. A Guest has restricted access to the device.
There is only one Guest account. A Guest has restricted access to the device.
New User:
New User: There can be multiple standard user accounts.
There can be multiple standard user accounts.
Creating new user accounts
Swipe down from the top of the screen twice to open the Quick Settings panel, and then tap the
Swipe down from the top of the screen twice to open the Quick Settings panel, and then tap the
user icon.
user icon.
Tap
Tap Add user
Add user to create a standard user account.
to create a standard user account.
Tap
Tap Add guest
Add guest to create a guest account.
to create a guest account.
Or create new users in Settings. Go to
Or create new users in Settings. Go to Settings
Settings >
> System
System >
> Multiple users
Multiple users.
.
Tap
Tap Add guest
Add guest to create a guest account.
to create a guest account.
Tap
Tap Add user or profile
Add user or profile >
> User
User to create a standard user account.
to create a standard user account.
Switching between user accounts
Swipe down from the top of the screen twice to open the Quick Settings panel, and then tap
Swipe down from the top of the screen twice to open the Quick Settings panel, and then tap
the user icon to switch between different user accounts.
the user icon to switch between different user accounts.
On the lock screen interface, tap the user icon, and then tap the user account.
On the lock screen interface, tap the user icon, and then tap the user account.
Go to
Go to Settings
Settings >
> System
System >
> Multiple users
Multiple users, then select the user account.
, then select the user account.
Deleting a user account
Go to
Go to Settings
Settings >
> System
System >
> Multiple users
Multiple users, and tap the user account you would like to
, and tap the user account you would like to
delete, then tap
delete, then tap Delete user
Delete user >
> DELETE
DELETE.
.
Swipe down from the top of the screen twice to open the Quick Settings panel, tap the user
Swipe down from the top of the screen twice to open the Quick Settings panel, tap the user
icon, then tap USER
icon, then tap USER SETTINGS to select the user account you would like to delete.
SETTINGS to select the user account you would like to delete.

Reading mode
Reading mode
Enable reading mode
You can enable reading mode by using the following methods:
You can enable reading mode by using the following methods:
Go to
Go to Settings
Settings >
> Display
Display >
> Reading mode
Reading mode.
.
Open the Quick Settings panel, then tap
Open the Quick Settings panel, then tap Reading mode
Reading mode.
.
Specify effect
After reading mode is enabled, you can select
After reading mode is enabled, you can select Enable chromatic effect
Enable chromatic effect,
, Enable grayscale
Enable grayscale
effect
effect or
or Auto (set effect according to app)
Auto (set effect according to app) to set the default display effect.
to set the default display effect.

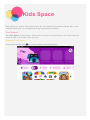
Kids Space
Kids Space
Kids space is a special user identity that can be controlled by parents offering kids a safe
Kids space is a special user identity that can be controlled by parents offering kids a safe
internet space with fun, thoughtful and age-appropriate contents.
internet space with fun, thoughtful and age-appropriate contents.
Get Started
Tap
Tap Kids Space
Kids Space on the screen, choose who's going to use this device, and then follow the
on the screen, choose who's going to use this device, and then follow the
steps to sign in or create a new account.
steps to sign in or create a new account.
Manage the Device
Press and hold the icon
Press and hold the icon to change settings and getting help.
to change settings and getting help.

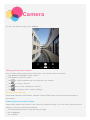
Camera
Camera
To open the Camera app, go to
To open the Camera app, go to Camera
Camera.
.
Taking photos and videos
You can take photos and record videos with your device's built-in camera.
You can take photos and record videos with your device's built-in camera.
Tap
Tap Photo
Photo or
or Portrait
Portrait to take a photo.
to take a photo.
Tap
Tap Video
Video to record a video.
to record a video.
Tap
Tap to switch between the front and the rear camera.
to switch between the front and the rear camera.
Tap
Tap to zoom in and out.
to zoom in and out.
Tap
Tap to turn Face enhance on and off.
to turn Face enhance on and off.
Tap
Tap to configure other camera settings.
to configure other camera settings.
Taking screenshots
Press and hold the power button and the volume down button at the same time to take a
Press and hold the power button and the volume down button at the same time to take a
screenshot.
screenshot.
Viewing pictures and videos
Photos and videos are stored in your device's internal storage. You can view your photos and
Photos and videos are stored in your device's internal storage. You can view your photos and
videos by using the following methods:
videos by using the following methods:
Tap the thumbnail when using the Camera app.
Tap the thumbnail when using the Camera app.
Go to
Go to Gallery
Gallery.
.
Go to
Go to Files
Files.
.

The screenshots are stored in your device's internal storage. You can view your screenshots by
The screenshots are stored in your device's internal storage. You can view your screenshots by
using the following methods:
using the following methods:
Go to
Go to Gallery
Gallery.
.
Go to
Go to Files
Files.
.

Network
Network
You need to set up a wireless network before connecting to the Internet.
You need to set up a wireless network before connecting to the Internet.
Set up a WLAN network.
Set up a WLAN network.
*Set up a mobile network.
*Set up a mobile network.
Set up a VPN network.
Set up a VPN network.
You can also share your mobile network with others.
You can also share your mobile network with others.
*Set up a hotspot.
*Set up a hotspot.
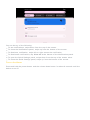
Setting up a WLAN network
Go to
Go to Settings
Settings >
> Network & internet
Network & internet >
> Internet
Internet. Turn on the WLAN switch and tap a
. Turn on the WLAN switch and tap a
WLAN hotspot in the list to connect to the Internet.
WLAN hotspot in the list to connect to the Internet. When you are connecting to a secure
When you are connecting to a secure
hotspot, you need to enter your login name and password to connect.
hotspot, you need to enter your login name and password to connect.
*Setting up a mobile network
Go to
Go to Settings
Settings >
> Network & internet
Network & internet >
>
SIMs
SIMs.
.
Note: You need a valid SIM card with a data service. If you don't have a SIM card,
Note: You need a valid SIM card with a data service. If you don't have a SIM card,
contact your carrier.
contact your carrier.
Setting up a VPN network
VPNs are used within organizations to allow you to communicate private information
VPNs are used within organizations to allow you to communicate private information
securely over a non-private network. You may need to configure a VPN, for example, to
securely over a non-private network. You may need to configure a VPN, for example, to
access your work email. Ask the network's administrator for the settings necessary to
access your work email. Ask the network's administrator for the settings necessary to
configure a VPN for your network.
configure a VPN for your network.
1. Go to
Go to Settings
Settings >
> Network & internet
Network & internet >
> VPN
VPN.
.
2. Tap
Tap to edit the VPN profile. Choose the VPN type and edit the Name, Server
to edit the VPN profile. Choose the VPN type and edit the Name, Server
address, IPSec identifier, and other information.
address, IPSec identifier, and other information.
3. Tap
Tap SAVE
SAVE.
.
4. Tap
Tap to edit or delete the VPN.
to edit or delete the VPN.
*Setting up a hotspot
You can use a personal hotspot to share an Internet connection with a computer or other
You can use a personal hotspot to share an Internet connection with a computer or other
device.
device.
Go to
Go to Settings
Settings >
> Network & internet
Network & internet >
>
Hotspot & tethering
Hotspot & tethering and do the following:
and do the following:
Tap
Tap WLAN hotspot
WLAN hotspot to configure the hotspot.
to configure the hotspot.
You can also use
You can also use Bluetooth tethering
Bluetooth tethering,
, USB tethering
USB tethering or
or Ethernet tethering.
Ethernet tethering.
Note: Share the name
Note: Share the name and password of your network to allow other people to connect
and password of your network to allow other people to connect
to your mobile network.
to your mobile network.

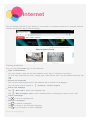
Internet
Internet
You can browse the web if your device is connected to a wireless network or a cellular network.
You can browse the web if your device is connected to a wireless network or a cellular network.
Launch the Chrome app to start browsing.
Launch the Chrome app to start browsing.
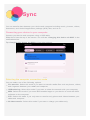
Visiting websites
You can use the
You can use the Chrome
Chrome app to visit websites.
app to visit websites.
Type a web address
Type a web address
You don't need to type the full web address of an "http://" website to access it.
You don't need to type the full web address of an "http://" website to access it.
To visit "http://www.lenovo.com", simply type "www.lenovo.com" into the address bar and Tap
To visit "http://www.lenovo.com", simply type "www.lenovo.com" into the address bar and Tap
.
.
Search for keywords
Search for keywords
You can also type keywords into the address bar to search for webpages.
You can also type keywords into the address bar to search for webpages.
You can set a search engine in
You can set a search engine in >
> Settings
Settings >
> Search engine
Search engine.
.
Add a new webpage
Add a new webpage
Tap
Tap >
> New tab
New tab to add a new webpage tab.
to add a new webpage tab.
Tap
Tap >
> New Incognito tab
New Incognito tab to visit a website without leaving any traces of your visit.
to visit a website without leaving any traces of your visit.
Close a webpage
Close a webpage
Tap
Tap to close a webpage tab.
to close a webpage tab.
Refresh a webpage
Refresh a webpage
Tap
Tap to refresh a webpage.
to refresh a webpage.
Tap
Tap to return to the previous webpage.
to return to the previous webpage.
Tap
Tap to go forward to a recent webpage.
to go forward to a recent webpage.
Saving webpages

You can save images and webpages in your device's internal storage.
You can save images and webpages in your device's internal storage.
Save images
Save images
Press and hold the image, then tap
Press and hold the image, then tap Download image
Download image.
.
Bookmark webpages
Bookmark webpages
Tap
Tap to add a webpage to
to add a webpage to Bookmarks
Bookmarks.
.
Tap
Tap >
> Bookmarks
Bookmarks to view bookmarks.
to view bookmarks.
Setting accessibility preferences
Tap
Tap >
> Settings
Settings >
> Accessibility
Accessibility to set the text scaling and the webpage zoom.
to set the text scaling and the webpage zoom.
Viewing history
Tap
Tap >
> History
History to view your recently visited webpages.
to view your recently visited webpages.
Tap
Tap >
> History
History >
> Clear browsing data...
Clear browsing data... to erase your browsing history.
to erase your browsing history.

Gmail
Gmail
You can send and receive emails if your device is connected to a wireless network.
You can send and receive emails if your device is connected to a wireless network.
To access the
To access the Gmail
Gmail app, go to
app, go to Gmail
Gmail.
.
Setting up a Gmail account
You can sign into Gmail if you have a Gmail account. If not, you will need to create a Gmail
You can sign into Gmail if you have a Gmail account. If not, you will need to create a Gmail
account. You can also sign in with email accounts provided by other companies.
account. You can also sign in with email accounts provided by other companies.
Using Gmail
After setting up your Gmail account, you can use the
After setting up your Gmail account, you can use the Gmail
Gmail app to send and receive emails.
app to send and receive emails.

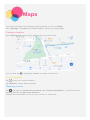
Maps
Maps
You need to configure
You need to configure the following settings before you can use
the following settings before you can use Maps
Maps.
.
Go to
Go to Settings
Settings >
> Location
Location and enable location access for Google apps.
and enable location access for Google apps.
Finding a location
Press
Press Search here
Search here and type the address that you want to find.
and type the address that you want to find.
You can also tap
You can also tap to speak the address you want to search for.
to speak the address you want to search for.
Current location
Tap
Tap to see your current location.
to see your current location.
Tap
Tap Explore
Explore to check what is nearby.
to check what is nearby.
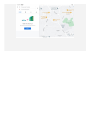
Planning a route
Tap
Tap and type in "
and type in "Choose start location
Choose start location" and "
" and "Choose destination
Choose destination", or just choose the
", or just choose the
starting point as "
starting point as "Choose start location
Choose start location".
".
Choose the travel mode: by car, by bus, on foot, or by bicycle.
Choose the travel mode: by car, by bus, on foot, or by bicycle.


Sync
Sync
You can transfer data between your device and computer including music, pictures, videos,
You can transfer data between your device and computer including music, pictures, videos,
documents, and Android application package (APK) files, and so on.
documents, and Android application package (APK) files, and so on.
Connecting your device to your computer
Connect your device and computer using a USB cable.
Connect your device and computer using a USB cable.
Slide down from the top of the screen. You will see "
Slide down from the top of the screen. You will see "Charging this device via USB
Charging this device via USB" in the
" in the
notifications bar.
notifications bar.
Tap
Tap Charging this device via USB
Charging this device via USB to view other options.
to view other options.
Selecting the computer connection mode
You can select one of the following options:
You can select one of the following options:
File transfer
File transfer: Select this mode if you want to transfer media files such as photos, videos,
: Select this mode if you want to transfer media files such as photos, videos,
and ringtones between your tablet and computer.
and ringtones between your tablet and computer.
USB tethering
USB tethering: Select this mode if you want to share the network with your computer.
: Select this mode if you want to share the network with your computer.
MIDI
MIDI: Select this mode if you want MIDI-enabled apps on your device to work with MIDI
: Select this mode if you want MIDI-enabled apps on your device to work with MIDI
software on the computer.
software on the computer.
PTP
PTP: Select this mode if you only want to transfer only photos and videos between your
: Select this mode if you only want to transfer only photos and videos between your
tablet and computer.
tablet and computer.
No data transfer
No data transfer: Select this mode if you want to charge your tablet only.
: Select this mode if you want to charge your tablet only.

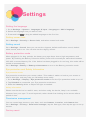
Settings
Settings
Setting the language
1. Go to
1. Go to Settings
Settings >
> System
System >
> Languages & input
Languages & input >
> Languages
Languages >
> Add a language
Add a language.
.
2. Select the language that you want to add.
2. Select the language that you want to add.
3. Press and hold
3. Press and hold to drag the added language to the first line.
to drag the added language to the first line.
Setting screen lock
Go to
Go to Settings
Settings >
> Security
Security >
> Screen lock
Screen lock, and select
, and select screen lock mode.
screen lock mode.
Setting sound
Go to
Go to Settings
Settings >
> Sound
Sound. Here you can set the ringtone, default notification sound, default
. Here you can set the ringtone, default notification sound, default
alarm sound, and so on. You can also set the ringing volume.
alarm sound, and so on. You can also set the ringing volume.
Battery protection mode
When plugged in for long periods, the battery may age faster due to high temperature and
When plugged in for long periods, the battery may age faster due to high temperature and
power. By enabling the Battery Protection Mode, power will eventually be maintained between
power. By enabling the Battery Protection Mode, power will eventually be maintained between
40%-60% to extend battery life.
40%-60% to extend battery life. If the device has been plugged in for too long, this mode will be
If the device has been plugged in for too long, this mode will be
turned on automatically.
turned on automatically.
Go to
Go to Settings
Settings >
> Battery
Battery >
> Battery enhancement
Battery enhancement to turn on the Battery protection mode.
to turn on the Battery protection mode.
Eye protection and Safety Information
Eye protection mode
Eye protection mode tints your screen amber. This makes it easier to look at your screen or
Eye protection mode tints your screen amber. This makes it easier to look at your screen or
read in dim light, and may help you fall asleep more easily.
read in dim light, and may help you fall asleep more easily.
1. Go to
1. Go to Settings
Settings >
> Display
Display >
> Eye protection mode
Eye protection mode to turn the Eye protection mode on or off.
to turn the Eye protection mode on or off.
2. Tap
2. Tap Schedule
Schedule to customize your Eye protection mode time.
to customize your Eye protection mode time.
3. Slide the
3. Slide the Intensity
Intensity slider to adjust the
slider to adjust the light as needed.
light as needed.
Safety Information
Please use the device in a well-lit area, and when using the device, keep it at a suitable
Please use the device in a well-lit area, and when using the device, keep it at a suitable
distance from your eyes. To avoid eyestrain, take a break from looking at the screen after a
distance from your eyes. To avoid eyestrain, take a break from looking at the screen after a
period of time.
period of time.
Permission management
You can control app access to your data, such as
You can control app access to your data, such as Contacts
Contacts,
, Location
Location, and
, and Camera
Camera data.
data.
Go to
Go to Settings
Settings >
> Privacy
Privacy >
> Permission manager
Permission manager,
, tap the data type, then tap the app to set up
tap the data type, then tap the app to set up
access.
access.
Factory reset

Factory reset will erase all data from your tablet's internal storage. Please back up important
Factory reset will erase all data from your tablet's internal storage. Please back up important
data on the device before resetting your tablet. Go to
data on the device before resetting your tablet. Go to Settings
Settings >
> System
System >
> Reset options
Reset options >
>
Erase all data (factory reset)
Erase all data (factory reset), then tap
, then tap Erase all data
Erase all data to reset to the manufacturer's default
to reset to the manufacturer's default
settings.
settings.
Page is loading ...
Page is loading ...
Page is loading ...
Page is loading ...
Page is loading ...
Page is loading ...
Page is loading ...
-
 1
1
-
 2
2
-
 3
3
-
 4
4
-
 5
5
-
 6
6
-
 7
7
-
 8
8
-
 9
9
-
 10
10
-
 11
11
-
 12
12
-
 13
13
-
 14
14
-
 15
15
-
 16
16
-
 17
17
-
 18
18
-
 19
19
-
 20
20
-
 21
21
-
 22
22
-
 23
23
-
 24
24
-
 25
25
-
 26
26
-
 27
27


Lenovo Tab M8 4th Generation User manual
- Category
- Tablets
- Type
- User manual
Ask a question and I''ll find the answer in the document
Finding information in a document is now easier with AI
Related papers
-
Motorola Moto Tab G20 User manual
-
Lenovo Tab 4 10 Operating instructions
-
Lenovo Tab 7 User guide
-
Lenovo M10 HD 32GB BLACK User manual
-
Lenovo Tab 4 8 User manual
-
Lenovo Smart Tab M10 HD User guide
-
Lenovo Yoga Tab 11 User manual
-
-
-