CyberLink PowerDirector 5 Owner's manual
- Category
- Video software
- Type
- Owner's manual
This manual is also suitable for

CyberLink
PowerDirector 5
User’s Guide

Copyright and Disclaimer
All rights reserved. No part of this publication may be reproduced, stored in a
retrieval system, or transmitted in any form or by any means electronic, mechanical,
photocopying, recording, or otherwise without the prior written permission of
CyberLink Corporation.
To the extent allowed by law, POWERDIRECTOR IS PROVIDED “AS IS”,
WITHOUT WARRANTY OF ANY KIND, EITHER EXPRESS OR IMPLIED,
INCLUDING WITHOUT LIMITATION ANY WARRANTY FOR INFORMATION,
SERVICES, OR PRODUCTS PROVIDED THROUGH OR IN CONNECTION WITH
POWERDIRECTOR AND ANY IMPLIED WARRANTIES OF
MERCHANTABILITY, FITNESS FOR A PARTICULAR PURPOSE, EXPECTATION
OF PRIVACY, OR NON-INFRINGEMENT.
BY USING THIS SOFTWARE, YOU AGREE THAT CYBERLINK WILL NOT BE
LIABLE FOR ANY DIRECT, INDIRECT, OR CONSEQUENTIAL LOSS ARISING
FROM THE USE OF THIS SOFTWARE OR MATERIALS CONTAINED EITHER IN
THIS PACKAGE.
The terms and conditions here under shall be governed and construed in accordance
with the laws of Taiwan.
PowerDirector is a registered trademark along with other company and product
names mentioned in this publication, used for identification purposes and remain
the exclusive property of their respective owners.
International Headquarters
Copyright © 2005 CyberLink Corporation. All rights reserved.
Mailing Address
CyberLink Corporation
15F, #100, Min Chuan Road, Hsin Tian City
Taipei County, Taiwan, R.O.C.
Web Site
www.cyberlink.com
Tel ephon e
886-2-8667-1298
Fax
886-2-8667-1300

i
Contents
Introduction ................................................... 1
Welcome! .....................................................................2
Where to Begin Reading ............................................2
The Movie-Making Process .............................................3
Pre-Production ..........................................................3
Putting Your Story Together ........................................3
Editing ......................................................................4
Producing and Burning Your Movie .............................4
Register Your Software ....................................................5
CD-Key Activation ..........................................................6
Upgrade Your Software ..................................................7
Uninstall Your Software ...................................................8
Uninstall from the Start Menu .....................................8
Uninstall from the Control Panel .................................8
Latest Features ...............................................................9
The PowerDirector Program ..........................................10
PowerDirector Modes ...............................................11
PowerDirector Projects .............................................11
System Requirements ....................................................13
PowerDirector Versions .................................................14
Capturing Media.......................................... 15
Capture Mode .............................................................16
Capture Preferences .....................................................17
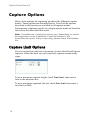
Capture Options ..........................................................18
Capture Limit Options .............................................18
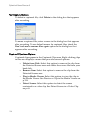
Profile Options ........................................................19
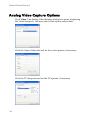
Analog Video Capture Options .................................20
Audio Capture Options ............................................21

CyberLink PowerDirector 5
ii
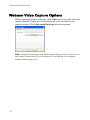
Webcam Video Capture Options ..............................22
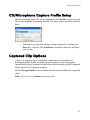
CD/Microphone Capture Profile Setup ......................23
Captured Clip Options ............................................23
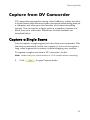
Capture from DV Camcorder ........................................25
Capture a Single Scene ............................................25
Batch Capture .........................................................27
Capture from HDV Camcorder ......................................34
Capture from TV ..........................................................36
Capture from Digital TV ................................................38
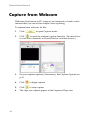
Capture from Webcam .................................................40
Capture from Microphone ............................................41
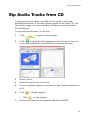
Rip Audio Tracks from CD ............................................43
Record a Voice-Over ....................................................44
Add Text Captions ........................................................46
Creating Your Story ...................................... 47
Working with Project Files .............................................48
Create a New Project ...............................................48
Save a Project .........................................................48
Open an Existing Project ..........................................48
New Workspace ......................................................48
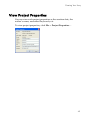
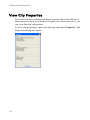
View Project Properties .............................................49
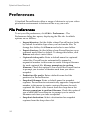
Preferences ..................................................................50
File Preferences .......................................................50
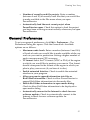
General Preferences ................................................51
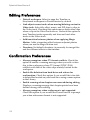
Editing Preferences ..................................................52
Confirmation Preferences .........................................52
Produce Preferences ................................................53
Set the Project’s Aspect Ratio ....................................54
The Library ..................................................................55
Media Room ...........................................................56
Effect Room ............................................................56
Title Room ..............................................................56
Transition Room ......................................................56
Audio Mixing Room .................................................57
Voice-Over Recording Room ....................................57
Chapter Setting Room ..............................................57

Contents
iii
Managing Media in the Library ......................................58
Import Clips into the Library ......................................58
Sort Clips in the Library ............................................59
Remove a Clip from the Library .................................60
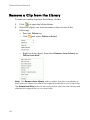
Rename a Clip in the Library ....................................61
Restore a Clip’s Original File Name ..........................61
View Clip Properties .................................................62
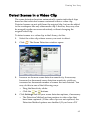
Detect Scenes in a Video Clip ...................................63
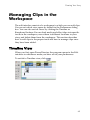
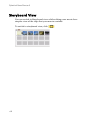
Managing Clips in the Workspace .................................65
Timeline View ..........................................................65
Storyboard View ......................................................68
Add a Clip to the Workspace ....................................69
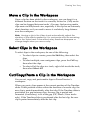
Move a Clip in the Workspace ..................................73
Select Clips in the Workspace ...................................73
Cut/Copy/Paste a Clip in the Workspace ..................73
Align Clips in the Timeline ........................................74
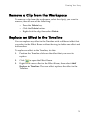
Remove a Clip from the Workspace ..........................75
Replace an Effect in the Timeline ...............................75
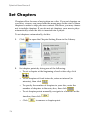
Set Chapters ................................................................76
Viewing SVRT Information .............................................78
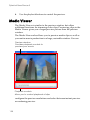
Preview Your Movie ......................................................79
Preview Your Movie in the Preview Window ................79
Preview Your Movie in the Media Viewer ...................80
Editing Clips ................................................ 81
Editing Media Clips ......................................................82
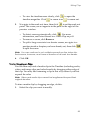
Split a Clip ..............................................................82
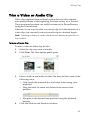
Trim a Video or Audio Clip .......................................83
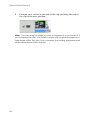
Mute an Entire Media Clip .......................................88
Mute an Entire Track ................................................88
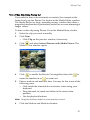
Take a Still Snapshot of a Video Clip .........................88
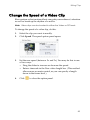
Change the Speed of a Video Clip ............................89
Stretch the Audio Portion of a Video Clip ...................90
Change the Color of a Visual Media Clip ..................90
Edit an Image Clip in PhotoNow! ..............................91
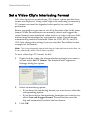
Set a Video Clip’s Interlacing Format ........................92
Adjust a Video Clip’s Aspect Ratio .............................93
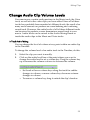
Change Audio Clip Volume Levels ............................95

CyberLink PowerDirector 5
iv
Add a Fade Effect to an Audio Clip ...........................97
Restore an Audio Clip’s Volume Levels ......................97
Using Magic Tools .......................................................98
Magic Clean ...........................................................99
Magic Motion .......................................................103
Magic Cut ............................................................104
Magic Fix ..............................................................105
Magic Style ...........................................................107
Magic Music .........................................................108
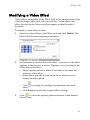
Modifying Effects ........................................................110
Set an Effect’s Duration ..........................................111
Modifying a Video Effect ........................................113
Modifying a PiP Effect ............................................114
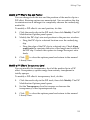
Modify a Title Effect ...............................................124
Preview a Clip ...........................................................136
Preview Window ....................................................136
Media Viewer ........................................................138
Producing Your Movie ................................ 141
Production Mode .......................................................142
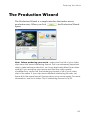
The Production Wizard ...............................................143
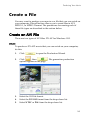
Create a File .............................................................145
Create an AVI File .................................................145
Create a DivX File .................................................150
Create an MPEG-1/MPEG-2 File ............................152
Create a PSP File (Optional) ...................................154
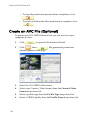
Create an AVC File (Optional) ................................156
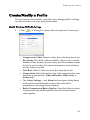
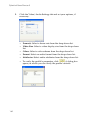
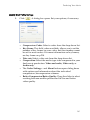
Create/Modify a Profile ..........................................159
Create a Streaming File ..............................................166
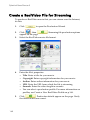
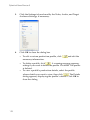
Create a WMV File for Streaming ...........................166
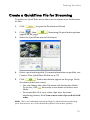
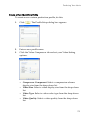
Create a RealVideo File for Streaming .....................168
Create a QuickTime File for Streaming ....................171
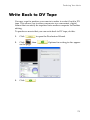
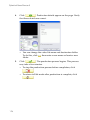
Write Back to DV Tape ...............................................175
Creating Disc............................................. 179
Create Disc Mode ......................................................180
Customize Your Disc’s Menu Page ..............................181

Contents
v
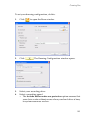
Burn to Disc ...............................................................188
Set Your Burning Configuration ..............................188
Burn Your Movie to Disc ........................................190
Appendix ................................................... 193
Technical Support ......................................................194
Web Support .........................................................194
Fax Support ..........................................................194
Telephone Support ................................................195
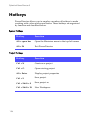
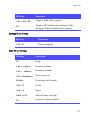
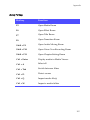
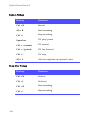
Hotkeys .....................................................................196
FAQ .........................................................................205
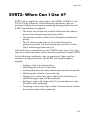
SVRT2: When Can I Use it? ........................................209
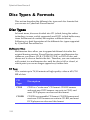
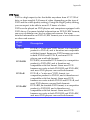
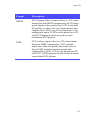
Disc Types & Formats .................................................210
Disc Types ............................................................210
Disc Type/Format Compatibility ..............................214
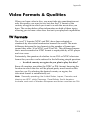
Video Formats & Qualities ..........................................215
TV Formats ...........................................................215
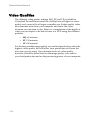
Video Qualities .....................................................216
Glossary ....................................................................217
Licensing and Copyright Notices .................................222
License Disclaimer .................................................223
Downloading Source Code ....................................223
List of Components ................................................224
Licenses and Copyrights .............................................225
Dolby Laboratories ................................................225
Intel License Agreement For Open Source Computer Vi-
sion Library .......................................................225
GNU Lesser General Public License ........................226
CLAPACK Copyright Notice ....................................238
Index......................................................... 239


1
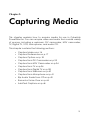
Chapter 1:
Introduction
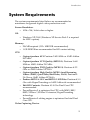
This chapter introduces CyberLink PowerDirector and the digital
video editing process. It provides a discussion of the different kinds of
technology you will use in the digital movie-making process, as well
as system requirements for working smoothly with CyberLink
PowerDirector.
This chapter contains the following sections:
• Welcome! on p.2
• The Movie-Making Process on p.3
• Register Your Software on p.5
• CD-Key Activation on p.6
• Upgrade Your Software on p.7
• Uninstall Your Software on p.8
• Latest Features on p.9
• The PowerDirector Program on p.10
• System Requirements on p.13
• PowerDirector Versions on p.14

CyberLink PowerDirector 5
2
Welcome!
Welcome to the CyberLink family of digital video tools!
PowerDirector is a digital video editing program that can help you
create professional-looking video movies, complete with music,
voice-over, special effects, and transition effects.
If you don’t have experience making movies, don’t worry. CyberLink
PowerDirector provides home users with a simple tool to help them
do something a little more creative with their home videos. You don’t
have to be a video professional or have aspirations of a box office hit
to enjoy using PowerDirector.
Where to Begin Reading
Of course, we recommend that you read through the entire User’s
Guide for complete information on working with CyberLink
PowerDirector. However, some people like to jump in and get
working on specific projects. If you are one of those people, please
refer to the list below for the page numbers of the information you
are looking for.
• If you have questions about the program or the digital movie-
making process, start by reading the Introduction on p.1,
then check out some of the information in the Appendix on
p.193 (in particular, the FAQ on p.205).
• If you want to capture media, read Capturing Media on p.15
• If you want information on using project files and putting
your media clips together into a story, start by reading
Creating Your Story on p.47.
• If you want to modify your media clips, read Editing Media
Clips on p.82.
• If you want to create a disc, read Creating Disc on p.179.

Introduction
3
The Movie-Making Process
The digital movie production process involves a
combination of artistry and technology, beginning with
raw video footage and ending with a movie production.
CyberLink PowerDirector provides the easiest way to
produce your finished movie and publish it to the
medium of your choice.
Pre-Production
Before you edit your movie using CyberLink
PowerDirector, you must first create (or gather) its
component parts: video clips, photos, music, and
narrative voice-overs.
If you collect raw footage yourself with a camcorder
or other recording device, you can capture that content in
PowerDirector’s Capture mode. PowerDirector has functions for
capturing from a DV camcorder, TV, webcam, microphone, or Audio
CD. If you want to use files that are already on your computer,
simply import them into the Library. However you collect your
content, you should have all of the bits and pieces of your movie on
hand so that the video editing process goes as smoothly as possible.
Putting Your Story Together
Once you have your raw footage on hand, import it into the
workspace in PowerDitrector’s Edit mode. The workspace offers both
timeline and storyboard views to suit your preferred working
method. Add and rearrange clips in the workspace - even lock tracks
to avoid making mistakes while you work.

CyberLink PowerDirector 5
4
Editing
CyberLink PowerDirector’s Edit mode offers loads of options for
editing audio, video, and image files in addition to video transitions,
video effects, titles, and PiP effects. You might expect to use the
functions in PowerDirector’s Edit mode to perform the following
tasks:
1. Condense a long video clip to a desired duration using Magic
Cut.
2. Clean up audio, video, and image files using Magic Clean.
3. Add a special effect to a video clip.
4. Add background music using Magic Music.
5. Adjust the sharpness, contrast, and color of a video clip.
6. Mix your background and voice-over tracks.
7. Add transition effects between video clips.
8. Add a pan or zoom effect to an image using Magic Motion.
9. Add a title and picture-in-picture (PiP) effect.
10. Automatically generate a movie with video effects, transitions,
PiP effects, and titles using Magic Style.
11. Stabilize shaky videos and enhance the focus on blurry photos
using Magic Fix.
12. Preview your production.
Producing and Burning Your Movie
After editing your media and creating your movie, it’s time to
produce your project. You can choose to make a disc, create a movie
file for playback on your computer, create a streaming file for use on
the Internet, or write your movie back to DV tape.

Introduction
5
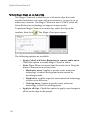
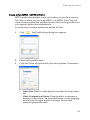
Register Your Software
After you install the program, a registration window opens,
prompting you to register your product. It is important to register
your software in order to receive technical support or other
information from CyberLink.
To register your software, do this:
1. Enter your personal information in the First Name, Last Name,
and Email entry boxes.
• Check one or both of the options to receive information from
CyberLink, or uncheck if you do not wish to receive this
information.
2. Click Register Now.
• If you would like to register this product at a later time, click
Remind Me Later. The registration box will open each time
you run the program until you register.

CyberLink PowerDirector 5
6
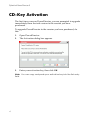
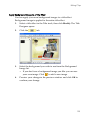
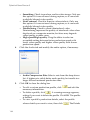
CD-Key Activation
The first time your run PowerDirector, you are prompted to upgrade
immediately from the trial version to the version you have
purchased.
To upgrade PowerDirector to the version you have purchased, do
this:
1. Open PowerDirector.
2. The Activation dialog box appears.
3. Enter your activation key, then click OK.
Note: You can copy and paste your activation key into the first entry
field.

Introduction
7
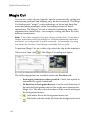
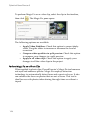
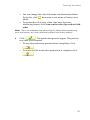
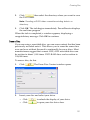
Upgrade Your Software
Software upgrades may be periodically available from CyberLink. To
upgrade your software, click on the Tool bar. The Upgrade
window will open and you can select to download new upgrades and
patches. You will be redirected to CyberLink’s cyberstore if you
choose to purchase new upgrades.
Note: You must be connected to the Internet to use this feature.

CyberLink PowerDirector 5
8
Uninstall Your Software
If you need to uninstall your CyberLink software for any reason, you
can do so either from the Windows Start menu or from the Windows
Control Panel.
Uninstall from the Start Menu
To uninstall your CyberLink software from the Start menu, do this:
1. Click Start > Programs > [name of CyberLink software
package] > Uninstall [product name]. The uninstall wizard
opens.
2. Follow the uninstall wizard to remove the program.
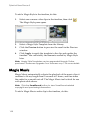
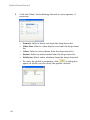
Uninstall from the Control Panel
To uninstall your CyberLink software from the Control Panel, do
this:
1. Click Start > Settings > Control Panel.
2. Double-click Add or Remove Programs.
3. Select the program name, then click Change/Remove.
4. Follow the uninstall wizard to remove the program.

Introduction
9
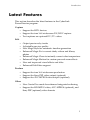
Latest Features
This section describes the latest features in the CyberLink
PowerDirector program.
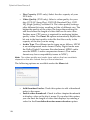
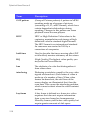
Capture
• Support for HDV devices
• Support for true 16:9 widescreen DV/HDV capture
• Text captions on captured DV/TV videos
Edit
• Output previews by tracks
• Adjustable preview quality
• New Magic Style for automatic timeline generation
• Enhanced Magic Fix to correct shaky videos and blurry
photos
• Enhanced Magic Clean to instantly correct color temperature
• Enhanced Magic Motion for custom pan and zoom effects
• New and improved visual effects and titles
• Enhanced RichVideo support
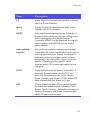
Produce
• Support for true 16:9 widescreen production
• Support for Sony PSP video output (optional)
• Support for AVC-MPEG4 video output (optional)
Other
• New Create Disc mode for enhanced integrated authoring
• Support for HD-MPEG video, AVC-MPEG4 (optional), and
Sony PSP (optional) video formats

CyberLink PowerDirector 5
10
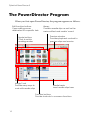
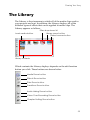
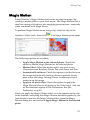
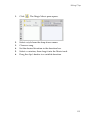
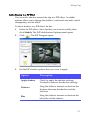
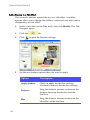
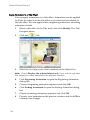
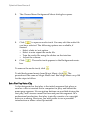
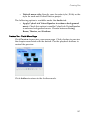
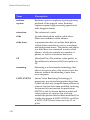
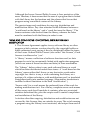
The PowerDirector Program
When you first open PowerDirector, the program appears as follows:
Library
Contains media clips as well as the
various effect and media ‘rooms’
Mode buttons
Click to switch
working modes
Function buttons
Provide shortcuts to common functions
Media tracks
Insert media clips here
Preview window
Provides playback controls to
preview clips and movies
Edit function buttons
Open editing rooms
dedicated to a specific task
Magic Tools
Provide easy ways to
work with media clips

Introduction
11
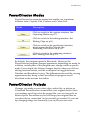
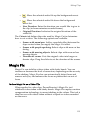
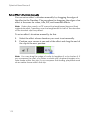
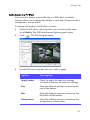
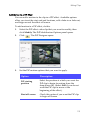
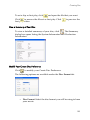
PowerDirector Modes
PowerDirector has separate modes that enable you to perform
different tasks: Capture, Edit, Produce, and Create Disc.
By default, the program opens in Edit mode. However, the
PowerDirector program changes appearance depending on mode. In
addition, certain parts of the program may change within a specific
mode. For example, the Library changes display when you click an
editing function button, and the workspace can toggle between
Timeline and Storyboard views. The different modes and the varying
appearances they bring to the PowerDirector program are all
described in the sections that follow.
PowerDirector Projects
Changes you make to your video clips, audio files, or photos in
CyberLink PowerDirector do not affect your original media. Since
your settings are all saved in the project file, you can trim, edit, or
delete clips in PowerDirector, but still keep your original files on
your hard drive, untouched. So let yourself get creative! If you end
up changing things too drastically, you can always start over.
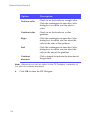
Mode Description
Click to switch to the capture interface. See
Capturing Media on p.15.
Click to switch to the editing interface. See
Editing Clips on p.81.
Click to switch to the production interface,
which opens the Disc Wizard. See
Producing Your Movie on p.141.
Click to switch to the authoring interface.
See Creating Disc on p.179.

Page is loading ...
Page is loading ...
Page is loading ...
Page is loading ...
Page is loading ...
Page is loading ...
Page is loading ...
Page is loading ...
Page is loading ...
Page is loading ...
Page is loading ...
Page is loading ...
Page is loading ...
Page is loading ...
Page is loading ...
Page is loading ...
Page is loading ...
Page is loading ...
Page is loading ...
Page is loading ...
Page is loading ...
Page is loading ...
Page is loading ...
Page is loading ...
Page is loading ...
Page is loading ...
Page is loading ...
Page is loading ...
Page is loading ...
Page is loading ...
Page is loading ...
Page is loading ...
Page is loading ...
Page is loading ...
Page is loading ...
Page is loading ...
Page is loading ...
Page is loading ...
Page is loading ...
Page is loading ...
Page is loading ...
Page is loading ...
Page is loading ...
Page is loading ...
Page is loading ...
Page is loading ...
Page is loading ...
Page is loading ...
Page is loading ...
Page is loading ...
Page is loading ...
Page is loading ...
Page is loading ...
Page is loading ...
Page is loading ...
Page is loading ...
Page is loading ...
Page is loading ...
Page is loading ...
Page is loading ...
Page is loading ...
Page is loading ...
Page is loading ...
Page is loading ...
Page is loading ...
Page is loading ...
Page is loading ...
Page is loading ...
Page is loading ...
Page is loading ...
Page is loading ...
Page is loading ...
Page is loading ...
Page is loading ...
Page is loading ...
Page is loading ...
Page is loading ...
Page is loading ...
Page is loading ...
Page is loading ...
Page is loading ...
Page is loading ...
Page is loading ...
Page is loading ...
Page is loading ...
Page is loading ...
Page is loading ...
Page is loading ...
Page is loading ...
Page is loading ...
Page is loading ...
Page is loading ...
Page is loading ...
Page is loading ...
Page is loading ...
Page is loading ...
Page is loading ...
Page is loading ...
Page is loading ...
Page is loading ...
Page is loading ...
Page is loading ...
Page is loading ...
Page is loading ...
Page is loading ...
Page is loading ...
Page is loading ...
Page is loading ...
Page is loading ...
Page is loading ...
Page is loading ...
Page is loading ...
Page is loading ...
Page is loading ...
Page is loading ...
Page is loading ...
Page is loading ...
Page is loading ...
Page is loading ...
Page is loading ...
Page is loading ...
Page is loading ...
Page is loading ...
Page is loading ...
Page is loading ...
Page is loading ...
Page is loading ...
Page is loading ...
Page is loading ...
Page is loading ...
Page is loading ...
Page is loading ...
Page is loading ...
Page is loading ...
Page is loading ...
Page is loading ...
Page is loading ...
Page is loading ...
Page is loading ...
Page is loading ...
Page is loading ...
Page is loading ...
Page is loading ...
Page is loading ...
Page is loading ...
Page is loading ...
Page is loading ...
Page is loading ...
Page is loading ...
Page is loading ...
Page is loading ...
Page is loading ...
Page is loading ...
Page is loading ...
Page is loading ...
Page is loading ...
Page is loading ...
Page is loading ...
Page is loading ...
Page is loading ...
Page is loading ...
Page is loading ...
Page is loading ...
Page is loading ...
Page is loading ...
Page is loading ...
Page is loading ...
Page is loading ...
Page is loading ...
Page is loading ...
Page is loading ...
Page is loading ...
Page is loading ...
Page is loading ...
Page is loading ...
Page is loading ...
Page is loading ...
Page is loading ...
Page is loading ...
Page is loading ...
Page is loading ...
Page is loading ...
Page is loading ...
Page is loading ...
Page is loading ...
Page is loading ...
Page is loading ...
Page is loading ...
Page is loading ...
Page is loading ...
Page is loading ...
Page is loading ...
Page is loading ...
Page is loading ...
Page is loading ...
Page is loading ...
Page is loading ...
Page is loading ...
Page is loading ...
Page is loading ...
Page is loading ...
Page is loading ...
Page is loading ...
Page is loading ...
Page is loading ...
Page is loading ...
Page is loading ...
Page is loading ...
Page is loading ...
Page is loading ...
Page is loading ...
Page is loading ...
Page is loading ...
Page is loading ...
Page is loading ...
Page is loading ...
Page is loading ...
Page is loading ...
Page is loading ...
Page is loading ...
Page is loading ...
Page is loading ...
Page is loading ...
Page is loading ...
Page is loading ...
Page is loading ...
Page is loading ...
Page is loading ...
Page is loading ...
Page is loading ...
Page is loading ...
Page is loading ...
Page is loading ...
Page is loading ...
Page is loading ...
Page is loading ...
Page is loading ...
Page is loading ...
-
 1
1
-
 2
2
-
 3
3
-
 4
4
-
 5
5
-
 6
6
-
 7
7
-
 8
8
-
 9
9
-
 10
10
-
 11
11
-
 12
12
-
 13
13
-
 14
14
-
 15
15
-
 16
16
-
 17
17
-
 18
18
-
 19
19
-
 20
20
-
 21
21
-
 22
22
-
 23
23
-
 24
24
-
 25
25
-
 26
26
-
 27
27
-
 28
28
-
 29
29
-
 30
30
-
 31
31
-
 32
32
-
 33
33
-
 34
34
-
 35
35
-
 36
36
-
 37
37
-
 38
38
-
 39
39
-
 40
40
-
 41
41
-
 42
42
-
 43
43
-
 44
44
-
 45
45
-
 46
46
-
 47
47
-
 48
48
-
 49
49
-
 50
50
-
 51
51
-
 52
52
-
 53
53
-
 54
54
-
 55
55
-
 56
56
-
 57
57
-
 58
58
-
 59
59
-
 60
60
-
 61
61
-
 62
62
-
 63
63
-
 64
64
-
 65
65
-
 66
66
-
 67
67
-
 68
68
-
 69
69
-
 70
70
-
 71
71
-
 72
72
-
 73
73
-
 74
74
-
 75
75
-
 76
76
-
 77
77
-
 78
78
-
 79
79
-
 80
80
-
 81
81
-
 82
82
-
 83
83
-
 84
84
-
 85
85
-
 86
86
-
 87
87
-
 88
88
-
 89
89
-
 90
90
-
 91
91
-
 92
92
-
 93
93
-
 94
94
-
 95
95
-
 96
96
-
 97
97
-
 98
98
-
 99
99
-
 100
100
-
 101
101
-
 102
102
-
 103
103
-
 104
104
-
 105
105
-
 106
106
-
 107
107
-
 108
108
-
 109
109
-
 110
110
-
 111
111
-
 112
112
-
 113
113
-
 114
114
-
 115
115
-
 116
116
-
 117
117
-
 118
118
-
 119
119
-
 120
120
-
 121
121
-
 122
122
-
 123
123
-
 124
124
-
 125
125
-
 126
126
-
 127
127
-
 128
128
-
 129
129
-
 130
130
-
 131
131
-
 132
132
-
 133
133
-
 134
134
-
 135
135
-
 136
136
-
 137
137
-
 138
138
-
 139
139
-
 140
140
-
 141
141
-
 142
142
-
 143
143
-
 144
144
-
 145
145
-
 146
146
-
 147
147
-
 148
148
-
 149
149
-
 150
150
-
 151
151
-
 152
152
-
 153
153
-
 154
154
-
 155
155
-
 156
156
-
 157
157
-
 158
158
-
 159
159
-
 160
160
-
 161
161
-
 162
162
-
 163
163
-
 164
164
-
 165
165
-
 166
166
-
 167
167
-
 168
168
-
 169
169
-
 170
170
-
 171
171
-
 172
172
-
 173
173
-
 174
174
-
 175
175
-
 176
176
-
 177
177
-
 178
178
-
 179
179
-
 180
180
-
 181
181
-
 182
182
-
 183
183
-
 184
184
-
 185
185
-
 186
186
-
 187
187
-
 188
188
-
 189
189
-
 190
190
-
 191
191
-
 192
192
-
 193
193
-
 194
194
-
 195
195
-
 196
196
-
 197
197
-
 198
198
-
 199
199
-
 200
200
-
 201
201
-
 202
202
-
 203
203
-
 204
204
-
 205
205
-
 206
206
-
 207
207
-
 208
208
-
 209
209
-
 210
210
-
 211
211
-
 212
212
-
 213
213
-
 214
214
-
 215
215
-
 216
216
-
 217
217
-
 218
218
-
 219
219
-
 220
220
-
 221
221
-
 222
222
-
 223
223
-
 224
224
-
 225
225
-
 226
226
-
 227
227
-
 228
228
-
 229
229
-
 230
230
-
 231
231
-
 232
232
-
 233
233
-
 234
234
-
 235
235
-
 236
236
-
 237
237
-
 238
238
-
 239
239
-
 240
240
-
 241
241
-
 242
242
-
 243
243
-
 244
244
-
 245
245
-
 246
246
-
 247
247
-
 248
248
-
 249
249
-
 250
250
-
 251
251
-
 252
252
-
 253
253
-
 254
254
-
 255
255
-
 256
256
-
 257
257
-
 258
258


CyberLink PowerDirector 5 Owner's manual
- Category
- Video software
- Type
- Owner's manual
- This manual is also suitable for
Ask a question and I''ll find the answer in the document
Finding information in a document is now easier with AI
Related papers
-
CyberLink PowerDirector 7 Owner's manual
-
-
-
CyberLink PowerDirector 8 Deluxe User manual
-
CyberLink PowerDirector 9 Owner's manual
-
-
-
-
-
Other documents
-
ArcSoft SHOWBIZ DVD 2 User manual
-
Manhattan 162579 User manual
-
Laser AO-EZCAMEL-T User manual
-
Diamond Multimedia GC500 Installation guide
-
iON Video 2 PC HD Quick start guide
-
JVC GR-DF450US Owner's manual
-
JVC GZ-MG30AC User manual
-
-
HP A6700f - Pavilion - 4 GB RAM Quick start guide
-
BenQ 5000G Series User manual