Page is loading ...

3
Quickstart Guide (English)
Introduction
Box Contents
Video 2 PC HD
RCA audio/video cable
Software CD
Quickstart Guide
Safety Instructions & Warranty Information Booklet
Support
For the latest information about this product (system requirements, compatibility information, etc.) and product registration,
visit ionaudio.com.
Driver & Software Installation
PC Minimum System Requirements:
• Windows 10, Windows 8.1, Windows 8, Windows 7, Windows Vista, or Windows XP
• Screen Resolution: 1024 x 768, 16-bit (or above)
• Pentium 4, 2.2 GHz or AMD Athlon XP 2200+
• 512 MB RAM (3GB DDR2 or above recommended)
• 10 GB free hard drive space
• Available USB 2.0 port (preferably on rear panel)
• CD/DVD drive (DVD Burner required for DVD burning)
Some software features may require additional computing power than the above minimum system requirements.
Mac Minimum System Requirements:
• OS X 10.5.6-10.8
• 1.66 GHz Intel Core Duo
• 1 GB RAM
• 10 GB free hard drive space
• Available USB 2.0 port (preferably on rear panel)
• CD/DVD drive (DVD Burner required for DVD burning)

4
THIS DEVICE COMPLIES WITH PART 15 OF THE FCC RULES. OPERATION IS SUBJECT TO THE FOLLOWING
TWO CONDITIONS: (1) THIS DEVICE MAY NOT CAUSE HARMFUL INTERFERENCE, AND (2) THIS DEVICE MUST
ACCEPT ANY INTERFERENCE RECEIVED, INCLUDING INTERFERENCE THAT MAY CAUSE UNDESIRED
OPERATION.
Windows
1. Insert the CD into your computer's CD drive.
2. Install the drivers.
On the window that appears after you insert the CD, click "Install Driver." Follow the on-screen
instructions that appear to complete the installation.
If this window does not automatically appear, double-click "My Computer" then double-click the CD. The
window should appear. (If the window still does not appear, right-click the CD and select "Explore."
Once the CD's contents are shown, double-click the "PC" folder, double-click the "Drivers" folder, then
double-click "Setup.exe.")
3. Install the software.
On the window that appears after you insert the CD, click "Install Software." Follow the on-screen
instructions that appear to complete the installation.
If this window does not automatically appear, double-click "My Computer" then double-click the CD. The
window should appear. If the window still does not appear, right-click the CD and select "Explore." Once
the CD's contents are shown, double-click the "PC" folder, double-click the "Software" folder, double-
click the "Cyberlink…" folder, then double-click "Setup.exe."
You can eject the CD and begin using Video 2 PC HD and the software you installed.
4. Connect the device.
Connect Video 2 PC HD to a free USB 2.0 port on your computer. (We recommend connecting it to a port
on the rear panel of your computer.)
You may see several dialog boxes in the corner of the screen, indicating the computer has detected Video
2 PC HD is connected. In some cases, you may see a message resembling an error message – this is
normal. Click "OK" (if necessary).
5. Begin!
You can find the software by going to Start Menu All
Programs Cyberlink PowerDirector. (You may also
double-click the shortcut icon on your computer's
Desktop.)
The first time you open PowerDirector, you will be asked
to enter a serial number. Find the number on the sleeve
of the CD and enter it.
Note: Sometimes, the software will
ask if you want to upgrade after you
open it. This is optional but not
required.

5
Mac
1. Insert the CD into your computer's CD drive.
2. Install the drivers and software.
Double-click the CD on the Desktop. On the window that appears, double-click the "Mac" folder, then
double-click "EZCap EN.pkg." Follow the on-screen instructions that appear to complete the installation.
You will need to restart your computer afterward to complete this process.
You may now eject the CD.
3. Connect the device.
Connect Video 2 PC HD to a free USB 2.0 port on your computer. (We recommend connecting it to a port
on the rear panel of your computer.)
4. Begin!
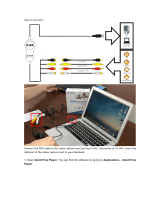
You can find the software by going to Applications EzCAP EzCAP. The first time you open EzCAP,
you will be asked to enter a serial number into the "Serial Number" field. Find the number on the sleeve
of the EzCAP CD and enter it then click "OK."
After installing EzCAP, you can also use Video 2 PC HD in any program that uses QuickTime video
digitizers, such as Apple QuickTime Player.

6
1
2234
Overview
IMPORTANT:
To capture a video's sound, connect the left and right AUDIO INPUTS to the left and right audio outputs of your
playback device.
To capture the video image itself, choose either the COMPOSITE VIDEO INPUT or the S-VIDEO INPUT.
1. USB CONNECTOR – Connect this end of Video 2 PC HD to the included USB extension cable then
connect the extension cable to an available USB 2.0 port on your computer (preferably a port on the
rear panel).
2. AUDIO INPUTS – Use standard RCA cables to connect these left and right audio inputs to the left and
right audio outputs of your playback device. Be sure to match the colors properly – red to red, white to
white.
3. COMPOSITE VIDEO INPUT – Use a standard
composite video cable to connect this input to the
composite video output of your playback device. (If
your playback device has an S-Video output, you may
connect that to the S-VIDEO INPUT instead.)
4. S-VIDEO INPUT – Use a standard S-Video cable (not
included) to connect this input to the S-Video output of
your playback device.
COMPUTER
V
IDEO PLAYBACK DEVICE
TV
V
CR
Camcorder
etc…
Note: Generally, S-Video connections are
of a better quality than composite video, so
we recommend using this one if your
p
la
y
back device has an S-
V
ideo out
p
ut.

7
Get Started!
PowerDirector (PC)
1. Connect Video 2 PC HD to your playback device and to
your computer (as shown in the Overview).
2. Open PowerDirector. You can find the software by going
to Start Menu All Programs Cyberlink
PowerDirector. (You may also double-click the shortcut
icon on your computer's Desktop.)
3. Click the "Capture" tab in the upper left-hand corner of
the screen. The software will automatically detect your
video device.
4. Start recording by clicking the red "Record" button. Play
your video source (digital camera, TV, DVD player, etc.).
5. When you are done capturing your video, click the "Stop"
button.
6. Enter the title of your video in the "Captured File Name"
field in the window that appears and click "OK." The
video will appear in the "Captured Content" at the bottom
of the window.
• If you want to create a CD, click the "Create Disc"
tab. Use the buttons underneath the "Content"
tab to add the videos you want on your CD, then
click "Burn" to burn the disc.
• If you want to save a video in a popular format
(such as a portable MPEG-4 for PSP, iPod, or iPhone), click the "Edit" tab then click the
"Produce" tab and select the proper format.
• If you want to upload a video to YouTube™ or Facebook™, click the "Edit" tab then click the
"Produce" tab then click the "YouTube" or "Facebook" tab near the top of the window.
Note: Sometimes, the software will ask
if you want to upgrade after you open
it. This is optional but not required.
Note: For more in-depth information
about using PowerDirector, press F1
on your keyboard or click the
"director's chair" icon button in the
upper left-hand corner of the screen,
and go to "Help" then "PowerDirector
Help" to access the software's help
file.
*Note: In some cases, depending on
your computer's operating system,
your video's picture or sound in
PowerDirector may appear "jerky" or
"stalled." This will not affect your video,
though; it is actually capturing it
properly.

8
Video Enhancement
Video enhancement gives standard definition video files the look and feel of high definition video through the
use of upscaling.
Benefits of using Video Enhancement:
• Sharpens the image quality.
• Upscales the resolution from 480 pixels to 1080 pixels.
• Reduces jagged edges and distracting video artifacts.
• Watch standard DVD movies with low resolution content in full-screen on large displays using PowerDVD,
Blu-ray/DVD playback software.
To additionally enhance your videos, Cyberlink Power Director 9 DE also has these features:
TrueTheater® Stabilizer, TrueTheater® Lighting, TrueTheater® De-noise. These features will upscale your SD
video to HD-like quality with improved colors, sharpness, and reduce shakiness and visual noise.
Follow these steps to enhance your recorded video to HD-like quality:
1. Select your video clip in the video timeline.
2. Click the Fix/Enhance tab located above the video timeline.
3. Select the Video Enhancement checkbox.
Note: The video enhancement results will vary based on the video source and will not give the same pristine
results as if you were watching a full-quality DVD or Blu-ray.

9
EzCAP Capture (Mac)
Note: Video enhancement is only for PC users. The included Mac
software does not upconvert video to HD. However, you can use your
favorite 3
rd
party video capturing program to further enhance your
videos.
1. Connect Video 2 PC HD to your playback device and to your
computer (as shown in the Overview). Video 2 PC HD must be
connected to your computer for the software to open properly.
2. Open EzCAP Capture. You can find the software by going to
Applications EzCAP EzCAP.
3. The first time you open EzCAP, you will be asked to enter a
serial number. Find the number on the sleeve of the EzCAP CD
and enter it.
4. EzCAP Capture is now open. (Note: Do not play your video
source (digital camera, TV, DVD player, etc.) yet. You need to set the software's audio first.)
5. Click "Record" in the top menu and select "Sound Settings." In the window that appears, click the "Source"
tab and select "ION Audio USB 2861 Device" from the list below it. Also, make sure the menu next to "Speaker"
is set to "On." Click "OK" when you are done.
6. Start recording by clicking "Record" in the top menu and selecting "Record." *(You can also press "Command"
+ "R.") Play your video source (digital camera, TV, DVD player, etc.).
7. When you are done capturing your video, click anywhere inside the box at the center of the screen. To return to
the main screen, click "OK."
8. For more information on using EzCAP Capture, please refer to the manual (PDF) in the "Mac" folder on the
included CD.
Important note!
To play your captured video on your iPod or iPhone, the video must be in a specific type of MPEG-4 format, even if you
already saved your video as an MPEG-4 in the software. To convert your video to be played on your device, follow these
steps:
1. Capture your video, save it, then close the software.
2. Open your Applications folder.
3. Open QuickTime, click the "File" menu and select "Open File."
4. Locate and the video you just captured and click "Open." The video will open in QuickTime.
5. Click the "File" menu and select "Save As." (You can rename the movie or save it to a new location, if desired.)
6. Click the "Format" drop-down menu and select your device.
7. Click "Save." This file can now be played on your device.
*Note: In some cases, depending on
your computer's operating system,
your video's picture or sound in
EzCAP may appear "jerky" or
"stalled." This will not affect your
video, though; it is actually capturing
it properly. If this occurs, though, we
recommend using QuickTime for
more fluid video monitoring. See the
QuickTime instructions below for
details.

10
QuickTime (Mac)
1. Connect Video 2 PC HD to your playback device and to
your computer (as shown in the Overview).
2. In order to use Video 2 PC HD with QuickTime, you must
first register your EzCAP Capture software. Open EzCAP
Capture by going to Applications EzCAP EzCAP.
3. You will be asked to enter a serial number into the "Serial
Number" field. Find the number on the sleeve of the
EzCAP CD and enter it then click "OK."
4. After entering the serial number and EzCAP Capture opens successfully, you may close it.
5. If you are using Snow Leopard (Mac OS X 10.6), set QuickTime to open in 32-bit mode before
beginning. To do this, go to your Applications folder, right-click "QuickTime" and select "Get Info,"
check the "Open in 32-bit mode" box in the window that appears, then close the window.
6. Open QuickTime, click the "File" menu and select "New Movie Recording."
7. If you see a downward-pointing triangle to the right of the "record" button, click it to open a drop-down
menu. If you do not see the triangle, click the "QuickTime Player" menu at the top of the screen and
select "Preferences."
8. In the drop-down menu, make sure that the proper "Camera" setting is selected ("Composite" or "S-
Video," depending on which connector you are using) and that "ION Audio USB 2861 Device" is
selected as the "Microphone." (Also, make sure the volume slider on the left-hand side of the window
is turned up.)
9. Start recording by clicking the red "record" button at the bottom of the screen. Play your video source
(digital camera, TV, DVD player, etc.).
10. When you are done capturing your video, click the "stop" button. Your captured video will automatically
open in the QuickTime player. To save it, go to "File" and select "Save" (or "Save As" to save it with a
different name, but save it as a "self-contained" movie).
11. If you want the captured video to be playable on your iPhone or iPod, click the "Format" drop-down
menu and select your device: "iPhone (Cellular)," "iPhone," or "iPod."
12. Click "Save."
Note: If your Mac is running an older
OS (e.g., 10.4), your version of
QuickTime may not have the option to
record and save movie files. If this is
the case, we recommend upgrading
to QuickTime Pro to access these
features.

51
Appendix (English)
Trademarks & Licenses
ION Audio is a trademark of ION Audio, LLC, registered in the U.S. and other countries.
iPhone, iPod, Mac, and OS X are trademarks or service marks of Apple Inc., registered
in the U.S. and other countries.
Windows is a registered trademark of Microsoft Corporation in the United States and
other countries.
PSP is a registered trademark of Sony Computer Entertainment Inc.
YouTube is a trademark of YouTube, LLC.
Facebook is a registered trademark of Facebook, Inc.
All other product or company names are trademarks or registered trademarks of their
respective owners.

ionaudio.com
Manual Version 1.6
/