Page is loading ...

1) Schematic diagram
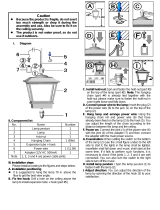
2) List of Components
No.
Name
Quantity
1
L-shape support
1
2
hold-nut
1
3
lamp
1
4
lamp pendant
1
5
U-shaped fastener
1
6
built-in wire
1
7
power wire
1 (138in)
8
adapter (12V AC 500mA)
1
9
extended wire
1 (138in)
10
iron nail, screw and expansion tube
7
Note
1,2,3,4,5,6 are wire connectors
3) Assembly process
I. Determine installation site
It is suggested to install at the height of 71in from the
ground to get the best view angle.
If choosing outdoor installation, there must access to
power to penetrate into the house through gaps of
windows or doors to avoid the adapter and main power
supply to be dampened.
II. Install L-shaped support
Method A: As shown in the above figure. It is to fix the
lamp with only one iron nail (if your unable to use the
iron nail due to the wall materials, use screw expansion
tube instead). The advantage of this method is that it
can reduce damages on the wall surface. If there has
been an iron nail (or a screw) on the wall already, it
only needs to have the length adjusted slightly. The
disadvantage of this method is that the lamp may be
swayed by the external force and is not very sturdy.
Therefore, this method is appropriate for the places
where cannot be influenced by the strong wind or
human touch. The preferred method is: to fix the
supplied iron nail (or screw + expansion tube) on the
wall surface which shall be 2-3mm away from the cap
of the iron nail (or screw) so that the lamp can be
suspended on it as shown in the following figure.
Then use two screws to fix U-shaped fastener (5) into
L-shaped support (1):
Connect the plug (4) of power wire (7) with the socket
(3) of built-in wire (6) and then suspend L-shaped
support (1) on the wall.
Method B: if the lamp holder is easy to be effected by
wind or human activities, it needs to be fastened. It is
Caution
This product (especially the lamp holder) is
fragile, do not exert too much strength or drop it
during the assembly and use. Be sure to fix it on
the wall securely.
This product is waterproof; but it is necessary to
keep the lamp in the vertical direction to ensure
water drains correctly.
Please assemble it in strict accordance with
the steps and requirements specified in the
instruction to ensure safety and reliability
during the installation.
The outdoor installation must be convenient for power wire to
penetrate into the house through gaps of windows or doors.

suggested to use Method B to install L-shaped support
(1). The preferred method is: drill two circular holes with
diameter of X mm and depth Y mm, and use two
expansion tubes and grub screws to fix U-shaped
fastener (5) on the wall, then use two screws to fix
L-shaped support (1) on the U-shaped fastener. But
before do this, do not forget to connect plug (4) with
socket (3) as shown in the above figure:
3. Fix the lamp
a.Connect power wire to the lamp: After ensuring the
L-shaped support is well suspended on the wall, insert the
plug (2) of the built-in wire into the socket (1) on the top of
the lamp (3):
b. Fix lamp: lift the lamp (3) up so that the upper part of the
plug (2) and its wire can enter into the hole of the hold-nut
(2), and turn the hold-nut (2) to let it tightly fit the thread of
the upper part of the lamp until the lamp and L-shaped
support to be fixed as a whole. Meanwhile, adjust the
direction of the lamp until it is satisfied. Note: #1. The hold
nut must be screwed tightly; otherwise, the waterproof
effect of lamp holder will be seriously affected. #2. The
lamp holder is fragile, and damage could result from falling
on the ground.
c. Turn the lamp pendant (4) to fix it with the thread under
the lamp.
4. Power on and examination
a.Power on: connect the plug (5) of power wire (7) with
the socket (8) of adaptor (8). If the power wire (7) is not long
enough, add extended wire (9) between those two and
connect (5) and (6), (7) and (8) separately. After that,
connect the adapter (8) with main power supply.
b. Examination: there is a switch at the bottom of the lamp
(3) (see the following figure). Turn on the switch to left side,
the lights should be twinkling, snow flying around, and
music playing. If the above are not functioning, check
whether the connections are properly tightened. You can
also turn the switch to right side to turn off the music.
5. Attention for Rainproof
If the lamp is used outdoor, please pay special attention:
a. Please fix the hold-nut at the top of lamp securely,
otherwise the rainproof effect will be seriously affected!
b. All connection points 1, 2, 3, 4, 5, 6, 7 and 8 must be
screwed securely to avoid water and electricity leakage.
c. The adapter itself is not waterproof, but is required. To
ensure that the connectors between adapter and main
power work properly place this indoors free from rain and
snow, so as to avoid the electricity leakage or electric
shock risk!
d. The end of L-shaped support is arranged with drip hole,
and this hole should be unobstructed;
e. The lamp should be kept vertical and avoid inclined to
ensure the water drains properly.
/