NIGHT OWL DP2 Series Owner's manual

Category
Video splitters
Type
Owner's manual
Quick Setup Guide
Digital Video Recorder (DVR) Product Setup
Quick Setup Guide
NEED HELP?
For system manuals, troubleshooting guides, FAQs, video tutorials and more:
Please visit Support.NightOwlSP.com
Enter the Series listed on the Product
Support Sticker into the Search bar.
Access the support material needed.
Why Call? Our Support Site Has it All!
Night Owl Technical Support
If you require Technical Support, you should always go to Support.NightOwlSP.com
first. With 24/7 access to system manuals, troubleshooting guides, FAQs, video
tutorials, and more, you'll have all the support you could need.
DVR Hardware Setup Video
Your device is running the latest firmware version.
Your device is registered. To register your device:
Download Night Owl Protect from your Smart Device's App Store.
Click "Sign Up" to create an account.
or
Go to NightOwlSP.com/NOProtect and manually register your device.
You are in front of the device with it powered on and connected to TV a Monitor.
Follow along as we guide you through the DVR's hardware
setup. Step-by-step instructions make it even easier to
connect your system!
Still need more support? Before calling Night Owl Technical Support, keep in
mind we can only provide phone support if:
For more Support Videos, go to Night Owl’s YouTube page by
typing www.youtube.com/nightowlsp into your web browser.
Use the QR Code for easy access to the DVR Hardware
Setup Video on Night Owl’s YouTube Channel.
Thank you for being a Night Owl Customer! Secure, Protect, Connect your world!
What’s in the Box
DVR
DVR Power Adapter
(x1)
USB Mouse
(x1)
6 ft. HDMI
(x1)
6 ft. Ethernet
(x1)
Power
Splitter(s)
(1 per 4 Cameras)
Monitor
Router
RESET
LAN1 LAN2 LAN3 LAN4 WAN
Camera(s) Camera Power
Adapter(s)
(1 per 4 Cameras)
Mounting
Hardware
(Varies by Model)
60 ft. Video/Power
Cables
(1 per Camera)
DISCLAIMER: The exact components of your system, images, and quantities may vary depending on
your model number. While these may vary, this QSG addresses the setup of your DVR and cameras.
DVR / Accessories
Camera / Accessories
Items Not Included
NOTE: A TV or Monitor with a
minimum 1080p HD resolution and
an HDMI input is required for the
initial setup. Use all of the included
Night Owl accessories. Third-party
accessories may not work correctly.
21
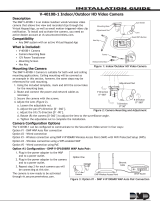
Plug one end of the included HDMI cable into the
HDMI port on the back of the DVR.
Plug the other end of the HDMI cable into the back
of your TV or Monitor.
Plug the USB mouse into the USB port on the back
HDMIHDMI
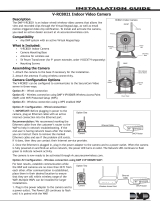
Plug one end of the included Ethernet cable into
the LAN port on the back of the DVR.
4
Plug the other end of the Ethernet cable into a port
on the back of your router or modem.
ETHERNET
ROUTER
(NOT INCLUDED)
5
STOP: BEFORE installing, connect and test each
camera locally to confirm they function properly.
PWR
HDD
6
Connect the end of the camera’s cable to the end
of a video / power cable labeled TO CAMERA ONLY.
VIDEO / POWER CABLEFROM CAMERA
7
Connect the video / power cable labeled TO
DVR ONLY to an open video input on the DVR.
NOTE: Make sure you twist
and lock BNC connectors.
8
Connect the red female power leads of the video / power
cables to the male power splitter ends.
POWER SPLITTER
CONNECTORS
POWER CABLE
CONNECTORS
9
Connect the power splitter to the camera power
adapter and plug the adapter into a surge
protector or Uninterruptible Power Supply (UPS).
CAMERA POWER
ADAPTER
POWER
SPLITTER
SURGE PROTECTOR
(NOT INCLUDED)
10
Connect the DVR power adapter to the Power Input
on the rear of the DVR.
POWER
11
SURGE PROTECTOR
(NOT INCLUDED)
Plug the DVR power adapter into a surge
protector or Uninterruptible Power Supply (UPS).
Some systems beep upon booting up.
Step 1: Connecting Your System
3
USB
ETHERNET
NOTE: Make sure the UPS or
surge protector is switched ON.
RESET
LAN1 LAN2 LAN3 LAN4 WAN
NOTE: To view cameras, TV or Monitor must be
tuned to the same input the HDMI is plugged into.
NOTE: Night Owl recommends connecting to the
Internet for the best user experience.
NOTE: Watch our DVR Setup Video on YouTube.
To CAMERA
To CAMERA
6
Step 2: Download Night Owl Protect
If you're a First Time User, download
Night Owl Protect from the App Store or
Google Play Store onto your Smart
Device. If you already have an account
skip to Step 3b.
Create and verify your Night Owl Protect
account. Use the Night Owl Protect login
credentials to log into the DVR in Step 3b.
Step 3: Startup Wizard
STOP: Connected DVRs automatically search for the latest
firmware version. If you are NOT going to connect your DVR
to the Internet, follow the onscreen prompts for updating the
firmware and registering the device.
Skip to “Don’t Want to Connect the DVR to the Internet.”
3a
2a
2b
If you have NOT created a Night Owl
Protect account, click “First Time
Users” and follow the onscreen steps.
If you have a Night Owl Protect
account, click “Already have an
account,” and skip to step 3b.
3c
After logging into your Night Owl
Protect account, the Startup Wizard
continues to lead you through the
setup process. Click “Complete Setup”
to complete the Startup Wizard.
3b
Log in using your Night Owl Protect
credentials (use the login credentials
created in step 2b).
NOTE: The DVR is automatically added to
the Night Owl Protect App when you log in
using your Night Owl Protect credentials.
NOTE: Setup is the same
for Smartphone and Tablet.
I Don’t Want to Connect the DVR to the Internet
Night Owl Strongly Recommends connecting the DVR to the Internet.
If you have decided not to connect:
You must manually update the device's firmware to the latest version to
receive Technical Phone Support. The latest firmware version is available on
the device’s support page on the Night Owl Support Site.
The DVR must be registered to receive Technical Phone Support.
You cannot view your system remotely.
Resetting your password is a much longer process to ensure security
4a
Go to NightOwlSP.com/NOProtect to
register the DVR. Use the information
found on the DVR's support sticker to
complete registration.
4c
Once the DVR is added to the App,
complete the Startup Wizard and
camera installation.
4b
Create Local Password
1. Default username is “admin”
2. Create a password
(any alphanumeric combo with a minimum of
8 characters; MUST include a number, a low-
ercase, and uppercase letter).
3. Click “Continue” to go to the Login Screen.
Notes
Quick Setup Guide
QSG-DPREV 200409
For system manuals, troubleshooting guides, FAQs, video tutorials and more:
Please visit Support.NightOwlSP.com
Enter the Series listed on the Product Support Sticker
(on top of the DVR) into the Search bar.
Access the support material needed.
iPhone, iPad, Mac and Mac OS X are registered trademarks of Apple Inc. Windows, Windows XP, Windows Vista, Windows 7,
Windows 8 and Windows 10 are registered trademarks of Microsoft Corporation in the United States and/or other countries.
Need More Help?
  • Page 1 1
  • Page 2 2
  • Page 3 3
  • Page 4 4
  • Page 5 5
  • Page 6 6
  • Page 7 7

NIGHT OWL DP2 Series Owner's manual

Category
Video splitters
Type
Owner's manual

Ask a question and I''ll find the answer in the document

Finding information in a document is now easier with AI