Allnet ALL7008 Quick setup guide

Category
Routers
Type
Quick setup guide

Allnet ALL7008 is a versatile networking device that offers a range of features to enhance your network connectivity and security. With its dual WAN ports, it allows you to connect to multiple internet sources for load balancing or redundancy. The LAN ports enable you to connect your local area network devices, while the DMZ port provides a dedicated connection for your company's servers. Additionally, the ALL7008 includes firewall and access control functions to protect your network from unauthorized access and cyber threats.

Allnet ALL7008 is a versatile networking device that offers a range of features to enhance your network connectivity and security. With its dual WAN ports, it allows you to connect to multiple internet sources for load balancing or redundancy. The LAN ports enable you to connect your local area network devices, while the DMZ port provides a dedicated connection for your company's servers. Additionally, the ALL7008 includes firewall and access control functions to protect your network from unauthorized access and cyber threats.

ALLWALL
ALL7008
2
Quick Install Guide
Express-Setup
Version 12 2007
3
4
Hardware Configuration
Hardware Description:
Power LED: Illuminates solid green when ALL7008 is first
powered up. Start up takes up to one minute to complete.
Status LED: When LED light start glittering, it means the
system is under the status of booting. Around two minutes
when the LED light stop glittering, it means the system is
booting successful.
WAN 1/2 Port: To connect to the external router, DSL modem,
or Cable modem.
LAN Port: Connect to the intranet PCs.
DMZ Port: Connect to the company’s server(s).
Console Port: 9-pin serial port connector for checking
ALL7008 system setting and restore to the factory setting.
5
Software Configuration
STEP 1Connect both the Administrator’s PC and the LAN port of ALL7008
to a hub or switch. And use a web browser to display the
configurations of the ALL7008 (such as Internet Explorer or
Netscape). The default IP address of ALL7008 is http://192.168.1.1
with a subnet mask of 255.255.255.0. Therefore, the IP address of
the Administrator PC must be in the range between 192.168.1.2–
192.168.1.254
STEP 2After the new IP of Administrators PC take effect, enable IE or
Netscape and connect to
http://192.168.1.1 and it can use browser
to set up the parameter of ALL7008.
The following table is a list of virtual IP addresses. These addresses may not use
WAN Real IP address.
10.0.0.0 ~ 10.255.255.255
172.16.0.0 ~ 172.31.255.255
192.168.0.0 ~ 192.168.255.255
6
STEP 3A pop-up screen will appear and prompt for a username and
password. A username and password is required to connect to
ALL7008. Enter the default login username and password of
Administrator (FigureS-1).
Username: admin
Password: admin
Click OK.
FigureS-1 Login WebUI
STEP 4After entering the username and password, select Interface on the
left menu and click on LAN. (FigureS-2)
LAN: enter IP address 192.168.1.1
Netmask: 255.255.255.0
Click OK.
FigureS-2 IP Address and Netmask Setting
STEP 5If new LAN IP Address is not 192.168.1.1, after clicking on OK, it
must change the System Manager’s IP Address to be at the same
subnet range as the new LAN IP. And enter the new LAN IP in
browser website field and reconnect ALL7008 again.
7
STEP 6After entering to the main system of ALL7008, select Interface on the
left menu and click on WAN. (Figure S-3)
FigureS-3 WAN 1/2 Interface
STEP 7WAN Interface 1 / 2: select the WAN 1/2 that needs to be set and
click Modify. Enter the IP address provided from ISP. (Figure S-4)
Figure S-4 WAN IP Address and Netmask Setting
8
STEP 8If Mail Server is in DMZ, it needs to set DMZ Interface; If Mail Server
is set in WAN, and then skips Step 8
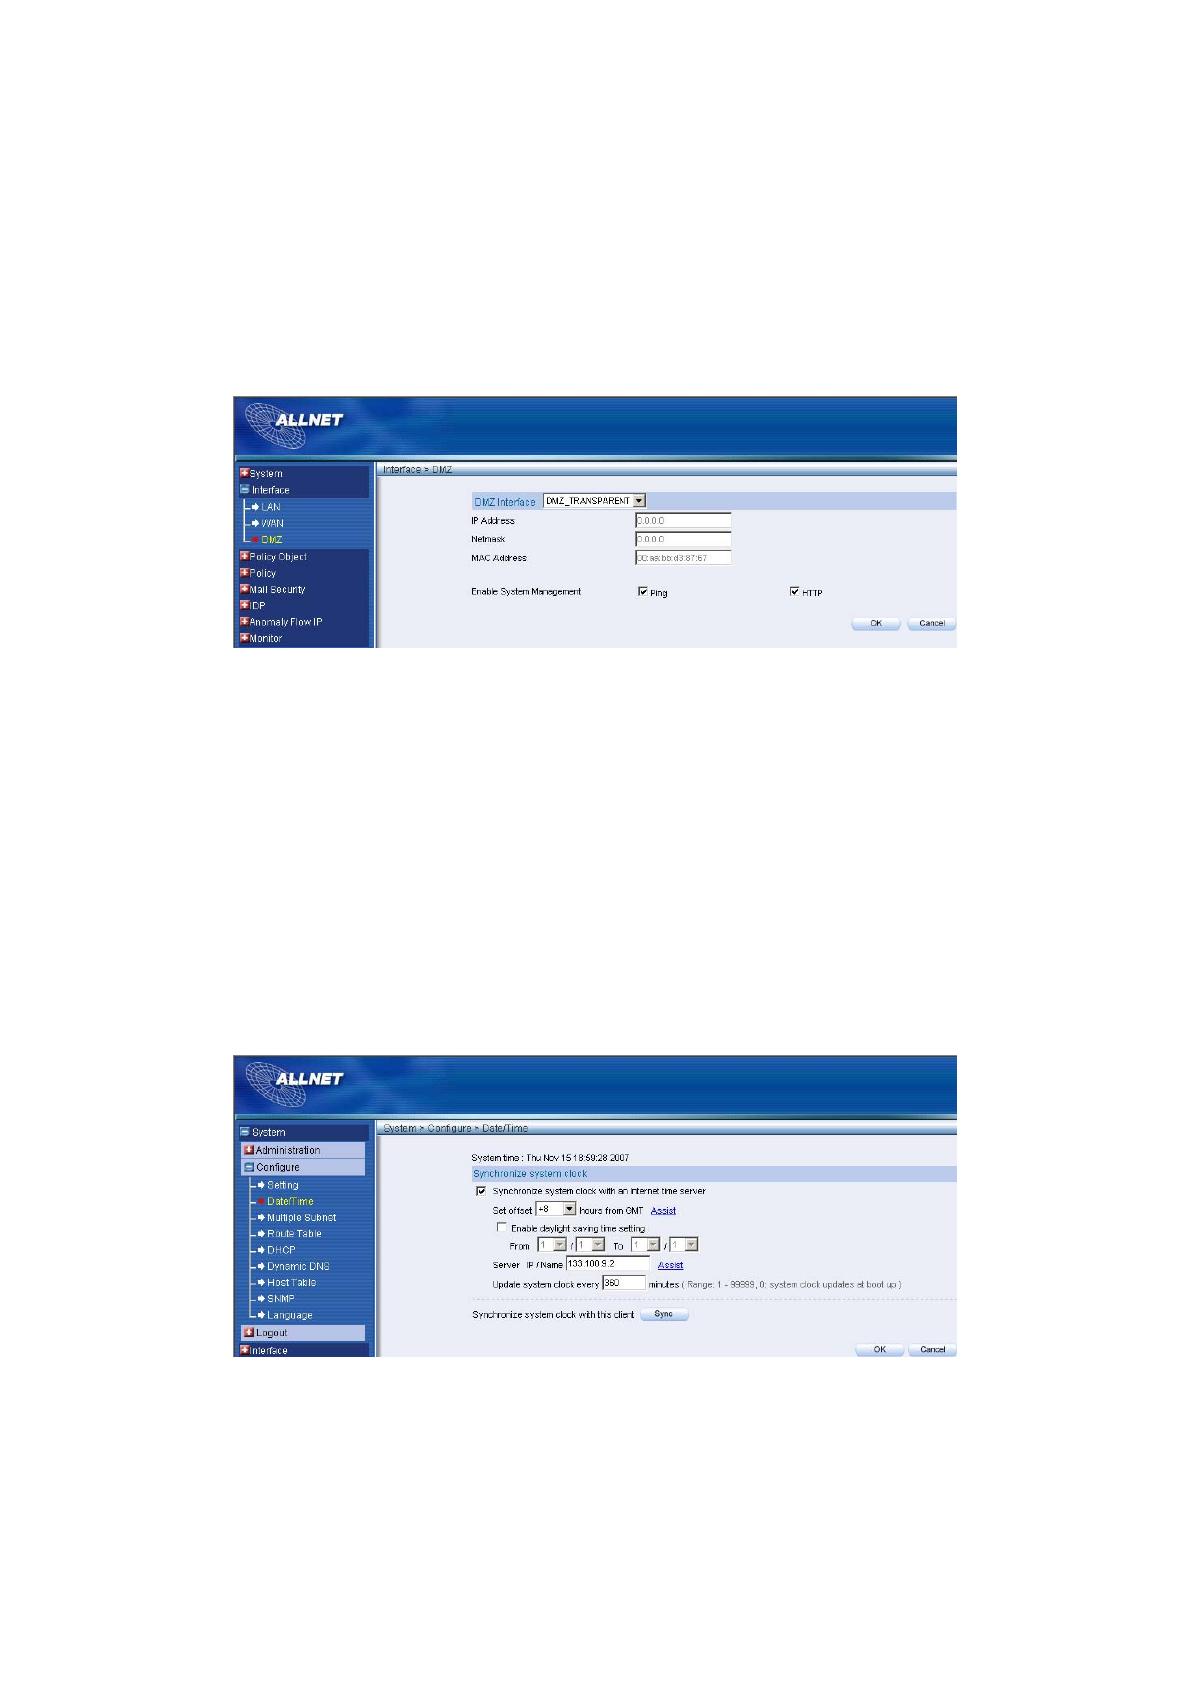
Select Interface on the left menu and click DMZ function.
DMZ Interface: Select DMZ_TRANSPARENT
Click OK. ALL7008 will reboot again. It takes about 2 minutes to
reboot. When the LED light stop glittering, it means reboot
successfully and can enter WebUI again. (FigureS-5)
FigureS-5 DMZ WebUI
STEP 9Click on System function and click on Date/Time function in
Configure.
STEP 10Enter the following setting in Date/Time setting:
Select Enable synchronize with an Internet time Server.
Set offset +8 hours from GMT
Enter the Server IP/Name: 133.100.9.2
Enter Update system clock every 360 minutes.
Click OK. (FigureS-6)
FigureS-6 Date/Time Setting
9
STEP 11Click on Policy on the left function menu and then click on
Outgoing from the sub-function list.
STEP 12Click New Entry (Figure S-7)
STEP 13At Add New Policy WebUI, enter the following information:
Source Address – Select “Inside_Any”
Destination Address – Select “Outside_Any”
Action: Select “PERMIT ”
Click OK
Figure S-7 Add New Policy Setting
STEP 14If ALL7008 access control function is being required, please refer to
Policy and Address to add some settings.
10
Mail Server is in DMZ or LAN
When Mail Server is in LAN or DMZ, it needs to set Mail Relay additionally.
(FigureS-8)
FigureS-8 Setting of Mail Server in DMZ
STEP 15Click on Mail Security, click on Configure and enter Mail Relay
function.
STEP 16In Mail Relay WebUI, enter the following setting:
Domain Name of Mail Server: broadband.com.tw
IP Address of Mail Server: 61.11.11.13
Click OK to complete Mail Relay Setting (FigureS-9)
FigureS-9 Complete Mail Relay Setting
11
STEP 17Enter Policy Object function and select Group in Service function.
STEP 18Enter the following setting in Group WebUI:
Name: E-mail
Add New Service: DNS, POP3, SMTP
Click OK to complete Group Setting (FigureS-10)
FigureS-10 Complete Group Setting
12
STEP 19In Policy function, add new WAN to DMZ Policy, DMZ to WAN
Policy, LAN to DMZ Policy individually.
WAN to DMZ】:
Source Address: Select “Outside_Any”
Destination Address: Select “DMZ_Any”
Service: Select “e-Mail”
Action: Select “PERMIT ”
Click OK
DMZ to WAN】:
Source Address: Select “DMZ_Any ”
Destination Address: Select “Outside_Any”
Service: Select “e-Mail”
Action: Select “PERMIT”
Click OK
LAN to DMZ】:
Source Address: Select “Inside_Any ”
Destination Address: Select “DMZ_Any”
Service: Select “e-Mail”
Action: Select “PERMIT”
Click OK
13
Mail Server is in WAN
When Mail Server is in WAN, it does not need to set Mail Relay function. Only
have to set up to Step13. (FigureS-11)
FigureS-11 Mail Server in WAN
14
15
  • Page 1 1
  • Page 2 2
  • Page 3 3
  • Page 4 4
  • Page 5 5
  • Page 6 6
  • Page 7 7
  • Page 8 8
  • Page 9 9
  • Page 10 10
  • Page 11 11
  • Page 12 12
  • Page 13 13
  • Page 14 14
  • Page 15 15

Allnet ALL7008 Quick setup guide

Category
Routers
Type
Quick setup guide

Allnet ALL7008 is a versatile networking device that offers a range of features to enhance your network connectivity and security. With its dual WAN ports, it allows you to connect to multiple internet sources for load balancing or redundancy. The LAN ports enable you to connect your local area network devices, while the DMZ port provides a dedicated connection for your company's servers. Additionally, the ALL7008 includes firewall and access control functions to protect your network from unauthorized access and cyber threats.

Ask a question and I''ll find the answer in the document

Finding information in a document is now easier with AI