Page is loading ...
Operating Instructions
CD Stereo System
Model No. SC-PM33DB
SC-PM32DB
Before connecting, operating or adjusting this product,
please read the instructions completely.
Please keep this manual for future reference.
Note:
“EB” on the packaging indicates the United Kingdom.
Operations in these instructions are described using
remote control, but you can do the operations with the
main unit if the controls are the same.
Unless otherwise indicated,illustrations in the operating
instructions are of SC-PM33DB.
Your unit may not look exactly as illustrated.
RQTV0123-B
EB
The illustrations show SC-PM33DB
Table of contents
Caution for AC Mains Lead ................... 3
Placement of speakers .......................... 3
Getting started ....................................... 4
Overview of controls ............................. 7
Discs ....................................................... 9
Cassette tape (
PM33DB
only) ................. 11
Radio ....................................................... 12
DAB ......................................................... 13
Timer ....................................................... 17
Sound adjustment ................................. 19
External unit ........................................... 20
Troubleshooting guide .......................... 21
Specifi cations ........................................ 22
Safety precautions ................................ 23
Maintenance ........................................... 23
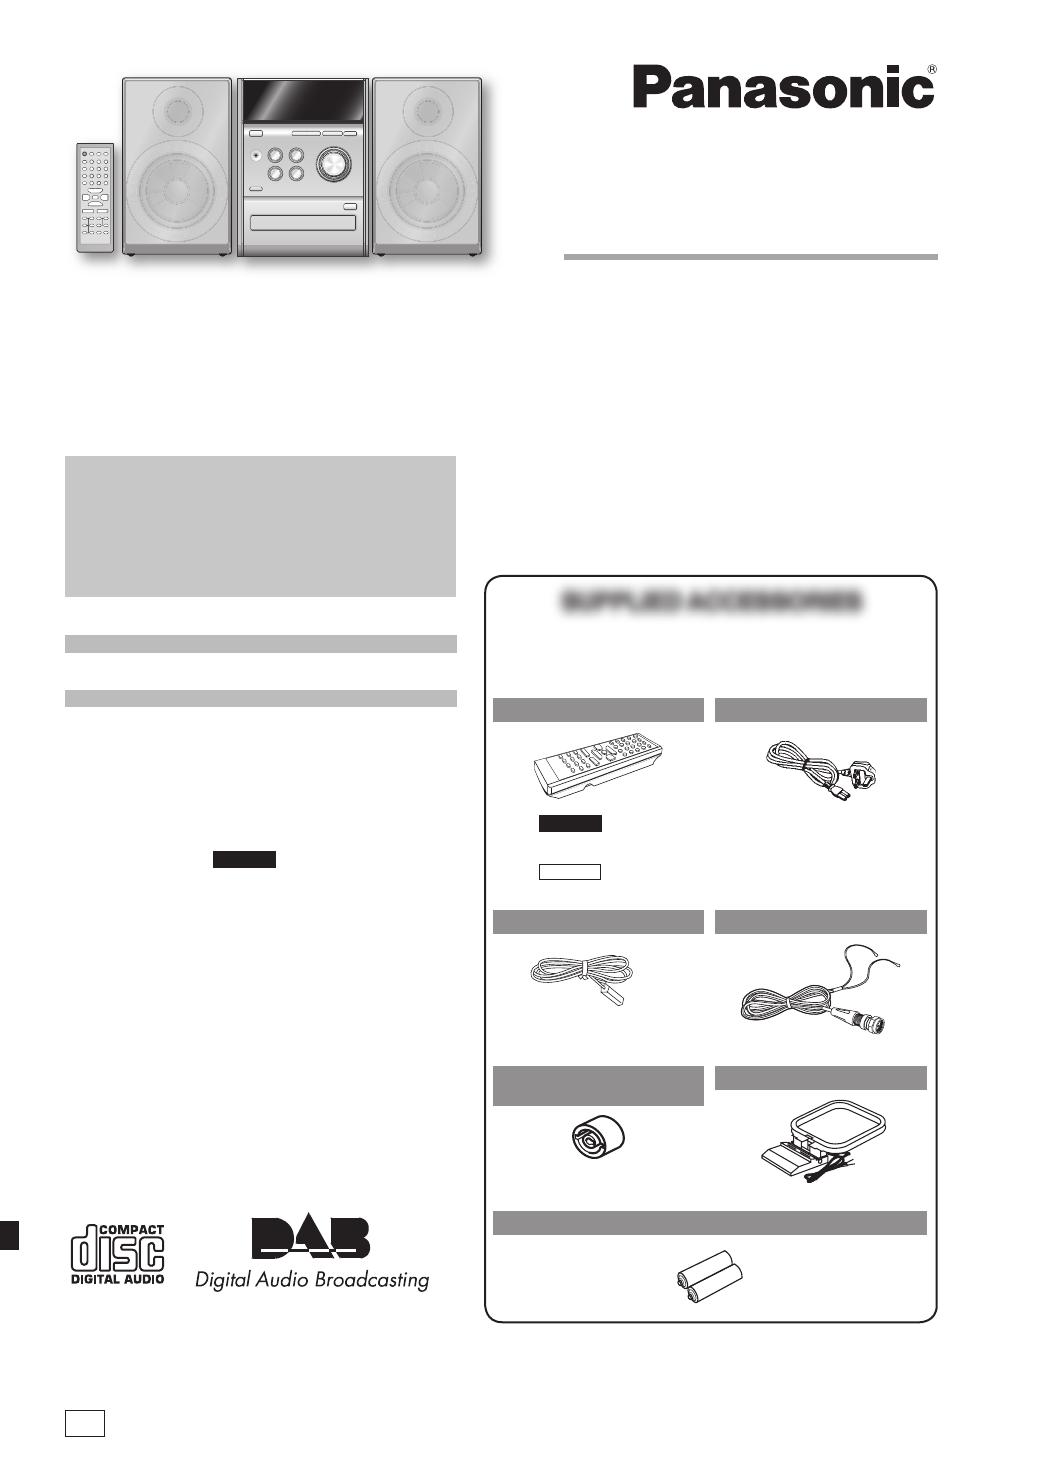
SUPPLIED ACCESSORIESSUPPLIED ACCESSORIES
Please check and identify the supplied accessories.
Use numbers indicated in parentheses when asking for
replacement parts. (As of February 2006).
1 x Remote control
PM33DB
(N2QAYB000003)
PM32DB
(N2QAYB000004)
1 x AC mains lead
(K2CT3CA00004)
1 x FM indoor antenna
(RSA0007-L)
1 x DAB “T” antenna
(N1EADY000001)
1 x Antenna plug
adaptor
(K1YZ02000013)
1 x AM loop antenna
(N1DAAAA00001)
2 x Remote control batteries
PM32-33DB_EB_En.indd 1PM32-33DB_EB_En.indd 1 3/1/06 12:11:24 PM3/1/06 12:11:24 PM
RQTV0123
2
Dear customer
Thank you for purchasing this product.
For optimum performance and safety, please read these
instructions carefully.
These operating instructions are applicable to the following
system.
System SC-PM33DB SC-PM32DB
Main unit SA-PM33DB SA-PM32DB
Speakers SB-PM33DB SB-PM3
Side of product
Inside of product
This product may receive radio interference caused by
mobile telephones during use. If such interference is
apparent, please increase separation between the product
and the mobile telephone.
The socket outlet shall be installed near the equipment and
easily accessible or the mains plug or an appliance coupler
shall remain readily operable.
THIS UNIT IS INTENDED FOR USE IN MODERATE
CLIMATES.
– If you see this symbol –
Information on Disposal for Users of Waste Electrical &
Electronic Equipment (private households)
This symbol on the products and/or
accompanying documents means that used
electrical and electronic products should not be
mixed with general household waste.
For proper treatment, recovery and recycling, please take
these products to designated collection points, where they
will be accepted on a free of charge basis. Alternatively, in
some countries you may be able to return your products
to your local retailer upon the purchase of an equivalent
new product.
Disposing of this product correctly will help to save valuable
resources and prevent any potential negative effects on
human health and the environment which could otherwise
arise from inappropriate waste handling. Please contact
your local authority for further details of your nearest
designated collection point.
Penalties may be applicable for incorrect disposal of this
waste, in accordance with national legislation.
For business users in the European Union
If you wish to discard electrical and electronic equipment,
please contact your dealer or supplier for further
information.
Information on Disposal in other Countries outside the
European Union
This symbol is only valid in the European Union.
If you wish to discard this product, please contact your
local authorities or dealer and ask for the correct method
of disposal.
■ Sales and Support Information
(For the United Kingdom and Republic of Ireland)
Customer Care Centre
• For UK customers: 08705 357357
• For Republic of Ireland customers: 01 289 8333
• Visit our website for product information
• E-mail: customer[email protected]
Direct Sales at Panasonic UK
• Order accessory and consumable items for your product
with ease and confi dence by phoning our Customer
Care Centre Monday-Friday 9:00am-5:30pm. (Excluding
public holidays)
• Or go on line through our Internet Accessory ordering
application at www.panasonic.co.uk
• Most major credit and debit cards accepted.
• All enquiries transactions and distribution facilities are
provided directly by Panasonic UK Ltd.
• It couldn’t be simpler!
• Also available through our Internet is direct shopping for
a wide range of fi nished products, take a browse on our
website for further details.
Interested in purchasing an extended guarantee?
Please call 0870 240 6284 or visit our website
www.panasonic.co.uk/guarantee.
PM32-33DB_EB_En.indd 2PM32-33DB_EB_En.indd 2 3/1/06 12:11:30 PM3/1/06 12:11:30 PM

RQTV0123
3
Placement of speakers
Speakers are designed identically so that no left or right
channel orientation is necessary.
Use only the supplied speakers.
The combination of the main unit and speakers provide the
best sound. Using other speakers can damage the unit and
sound quality will be negatively affected.
Note
• Keep your speakers at least 10 mm away from the system for
proper ventilation.
• These speakers do not have magnetic shielding. Do not place
them near televisions, personal computers or other devices easily
infl uenced by magnetism.
• You cannot take the front net off the speakers.
Caution
• Use the speakers only with the recommended
system. Failure to do so can damage the amplifi er
and speakers, and can cause fi re. Consult a qualifi ed
service person if damage occurs or if a sudden
change in performance is apparent.
• Do not attach these speakers to walls or ceilings.
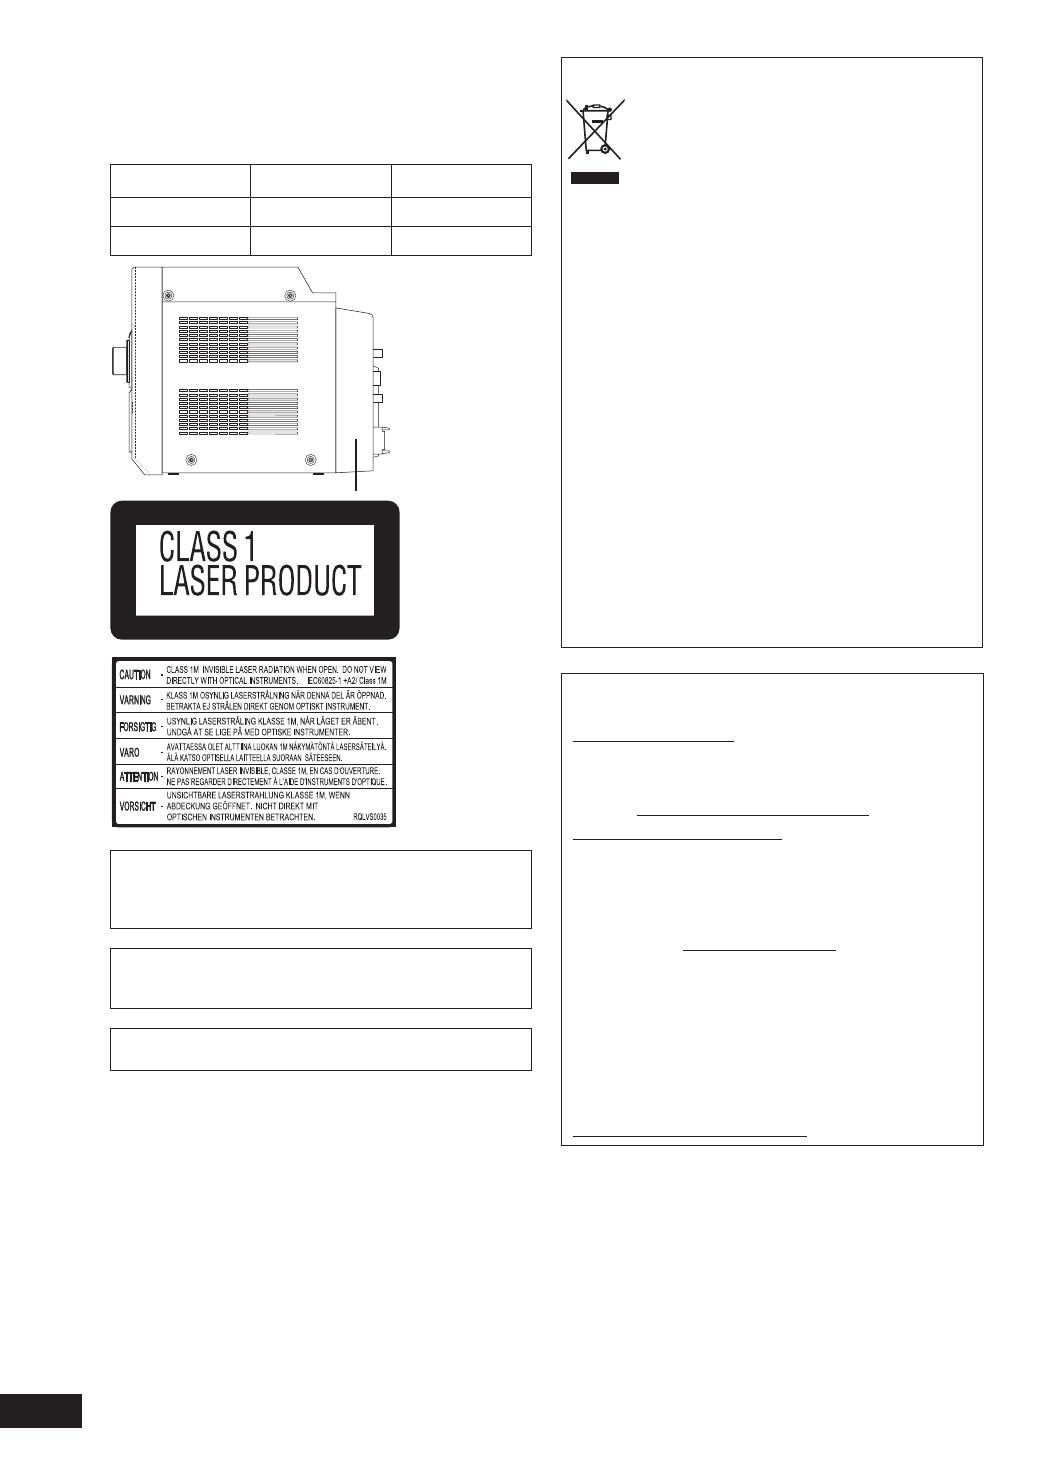
How to replace the fuse
The location of the fuse differ according to the type of AC
mains plug (fi gures A and B). Confi rm the AC mains plug fi tted
and follow the instructions below.
Illustrations may differ from actual AC mains plug.
1. Open the fuse cover with a screwdriver.
Fuse cover
Figure A Figure B
2. Replace the fuse and close or attach the fuse cover.
Fuse
(5 ampere)
Fuse
(5 ampere)
Figure A Figure B
Caution for AC Mains Lead
(For United Kingdom)
(“EB” area code model only)
For your safety, please read the following text carefully.
This appliance is supplied with a moulded three pin mains
plug for your safety and convenience.
A 5-ampere fuse is fi tted in this plug.
Should the fuse need to be replaced please ensure that
the replacement fuse has a rating of 5-ampere and that it is
approved by ASTA or BSI to BS1362.
Check for the ASTA mark m or the BSI mark o on the body
of the fuse.
If the plug contains a removable fuse cover you must ensure
that it is refi tted when the fuse is replaced.
If you lose the fuse cover the plug must not be used until a
replacement cover is obtained.
A replacement fuse cover can be purchased from your local
dealer.
CAUTION!
IF THE FITTED MOULDED PLUG IS UNSUI T ABLE FOR
THE SOCKET OUTLET IN YOUR HOME THEN THE FUSE
SHOULD BE RE MOVED AND THE PLUG CUT OFF AND
DIS POSED OF SAFELY.
THERE IS A DANGER OF SEVERE ELECTRI CAL
SHOCK IF THE CUT OFF PLUG IS IN SERTED INTO ANY
13-AMPERE SOCKET.
If a new plug is to be fi tted please observe the wiring code
as stated below.
If in any doubt please consult a qualifi ed electrician.
IMPORTANT
The wires in this mains lead are coloured in accor dance with
the following code:
Blue: Neutral, Brown: Live.
As these colours may not correspond with the coloured
markings identifying the terminals in your plug, proceed as
follows:
The wire which is coloured Blue must be connected to the
terminal which is marked with the letter N or col oured Black
or Blue.
The wire which is coloured Brown must be connected to the
terminal which is marked with the letter L or coloured Brown
or Red.
WARNING: DO NOT CONNECT EITHER WIRE TO THE
EARTH TERMINAL WHICH IS MARKED WITH THE
LETTER E, BY THE EARTH SYMBOL n OR COLOURED
GREEN OR GREEN/YELLOW.
THIS PLUG IS NOT WATERPROOF—KEEP DRY.
Before use
Remove the connector cover.
PM32-33DB_EB_En.indd 3PM32-33DB_EB_En.indd 3 3/1/06 12:11:32 PM3/1/06 12:11:32 PM
RQTV0123
4
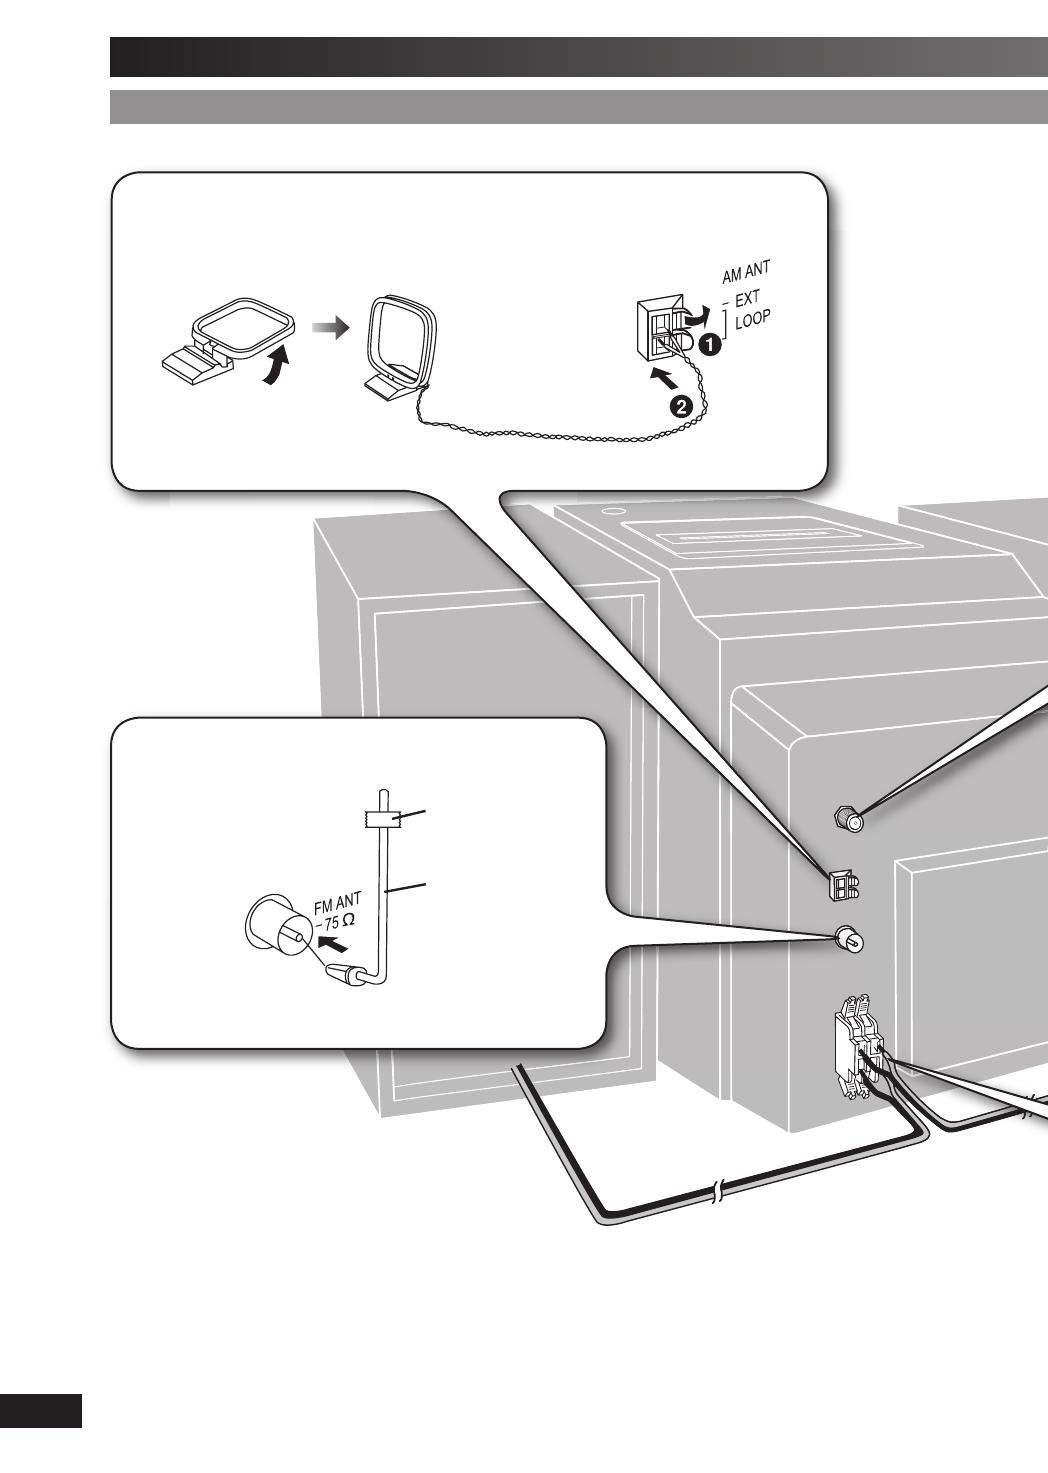
Getting started
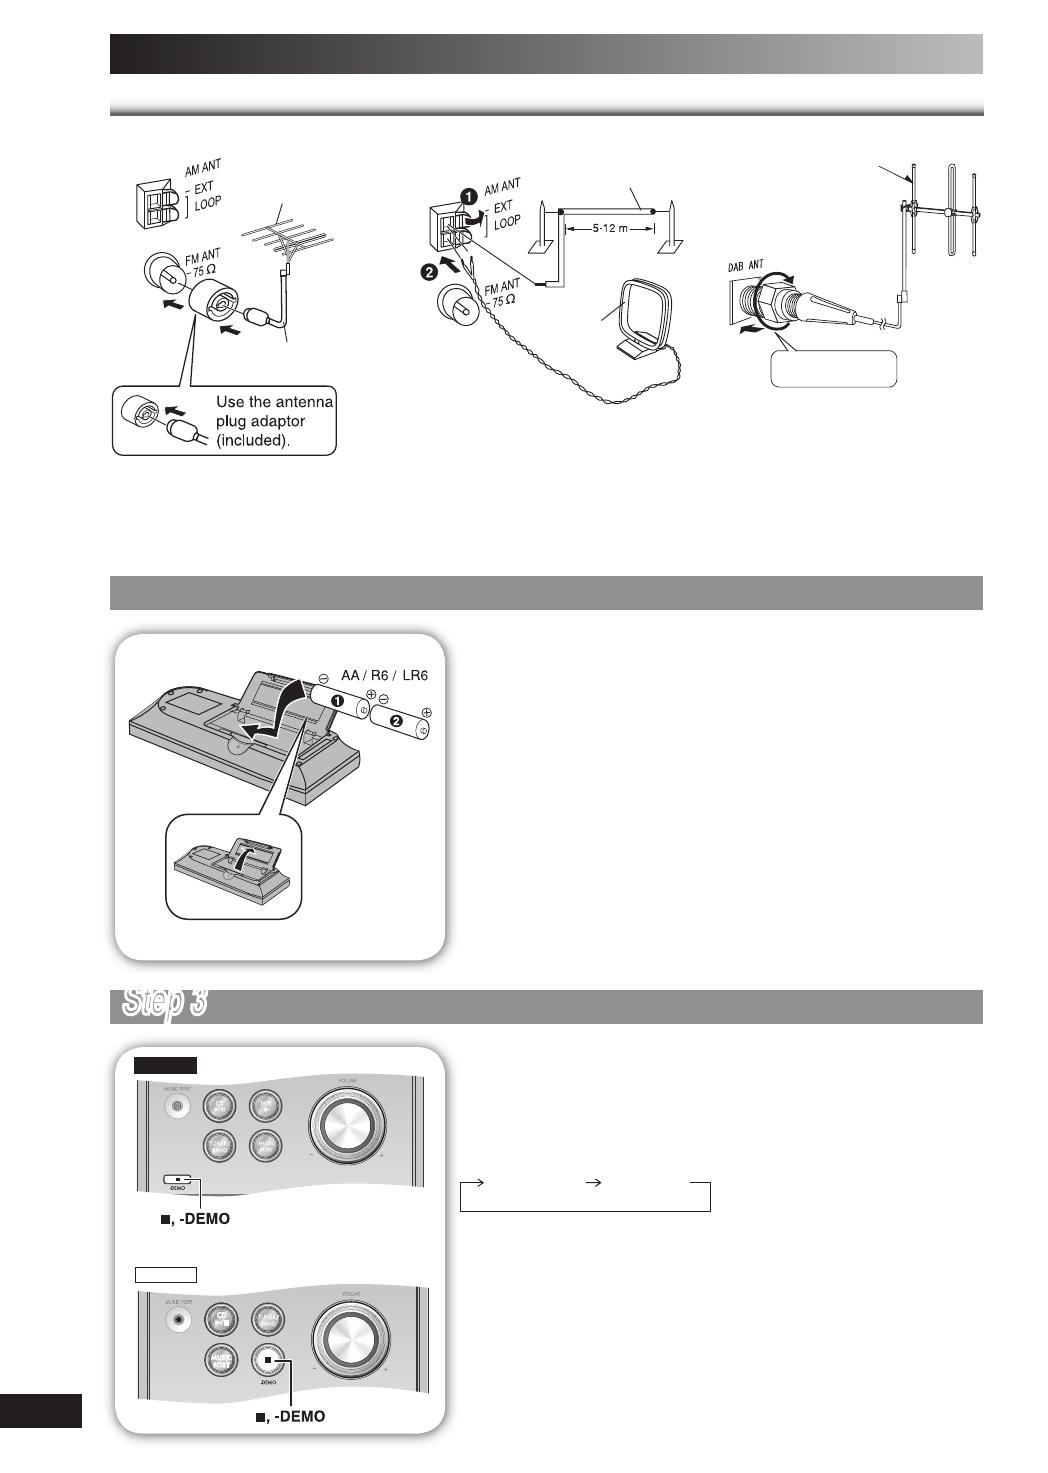
Step 1Step 1
- Making the connections - Making the connections
Connect the AC mains lead only after all other connections have been made.
1
Connect the AM loop antenna.
Stand the antenna up on its base. Keep the loose antenna cord away from other wires and cords.
AM loop antenna
2
Connect the FM indoor antenna.
Tape the antenna to a wall or column, in a position with least
amount of interference.
Adhesive
tape
FM indoor
antenna
PM32-33DB_EB_En.indd 4PM32-33DB_EB_En.indd 4 3/1/06 12:11:35 PM3/1/06 12:11:35 PM
RQTV0123
5
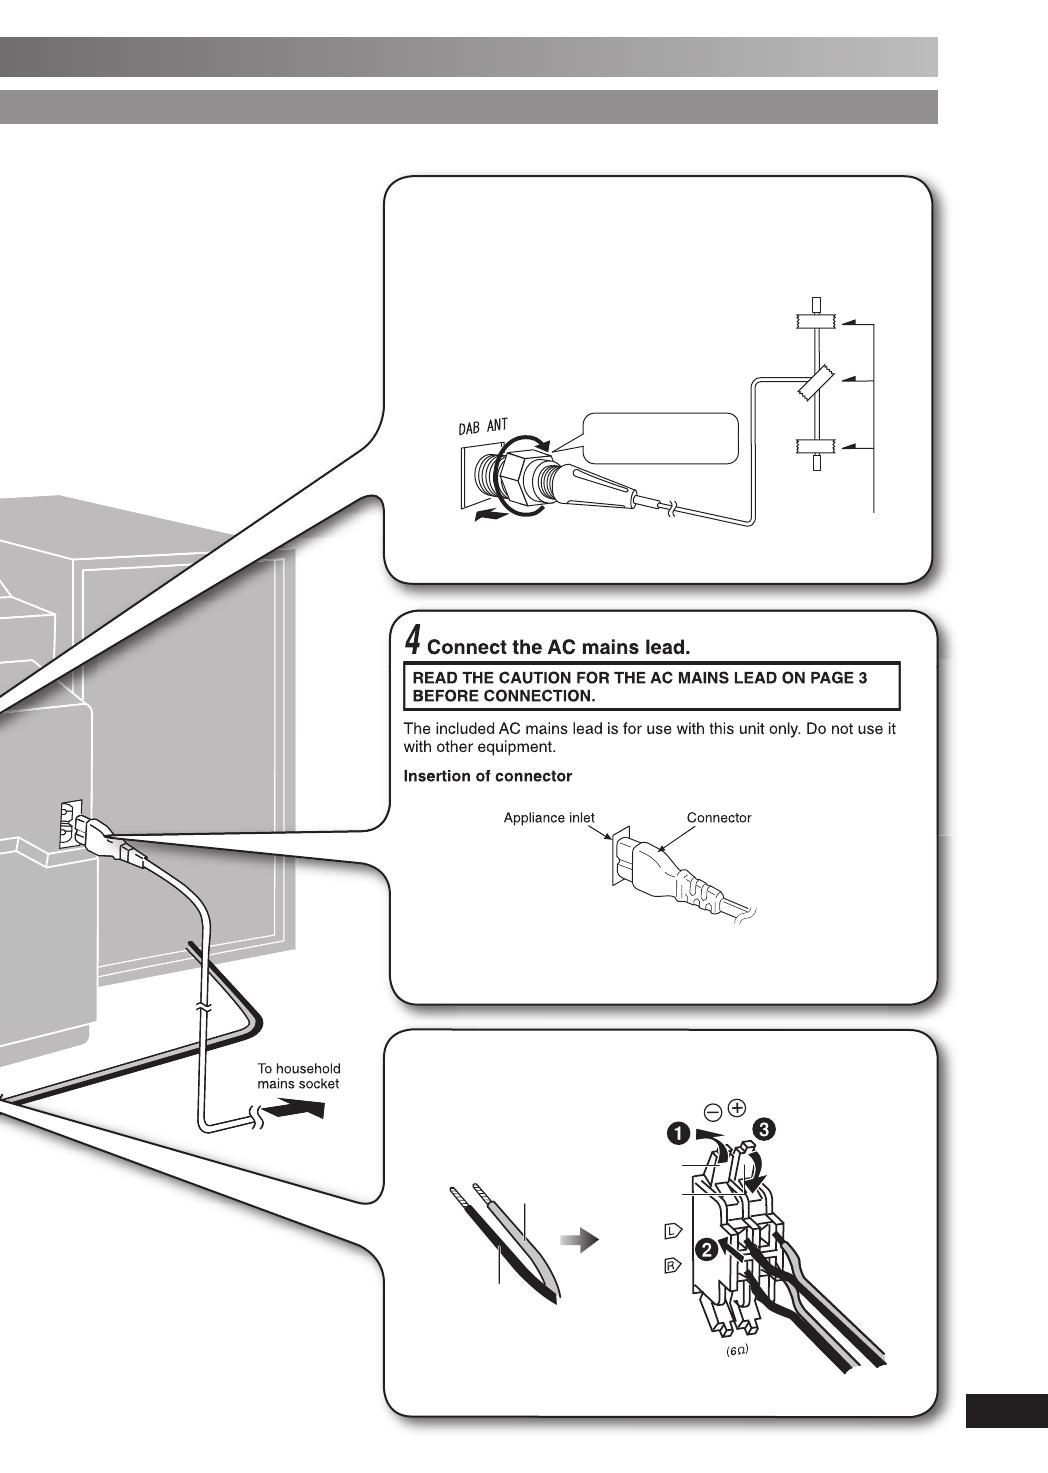
Step 1
- Making the connections
To household
mains socket
4
Connect the AC mains lead.
READ THE CAUTION FOR THE AC MAINS LEAD ON PAGE 3
BEFORE CONNECTION.
The included AC mains lead is for use with this unit only. Do not use it
with other equipment.
Insertion of connector
Connector
Even when the connector is perfectly inserted, depending on the type
of inlet used, the front part of the connector may jut out as shown in the
drawing. However there is no problem using the unit.
Appliance inlet
5
Connect the speaker cables.
Red (ª)
Black (·)
Red (ª)
Black (·)
Incorrect connection can damage the unit.
3
DAB “T” antenna
The cross bar of the T should be kept fi rmly stretched.
Find a position with good reception.
There is a function on the unit to check signal quality.
For best reception
A DAB outdoor antenna is recommended (refer to page 6).
Be sure to fully
tighten the screw.
Adhesive tape
PM32-33DB_EB_En.indd 5PM32-33DB_EB_En.indd 5 3/1/06 12:11:48 PM3/1/06 12:11:48 PM
RQTV0123
6
Getting started (continued)
Optional antenna connectionsOptional antenna connections
FM outdoor antenna AM outdoor antenna DAB outdoor antenna
FM outdoor antenna
(not included)
75
Ω coaxial cable
(not included)
AM loop antenna
(included)
AM outdoor antenna
(not included)
Be sure to fully
tighten the screw.
DAB outdoor antenna
(not included)
• Never use an outdoor antenna during a lightning storm.
• You can connect the FM outdoor antenna for better reception. Please consult your dealer for installation.
• Disconnect the FM indoor antenna if an FM outdoor antenna is installed.
• Connect the AM outdoor antenna without removing the AM loop antenna. Run 5 to 12 m of vinyl-covered wire horizontally
along a window or other convenient location.
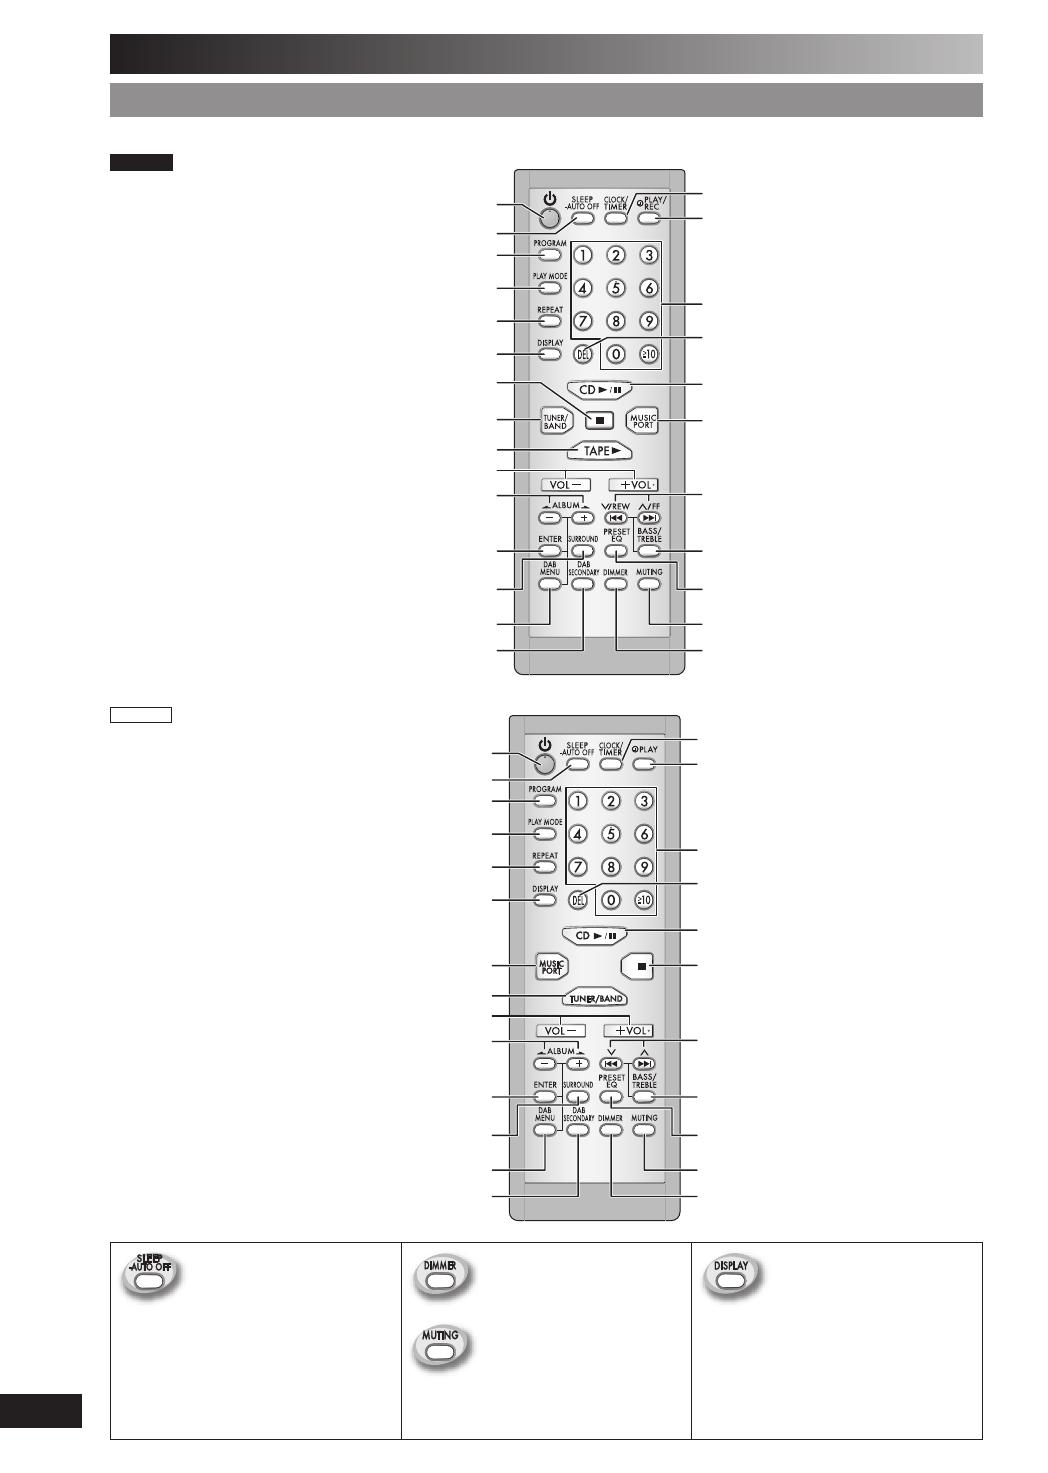
Step 2Step 2
- Inserting batteries into the remote control - Inserting batteries into the remote control
■ Batteries
• Insert so the poles (+ and –) match those in the remote control.
• Remove if the remote control is not going to be used for a long period of
time. Store in a cool, dark place.
• Do not use rechargeable type batteries.
• Mishandling of batteries in the remote control can cause electrolyte
leakage, which may cause a fi re.
Do not:
• mix old and new batteries;
• use different types of batteries at the same time;
• heat or expose to fl ame;
• take apart or short-circuit;
• attempt to recharge alkaline or manganese batteries;
• use batteries if their covering has been peeled off.
■ Use
Aim at the remote control sensor, avoiding obstacles, at a maximum
range of 7
m directly in front of the unit.
Refer to page 7 for remote control signal sensor position.
Step 3
- DEMO function - DEMO function
0-$"
0-$"
When the unit is fi rst plugged in, a demonstration of its functions may be
shown on the display.
If the demo setting is off, you can show a demonstration by selecting
“DEMO ON”.
Press and hold [7, -DEMO].
The display changes each time the button is held down.
$%-//&& $%-//.
While in standby mode, select “DEMO OFF” to reduce power
consumption.
PM32-33DB_EB_En.indd 6PM32-33DB_EB_En.indd 6 3/1/06 12:12:00 PM3/1/06 12:12:00 PM

RQTV0123
7
Overview of controls
Main unitMain unit
Refer to the numbers in parentheses for page reference.
Top of unit
3 Tuner/Band/DAB selection
(12, 14)
Cassette lid
1 Standby/on switch (y/l)
(9, 18)
Press to switch the unit from on
to standby mode or vice versa.
In standby mode, the unit is still
consuming a small amount of
power.
Disc tray
Headphone jack
(PHONES)
Avoid listening for prolonged
periods of time to prevent
hearing damage.
Plug type: 3.5
mm stereo
(not included)
Cassette lid open (11)
5 Bass/Treble selection (19)
7 Volume control
Recording start/pause (11, 20)
2 Disc play/pause (9, 10, 11)
8 Tape play (11)
Disc tray open/close (9, 11)
6 Disc skip/search, tape
fast-forward/rewind, tune/
preset channel selection,
time adjustment, bass/treble
adjustment (9, 10, 11, 12, 14,
15, 17, 18, 19)
Remote control sensor
Stop/Demo (6, 9, 10, 11)
AC supply indicator (AC IN)
This indicator lights when the unit
is connected to the AC mains
supply.
Music port jack (20)
Display panel
4 Music port selection (20)
PM33DB
1
Standby/on switch (y/l)
(9, 18)
Press to switch the unit from on
to standby mode or vice versa.
In standby mode, the unit is still
consuming a small amount of
power.
Music port jack (20)
2
Disc play/pause
(9, 10)
4 Music port selection (20)
Stop/Demo (6, 9, 10)
5 Bass/Treble selection (19)
6 Disc skip/search, tune/
preset channel selection,
time adjustment, bass/treble
adjustment (9, 10, 12, 14, 15,
17, 18, 19)
7 Volume control
3 Tuner/Band/DAB selection
(12, 14)
PM32DB
PM32-33DB_EB_En.indd 7PM32-33DB_EB_En.indd 7 3/1/06 12:12:04 PM3/1/06 12:12:04 PM
RQTV0123
8
Overview of controls (continued)
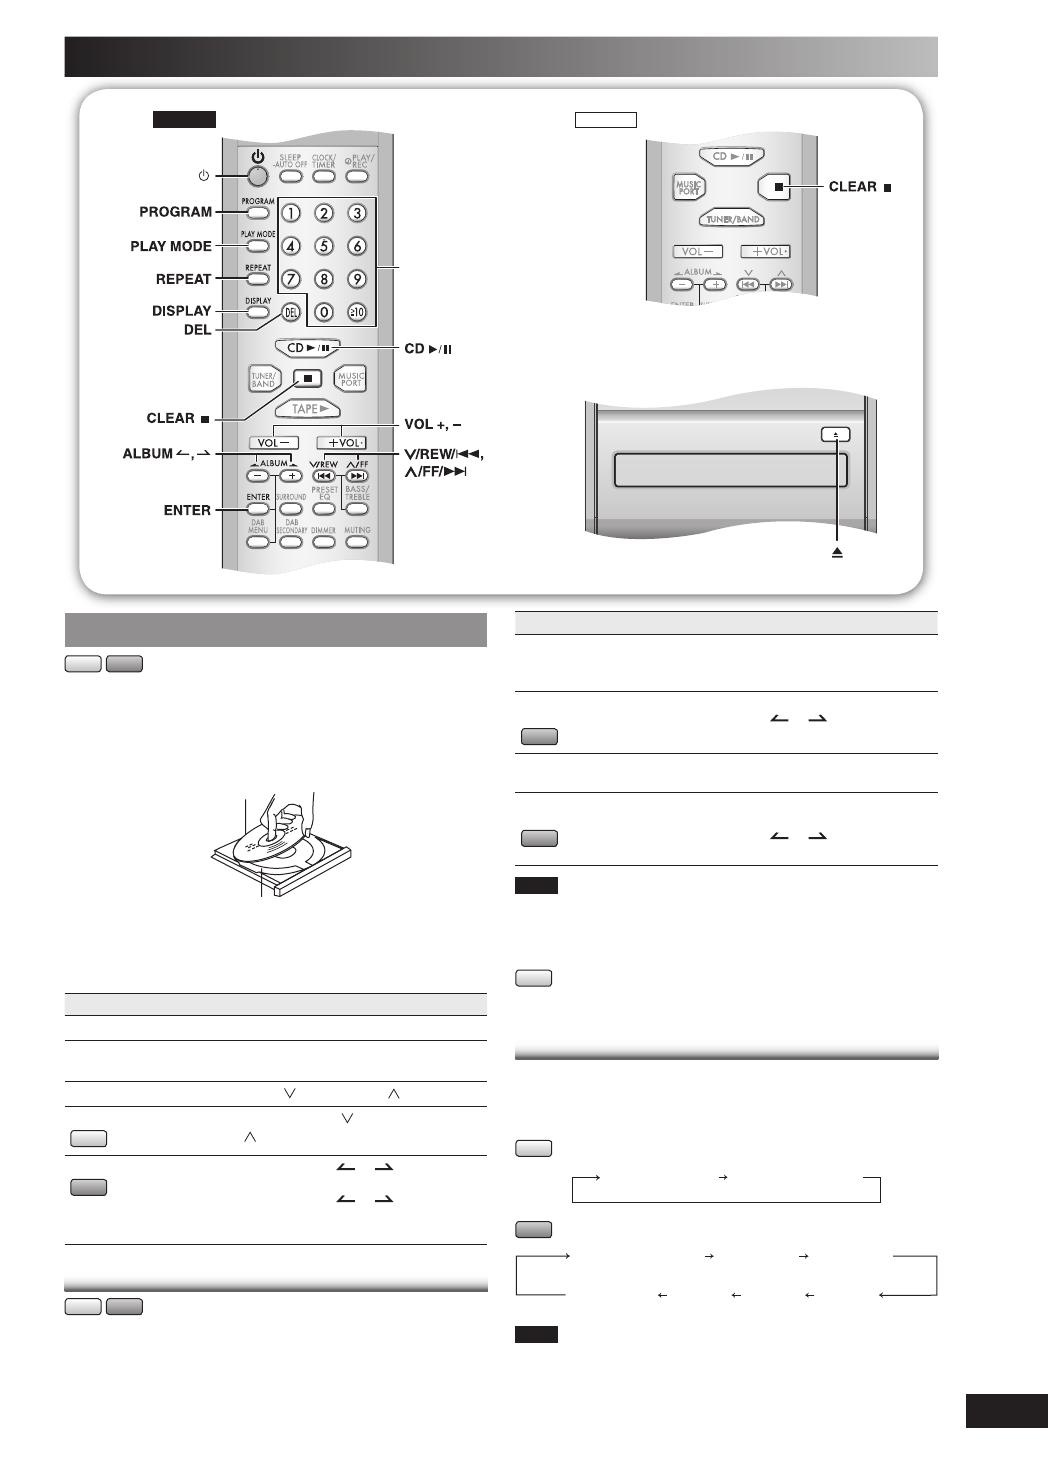
Remote controlRemote control
Buttons such as 1 function the same as the controls on the main unit.
PM33DB
1
Clock/Timer (17, 18)
Play timer/Record timer (18)
Numeric (9, 10, 12, 14, 15)
Delete (10)
Clear, Stop (9, 10, 11)
6
Muting
Dimmer
Program (10, 12, 14)
Play mode (9, 11, 12, 14, 15)
Repeat (10)
Display (9, 15)
3
Enter (10, 15, 16)
Surround (19)
DAB menu (15, 16)
DAB secondary (15)
Sleep timer/ -Auto off (17)
5
Preset EQ (19)
7
2
Album, DAB menu selection (9, 10, 15, 16)
4
8
CLEAR
PM32DB
1
Clock/Timer (17, 18)
Play timer (18)
Numeric (9, 10, 12, 14, 15)
Delete (10)
6
Muting
Dimmer
Program (10, 12, 14)
Play mode (9, 12, 14, 15)
Repeat (10)
Display (9, 15)
4
Enter (10, 15, 16)
Surround (19)
DAB menu (15, 16)
DAB secondary (15)
Sleep timer/ -Auto off (17)
5
Preset EQ (19)
7
2
Album, DAB menu selection (9, 10, 15, 16)
Clear, Stop (9, 10)
3
CLEAR
This function allows you to
turn off the unit in disc or tape
mode only after left unused for
10 minutes.
The setting is maintained even
if the unit is turned off.
Dims the display panel. Long press of [DISPLAY] key
will switch to fast text scrolling.
This function allows you to
scroll the display setting faster
than current setting.
Mutes the sound.
• Press and hold untill the “AUTO OFF”
indicated.
• Press and hold again to cancel.
• Press the button to activate.
• Press again to cancel.
• Long press again to turn OFF fast text
scrolling.
PM32-33DB_EB_En.indd 8PM32-33DB_EB_En.indd 8 3/1/06 12:12:06 PM3/1/06 12:12:06 PM
RQTV0123
9
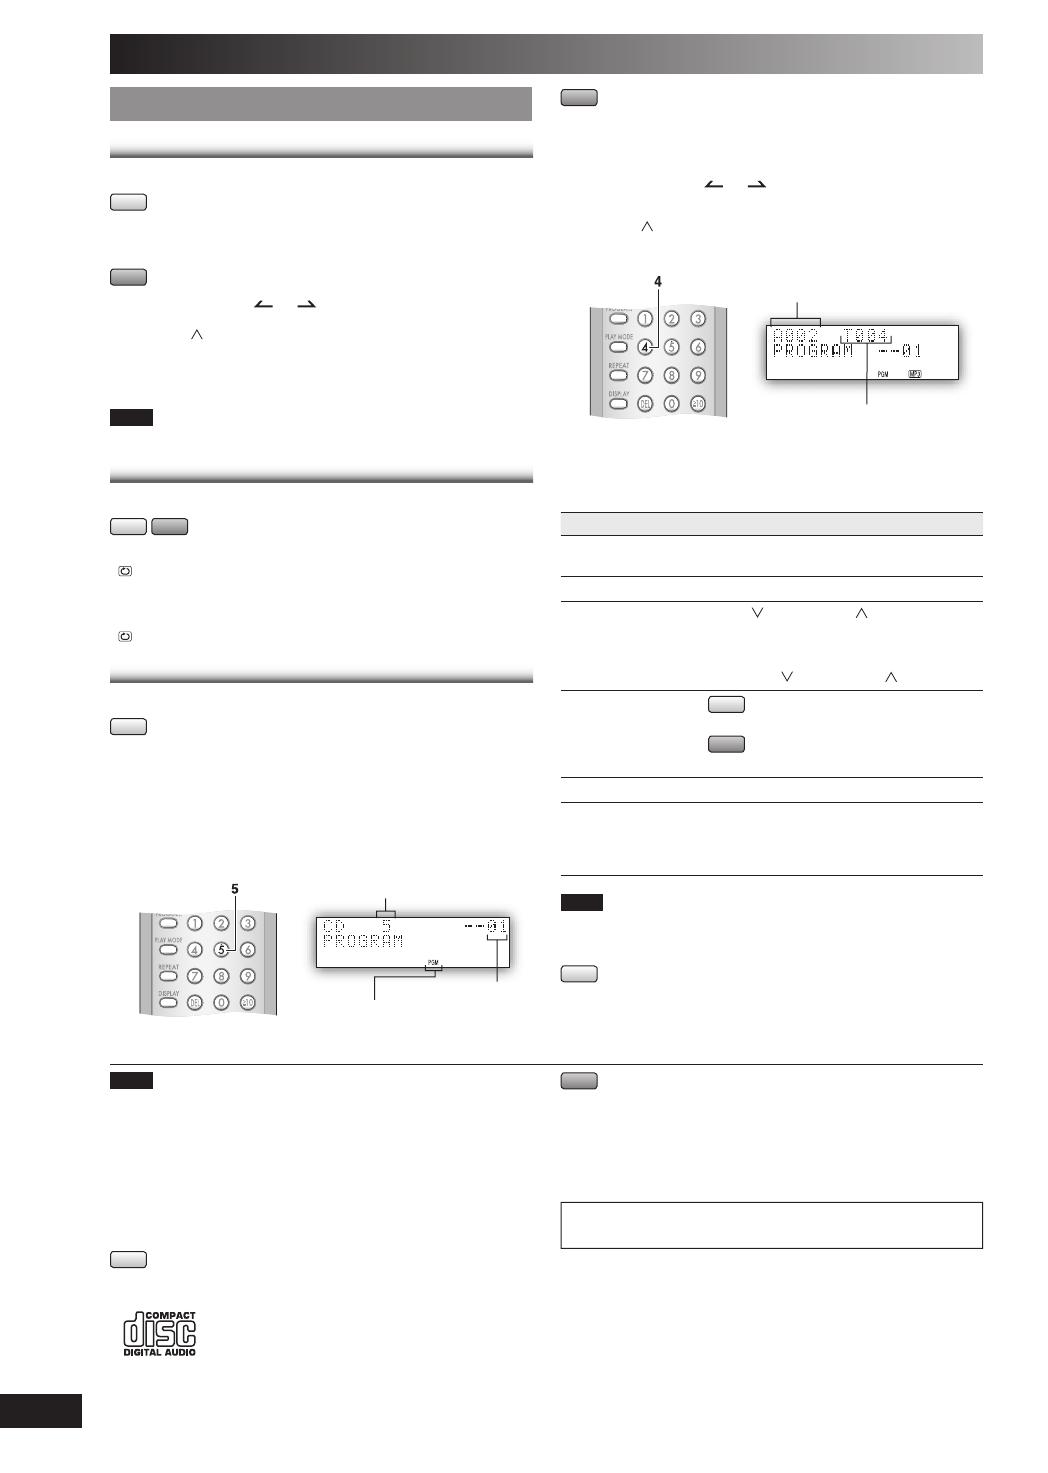
Discs
CLEAR
0-$"
CLEAR
0-$"
Numeric
buttons
Basic playBasic play
CD
MP3
1
Press [y] to turn the unit on.
2
Press [0] to open the disc tray and then load the
disc. Press [0] again to close the tray.
Label must face upward
Disc tray
3
Press [CD 6] to start play.
4
Adjust the volume.
To Action
stop the disc Press [ 7 ].
pause play Press [CD 6]. Press again to
resume play.
skip tracks Press
[ /REW/4] or [ /FF/¢].
search through tracks
CD
Press and hold [ /REW/4] or
[ /FF/¢] during play or pause.
skip album
MP3
Press [ALBUM or ] in the play
mode.
Press [ALBUM
or ] once and
then the numeric buttons in the stop
mode.
Play Mode functionPlay Mode function
CD
MP3
1
Press [CD 6].
2
Press [PLAY MODE] to select the desired mode.
Mode To play
1-TRACK
1TR
one selected track on the disc.
Press the numeric buttons to select the
track.
1-ALBUM
1ALBUM
MP3
one selected album on the disc.
Press [ALBUM
or ] to select the
album.
RANDOM
RND
a disc randomly.
1-ALBUM RANDOM
1ALBUM RND
MP3
all tracks in one selected album
randomly.
Press [ALBUM
or ] to select the
album.
Note
• During RANDOM or 1-ALBUM RANDOM play, you cannot skip to
tracks that have been played.
• The current play mode is cleared when you change a disc or open
the disc tray.
CD
• During RANDOM play, you can search backward or forward only
within the current track.
Display functionDisplay function
This function allows you to display the information of the
current track.
Press [DISPLAY] repeatedly during play or pause mode.
CD
Elapsed play time Remaining play time
MP3
Remaining play time Album name Track name
Elapsed time
ID3
(Artist)
ID3
(Track)
ID3
(Album)
Note
• Maximum number of displayable characters: approximately 30
• This unit supports ver. 1.0 & 1.1 ID3 tags. Text data that is not
supported will not be displayed.
• ID3 is a tag embedded in MP3 tracks to provide information about
the track.
PM32-33DB_EB_En.indd 9PM32-33DB_EB_En.indd 9 3/1/06 12:12:09 PM3/1/06 12:12:09 PM
RQTV0123
10
Advanced playAdvanced play
Direct access playDirect access play
This function allows you to start play from a specifi c track.
CD
Press the numeric buttons to select and play your
desired track.
MP3
1
Press [ALBUM or ] to select the album.
2
Press [ /FF/¢] once and then the numeric buttons
to select and play your desired track.
For two-digit track, press [
h
10] once, and then the two digits.
For three-digit track, press
[
h
10]
twice, and then the three digits.
Note
This function does not work during any random/program mode.
Repeat playRepeat play
You can repeat program play or other selected play mode.
CD
MP3
Press [REPEAT] before or during play.
“
” is displayed.
To cancel
Press [REPEAT] again.
“
” is cleared.
Program playProgram play
This function allows you to program up to 24 tracks.
CD
1
Press [CD 6] and then [ 7 ].
2
Press [PROGRAM].
3
Press the numeric buttons to select your desired
track.
Repeat this step to program other tracks.
Example:
Track number
Program number
Program indicator
4
Press [CD 6] to start play.
MP3
1
Press [CD 6] and then [ 7 ].
2
Press [PROGRAM].
3
Press [ALBUM or ] to select your desired
album.
4
Press [ /FF/¢] once and then the numeric buttons
to select your desired track.
Example:
Album number
Track number
5
Press [ENTER].
Repeat steps 3 to 5 to program other tracks.
6
Press [CD 6] to start play.
To Action
cancel program
mode
Press [PROGRAM] in the stop mode.
replay the program Press [PROGRAM] then [CD 6].
check program
contents
Press
[ /REW/4] or [ /FF/¢] when
“PGM” is displayed in the stop mode.
To check while programming, press
[PROGRAM] twice after “PGM” appears,
then press
[ /REW/4] or [ /FF/¢] .
add to the program
CD
Repeat step 3 in the stop mode.
MP3
Repeat steps 3 to 5 in the stop mode.
clear the last track Press [DEL] in the stop mode.
clear all
programmed tracks
Press [CLEAR] in the stop mode.
“CLEAR ALL” is displayed.
Within 5 seconds, press the button again to
clear all tracks.
Note
• When you try to program more than 24 tracks “PROGRAM FULL”
appears.
• The program memory is cleared when you open the disc tray.
CD
• During program play, you can search backward or forward only
within the current track.
Note
• This unit can play MP3 fi les and CD-DA format audio CD-R/RW
that have been fi nalized.
• It may not be able to play some CD-R/RW depending on the
condition of the recording.
• Do not use irregularly shaped discs.
• Do not use discs with labels and stickers that are coming off or with
adhesive exuding from under labels and stickers.
• Do not attach extra labels or stickers on the disc.
• Do not write anything on the disc.
CD
• This unit can access up to 99 tracks.
• Choose a CD with this mark:
Using DualDiscs
The “CD” sides of DualDiscs do not meet the CD-DA standard so it
may not be possible to play them on this unit.
MP3
• Files are treated as tracks and folders are treated as albums.
•
This unit can access up to 999 tracks, 255 albums and 20 sessions.
• Disc must conform to ISO9660 level 1 or 2 (except for extended
formats).
• To play in a certain order, prefi x the folder and fi le names with the
3-digit numbers in the order you want to play them.
MPEG Layer-3 audio decoding technology licensed from
Fraunhofer IIS and Thomson multimedia.
Discs (continued)
PM32-33DB_EB_En.indd 10PM32-33DB_EB_En.indd 10 3/1/06 12:12:15 PM3/1/06 12:12:15 PM

RQTV0123
11
Cassette tape (
PM33DB
only)
CLEAR
Top of unit
Basic playBasic play
1
Press [0] on top of the unit. Insert the cassette.
"
Insert inside the
guides
Forward side
2
Close the lid by hand.
3
Press [TAPE 3] to start play.
To play the other side of the cassette, turn the cassette over.
To Action
stop tape playback Press [ 7 ].
start one-touch play Press [TAPE 3] when the unit is OFF with
the cassette loaded.
fast-forward and
rewind
Press
[ /REW/4] or [ /FF/¢] in the
stop mode.
Note
• Tapes exceeding 100 minutes are thin and can break or get caught
in the mechanism.
• Endless tapes can get caught up in the deck’s moving parts if used
incorrectly.
TPS (Tape Program Sensor)TPS (Tape Program Sensor)
This function enables you to search the beginning of a track,
up to a maximum of 9.
Press
[ /REW/4] or [ /FF/¢] during play.
Play resumes from the track found.
Note
TPS may not function properly:
• with short silent parts
• when noise occurs between tunes
• if silent parts are found within tunes
RecordingRecording
Use normal position tapes.
High position and metal position tapes can be used, but this
unit will not be able to record or erase them correctly.
Preparation
Wind the leader tape so that recording can begin
immediately.
Recording the radioRecording the radio
1
Insert the cassette to be recorded.
2
Tune to the required station (refer to page 12).
3
Press [¶ REC/
8
] to start recording.
Recording discsRecording discs
1
Insert the cassette to be recorded.
2
Press [0] to insert the disc. Press again to close.
3
Press [CD 3/
8
] and then [7, –DEMO].
4
Press [PLAY MODE] to select your desired mode
(refer to page 9).
5
Press [¶ REC/
8
] to start recording.
Recording programmed tracksRecording programmed tracks
1
Insert the cassette to be recorded.
2
Program the tracks you want (refer to page 10).
3
Press [¶ REC/
8
] to start recording.
Other basic operationsOther basic operations
To Action
stop recording Press [ 7 ].
stop recording
temporarily
1) Press [¶ REC
/
8
].
2) Press again to resume recording.
record on the other
side of the tape
Turn the cassette over and press
[¶ REC/
8
].
erase a recorded
sound
1) Insert the cassette to be recorded.
2)
Press [TAPE 3] and then [7, –DEMO].
3) Press [¶ REC/
8
].
Your attention is drawn to the fact that recording pre-
recorded tapes or discs or other published or broadcast
material may infringe copyright laws.
Erasure preventionErasure prevention
The illustration shows how to remove the tabs to prevent
recording. To record on the tape again, cover as shown.
Side A
Tab for side ATab for side B
To re-record
Normal tape
Adhesive tape
PM32-33DB_EB_En.indd 11PM32-33DB_EB_En.indd 11 3/1/06 12:12:19 PM3/1/06 12:12:19 PM
RQTV0123
12
Radio
CLEAR
CLEAR
0-$" 0-$"
Numeric
buttons
Numeric
buttons
Manual tuningManual tuning
1
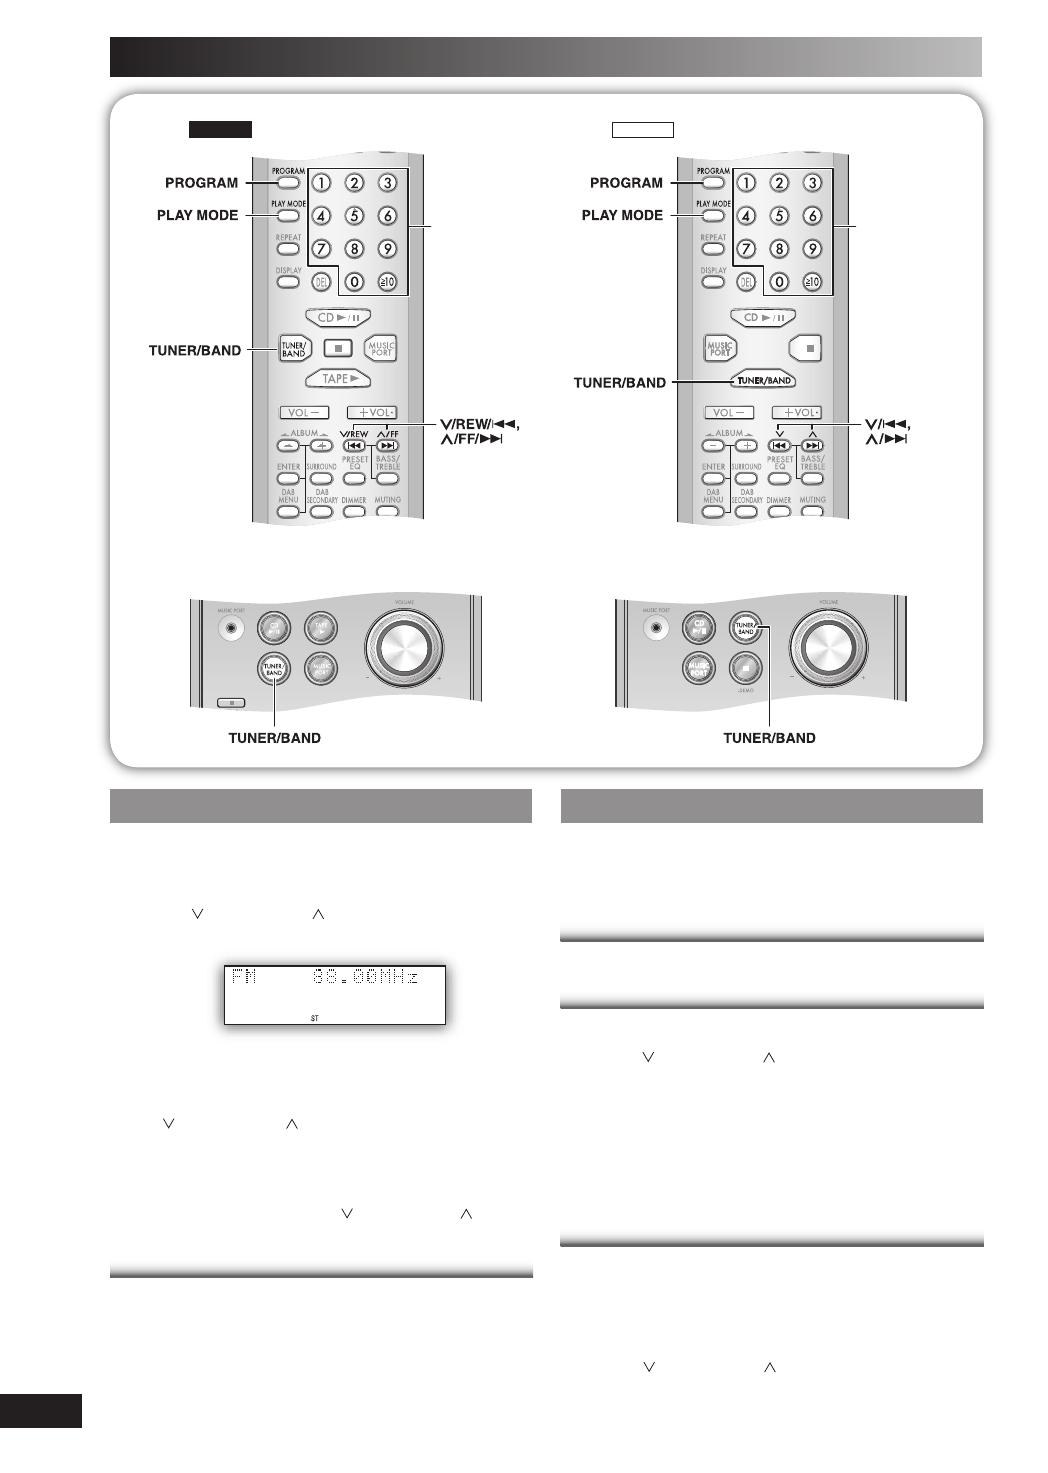
Press [TUNER/BAND] to select “FM” or “AM”.
2
Press [PLAY MODE] to select “MANUAL”.
3
Press [ /REW/4] or [ /FF/¢] to select the
frequency of the required station.
“
ST ”
is displayed when a stereo FM broadcast is being
received.
To tune automatically
Press
[ /REW/4] or [ /FF/¢] for a moment until the
frequency starts changing rapidly. The unit begins auto
tuning, stopping when it fi nds a station.
• Auto tuning may not function when there is excessive
interference.
• To cancel auto tuning, press [ /REW/4] or [ /FF/¢]
once again.
To improve FM sound qualityTo improve FM sound quality
Press and hold [PLAY MODE] to display “MONO”.
To cancel
Press and hold [PLAY MODE] again until “MONO”
disappears.
• MONO is also cancelled if the frequency is changed.
• Turn off “MONO” for normal listening.
Memory presetMemory preset
Up to 15 stations can be set in both the FM and AM bands.
Preparation
Press [TUNER/BAND] to select “FM” or “AM”.
Automatic presettingAutomatic presetting
Press and hold [PROGRAM] to start presetting.
Manual presettingManual presetting
1
Press [PLAY MODE] to select “MANUAL”.
2
Press [ /REW/4] or [ /FF/¢] to tune to the
required station.
3
Press [PROGRAM].
4
Press the numeric buttons to select a channel.
The station occupying a channel is erased if another
station is preset in that channel.
5
Repeat steps 2 to 4 to preset more stations.
Selecting a preset stationSelecting a preset station
Press the numeric buttons to select the channel.
For channels 10 to 15 press [
h
10], then the two digits.
OR
1
Press [PLAY MODE] to select “PRESET”.
2
Press [ /REW/4] or [ /FF/¢] to select the
channel.
PM32-33DB_EB_En.indd 12PM32-33DB_EB_En.indd 12 3/1/06 12:12:23 PM3/1/06 12:12:23 PM
RQTV0123
13
DAB
DAB stands for digital audio broadcasting. It is a new form
of radio that is broadcast digitally. Unlike regular analogue
broadcasting, digital radio deteriorates less, and is thus able
to provide quality sound close to that of a disc.
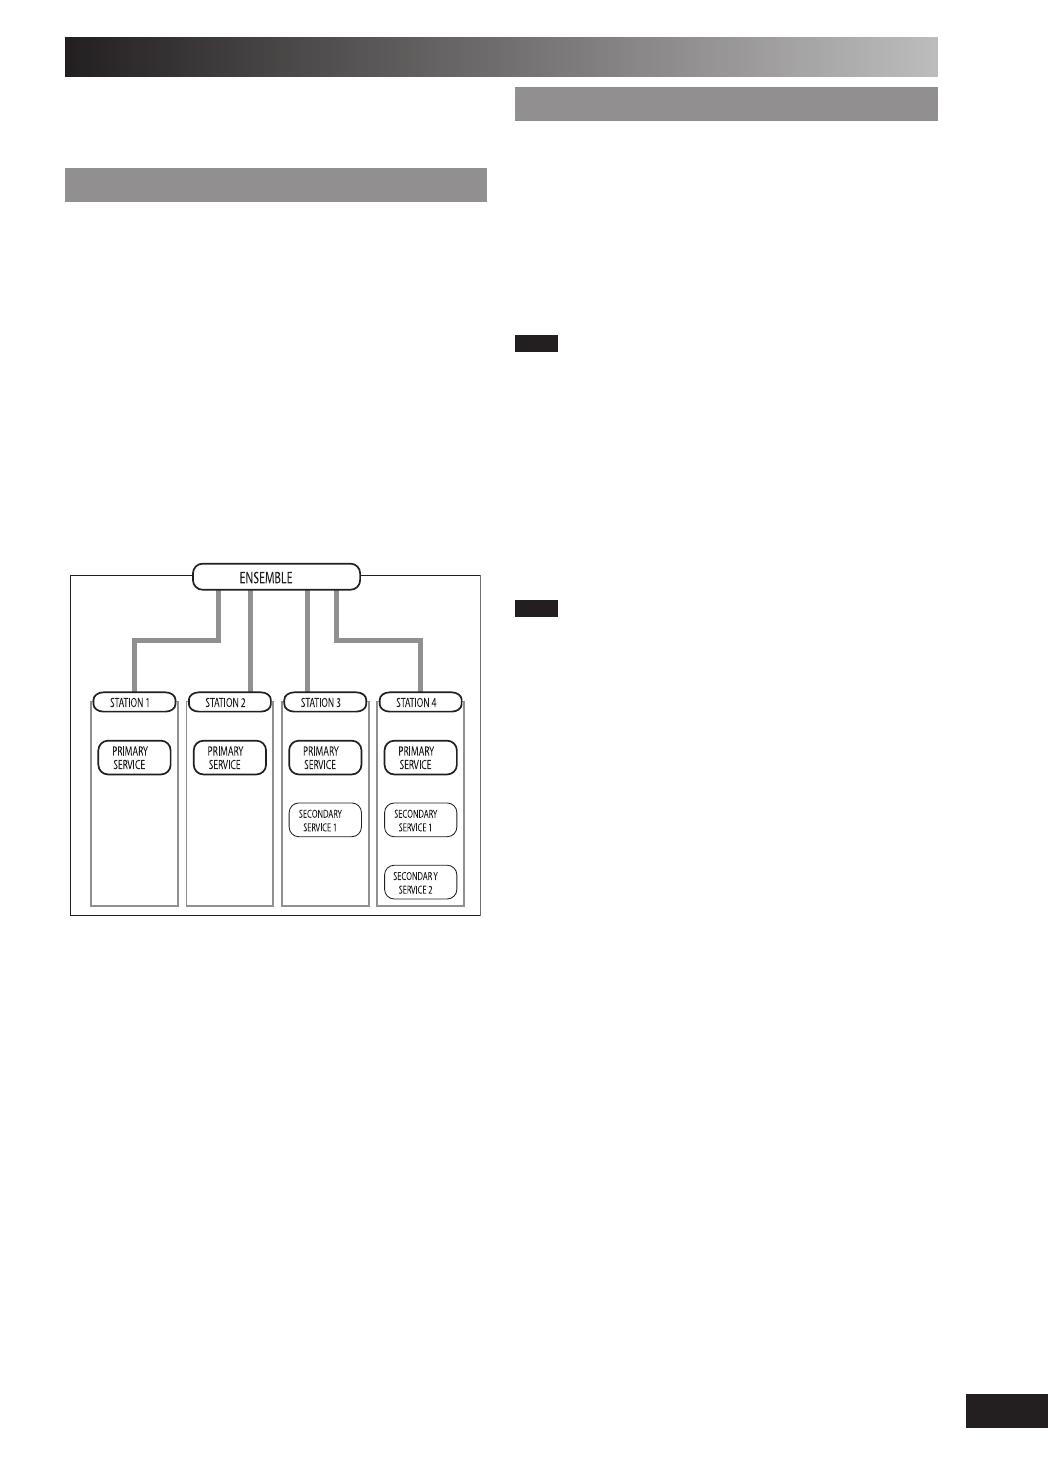
DAB structureDAB structure
Band
There are two types of DAB bands, “BAND III” (Receivable
in this unit) and “L BAND”(Not broadcast in the United
Kingdom, and not receivable on this unit).
Frequencies
There are 41 frequencies on BAND III. Among those
frequencies, 7 are used in the United Kingdom ( current as
of February, 2006).
Ensemble, station and service
The number of stations that make up one frequency differ
between DAB and analogue radio. Analogue stations all
broadcast on different frequencies, even if it is the same
company doing the broadcasting. With DAB however, it is
possible to broadcast a number of stations on the same
frequency.
In DAB terminology, a group of stations on the same frequency
is called an ensemble.
As shown in the diagram, an ensemble consists of a group
of stations which have primary services, they can also
have secondary services. This means, for example, that
commentary on sports events from different areas can all be
broadcast at once.
DAB reception method on this unitDAB reception method on this unit
Depending on the region there is a difference between
broadcast frequency and stations broadcast along the
same frequency. For this reason, a memory of receivable
stations should fi rst be created and then selected from those
memorized stations as the reception method.
DAB Auto Scan
This function searches for currently receivable stations and
inputs them into unit memory.
When DAB is selected for the fi rst time, this function starts
automatically.
Note
Even if the station is stored into memory, some stations
may not broadcast depending on the time of day etc. If this
occurs,”NO SERVICE” is displayed.
Station Memory Updating
When there is a station name change, or a new station
begins broadcasting, the unit memory is automatically
updated when:
• The previous station name is displayed by selecting
“STATION TUNE”.
• One of the stations already broadcasting on the same
frequency with the new station is displayed by selecting
“STATION TUNE”.
Note
• Deleting stations that are no longer broadcasting is not automatic. If
you want to delete a station, perform Auto scan again and the new
memory is created.
• When a new frequency begins broadcasting, stations on that new
frequency are not automatically added to memory. Perform Auto
scan to add them to memory. Also, you may need to change the
Auto scan range if the new frequency is outside the factory set Auto
scan range (refer to page 16).
STATION TUNE
You can select stations from the memory created as shown
above in alphanumeric order. You can easily select your
favorite stations by using presets (refer to page 14).
PM32-33DB_EB_En.indd 13PM32-33DB_EB_En.indd 13 3/1/06 12:12:27 PM3/1/06 12:12:27 PM

RQTV0123
14
DAB operationDAB operation
1
Press [TUNER/BAND] to enter DAB mode.
The unit comes on.
Note
“Scan Failed.”appears if no stations are memorized. If this occurs,
adjust the antenna and try Auto scaning.
2
Press [PLAY MODE] to select “STATION TUNE”
Each time you press the button:
“STATION TUNE”
“PRESET TUNE”
3
Press [ /REW/4] or [ /FF/¢] to select a station.
The station name changes in alphanumeric order.
DAB Auto ScanDAB Auto Scan
Press and hold [PLAY MODE] until “DAB Auto Scan”
appears.
When a frequency is tuned by Auto scanning on this unit,
the ensemble corresponding to the frequency is displayed
for approximately 2 seconds.
Note
• When updating memory with Auto scan, preset stations are not
erased or changed
• When a frequency cannot be received, the previous memory is
restored.
• Total stations received is displayed for approximately 2 seconds.
PresettingPresetting
To Preset
Up to 20 channels can be set.
1
Press [ /REW/4] or [ /FF/¢] to select a station.
2
Press [PROGRAM].
3
Press the numeric buttons to select a channel.
Note
You cannot preset stations when the station is not broadcasting or
when you are selecting a secondary service.
DAB (continued)
CLEAR
CLEAR
0-$"0-$"
Numeric
buttons
Numeric
buttons
PM32-33DB_EB_En.indd 14PM32-33DB_EB_En.indd 14 3/1/06 12:12:28 PM3/1/06 12:12:28 PM
RQTV0123
15
Selecting a preset channel
1
Press [PLAY MODE] to select “PRESET TUNE”
Each time you press the button:
“STATION TUNE”
“PRESET TUNE”
2
Press [ /REW/4] or [ /FF/¢] or numeric
buttons to select a channel.
Listening to the secondary serviceListening to the secondary service
Press the [DAB SECONDARY] to select the secondary
service.
“
”is displayed if there is a secondary service broadcast.
The secondary services are selected each time the button
is pressed. The primary service is returned to after the last
secondary service.
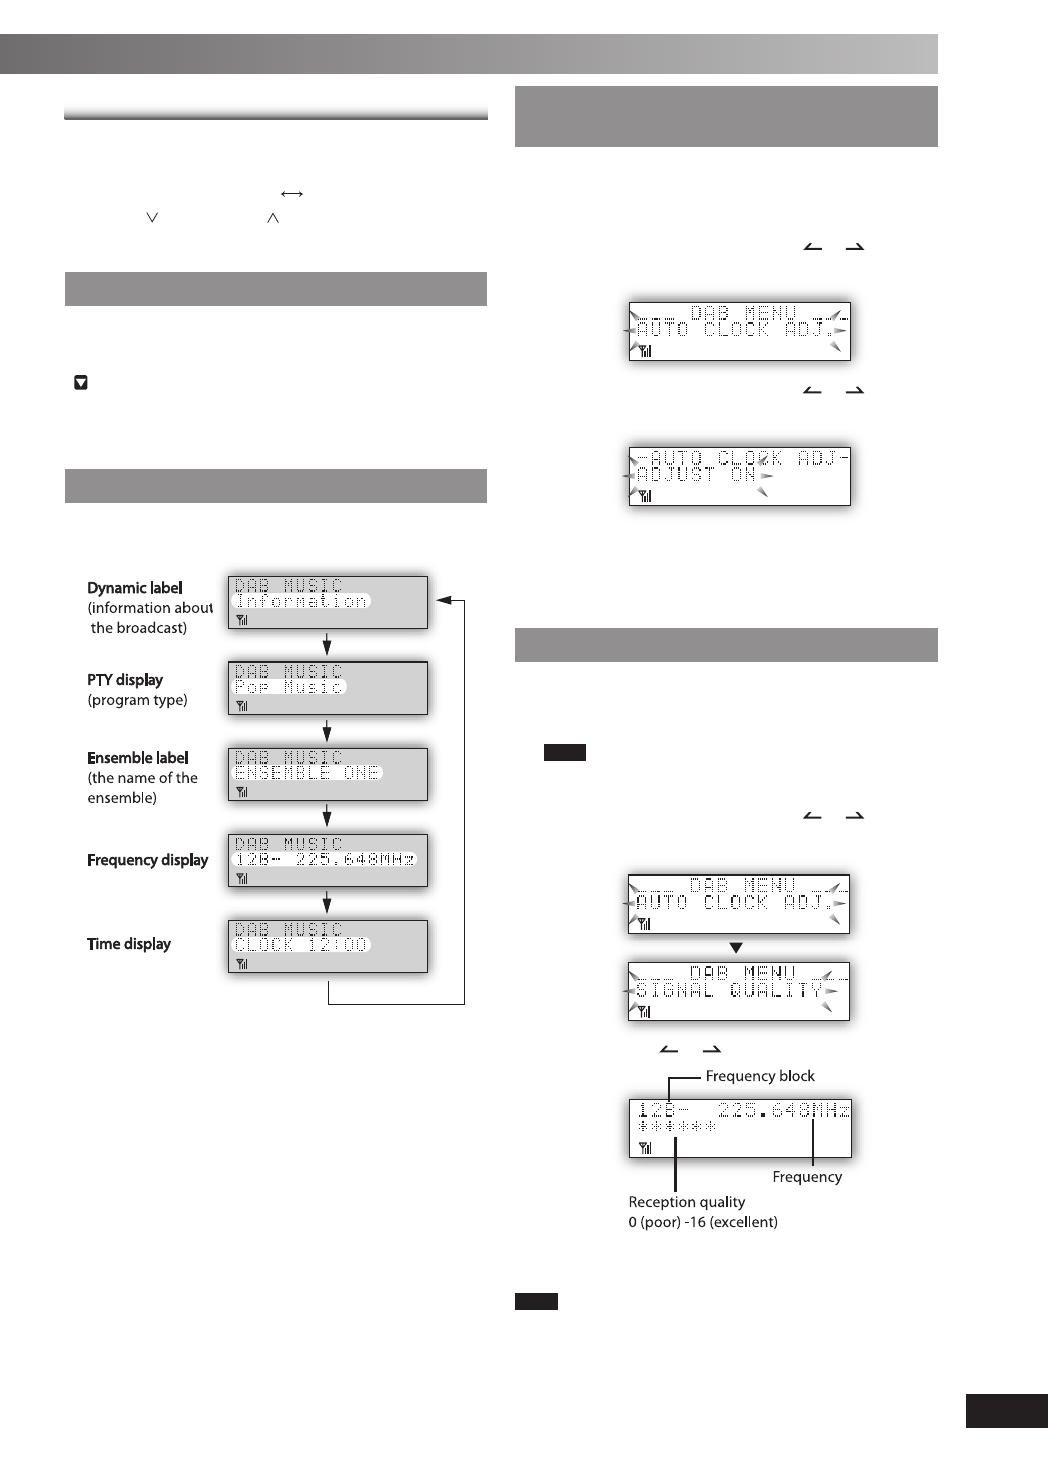
DisplayDisplay
Press [DISPLAY] to select the display.
Each time you press the button:
Turning automatic clock adjustment Turning automatic clock adjustment
function onfunction on
To adjust the time information during DAB broadcasting and
automatic time adjustment.
1
Press [DAB MENU] to enter menu mode.
2
Within 10 seconds, press [ALBUM or ] to select
“AUTO CLOCK ADJ.” and then press [ENTER].
3
Within 10 seconds, press [ALBUM or ] to select
“ADJUST ON” and then press [ENTER].
Select “ADJUST OFF” to turn the automatic clock adjustment
function off.
To cancel
Press [DAB MENU] again.
Checking the DAB signal qualityChecking the DAB signal quality
To improve reception by adjusting the antenna while
monitoring signal quality on the display.
1
Press [DAB MENU] to enter menu mode.
Note
“Scan Failed.”appears if no stations are memorized. If
this occurs, adjust the antenna and try Auto scaning.
2
Within 10 seconds, press [ALBUM or ] to select
“SIGNAL QUALITY” and then press [ENTER].
3
Press [ALBUM or ] to select the frequency.
To cancel
Press [DAB MENU] again
Note
In order to enjoy the new stations after adjusting the antenna, it is
necessary to perform Auto scanning and update the station memory.
PM32-33DB_EB_En.indd 15PM32-33DB_EB_En.indd 15 3/1/06 12:12:34 PM3/1/06 12:12:34 PM
RQTV0123
16
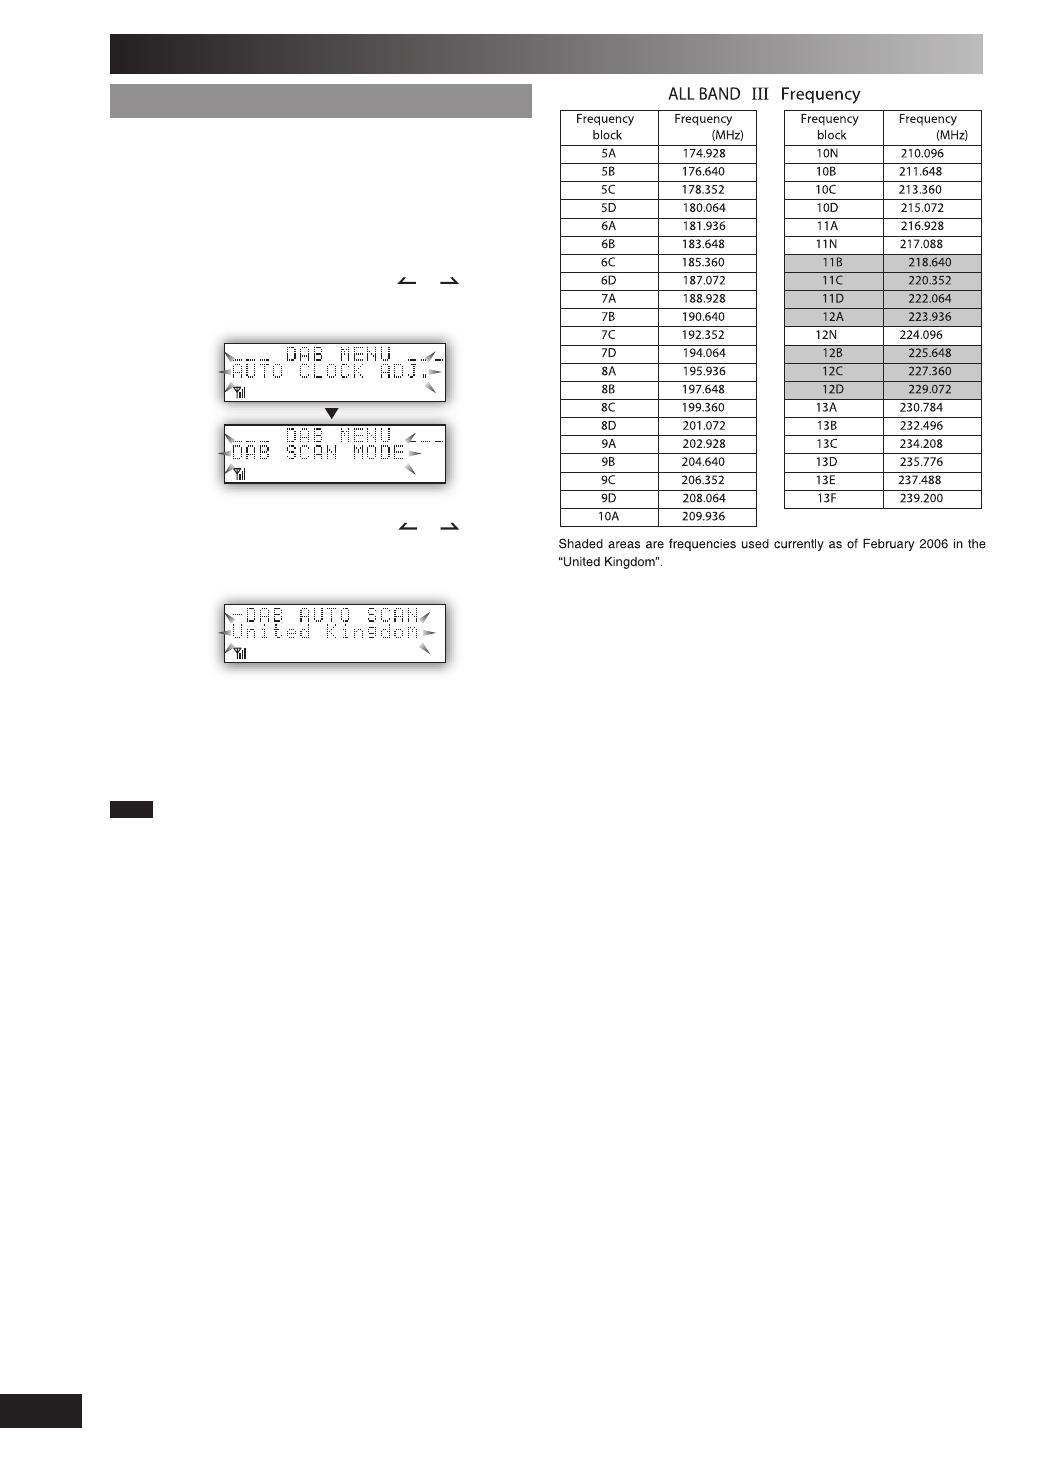
Changing the Auto scan frequency rangeChanging the Auto scan frequency range
Only the frequencies currently used in the UK as of February
2006 on BAND III are Auto scanned (*United Kingdom’,
factory setting).
Select “ALL BAND III” when you want to store stations on
other frequencies to memory.
1
Press [DAB MENU] to enter menu mode.
2
Within 10 seconds, press [ALBUM or ] to select
“DAB SCAN MODE” and then press [ENTER].
3
Within 10 seconds, press [ALBUM or ] to select
“United Kingdom” or “ALL BAND III” and then press
[ENTER].
Auto scan begins automatically after the change has been
made.
To cancel
Press [DAB MENU] again
Note
When the “DAB SCAN MODE” is changed, the DAB preset channels
are erased and if the DAB play timer has been set the timer switches
to off.
DAB (continued)
PM32-33DB_EB_En.indd 16PM32-33DB_EB_En.indd 16 3/1/06 12:12:38 PM3/1/06 12:12:38 PM
RQTV0123
17
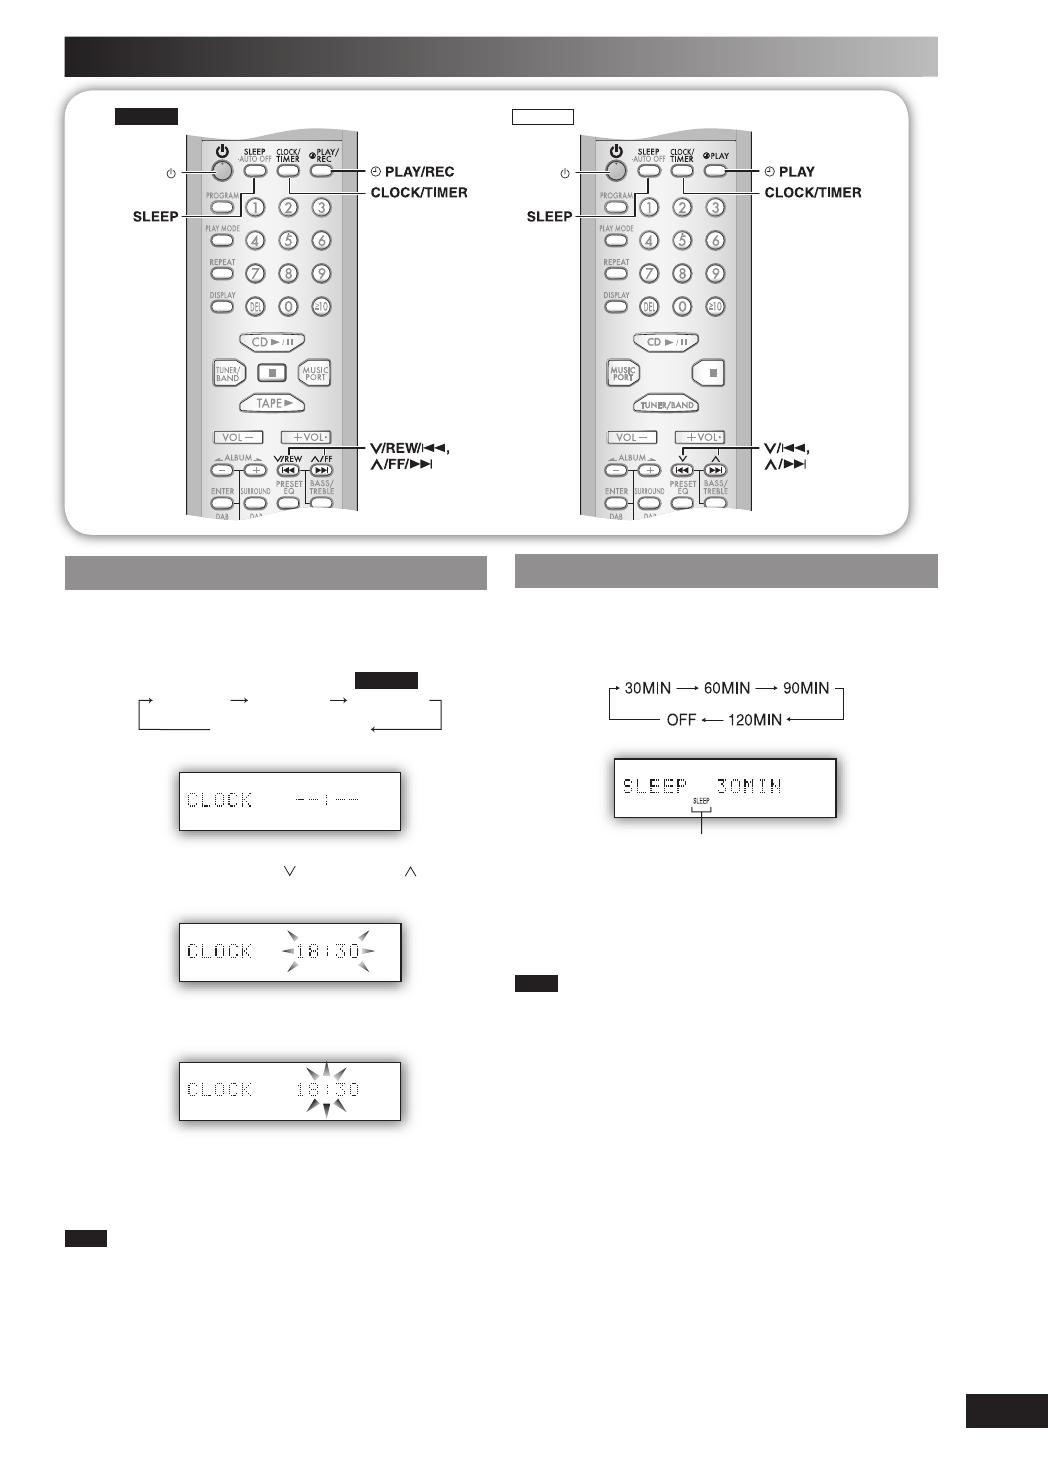
Timer
0-$"
CLEAR
0-$"
CLEAR
Setting the clockSetting the clock
This is a 24-hour clock.
1
Press [CLOCK/TIMER] to select “CLOCK”.
Each time you press the button:
PM33DB
CLOCK
˚ PLAY
Original display
˚ REC
2
Within 5 seconds, press
[ /REW/4] or [ /FF/¢]
to set the time.
3
Press [CLOCK/TIMER] again to confirm.
Displaying the clock
Press [CLOCK/TIMER] to display the clock for few
seconds.
Note
The clock may lose or gain minutes over a period of time. Readjust
as necessary.
Using the sleep timerUsing the sleep timer
This function enables you to turn off the unit automatically
after the set time.
Press [SLEEP] repeatedly to select your desired time.
Sleep timer indicator
To cancel
Press [SLEEP] to select “OFF”.
Changing the remaining time
Press [SLEEP] to show the remaining time, and press
[SLEEP] again to select your desired time.
Note
• The play and sleep timer or the record and sleep timer can be used
together.
• The sleep timer always has priority. Be sure not to overlap timer
settings.
PM32-33DB_EB_En.indd 17PM32-33DB_EB_En.indd 17 3/1/06 12:12:41 PM3/1/06 12:12:41 PM

RQTV0123
18
Using the play or record timerUsing the play or record timer
Record timer is only applicable for PM33DB.
You can set the timer to come on at a certain time to wake
you up (play timer) or to record from the radio or music port
source (record timer).
Preparation
Turn the unit on and set the clock (refer to page 17).
Timer Action
Play timer Prepare the music source you want to
listen to; cassette, disc, radio or music port
source, and set the volume.
Record timer Check the cassette’s erasure prevention
tabs (refer to page 11), insert the cassette
(refer to page 11) and tune to the radio
station (refer to page 12) or select the
music port source (refer to page 20).
1
Press [CLOCK/TIMER] repeatedly to select your
desired timer.
PM33DB
CLOCK
˚ PLAY
Original display
˚ REC
2
Within 5 seconds, press
[ /REW/4] or [ /FF/¢]
to set the starting time.
PM33DB
Play timer indicator
Start time
Record timer indicator
3
4
Press [CLOCK/TIMER] to confirm.
Repeat steps 2 and 3 to set the finishing time.
PM33DB
Finish time
To activate the timer
5
Press [˚PLAY/REC] to turn on your desired timer.
PM33DB
˚ PLAY
no display (off)
˚ REC
6
Press [y] to turn off the unit.
The unit must be off for the timers to operate.
Other basic operationsOther basic operations
To Action
change the settings Repeat steps 1 to 4 and 6.
change the source
or volume
1) Press [
˚PLAY/REC] to clear the timer
indicator from the display.
2) Make changes to the source or volume.
3) Perform steps 5 and 6.
check the settings
(when the unit is on
or in standby mode)
Press [CLOCK/TIMER] repeatedly to select
˚PLAY or ˚REC.
cancel Press [˚PLAY/REC] to clear the timer
indicators from the display.
Note
• The play timer and record timer cannot be used together.
• The play timer will start at the preset time, with the volume
increasing gradually to the preset level.
• The record timer will start 30 seconds before the set time, with the
volume muted.
• The timer comes on at the set time every day if the timer is on.
• The unit must be in the standby mode for the timer to function.
• If you turn the unit off and on again while a timer is functioning, the
fi nish time setting will not be activated.
• If MUSIC PORT is selected as the source when the timer comes on,
the system turns on and engages MUSIC PORT as the source. If
you wish to playback or record from the portable audio equipment,
activate the equipment’s play mode and increase the volume. (See
the portable audio equipment’s instruction manual.)
Timer (continued)
PM32-33DB_EB_En.indd 18PM32-33DB_EB_En.indd 18 3/1/06 12:12:45 PM3/1/06 12:12:45 PM

RQTV0123
19
Sound adjustment
CLEAR
0-$"
CLEAR
0-$"
Selecting sound effectsSelecting sound effects
You can change the sound effect by selecting Preset EQ or
adjusting the bass or treble effect.
Preset EQPreset EQ
Press [PRESET EQ] repeatedly to select your desired
setting.
HEAVY
→
CLEAR
→
SOFT
→
VOCAL
→
EQ-OFF
Setting Effect
HEAVY Adds punch to rock
CLEAR Clarifi es higher frequencies
SOFT For background music
VOCAL Adds gloss to vocal
EQ-OFF No effect
Bass or trebleBass or treble
Enable you to enjoy the lower or higher pitch sound.
1
Press [BASS/TREBLE] repeatedly to select your
desired setting.
BASS TREBLE
original display
Setting Effect
BASS For lower pitch sound
TREBLE For higher pitch sound
2
Within 3 seconds, p
ress [ /REW/4] or [ /FF/¢]
to adjust the level.
Note
The tone level can be varied within -4 to +4.
Enjoying surround soundEnjoying surround sound
Enable you to add natural width and depth to the stereo
sound.
To activate
Press [SURROUND] to display “
” indicator.
To cancel
Press [SURROUND] again to clear “
”
indicator.
Note
• Surround sound is less discernible when listening through
headphones.
• If interference in FM stereo reception increases, cancel the
surround sound effect.
PM32-33DB_EB_En.indd 19PM32-33DB_EB_En.indd 19 3/1/06 12:12:47 PM3/1/06 12:12:47 PM

RQTV0123
20
External unit
Connecting to a portable audio Connecting to a portable audio equipmenequipmentt
This feature enables you to enjoy music from portable audio equipment.
0-$"
0-$"
Audio cord (not included)
Portable audio
equipment
(not included)
Playing from portable audio equipmentPlaying from portable audio equipment
Switch off the equalizer function (if there is any) of the
portable audio equipment before you plug into the MUSIC
PORT jack. Otherwise, sound from the speaker may be
distorted.
1
Plug the audio cord into the MUSIC PORT jack and
press [MUSIC PORT].
2
Play the portable audio equipment. (See the
portable audio equipment’s instruction manual.)
Note
All peripheral components and cables are sold separately.
PM33DB
Recording from portable audio Recording from portable audio eequipmentquipment
1
Insert the cassette to be recorded.
2
Press [MUSIC PORT].
3
Play the portable audio equipment.
4
Press [¶ REC/
8
] to start recording.
Note
For other recording operations, refer to page 11, “Other basic
operations”.
Audio cord (not included)
Portable audio
equipment
(not included)
PM32-33DB_EB_En.indd 20PM32-33DB_EB_En.indd 20 3/1/06 12:12:50 PM3/1/06 12:12:50 PM
/