Canon Selphy CP910 User manual

Category
Label printers
Type
User manual

This manual is also suitable for

1
Contents
Part Names
Basic Operations
Print Settings
Printing via USB
Cable
Troubleshooting
Appendix
Printing via Wi-Fi
Cover
Printer User Guide
ENGLISH
© CANON INC. 2014 CEL-SU9VA210
• Make sure you read this guide, including the “Safety
Precautions” section, before using the printer.
• Reading this guide will help you learn to use the printer
properly.
• Store this guide safely so that you can use it in the
future.
• Click the buttons in the lower right to access other pages.
: Next page
: Previous page
: Page before you clicked a link
• To jump to the beginning of a chapter, click the chapter
title at right.
From chapter title pages, you can access topics by
clicking their titles.
Package Contents
Before use, make sure the following items are included in the package.
If anything is missing, contact the retailer where you purchased the printer.
□ SELPHY Printer □ Compact Power
Adapter
CA-CP200 B
□ Power Cord
□ Paper Cassette
PCP-CP400
□ SELPHY CP910
Solution Disk
□ SELPHY CP910
Manuals Disk
□ Getting Started □ Warranty System
Booklet
2
Cover
Contents
Part Names
Basic Operations
Print Settings
Printing via USB
Cable
Troubleshooting
Appendix
Printing via Wi-Fi
Ink and Paper (Sold Separately)
Before use, purchase a Color Ink / Paper Set.
Color Ink / Paper Set
Necessary Paper
Cassette
Product Name Paper Size
Number of
Possible
Prints
Color Ink / Paper Set KP-36IP
(Postcard)
Postcard Size
36
Paper Cassette
PCP-CP400
(included with
SELPHY)
Color Ink / Paper Set KP-108IN
(Photo Paper)
108
Color Ink / Paper Set KC-36IP
Card Size
36
Paper Cassette
PCC-CP400*
Color Ink / Label Set KC-18IF
(Full-Page Label)
18
Color Ink / Label Set KC-18IL
(8 Labels per Page)
18
Color Ink / Label Set KC-18IS
(Square Labels)
18
* Purchase with the Color Ink / Paper Set.
Accessory availability varies by region.
3
Cover
Contents
Part Names
Basic Operations
Print Settings
Printing via USB
Cable
Troubleshooting
Appendix
Printing via Wi-Fi
Safety Precautions
• Before using the product, please ensure that you read the safety
precautions described below. Always ensure that the product is used
correctly.
• The safety precautions noted on the following pages are intended
to prevent injuries to yourself and other persons, or damage to the
equipment.
• Be sure to also check the guides included with any separately sold
accessories you use.
Warning
Denotes the possibility of serious injury or death.
• Store this equipment out of the reach of children and infants.
Mistakenly putting the power cord around a child’s neck could result in
asphyxiation.
• Use only recommended power sources.
• Do not attempt to disassemble, alter, or apply heat to the product.
• Avoid dropping or subjecting the product to severe impacts.
• To avoid the risk of injury, do not touch the interior of the product if
it has been dropped or otherwise damaged.
• Stop using the product immediately if it emits smoke, a strange
smell, or otherwise behaves abnormally.
• Do not use organic solvents such as alcohol, benzine, or thinner to
clean the product.
• Do not let the product come into contact with water (e.g. sea water)
or other liquids.
• Do not allow liquids or foreign objects to enter the product.
This could result in electrical shock or fire.
If liquid comes into contact with the product, unplug it from the outlet and
consult your retailer or a Canon Customer Support Help Desk.
Before Use
• Images printed with this product are to be used for personal enjoyment.
Unauthorized printing of copyrighted material is prohibited.
• The printer warranty is valid only in the country or area of purchase. In
case of printer problems while abroad, return to the area of purchase
before contacting a Canon Customer Support Help Desk.
• Although the LCD monitor is produced under extremely high-precision
manufacturing conditions and more than 99.99% of the pixels meet
design specifications, in rare cases some pixels may be defective or may
appear as red or black dots. This does not constitute a malfunction or
affect printed images.
• The LCD monitor may be covered with a thin plastic film for protection
against scratches during shipment. If so, remove the film before use.
Conventions in This Guide
• In this guide, the printer is referred to as “SELPHY” or “the printer”.
• Icons are used in this guide to represent buttons on SELPHY. Refer to
“Controls” (=
6) for details.
• On-screen text or icons are shown in square brackets, as in [ ].
•
: Important information you should know
•
: Notes and tips for expert use
• =xx: Pages with related information (In this example, “xx” represents a
page number.)
• Instructions in this guide apply to the printer under default settings.
• For convenience, all supported memory cards are simply referred to as
“memory card”.
4
Cover
Contents
Part Names
Basic Operations
Print Settings
Printing via USB
Cable
Troubleshooting
Appendix
Printing via Wi-Fi
This may cause overheating of or damage to the printer or adapter, which
may result in electric shock, burns or other injury, or fire.
High temperature may deform the product or adapters.
Caution
Denotes the possibility of damage to the equipment.
• Unplug the product from the power outlet when you are not using it.
• Do not place anything, such as cloth, on top of the printer while in
use.
Leaving the unit plugged in for a long period of time may cause it to
overheat and distort, resulting in fire.
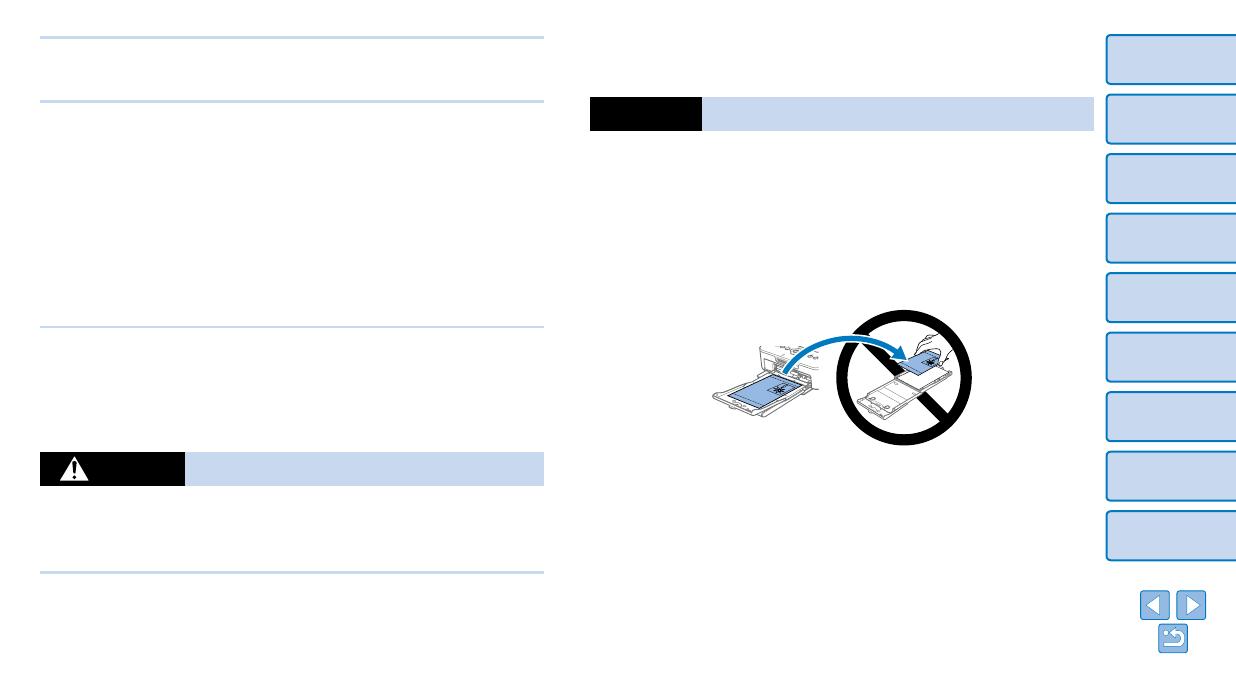
• Never reuse paper for printing, even if most of the paper is blank, as
shown.
Reusing paper may damage the printer if paper jams or the ink sheet
adheres to the paper.
• Do not unplug the printer while it is printing.
If you accidentally turn the printer off while printing, restart it and wait until
the paper is ejected. If paper jams and cannot be removed, contact your
retailer or a Canon Customer Support Help Desk. Do not attempt to remove
jammed paper by force, which may damage the printer.
• Do not use the printer near motors or other devices that generate
strong magnetic fields, or in dusty environments.
This may damage the printer or cause malfunction.
• Do not touch the printer or the power plug during thunderstorms.
This could result in electrical shock or fire. Immediately stop using the
equipment and distance yourself from it.
• Unplug the power cord periodically, and using a dry cloth, wipe away
any dust or dirt that has collected on the plug, the exterior of the
power outlet, and the surrounding area.
• Do not handle the power cord with wet hands.
• Do not use the equipment in a manner that exceeds the rated
capacity of the electrical outlet or wiring accessories. Do not use if
the power cord or plug are damaged, or not fully plugged into the
outlet.
• Do not allow dirt or metal objects (such as pins or keys) to contact
the terminals or plug.
• Do not cut, damage, alter, or place heavy items on the power cord.
This could result in electrical shock or fire.
• Do not play the supplied CD-ROM(s) in any CD player that does not
support data CD-ROMs.
It is possible to suffer hearing loss from listening with headphones to the
loud sounds of a CD-ROM played on a music CD player. Additionally,
playing the CD-ROM(s) in an audio CD player (music player) could damage
the speakers.
Caution
Denotes the possibility of injury.
• Do not stick any part of your hand into the printer interior.
• Place SELPHY in a safe location where people will not trip over the
power cord.
Failure to do this may lead to injury or printer damage.
• Avoid using, placing, or storing the product in the following places:
Places subject to direct sunlight
Places subject to temperatures above 40 °C (104 °F)
Humid or dusty places Places subject to strong vibration
Package Contents .........................2
Ink and Paper (Sold Separately) .... 2
Before Use .....................................3
Conventions in This Guide ............. 3
Safety Precautions ......................... 3
Contents.........................................5
Part Names ....................................5
Basic Operations ............. 7
Initial Preparations .........................8
Supported Cards/Images .............13
Printing Images ............................14
Storing Prints ...............................17
After Printing ................................17
Print Settings ................. 18
Printing All Images .......................19
Cropping Images .........................20
Printing ID Photos ........................21
Adjusting Settings ........................23
Printing via Wi-Fi ............ 30
Printing from a Smartphone .........31
Printing from a Camera ................ 34
Printing
from a Computer ............. 36
Other Wi-Fi Functions ..................44
Printing via AirPrint.......................46
Printing via USB Cable ... 48
Printing from a Computer ............. 49
Printing from a Camera ................ 52
Troubleshooting ............. 53
Appendix ........................ 58
Printing without a Power Outlet ...59
Specifications ............................... 60
Handling and Maintenance ..........62
Wi-Fi (Wireless LAN)
Precautions ..................................62
5
Cover
Basic Operations
Print Settings
Printing via USB
Cable
Troubleshooting
Appendix
Printing via Wi-Fi
Contents
Part Names
Part Names
Memory Card Slot (=
13)
Paper Cassette
Compartment (=
10)
Paper Cassette
Compartment Cover
(=
10)
Ink Cassette Lock
(=
15)
Ink Cassette
Compartment (=
10)
Ink Cassette
Compartment Cover
(=
10)
Camera / Flash Drive
USB Port (=
16, 52)
DC IN (Power Input)
Terminal (=
10)
Computer USB Port
(=
50)
Air Vent (=
62)
Paper Ejection
Slot
Security Slot*
* Security cables, such as a Kensington lock, can be attached to this slot.
Contents
6
Cover
Contents
Basic Operations
Print Settings
Printing via USB
Cable
Troubleshooting
Appendix
Printing via Wi-Fi
Part Names
Controls
Icons in This
Guide
Name Function
Screen (LCD monitor)
Displays images, setting screens, or
error messages (=
57)
<q>
ON button
Turns SELPHY on or off (=
12)
<k>
MENU button
Displays the menu screen (=
12)
EDIT button
Displays the editing menu and rotates
the crop frame
<o>
OK button Confirms the selected item
<u>
Up / More prints button
Specifies the print quantity or selects
setting items
<d>
Down / Fewer prints button
<l>
Left button
Switches images, changes setting values
<r>
Right button
<->
Enlarge button
Switches display modes, enlarges the
crop frame
<0>
Reduce button
Switches display modes, reduces the
crop frame
<v>
BACK button
Restores the previous screen (=
23),
cancels printing (=
15)
<p>
PRINT button
Starts printing (=
15)
On-Screen Information
File number
Print settings (=
2429)
(Dimmed when unavailable)
Total prints
Prints of current image
Port/slot
in use (=
13, 16)
Cropping
(=
20)
Paper orientation
Shooting date of current image
Print size
(Postcard size shown here)
Switching Display Modes
Press the <-> button for full-screen display at higher resolution. The print
area is outlined. Press the <-> button to restore single-image display.
Press the <0> button to view nine images at once. Press the <0> button
to restore single-image display.
7
Cover
Contents
Part Names
Print Settings
Printing via USB
Cable
Troubleshooting
Appendix
Printing via Wi-Fi
Basic Operations
Basic Operations
This chapter introduces basic printing operations such as preparing the printer, selecting images
on a memory card, and specifying the number of prints.
Initial Preparations ....................................................................................8
Preparing the Ink Cassette ................................................................................8
Preparing the Paper Cassette ...........................................................................9
Loading the Cassettes ....................................................................................10
Installing and Plugging in SELPHY .................................................................10
Display Language ...........................................................................................12
Supported Cards/Images ........................................................................13
Supported Memory Cards ...............................................................................13
Supported Images ...........................................................................................13
Printing Images .......................................................................................14
Avoiding Left Over Paper ................................................................................16
Printing from USB Flash Drives ......................................................................16
Making One Print from a Selected Image .......................................................16
Storing Prints ..........................................................................................17
After Printing ...........................................................................................17
8
Cover
Contents
Part Names
Print Settings
Printing via USB
Cable
Troubleshooting
Appendix
Printing via Wi-Fi
Basic Operations
Initial Preparations
Prepare for printing as follows. This example shows a Postcard-size (4x6
in.) Color Ink / Paper Set (sold separately, =
2), but the same steps are
followed for other sizes.
Avoid getting dust on ink sheets or paper, which may cause banding or
damage the printer (=
4).
Preparing the Ink Cassette
Check the ink cassette and ink
sheet.
Holding the ink cassette without touching
the ink sheet, check the size (such as
“Postcard (4x6 in.) Size” or “Card Size”)
to make sure it matches the size of paper
you will print on.
Make sure the ink sheet is taut. Loose
ink sheets may tear when loaded. If
the sheet is loose, turn the sprocket as
shown.
For an ink cassette that has a lock on
the bottom, press the lock (as shown)
to release it as you turn the sprocket to
make the sheet taut.
Ink sheet
• Do not hold the ink cassette with wet hands. Avoid touching the
ink sheet, and avoid getting dust on it. Dirt or moisture may cause
banding or affect print quality, tear ink sheets and prevent printing,
or damage the printer (=
4).
• When turning the sprocket, turn it gently, only until the sheet is taut.
Forcing the sprocket or overtightening it may tear ink sheets and
prevent printing, or SELPHY may run out of ink before paper.
• Never reuse ink cassettes, which may damage the printer or cause
malfunction.
9
Cover
Contents
Part Names
Print Settings
Printing via USB
Cable
Troubleshooting
Appendix
Printing via Wi-Fi
Basic Operations
Preparing the Paper Cassette
1 Check the paper size.
Check the size on the paper cassette
(such as “Postcard” or “Card Size”) to
make sure it matches the size of the ink
cassette.
2 Open both covers.
There are two layers of covers. First open
the outer cover (
), and then the inner
cover (
).
3 Load the paper.
Load the paper in the paper cassette.
The paper cassette holds up to 18
sheets. Loading 19 or more sheets may
damage the printer or cause malfunction.
Holding the paper as shown, load it with
the glossy side up. (Do not touch the
glossy side of the paper, which may affect
print quality.)
Remove any protective sheets from
the paper, and load only paper into the
cassette.
When making postcard prints with space
for a stamp, load the paper with the
stamp area facing as shown.
Glossy
side
4 Close the inner cover.
Close the inner cover firmly until it clicks
into place. Leave the outer cover open
when printing.
• Use only paper in a genuine Canon Color Ink / Paper Set for
SELPHY CP printers. Other paper, such as regular postcards or
paper for SELPHY ES printers, cannot be used.
• Never do the following, which may damage the printer or cause
malfunction.
- Loading paper upside-down, with the glossy
and back sides reversed
- Bending or separating paper at the
perforations before printing
- Using label paper whose upper label surface
is peeling off or has been partially pulled up
- Writing on paper before printing
- Reusing paper, as by printing on blank areas
(=
4)
• Do not touch the springs on the paper
cassette.
Accidentally bending the springs may
prevent efficient paper feeding.
• Note that one spring is attached in the center on the top of card-size
paper cassettes.
• Avoid touching or rubbing the glossy, printing side of the paper. Do
not handle paper with wet hands, and keep paper free of dust. Dirt
or moisture may cause banding or affect print quality, or damage the
printer (=
4).
Springs
10
Cover
Contents
Part Names
Print Settings
Printing via USB
Cable
Troubleshooting
Appendix
Printing via Wi-Fi
Basic Operations
Loading the Cassettes
1 Open the covers.
Open the ink and paper compartment
covers.
2 Load the ink cassette.
Insert the ink cassette into the printer in
the direction of the arrow on the cassette
until it clicks into place.
Close the ink cassette compartment
cover.
3 Load the paper cassette.
Making sure the outer cover is open
(=
9), insert the paper cassette all
the way into the compartment.
Installing and Plugging in SELPHY
1 Choose the right place to put
SELPHY.
Place the printer on a table or other flat,
stable surface. Never place the printer on
an unstable or tilted surface.
Keep the printer away from sources of
electromagnetism or strong magnetism.
Leave at least 10 cm (4 in.) of open
space around the printer.
Leave more open space behind the
printer than the length of paper used, so
that the paper can pass in and out of the
printer freely when printing.
2 Plug the adapter cord into
SELPHY.
Insert the adapter plug fully into the
power inlet on SELPHY.
3 Connect the power cord.
Connect the power cord to the compact
power adapter, and then plug the other
end into a power outlet.
Minimum
10 cm (4 in.)
Minimum
10 cm
(4 in.)
More than
length of
paper
11
Cover
Contents
Part Names
Print Settings
Printing via USB
Cable
Troubleshooting
Appendix
Printing via Wi-Fi
Basic Operations
• Do not use the printer near motors or other devices that generate
strong magnetic fields, or in dusty environments. This may damage
the printer or cause malfunction.
• Do not place the printer near televisions or radios. This may cause
the printer to malfunction.
12
Cover
Contents
Part Names
Print Settings
Printing via USB
Cable
Troubleshooting
Appendix
Printing via Wi-Fi
Basic Operations
Display Language
Change the language of menus and messages.
1 Turn on SELPHY.
Hold the <q> button until the screen at
left is displayed.
To turn off SELPHY, hold the <q> button
again until the screen changes.
Approx. 45°
2 Raise the screen (LCD monitor).
Never force the screen up more than 45°,
which may damage the printer or cause
malfunction.
3 Access the setting screen.
Press the <k> button.
Press the <u><d> buttons to select
[Change Settings], and then press the
<o> button.
4 Access the language setting
screen.
Press the <u><d> buttons to select
[
Language], and then press the
<o> button.
5 Choose a language.
Press the <u><d><l><r> buttons
to select a language, and then press the
<o> button.
To return to the screen in step 2, press
the <v> button twice.
13
Cover
Contents
Part Names
Print Settings
Printing via USB
Cable
Troubleshooting
Appendix
Printing via Wi-Fi
Basic Operations
Supported Cards/Images
Supported Memory Cards
No Adapter Required Adapter Required (Sold Separately)
SD Memory Card
SDHC Memory Card
SDXC Memory Card
miniSD Memory Card
miniSDHC Memory Card
microSD Memory Card
microSDHC Memory Card
microSDXC Memory Card
• For memory cards that require an adapter, always insert the card
into the adapter before inserting the adapter into the card slot.
If you mistakenly insert the memory card into the card slot without
an adapter, you may not be able to remove the card from the printer.
• Use a memory card formatted with the device you shot the photos
with. Images on cards formatted with a computer may not be
recognized.
• For instructions, refer to the memory card or adapter user manual.
USB Flash Drives
You can print images on USB flash drives (sold separately) by inserting the
drive into the USB port on SELPHY (=
16).
Supported Images
JPEG images conforming to the Exif standard can be printed with SELPHY.
• Images may not be displayed or printed correctly depending on their size or if
they have been edited on a computer.
14
Cover
Contents
Part Names
Print Settings
Printing via USB
Cable
Troubleshooting
Appendix
Printing via Wi-Fi
Basic Operations
Printing Images
Select images and specify the number of prints as follows. Here, printing
from an SD memory card is described as an example, but you can print
from other memory cards with the same steps.
1 Turn on SELPHY.
Hold the <q> button until the screen at
left is displayed.
To turn off SELPHY, hold the <q> button
again until the screen changes.
2 Raise the screen (LCD monitor).
Never force the screen up more than 45°,
which may damage the printer or cause
malfunction.
3 Insert the memory card into the
slot.
Insert the memory card facing as shown
until it clicks into place.
To remove the card, push it in until it
clicks, and then slowly release it.
The image display screen used in the
next step is displayed (=
6).
Approx. 45°
Label side
4 Choose an image.
Press the <l><r> buttons to select an
image to print.
To jump forward or back by five images,
hold down the <l><r> buttons.
5 Specify the number of prints.
Press the <u><d> buttons to specify
the number of prints.
To increase or decrease the quantity
by five prints, hold down the <u><d>
buttons.
To print other images at the same time,
repeat steps 4 – 5.
Prints of current image
Total prints
15
Cover
Contents
Part Names
Print Settings
Printing via USB
Cable
Troubleshooting
Appendix
Printing via Wi-Fi
Basic Operations
6 Print.
Press the <p> button to start printing.
While printing, paper passes in and out
of the back of SELPHY several times.
Do not touch the paper until printing is
finished and the print is ejected onto the
paper cassette.
Do not allow 19 or more prints to
collect in the ejection area on the paper
cassette.
To cancel printing in progress, always
press the <v> button.
7 Add more paper as needed.
If a message indicates that the paper
has run out, remove the paper cassette
without turning off the power.
Add more paper to the cassette (=
9)
and reinsert the cassette in SELPHY
(=
10).
8 Change the ink cassette as
needed.
If a message indicates that the ink
has run out, open the ink cassette
compartment cover without turning off the
power.
To remove the ink cassette, move the
lock in the direction shown. Insert a new
ink cassette (=
8, 10).
• Never pull out the paper cassette, open the ink cassette
compartment cover, or remove a memory card while printing or
when you hear printer operation sounds immediately after it has
been turned on. This may damage the printer.
• To cancel printing in progress, always press the <v> button.
Printing cannot be canceled by pressing the <q> button, and
unplugging the printer may damage it.
• Image display in step 4 may take some time when memory cards contain
many images.
• If a message indicates that DPOF images remain, see “Printing Using Camera
Settings (DPOF Print)” (=
52).
• You can specify up to 99 images in step 4 and up to 99 prints per image in
step 5. However, the total number of prints cannot exceed 999.
• Even if you press the <v> button to cancel printing, the printer will continue
printing until the current sheet is finished.
16
Cover
Contents
Part Names
Print Settings
Printing via USB
Cable
Troubleshooting
Appendix
Printing via Wi-Fi
Basic Operations
Avoiding Left Over Paper
Note the following to prevent wasted paper, which occurs if ink is consumed
faster than the paper.
• Do not turn the sprocket too much when removing slack from the ink
sheet (=
8).
• To cancel printing in progress, always press the <v> button; after
pressing the <v> button, never turn off the power before SELPHY is
finished printing (step 6).
• If a message indicates that the paper has run out, add paper without
turning off the printer or removing the ink cassette (step 7). Otherwise,
press the <v> button to cancel printing (step 6).
Note that under some conditions, even if you follow these instructions, ink
may be consumed faster than the paper, leaving you with excess paper.
Printing from USB Flash Drives
Images on USB flash drives (sold separately) can be printed the same way
as images on memory cards.
Insert a USB flash drive.
Remove any inserted memory cards.
Insert a USB flash drive as shown.
After this, all steps are the same as for
printing images from memory cards
(=
1415).
• Some USB flash drives may be more difficult than others to insert and remove,
and some may not work as expected.
• For instructions, refer to the flash drive user manual.
Making One Print from a Selected Image
For a convenient way to make a single print of a selected image, follow
these steps.
Choose and print an image.
Choose an image as described in steps
1 – 4 of “Printing Images” (=
14).
Press the <p> button for a single print
of the selected image.
• A single print is not produced this way if you follow steps 4 – 5 in
“Printing Images” (=
14) to choose images and the number
of prints. To use this method for individual prints, make sure the
number of prints is [0] in step 4 on =
14 beforehand.
17
Cover
Contents
Part Names
Print Settings
Printing via USB
Cable
Troubleshooting
Appendix
Printing via Wi-Fi
Basic Operations
After Printing
Turn off SELPHY (=
12) and remove any memory cards or USB
flash drives.
Lower the screen for storage.
Unplug the power cord from the outlet and disconnect the adapter plug
from SELPHY.
• If the compact power adapter is still warm, wait for it to cool down
before putting it away.
Remove the paper cassette and close the paper cassette compartment
cover. Leave any remaining paper in the cassette, and store the
cassette in a dark, cool, and dry place away from dust.
• Leave the ink cassette in SELPHY.
• Store SELPHY on a flat surface, away from sunlight and dust. Any
dust that gets inside SELPHY may cause white banding on photos
or damage the printer.
• Store any extra ink cassettes in the original package or a bag, away
from sunlight and dust.
• Store any unused paper or ink cassettes in their unopened
packages, away from sunlight.
Storing Prints
• To remove any extra paper from the
edges of a print, fold the paper along the
perforations and tear the edges off.
• When writing on prints, use an oil-based
pen.
• To prevent discoloration, do not store
prints where temperatures exceed 40 °C
(104 °F), in humid or dusty places, or in
direct sunlight.
• Also avoid the following actions, which may cause discoloration, fading,
or bleeding: sticking tape on the printed surface, allowing the printed
surface to contact vinyl or plastic, applying alcohol or volatile solvents to
the printed surface, or leaving the printed surface pressed firmly against
other surfaces or objects over extended periods.
• When storing prints in an album, choose an album with photo covers
made of nylon, polypropylene, or cellophane.
• Color may change over time or depending on storage conditions.
Canon cannot be held liable for discoloration.
18
Cover
Contents
Part Names
Basic Operations
Printing via USB
Cable
Troubleshooting
Appendix
Printing via Wi-Fi
Print Settings
Print Settings
Explore a variety of printing features in this chapter, such as cropping images, preparing ID
photos, and enhancing images.
Printing All Images ..................................................................................19
Cropping Images .....................................................................................20
Printing ID Photos ...................................................................................21
Cropping Passport Images ..............................................................................22
Adjusting Settings ..................................................................................23
Configuring Settings ........................................................................................23
Choosing the Finish (Print Finish) ...................................................................24
Printing with a Border around Images (Borders) .............................................24
Choosing a Layout (Page Layout) ...................................................................25
Optimal Prints with Auto Correction (Image Optimize) ....................................26
Adjusting the Brightness .................................................................................26
Making Skin Look Smooth (Smooth Skin) .......................................................27
Adjusting the Color Tone (My Colors) .............................................................27
Reducing the Appearance of Red-Eye (Correct Red-Eye)..............................28
Printing with the Date (Date) ...........................................................................28
Changing How the Date Is Displayed (Date Format) ......................................29
Saving Energy (Auto Power Down) .................................................................29
19
Cover
Contents
Part Names
Basic Operations
Printing via USB
Cable
Troubleshooting
Appendix
Printing via Wi-Fi
Print Settings
Printing All Images
Print all images on a memory card at once as follows.
1 Access the menu.
Press the <k> button.
2 Access the setting screen.
Press the <u><d> buttons to select
[Print All Images], and then press the
<o> button.
3 Choose the number of prints.
Press the <u><d> buttons to specify
the number of prints.
4 Print.
Press the <p> button to start printing.
To cancel printing, press the <v> button.
• If the memory card contains more than 1,000 images, the 999 most recent
images are printed, as determined by shooting date.
• You can specify up to 99 prints in step 3. However, the total number of prints
cannot exceed 999.
(For example, you can specify up to nine prints of each image if the card
contains 100 images.)
Prints per
image
Number of sheets
required
Number of
images on card
20
Cover
Contents
Part Names
Basic Operations
Printing via USB
Cable
Troubleshooting
Appendix
Printing via Wi-Fi
Print Settings
Cropping Images
Print only selected areas of an image as follows.
1 Access the cropping screen.
Choose an image as described in step 4
of “Printing Images” (=
14), press the
EDIT button, and then press the <o>
button.
A crop frame is displayed, showing the
image area that will be cropped.
2 Adjust the image area to crop.
To switch the crop frame between portrait
and landscape orientation, press the
EDIT button.
To move the crop frame, press the
<u><d><l><r> buttons.
To enlarge the crop frame, press the
<-> button, and to reduce it, press the
<0> button.
3 Confirm the setting.
To confirm the cropping area and return
to the image display screen, press the
<o> button.
is now shown in the
lower left.
To crop other images for printing with the
first one, repeat steps 1 – 3.
4 Print.
Print as described in step 6 of “Printing
Images” (=
15).
After printing, crop settings are cleared.
• To adjust the cropping area once you have set it, press the EDIT button on the
image display screen, press the <u><d> buttons to select [Adjust Cropping],
and then press the <o> button. Repeat steps 2 – 3.
• To cancel cropping after you have set the cropping area, press the EDIT button
on the image display screen, press the <u><d> buttons to select [Reset
Cropping], press the <o> button to access the reset cropping screen, and
then press the <o> button again.
• Cropping areas you have set are cleared if you turn off SELPHY or remove the
memory card before printing.
• You can specify cropping for up to 99 images at once.
• Cropping is not available when printing with [Print All Images] or [DPOF Print]
or when [Page Layout] (=
25) is set to [ Index] or [ Shuffle].
• The cropping aspect ratio indicated by the frame displayed on images cannot
be adjusted.
• To change the number of prints, press the <u><d> buttons on the image
display screen in step 3. Note that specifying zero prints will not clear cropping
settings.
  • Page 1 1
  • Page 2 2
  • Page 3 3
  • Page 4 4
  • Page 5 5
  • Page 6 6
  • Page 7 7
  • Page 8 8
  • Page 9 9
  • Page 10 10
  • Page 11 11
  • Page 12 12
  • Page 13 13
  • Page 14 14
  • Page 15 15
  • Page 16 16
  • Page 17 17
  • Page 18 18
  • Page 19 19
  • Page 20 20
  • Page 21 21
  • Page 22 22
  • Page 23 23
  • Page 24 24
  • Page 25 25
  • Page 26 26
  • Page 27 27
  • Page 28 28
  • Page 29 29
  • Page 30 30
  • Page 31 31
  • Page 32 32
  • Page 33 33
  • Page 34 34
  • Page 35 35
  • Page 36 36
  • Page 37 37
  • Page 38 38
  • Page 39 39
  • Page 40 40
  • Page 41 41
  • Page 42 42
  • Page 43 43
  • Page 44 44
  • Page 45 45
  • Page 46 46
  • Page 47 47
  • Page 48 48
  • Page 49 49
  • Page 50 50
  • Page 51 51
  • Page 52 52
  • Page 53 53
  • Page 54 54
  • Page 55 55
  • Page 56 56
  • Page 57 57
  • Page 58 58
  • Page 59 59
  • Page 60 60
  • Page 61 61
  • Page 62 62
  • Page 63 63
  • Page 64 64
  • Page 65 65

Canon Selphy CP910 User manual

Category
Label printers
Type
User manual
This manual is also suitable for

Ask a question and I''ll find the answer in the document

Finding information in a document is now easier with AI