Celestron Addendum to the Advanced GT mount (firmware v.4.10) User manual
- Category
- Telescopes
- Type
- User manual
This manual is also suitable for

The following is a supplemental addendum to the included instruction manual that
explains the new features of Celestron's Advanced Series Telescopes. Please refer to
this addendum for information concerning the new hand control features included with
your telescope. Refer to the owner's manual for step-by-step instruction on assembling
and using your telescope.
The Advanced Series GT, computerized version of each telescope has a hand controller designed to give you
instant access to all the functions that your telescope has to offer. With automatic slewing to over 40,000
objects, and common sense menu descriptions, even a beginner can master its variety of features in just a few
observing sessions. Below is a brief description of the individual components of the computerized hand
controller:
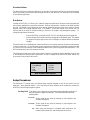
1. Liquid Crystal Display (LCD) Window: Has a dual-line, 16 character display screen that is backlit
for comfortable viewing of telescope information and scrolling text.
2. Align: Instructs the telescope to use a selected star or object as an alignment position.
3. Direction Keys: Allows complete control of the telescope in any direction. Use the direction keys to
move the telescope to the initial alignment stars or for centering objects in the eyepiece.
Figure 3-1
The Advanced GT Hand Control
1
2
3
7
8
9
10
4
5
6
11
12

4. Catalog Keys: The Advanced Series has keys on the hand control to allow direct access to each of the
catalogs in its database. The hand control contains the following catalogs in its database:
Messier – Complete list of all Messier objects.
NGC – Complete list of all the deep-sky objects in the Revised New General Catalog.
Caldwell – A combination of the best NGC and IC objects.
Planets - All 8 planets in our Solar System plus the Moon.
Stars – A compiled list of the brightest stars from the SAO catalog.
List – For quick access, all of the best and most popular objects in the Advanced GT database have
been broken down into lists based on their type and/or common name:
Named Stars
Common name listing of the brightest stars in the
sky.
Named Objects
Alphabetical listing of over 50 of the most popular
deep sky objects.
Double Stars
Numeric-alphabetical listing of the most visually
stunning double, triple and quadruple stars in the
sky.
Variable Stars
Select list of the brightest variable stars with the
shortest period of changing magnitude.
Asterisms
A unique list of some of the most recognizable star
patterns in the sky.
CCD Objects
A custom list of many interesting galaxy pairs, trios
and clusters that are well suited for CCD imaging
with the Advanced GT telescope.
IC Objects
A complete list of all the Index Catalog deep-sky
objects.
Abell Objects
A custom list of the Abell Catalog deep-sky
galaxies.
Constellation
A complete list of all 88 constellations.
5. Info: Displays coordinates and useful information about objects selected from the Advanced GT
database.
6. Tour: Activates the tour mode, which seeks out all the best objects for the current date and time, and
automatically slews the telescope to those objects.
7. Enter: Pressing Enter allows you to select any of the Advanced GT functions and accept entered
parameters.
8. Undo: Undo will take you out of the current menu and display the previous level of the menu path.
Press Undo repeatedly to get back to a main menu or use it to erase data entered by mistake.
9. Menu: Displays the many setup and utilities functions such as tracking rates and user defined objects
and many others.
10. Scroll Keys:
Used to scroll up and down within any of the menu lists. A double-arrow will appear on
the right side of the LCD when there are sub-menus below the displayed menu. Using these keys will
scroll through those sub-menus.
11. Rate: Instantly changes the rate of speed of the motors when the direction buttons are pressed.
12. RS-232 Jack: Allows you to interface with a computer and control the telescope remotely.
Hand Control Operation
This section describes the basic hand control procedures needed to operate the Advanced GT Series Telescopes.
These procedures are grouped into three categories: Alignment, Setup and Utilities. The alignment section deals
with the initial telescope alignment as well as finding objects in the sky; the setup section discusses changing
parameters such as tracking mode and tracking rate; finally, the last section reviews all of the utilities functions
such as calibrating your mount, polar alignment and backlash compensation.

A
A
l
l
i
i
g
g
n
n
m
m
e
e
n
n
t
t
P
P
r
r
o
o
c
c
e
e
d
d
u
u
r
r
e
e
s
s
In order for the telescope to accurately point to objects in the sky, it must first be aligned with known positions
(stars) in the sky. With this information, the telescope can create a model of the sky, which it uses to locate any
object with known coordinates. There are many ways to align your telescope with the sky depending on what
information the user is able to provide: Two Star Align uses the entered time/location information and allows
the user to select which two alignment stars the telescope will automatically slew to. One Star Align uses the
same time/location information but only uses one star for alignment. Solar System Align will display a list of
visible daytime objects (planets and the moon) available to align the telescope. Quick-Align will ask you to
input all the same information as you would for the other Alignment procedures. However, instead of slewing
to the alignment stars for centering and alignment, the telescope bypasses this step and simply models the sky
based on the information given. Finally, Last Alignment restores your last saved star alignment and switch
position. Last Alignment also serves as a good safeguard in case the telescope should lose power.
S
S
t
t
a
a
r
r
t
t
u
u
p
p
P
P
r
r
o
o
c
c
e
e
d
d
u
u
r
r
e
e
Before any of the described alignments are performed, the telescope mount needs to be positioned so that the
index marks are aligned on both the right ascension and declination axes (see Fig 2-8).
Once the index position has been set, the hand control will display the last entered date and time information
stored in the hand control. Once the telescope is powered on:
1. Press ENTER begin the alignment process.
2. The hand control will ask the user to set the mount to its index position. Move the telescope mount,
either manually or with the hand control, so that the index marked in both R.A. and Dec are aligned
(see Fig 2-8). Press Enter to continue.
3. The hand control will then display the last entered local time, date, time zone, longitude and latitude.
• Use the Up/Down keys (10) to view the current parameters.
• Press ENTER to accept the current parameters.
• Press UNDO to enter current date and time information into the hand control. The following
information will be displayed:
Location - The hand control will display a list of cities to choose from. Choose the city from the
database that is closest to your current observing site. The city you choose will be
remembered in the hand controls memory so that it will be automatically displayed the next
time an alignment is done. Alternatively, if you know the exact longitude and latitude of your
observing site, it can be entered directly into the hand control and remembered for future use
as well. To choose a location city:
Use the Up and Down scroll keys to choose between City Database and Custom Site. City Database
will allow you to select the closest city to your observing site from a list of either international or U.S.
location. Custom Site allows you to enter the exact longitude and latitude of your observing site. Select
City Database and press ENTER.
The hand control will allow you to choose from either U.S. or international locations. For a listing of
U.S. locations by state and then by city, press ENTER while United States is displayed. For
international locations, use the Up or Down scroll key to select International and press ENTER.
Use the Up and Down Scroll buttons to choose your current state (or country if International locations
was selected) from the alphabetical listing and press ENTER.
Use the Up and Down Scroll buttons to choose the closest city to your location from the displayed list
and press ENTER.
Time - Enter the current local time for your area. You can enter either the local time (i.e. 08:00),
or you can enter military time (i.e. 20:00 ).
• Select PM or AM. If military time was entered, the hand control will bypass this step.
• Choose between Standard time or Daylight Savings time. Use the Up and Down scroll
buttons (10) to toggle between options.
• Select the time zone that you are observing from. Again, use the Up and Down buttons (10)
to scroll through the choices. Refer to Time Zone map in Appendix for more information.
Date - Enter the month, day and year of your observing session.

4. Select one of the alignment methods as described below.
Note: If incorrect information is entered into the hand control, the UNDO button acts like a back space button
allowing the user to re-enter the correct data.
T
T
w
w
o
o
S
S
t
t
a
a
r
r
A
A
l
l
i
i
g
g
n
n
Two-Star Align allows the user to select two stars on which to align the telescope. To align your telescope
using the Two-Star Align method:
1. Select Two-Star Align from the alignment choices given. Based on the date and time information
entered, the hand control will automatically select and display a bright star that is above the horizon.
• Press ENTER to select this star as your first alignment
star.
• If for some reason the chosen star is not visible
(perhaps behind a tree or building) press UNDO to
have the hand control automatically select the next
brightest star.
• Or you can use the Up/Down keys to browse the entire
Named Star list and select any one of over two hundred
alignment stars.
• The hand control will only display stars on one side of
the Meridian. To display alignment stars on the
opposite side of the Meridian, simply press the MENU
button before selecting your first alignment star. By
default, Meridian filtering is enabled with the side of
the Meridian that has the largest number of stars above
the horizon. Meridian filtering is indicated in the upper
right hand corner of the LCD display with an “E” (East)
or “W” (West). If nothing appears in the corner of the
LCD, Meridian filtering is not enabled.
2. Once the telescope is finished slewing to your first alignment
star, the display will ask you to use the arrow buttons to align the selected star with the cross hairs in
the center of the finderscope. When centered in the
finder, press ENTER.
3. The display will then instruct you to center the star in
the field of view of the eyepiece. When the star is
centered, press ALIGN to accept this star as your first
alignment star.
4. After the first alignment star has been entered the hand
control will automatically select a second alignment
star and have you repeat this procedure for that star.
When the telescope has been aligned on both stars the
display will ask you if you wish to add any additional
calibration stars. Calibration stars are used to improve the
pointing accuracy of your telescope by compensating for
subtle optical-mechanical misalignments between the
telescope optics and the mount. Therefore it is usually a
good idea to add at least two additional calibration stasr to
improve the telescope’s all-sky pointing accuracy. If you
choose not to add any additional calibration stars you can
always add them later after a successful alignment has been
completed (see Improving Pointing Accuracy section
below).
5. Press ENTER to select a calibration star. Select a star the same way you did with the first two
alignments stars and press ENTER. You will notice that all the calibration stars displayed are located
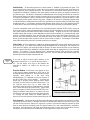
Mount Calibration
After a Two Star Alignment is
successfully completed, the hand
control will ask if you wish to add
calibration stars.
Adding calibration stars is necessary
to calculate and compensate for
"cone" error inherent in all German
equatorial mounts. Cone error is the
inaccuracy that results from the
optical tube not being exactly
perpendicular to the mount’s
declination axis. The telescope is
able to automatically determine the
cone error value by always using
calibration stars on the opposite
side of the Meridian from the
alignment stars. (see Figure 3-2)
Figure 3-2
The Meridian is an imaginary line in the sky
that starts at the North celestial pole and
ends at the South celestial pole and passes
through the zenith. If you are facing South,
the meridian starts from your Southern
horizon and passes directly overhead to the
North celestial pole.

on the opposite side of the side of the sky (Meridian) as the original alignment stars. This is essential
for an accurate calibration of the mount.
Finally you can choose to continue to add additional calibration stars or Press UNDO to complete the
alignment.
Tips for adding calibration stars:
• It is recommended that users add at least two calibration stars for optimal point accuracy.
• Calibration stars that are near the poles are intentionally filtered out because they can result in a
less accurate calibration.
• Although it is not be necessary to use calibration stars if the telescope mount has not been moved
since its original alignment/calibration, it may be necessary to add calibration stars if the optical
tube has been removed for any reason.
O
O
n
n
e
e
S
S
t
t
a
a
r
r
A
A
l
l
i
i
g
g
n
n
One-Star Alignment works much the same way as Two-Star Align but uses only a single star in the sky for
alignment. This method of alignment is not as accurate as the two-star alignment and is recommended only for
telescopes that are permanently and accurately polar aligned.
S
S
o
o
l
l
a
a
r
r
S
S
y
y
s
s
t
t
e
e
m
m
A
A
l
l
i
i
g
g
n
n
Solar System Align is designed to provide excellent tracking and GoTo performance by using solar system
objects (Sun, Moon and planets) to align the telescope with the sky. Solar System Align is a great way to align
your telescope for daytime viewing as well as a quick way to align the telescope for nighttime observing.
Never look directly at the sun with the naked eye or with a telescope (unless you have the proper solar
filter). Permanent and irreversible eye damage may result.
1. Select Solar System Align from the alignment options.
2. The SELECT OBJECT message will appear in the top row of the display. Use the Up and Down scroll keys (10) to
select the daytime object (planet, moon or sun) you wish to align. Press ENTER.
3. Use the direction arrow buttons to carefully center the object in the finderscope. Press ENTER when centered.
4. Then, center the object in the eyepiece and press ALIGN.
Once in position, the telescope will model the sky based on this information and display Alignment
Successful.
Tips for Using Solar System Align
• For safety purposes, the Sun will not be displayed in any of the hand control’s customer object lists unless it is
enabled from the Utilities Menu. To allow the Sun to be displayed on the hand control, do the following:
1. Press the UNDO button until the display reads “Advanced GT”
2. Press the MENU button and use the Up and Down keys to select the Utilities menu. Press ENTER.
3. Use the UP and Down keys to select Sun Menu and press ENTER.
4. Press ENTER again to allow the Sun to appear on the hand control display.
The Sun can be removed from the display by using the same procedure as above.
• To improve the telescope pointing accuracy, you can add alignment stars as described in the Improving Pointing
Accuracy section below.
Q
Q
u
u
i
i
c
c
k
k
-
-
A
A
l
l
i
i
g
g
n
n
Quick-Align uses all the date and time information entered at startup to align the telescope. However, instead of slewing to
the alignment stars for centering and alignment, the telescope bypasses this step and simply models the sky based on the

information given. This will allow you to roughly slew to the coordinates of bright objects like the moon and planets and
gives the telescope the information needed to track objects in any part of the sky (depending on accuracy of polar
alignment). Quick-Align is not meant to be used to accurately locate small or faint deep-sky objects or to track objects
accurately for photography.
To use Quick-Align, simply select Quick Align from the alignment options and press ENTER. The telescope will
automatically use the entered date/time parameters to align itself with the sky and display Alignment Successful.
NOTE: Once a Quick-Align has been done, you can add alignment and/or calibration stars to improve your telescopes
pointing accuracy. See the Pointing Accuracy section below for details.
L
L
a
a
s
s
t
t
A
A
l
l
i
i
g
g
n
n
m
m
e
e
n
n
t
t
The Last Alignment method will automatically recall the last stored index positions to continue using the
alignment that was saved when the telescope was last powered down. This is a useful feature should your
telescope accidentally lose power or be powered down.
NOTE: Just like with Quick-Align, you can use the Alignment Stars or Sync feature (see below) to improve
your telescopes pointing accuracy after using the Last Alignment method. If the mount has not moved since the
previous alignment then it is recommended to use Sync to improve the pointing accuracy of your mount.
However, if the mount has been moved then changing alignment stars is the best way to re-align your mount.
To maintain a more accurate alignment over a series of observing sessions, use the Hibernate feature described
later in this chapter.
I
I
m
m
p
p
r
r
o
o
v
v
i
i
n
n
g
g
P
P
o
o
i
i
n
n
t
t
i
i
n
n
g
g
A
A
c
c
c
c
u
u
r
r
a
a
c
c
y
y
The Advanced Series telescopes have several options that allow you to improve the pointing accuracy of your
mount in a variety of ways.
Alignment Stars:
Alignment stars allows you to replace any of the original alignment stars with a new star or celestial object.
This can be useful if you have aligned your telescope using the Quick-Align method. You can add alignment
stars to align the telescope on actual objects in the sky. This will improve the pointing accuracy of your
telescope without having to re-enter addition information.
To replace an existing alignment star with a new alignment star:
1. Select the desired star (or object) from the database and slew to it.
2. Once centered, press the UNDO button until you are at the main menu.
3. With Advanced GT displayed, press the ALIGN key on the hand control.
4. Use the Up/Down buttons and select the Alignment Stars option and press ENTER.
5. The display will then ask you which alignment star you want to replace. Use the UP and Down scroll
keys to select the alignment star to be replaced and press ENTER. It is usually best to replace the star
closest to the new object. This will space out your alignment stars across the sky.
6. Align the star in the center of the finderscope and press ENTER.
7. Carefully center the object in the center of the eyepiece and press ALIGN
Calibration Stars:
Calibration stars are used to improve the pointing accuracy of your telescope’s mount by compensating for
misalignments between the telescope optics and the mount
To add calibration stars:
1. Select the desired star (or object) from the database and slew to it.
2. Once centered, press the UNDO button until you are at the main menu.
3. With Advanced GT displayed, press the ALIGN key on the hand control.
4. Use the Up/Down buttons and select the Calib Sta
rs option and press ENTER.
5. Align the object in the center of the finderscope and press ENTER.

6. Carefully center the object in the center of the eyepiece and press ALIGN.
7. Use the Up/Down arrow keys to assign a number for the star and press ENTER.
To add additional calibration stars, repeat steps 1-6 again.
Tips for adding calibration stars:
• Make sure that the calibration stars that you choose are on the other side of the meridian from the
alignment stars that you used to align the telescope.
Sync:
The Sync feature can be used to improve pointing accuracy in a specific region of the sky. Sync is a very
useful feature especially when used in conjunction with the Constellation tour and Identify feature in which
you will be exploring smaller areas of the sky. To Sync on an object:
1. Select the desired star (or object) from the database and slew to it.
2. Once centered, press the UNDO button until you are at the main menu.
3. With Advanced GT displayed, press the ALIGN key on the hand control.
4. Use the Up/Down buttons and select the Sync option and press ENTER.
5. Align the Sync object in the center of the finderscope and press ENTER.
6. Carefully center the object in the center of the eyepiece and press ALIGN.
Your telescope’s pointing accuracy will now be improved in that area of the sky.
NOTE: Sync can improve your telescope’s pointing accuracy over a wide area or over smaller areas of the sky
depending on the quality of the initial alignment, as well as where the telescope was pointing when the Sync
was done.
Undo Sync:
Since doing a Sync can affect your pointing accuracy in other parts of the sky, it may be necessary to ‘Un-
Sync” your telescope when exploring other parts of the sky. Doing an Undo Sync will restore the pointing of
your telescope to its original alignment. Additionally, if you wish to add calibration stars or re-alignment stars
you will be asked to do an Undo Sync before you will be able to proceed
O
O
b
b
j
j
e
e
c
c
t
t
C
C
a
a
t
t
a
a
l
l
o
o
g
g
Selecting an Object
Now that the telescope is properly aligned, you can choose an object from any of the catalogs in the telescope's
extensive database. The hand control has a key (4) designated for each of the catalogs in its database. There are
two ways to select objects from the database: scrolling through the named object lists and entering object
numbers.
Pressing the LIST key on the hand control will access all objects in the database that have common names or
types. Each list is broken down into the following categories: Named Stars, Named Object, Double Stars,
Variable Stars, Asterisms and CCD Objects. Selecting any one of these catalogs will display a numeric-
alphabetical listing of the objects under that list. Pressing the Up and Down keys (10) allows you to scroll
through the catalog to the desired object.
When scrolling through a long list of objects, holding down either the Up or Down key will allow you to scroll
through the catalog more rapidly by only displaying every fifth catalog object.
Pressing any of the other catalog keys (M, CALD, NGC, or STAR) will display a blinking cursor below the
name of the catalog chosen. Use the numeric key pad to enter the number of any object within these
standardized catalogs. For example, to find the Orion Nebula, press the "M" key and enter "042".
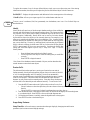
Helpful
Hint

Slewing to an Object
Once the desired object is displayed on the hand control screen, choose from the following options:
• Press the INFO Key. This will give you useful information about the selected object such as
R.A. and declination, magnitude size and text information for many of the most popular objects.
• Press the ENTER Key. This will automatically slew the telescope to the coordinates of the
object.
Caution: Never slew the telescope when someone is looking into the eyepiece. The telescope can move at fast slew
speeds and may hit an observer in the eye.
Object information can be obtained without having to do a star alignment. After the telescope is powered on,
pressing any of the catalog keys allows you to scroll through object lists or enter catalog numbers and view the
information about the object as described above.
Finding Planets
Your telescope can locate all 8 of our solar systems planets plus the Moon. However, the hand control will
only display the solar system objects that are above the horizon (or within its filter limits). To locate the planets,
press the PLANET key on the hand control. The hand control will display all solar system objects that are
above the horizon:
• Use the Up and Down keys to select the planet that you wish to observe.
• Press INFO to access information on the displayed planet.
• Press ENTER to slew to the displayed planet.
Tour Mode
The Advanced Series telescopes include a tour feature which automatically allows the user to choose from a list
of interesting objects based on the date and time in which you are observing. The automatic tour will display
only those objects that are within your set filter limits (see Filter Limits in the Setup Procedures section of the
manual). To activate the Tour mode, press the TOUR key (6) on the hand control. The hand control will
display the best objects to observe that are currently in the sky.
• To see information and data about the displayed object, press the INFO key.
• To slew to the object displayed, press ENTER.
• To see the next tour object, press the Up key.
Constellation Tour
In addition to the Tour Mode, your telescope has a Constellation Tour that allows the user to take a tour of all
the best objects in each of the 88 constellations. Selecting Constellation from the LIST menu will display all
the constellation names that are above the user defined horizon (filter limits). Once a constellation is selected,
you can choose from any of the database object catalogs to produce a list of all the available objects in that
constellation.
• To see information and data about the displayed object, press the INFO key.
• To slew to the object displayed, press ENTER.
• To see the next tour object, press the Up key.

Direction Buttons
The hand control has four direction buttons (3) in the center of the hand control which control the telescope's
motion in Declination (north and south) and Right Ascension (east and west). The telescope can be controlled
at nine different speed rates.
Rate Button
Pressing the RATE key (11) allows you to instantly change the speed rate of the motors from high speed slew
rate to precise guiding rate or anywhere in between. Each rate corresponds to a number on the hand controller
key pad. The number 9 is the fastest rate (3º per second, depending on power source) and is used for slewing
between objects and locating alignment stars. The number 1 on the hand control is the slowest rate (.5x
sidereal) and can be used for accurate centering of objects in the eyepiece and photographic guiding. To
change the speed rate of the motors:
• Press the RATE key on the hand control. The LCD will display the current speed rate.
• Press the number on the hand control that corresponds to the desired speed. The number
will appear in the upper-right corner of the LCD display to indicate that the rate has been
changed.
The hand control has a "double button" feature that allows you to instantly speed up the motors without having
to choose a speed rate. To use this feature, simply press the arrow button that corresponds to the direction that
you want to move the telescope. While holding that button down, press the opposite directional button. This
will increase the slew rate to the maximum slew rate.
The direction that a star moves in the eyepiece when a direction is pressed will change depending on which side
of the Meridian the telescope tube is positioned. In order to change the direction of the arrow buttons, see
Scope Setup Features later in this section.
1 = .5x 6 = 64x
2 = 1x (sidereal) 7 = .5º / sec
3 = 4x 8 = 2º / sec
4 = 8x 9 = 3º / sec
5 = 16x
S
S
e
e
t
t
u
u
p
p
P
P
r
r
o
o
c
c
e
e
d
d
u
u
r
r
e
e
s
s
The Advanced GT contains many user defined setup functions designed to give the user control over the
telescope's many advanced features. All of the setup and utility features can be accessed by pressing the
MENU key and scrolling through the options:
Tracking Mode This allows you to change the way the telescope tracks depending on the type of
mount being used to support the telescope. The telescope has three different
tracking modes:
EQ North
Used to track the sky when the telescope is polar aligned in the
Northern Hemisphere.
EQ South
Used to track the sky when the telescope is polar aligned in the
Southern Hemisphere.
Off
When using the telescope for terrestrial (land) observation, the
tracking can be turned off so that the telescope never moves.
Nine available slew s
p
eeds

Tracking Rate In addition to being able to move the telescope with the hand control buttons, your
telescope will continually track a celestial object as it moves across the night sky.
The tracking rate can be changed depending on what type of object is being
observed:
Sidereal
This rate compensates for the rotation of the Earth by moving the
telescope at the same rate as the rotation of the Earth, but in the
opposite direction. When the telescope is polar aligned, this can
be accomplished by moving the telescope in right ascension only.
Lunar
Used for tracking the moon when observing the lunar landscape.
Solar
Used for tracking the Sun when solar observing with the proper
filter.
View Time-Site - Displays the current time and longitude/latitude downloaded from the optional CN-16 GPS
receiver. It will also display other relevant time-site information like time zone, daylight saving and local
sidereal time. Local sidereal time (LST) is useful for knowing the right ascension of celestial objects that are
located on the Meridian at that time. View Time-Site will always display the last saved time and location entered
while it is linking with the GPS. Once current information has been received, it will update the displayed
information. If GPS is switched off or not present, the hand control will only display the last saved time and
location.
User Defined Objects - Your telescope can store over 100 different user defined objects in its memory (99
sky objects and 9 land objects). The objects can be daytime land objects or an
interesting celestial object that you discover that is not included in the regular
database. There are several ways to save an object to memory depending on what
type of object it is:
GoTo Object: To go to any of the user defined objects stored in the database, scroll down to either
GoTo Sky Obj or Goto Land Obj and enter the number of the object you
wish to select and press ENTER. The telescope will automatically retrieve and
display the coordinates before slewing to the object.
Save Sky Object: Your telescope stores celestial objects to its database by saving its right ascension
and declination in the sky. This way the same object can be found each time the
telescope is aligned. Once a desired object is centered in the eyepiece, simply
scroll to the "Save Sky Obj" command and press ENTER. The display will ask
you to enter a number between 1-99 to identify the object. Press ENTER again to
save this object to the database.
Save Database (Db)
Object: This feature allows you to create your own custom tour of database objects by
allowing you to record the current position of the telescope and save the name of
the object by selecting it from any one of the database catalogs. These objects then
can be accessed by selecting GoTo Sky Object.
Enter R.A. - Dec: You can also store a specific set of coordinates for an object just by entering the
R.A. and declination for that object. Scroll to the "Enter RA-DEC " command
and press ENTER. The display will then ask you to enter first the R.A. and then the
declination of the desired object.
Save Land Object: The telescope can also be used as a spotting scope on terrestrial objects. Fixed land
objects can be stored by saving their altitude and azimuth relative to the location of
the telescope at the time of observing. Since these objects are relative to the
location of the telescope, they are only valid for that exact location. To save land
objects, once again center the desired object in the eyepiece. Scroll down to the
"Save Land Obj" command and press ENTER. The display will ask you to
enter a number between 1-9 to identify the object. Press ENTER again to save this
object to the database.

To replace the contents of any of the user defined objects, simply save a new object using one of the existing
identification numbers; the telescope will replace the previous user defined object with the current one.
Get RA/DEC - Displays the right ascension and declination for the current position of the telescope.
Goto R.A/ Dec - Allows you to input a specific R.A. and declination and slew to it.
To store a set of coordinates (R.A./Dec) permanently into the database, save it as a User Defined Object as
described above.
Identify
Identify Mode will search any of the telescope's database catalogs or lists and display
the name and offset distances to the nearest matching objects. This feature can serve
two purposes. First, it can be used to identify an unknown object in the field of view
of your eyepiece. Additionally, Identify Mode can be used to find other celestial
objects that are close to the objects you are currently observing. For example, if your
telescope is pointed at the brightest star in the constellation Lyra, choosing Identify
and then searching the Named Star catalog will no doubt return the star Vega as the
star you are observing. However, by selecting Identify and searching by the Named
Object or Messier catalogs, the hand control will let you know that the Ring Nebula
(M57) is approximately 6° from your current position. Searching the Double Star
catalog will reveal that Epsilon Lyrae is only 1° away from Vega. To use the
Identify feature:
• Press the Menu button and select the Identify option.
• Use the Up/Down scroll keys to select the catalog that you would like
to search.
• Press ENTER to begin the search.
Note: Some of the databases contain thousands of objects, and can therefore take
several minutes to return the closest objects.
Precise GoTo
The Advanced Series telescopes have a precise goto function that can assist in
finding extremely faint objects and centering objects closer to the center of the field
of view for astrophotography and CCD imaging. Precise Goto automatically
searches out the closest bright star to the desired object and asks the user to carefully
center it in the eyepiece. The hand control then calculates the small difference
between its goto position and its centered position. Using this offset, the telescope
will then slew to the desired object with enhanced accuracy. To use Precise Goto:
1. Press the MENU button and use the Up/Down keys to select Precise Goto.
• Choose Database to select the object that you want to observe from any of the database catalogs
listed or;
• Choose RA/DEC to enter a set of celestial coordinates that you wish to slew to.
2. Once the desired object is selected, the hand control will search out and display the closest bright star
to your desired object. Press ENTER to slew to the bright alignment star.
3. Use the direction buttons to carefully center the alignment star in the eyepiece.
4. Press ENTER to slew to the desired object.
Scope Setup Features
Setup Time-Site
- Allows the user to customize the telescope's display by changing time and location
parameters (such as time zone and daylight savings).
Helpful
Hint
SETUP TIME-SITE
RA POSITIV
E
RA NEGATIVE
DEC POSITIV
E
DEC NEGATIV
E
ANTI-BACKLASH
LIST ALT MA
X
LIST ALT MI
N
FILTER LIMITS
RA BUTTONS
DEC BUTTONS
DIRECTION BUTTONS
RA APPROAC
H
DEC APPROAC
H
GOTO APPROACH
RA RATE
DEC RATE
AUTOGUIDE RATES
CONE VALUE
DEC INDEX
RA INDEX
MOUNT SETTINGS
RA MIN LIMITS
RA MAX LIMITS
RA LIMITS
SCOPE SETUP

Anti-backlash – All mechanical gears have a certain amount of backlash or play between the gears. This
play is evident by how long it takes for a star to move in the eyepiece when the hand control arrow buttons are
pressed (especially when changing directions). The Advanced GT's anti-backlash features allows the user to
compensate for backlash by inputting a value which quickly rewinds the motors just enough to eliminate the
play between gears. The amount of compensation needed depends on the slewing rate selected; the slower the
slewing rate the longer it will take for the star to appear to move in the eyepiece. There are two values for each
axis, positive and negative. Positive is the amount of compensation applied when you press the button, in order
to get the gears moving quickly without a long pause. Negative is the amount of compensation applied when
you release the button, winding the motors back in the other direction to resume tracking. Normally both values
should be the same. You will need to experiment with different values (from 0-99); a value between 20 and 50
is usually best for most visual observing, whereas a higher value may be necessary for photographic guiding.
To set the anti-backlash value, scroll down to the anti-backlash option and press ENTER. While viewing an
object in the eyepiece, observe the responsiveness of each of the four arrow buttons. Note which directions you
see a pause in the star movement after the button has been pressed. Working one axis at a time, adjust the
backlash settings high enough to cause immediate movement without resulting in a pronounced jump when
pressing or releasing the button. Now, enter the same values for both positive and negative directions. If you
notice a jump when releasing the button, but setting the values lower results in a pause when pressing the
button, go with the higher value for positive, but use a lower value for negative. The telescope will remember
these values and use them each time it is turned on until they are changed.
Filter Limits – When an alignment is complete, the telescope automatically knows which celestial objects are
above the horizon. As a result, when scrolling through the database lists (or selecting the Tour function), the
hand control will display only those objects that are known to be above the horizon when you are observing.
You can customize the object database by selecting altitude limits that are appropriate for your location and
situation. For example, if you are observing from a mountainous location where the horizon is partially
obscured, you can set your minimum altitude limit to read +20º. This will make sure that the hand control only
displays objects that are higher in altitude than 20º.
If you want to explore the entire object database, set the
maximum altitude limit to 90º and the minimum limit to –
90º. This will display every object in the database lists
regardless of whether it is visible in the sky from your
location.
Direction Buttons –The direction a star appears to move
in the eyepiece changes depending on which side of the
Meridian the telescope tube is on. This can create confusion
especially when guiding on a star when doing
astrophotography. To compensate for this, the direction of
the drive control keys can be changed. To reverse the
button logic of the hand control, press the MENU button
and select Direction Buttons from the Utilities menu. Use
the Up/Down arrow keys (10) to select either the
Declination (north and south) or Right Ascension (east and
west) button directions and press ENTER. Select either
positive or negative for both axes and press ENTER to save.
Setting the azimuth button direction to positive will move
the telescope in the same direction that the telescope tracks
(i.e. towards the west). Setting the altitude buttons to
positive will move the telescope counterclockwise along the DEC axis.
Goto Approach - lets the user define the direction that the telescope will approach when slewing to an object.
This allows the user the ability to minimize the affects of backlash when slewing from object to object. Just
like with Direction Buttons, setting GoTo Approach to positive will make the telescope approach an object
from the same direction as tracking (west) for Right Ascension (RA) and counterclockwise in declination.
Declination Goto approach will only apply while the telescope tube is on one side of the Meridian. Once the
tube passes over to the other side of the Meridian, the Goto approach will need to be reversed.
Observing
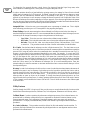
Tip!
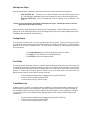
Fig 3-3 – R.A limits- This figure shows the
full range of motion for the R.A. axis

To change the Goto approach direction, simply choose Goto Approach from the Scope Setup menu, select
either Altitude or Azimuth approach, choose positive or negative and press ENTER.
In order to minimize the affect of gear backlash on pointing accuracy, the settings for Button Direction should
ideally match the settings for GoTo Approach. By default, using the up and right direction buttons to center
alignment stars will automatically eliminate much of the backlash in the gears. If you change the Goto
approach of your telescope it is not necessary to change the Button Direction as well. Simply take notice of the
direction the telescope moves when completing it final goto approach. If the telescope approaches its alignment
star from the west (negative azimuth) and clockwise (negative altitude) then make sure that the buttons used to
center the alignment stars also move the telescope in the same directions.
Autoguide Rate – Allows the user to set an autoguide rate as a percentage of sidereal rate. This is helpful
when calibrating your telescope to a CCD autoguider for long exposure photography.
Mount Settings- Once the mount settings have been calibrated (see Utilities section below) the values are
stored and displayed in the hand control. It is not recommended that the calibration values be changed, however
each setting can be changed if necessary to improve the performance of the telescope.
• Cone Value – This is the cone error value set when calibration stars are added
• DEC Index - This is the declination index error value set when calibrations stars are added.
• RA Index - This is the R.A. index error value set when Utilities / Calibrate Mount / R.A. Switch
is carried out. This procedure records the offset of the RA index marker from the Meridian.
R.A. Limits - Sets the limits that the telescope can slew in Right Ascension (R.A.) The slew limits are set to
0º to 180º; with zero being the position of the telescope when the counterweight bar is extended out towards the
west and 180º being the position when the counterweight bar is extended out toward the east (see Fig 3-3).
However, the slew limits can be customized depending on your needs. For example, if you are using CCD
imaging equipment that has cables that are not long enough to move with the telescope as it slews across the
sky, you can adjust the R.A. slew limit on the side of the mount that is restricted by the cables. Using the
example above, the user could slew the telescope in R.A. until it reaches the point that the cables are extended
to their maximum. Then by displaying the telescopes R.A. in this position (by looking at Get Axis Position
under the Utilities menu) you can determine the telescopes R.A. at its most extended position. Enter this
azimuth reading for either the maximum or minimum azimuth slew limit to ensure that the telescope will not
slew beyond this point.
Warning: In order for the telescope to be able to slew to a star from the direction that minimizes the amount of
backlash in the gears, it may be necessary for the telescope to slew beyond the specified slew limit in order to
approach the star from the correct direction. This can limit your ability to slew to an object by as much as 6º
from the azimuth slew limit set in the hand control. If this proves to be a problem, the direction that the
telescope takes to center an object can be changed. To change the telescopes slewing direction, see Goto
Approach under the Scope Setup menu. In order to guaranty that the telescope will have a full range of motion
in R.A. (azimuth), set the azimuth slew limits to 354 and 186. This will allow the mount to slew without regard
to the slew limits.
Utility Features
Scrolling through the MENU (9) options will also provide access to several advanced utility functions within
the Advanced Series telescopes such as; Calibrate Goto, Polar Alignment, Hibernate as well as many others.
Calibrate Mount
- In order to optimize the performance and pointing accuracy of the Advanced mount, the
mount has built-in calibration routines allowing it to compensate for mechanical variation inherent in every
German equatorial mount. Each calibration is completely automatic and in most cases only needs to be
performed once. It is highly recommended that you take a few minutes to go through the mount calibration
procedures.
R.A. Index Calibration - This procedure records the offset of the RA index marker from the meridian. To
perform an RA Index Calibration, the mount must be polar aligned and a two star alignment must have been
performed with calibration stars.
Helpful
Hint!

• Calibrating the RA index will improve the pointing accuracy to the initial alignment stars when
the mount has been polar aligned
To successfully calibrate the R.A. index of your telescope, you should follow a complete alignment
process which includes the following:
- Complete a Two-Star alignment adding three calibration stars at the end. (See Alignment
Procedures earlier in this section).
- Use the Polar Align Utility feature to polar align your telescope as described later in this section.
- Once polar aligned you must re-align your telescope using the Two-Star alignment method and
adding calibration star as an option.
- Finally, use the Utility/Calibrate Mount/ R.A. Index feature to properly calibrate the R.A. axis of
the mount.
• GoTo Calibration – Goto Calibration is a useful tool when attaching heavy visual or
photographic accessories to the telescope. Goto Calibration calculates the amount of distance and
time it takes for the mount to complete its final slow goto when slewing to an object. Changing
the balance of the telescope can prolong the time it takes to complete the final slew. Goto
Calibration takes into account any slight imbalances and changes the final goto distance to
compensate.
Home Position –
The telescope’s "home" position is a user-definable position
that is used to store the telescope when not in use. The home position is useful
when storing the telescope in a permanent observatory facility. By default the
Home position is the same as the index position used when aligning the mount.
To set the Home position for your mount simply use the arrow buttons on the hand
control to move the telescope mount to the desired position. Select the Set option
and press Enter.
Polar Align
Display Align – the user can now display the polar alignment error in both
the Azimuth and Altitude axes. These values can assist you in knowing the
amount and direction of your error when polar aligning.
Align Mount- The Advanced GT has a polar alignment function that will
help you polar align your telescope for increased tracking precision and
astrophotography. After performing a two star alignment, the telescope will
slew to where Polaris should be. By using the equatorial head to center
Polaris in the eyepiece, the mount will then be pointed towards the actual
North Celestial Pole. Once Polar Align is complete, you must re-align your
telescope again using any of the alignment methods described earlier. To
polar align the mount in the Northern Hemisphere:
1. With the telescope set up and roughly positioned towards Polaris, align the
mount using the Two- Star Alignment method.
2. Select Polar Align from the Utilities menu and press Enter.
Based on your current alignment, the telescope will slew to where it thinks Polaris should be. Use the
equatorial head latitude and azimuth adjustments to place Polaris in the center of the eyepiece. Do not
use the direction buttons to position Polaris. Once Polaris is centered in the eyepiece press ENTER; the
polar axis should then be pointed towards the North Celestial Pole.
Light Control – This feature allows you to turn off both the red key pad light and LCD display for daytime
use to conserve power and to help preserve your night vision.
Factory Settings – Returns the Advanced GT hand control to its original factory settings. Parameters such as
backlash compensation values, initial date and time, longitude/latitude along with slew and filter limits will be
reset. The hand control will ask you to press the "0" key before returning to the factory default setting.
R.A. INDEX
GOTO
CALIBRATE MOUNT
GOTO
SET
HOME POSTION
DISPLAY ALIGN
ALIGN MOUNT
POLAR ALIGN
LIGHT CONTROL
PRESS UNDO
PRESS "0"
FACTORY SETTING
VERSION
GET AXIS POSITION
GOTO AXIS POSITION
HIBERNATE
SUN MENU
SCROLLING MENU
SET MOUNT POSITION
TURN ON/OFF GPS
UTILITIES

Version - Selecting this option will allow you to see the current version number of the hand control and
motor control software. The numbers indicate the hand control software version. For the motor control, the
hand control will display two sets of numbers; the first numbers are for R.A and the second set are for DEC.
Get Axis Positions - Displays the relative altitude and azimuth for the current position of the telescope.
Goto Axis Positions - Allows you to enter a specific relative altitude and azimuth position and slew to it.
Hibernate - Hibernate allows the telescope to be completely powered down and still retain its alignment
when turned back on. This not only saves power, but is ideal for those that have their telescopes permanently
mounted or leave their telescope in one location for long periods of time. To place your telescope in Hibernate
mode:
1. Select Hibernate from the Utility Menu.
2. Move the telescope to a desired position and press ENTER.
3. Power off the telescope. Remember to never move your telescope manually while in Hibernate mode.
Once the telescope is powered on again the display will read Wake Up. After pressing Enter you have the
option of scrolling through the time/site information to confirm the current setting. Press ENTER to wake up
the telescope.
Pressing UNDO at the Wake Up screen allows you to explore many of the features of the hand control without
waking the telescope up from hibernate mode. To wake up the telescope after UNDO has been pressed, select
Hibernate from the Utility menu and press ENTER. Do not use the direction buttons to move the telescope
while in hibernate mode.
Sun Menu
For safety purposes the Sun will not be displayed as a database object unless it is first enabled. The enable the Sun, go to the
Sun Menu and press ENTER. The Sun will now be displayed in the Planets catalog as can be used as an alignment object
when using the Solar System Alignment method. To remove the Sun from displaying on the hand control, once again
select the Sun Menu from the Utilities Menu and press ENTER.
Scrolling Menu
This menu allows you to change the rate of speed that the text scrolls across the hand control display.
• Press the Up (number 6) button to increase the speed of the text.
• Press the Down (number 9) button to decrease the speed of the text.
Set Mount Position
The Set Mount Position menu can be used to recover an alignment in cases where the clutches have been
disengaged or similar situation. For instance, you might use this if you needed to rebalance the mount after
having completed an alignment.
Using this tool will invalidate the PEC index
Turn On/Off GPS - If using your Advanced GT telescope with the optional CN-16 GPS accessory (see
Optional Accessories section of the manual), you will need to turn the GPS on the first time you use the
accessory. If you want to use the telescope's database to find the coordinates of a celestial object for a future or
past dates you would need to turn the GPS off in order to manually enter a time other than the present.
H
H
e
e
l
l
p
p
f
f
u
u
l
l
H
H
i
i
n
n
t
t

EQ NORT
H
EQ SOUTH
OFF
MODE
SIDEREAL
SOLAR
LUNAR
RATE
TRACKING
VIEW TIME-SITE
SETUP TIME-SITE
ANTI-BACKLASH
FILTER LIMITS
DIRECTION BUTTONS
GOTO APPROACH
A
UTOGUIDE RAT
E
MOUNT SETTING
RA LIMITS
SCOPE SETUP
CALIBRATE MOUN
T
HOME POSITIO
N
POLAR ALIG
N
LIGHT CONTROL
FACTORY SETTING
VERSION
GET AXIS POSITION
GOTO AXIS POSITION
HIBERNATE
SUN MENU
SCROLLING MENU
SET MOUNT POSITION
TURN ON/OFF GPS
UTILITIES
GOTO SKY OBJ
SAVE SKY OBJ
ENTER RA & DEC
SAVE LAND OBJ
GOTO LAND OBJ
USER OBJECTS
GET RA-DEC
GOTO RA-DEC
SELECT CATALOG
IDENTIFY
GOTO TYPE
PRECISE GOTO
MENU
SET TO INDEX
ENTER TIM
E
DLS/S
T
TIME ZON
E
ENTER DATE- MM/DD/Y
Y
ADD CALIBRATION STAR?
CENTER STAR 2
CENTER STAR 1
TWO-STAR ALIGN
CENTER STAR 1
SELECT STAR 1
ONE-STAR ALIGN
CENTER OBJEC
T
SELECT OBJEC
T
SOLAR SYSTEM ALIGN
LAST ALIGNMENT
QUICK-ALIGN
ENTER LONG/LA
T
START-UP PROCUDURE
ALIGNMENT
NAMED STAR
NAMED OBJECT
A
STERIS
M
TOUR
VARIABLE STAR
DOUBLE STAR
CCD OBJECTS
A
BELL
IC CATALOG
CALDWELL
MESSIER
NGC
SAO
SOLAR SYSTEM
CONSTELLATION
LIST
ADVANCED GT
-
 1
1
-
 2
2
-
 3
3
-
 4
4
-
 5
5
-
 6
6
-
 7
7
-
 8
8
-
 9
9
-
 10
10
-
 11
11
-
 12
12
-
 13
13
-
 14
14
-
 15
15
-
 16
16


Celestron Addendum to the Advanced GT mount (firmware v.4.10) User manual
- Category
- Telescopes
- Type
- User manual
- This manual is also suitable for
Ask a question and I''ll find the answer in the document
Finding information in a document is now easier with AI
Related papers
-
Celestron Addendum to the CGE mount (firmware v.4.10) User manual
-
-
-
-
-
Celestron 11068 User manual
-
Celestron NexStar 5 SE User manual
-
-
Celestron 80LCM User manual
-
Celestron Advanced VX Owner's manual
Other documents
-
Tasco Spacestation 49076525/49114675 User manual
-
Orion ATLAS EQ-G User manual
-
 Sky-Watcher SynScan User manual
-
 ASTRO-PHYSICS GTO User manual
-
-
Meade LX200-ACF_manual 01.10 Owner's manual
-
-
Meade LX200 R User manual
-
-

