Page is loading ...

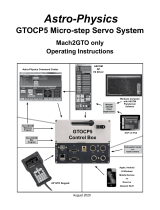
ASTRO-PHYSICS
GTO KEYPAD
Version v4.19.3
Flash RAM Updates
Keypad ash RAM updates can be accomplished through the Internet.
Check our web site www.astro-physics.com periodically for further information.
August 2018

1
CONTENTS
ABOUT THIS MANUAL 5
GTO KEYPAD CONTROLLER 6
Layout and Buttons of the Keypad 6
Vacuum Fluorescent Display 6
N-S-E-W Directional Buttons 6
RA/DEC REV Button: 6
STOP Button 7
Number Buttons 7
<PREV and NEXT> Buttons 7
GoTo Button 7
± Button 7
MENU Button 7
FOC Button 7
Retractable Hanger 7
Keypad Protector 8
Installation: 8
Keypad Care and Warranty 8
Warranty 8
Keypad Battery for 256K Memory Boards 8
Keypad Battery for 512K Memory Boards 8
Cleaning Keypad Display 8
Temperature Ratings 8
GETTING STARTED – DO THIS AT HOME, IF POSSIBLE 9
Setup your Mount and Cable Connections 9
Gather Basic Information 9
Enter Your Location, Date and Time 9
Resetting Daylight Savings and Time in the Spring and Fall 11
Setting Keypad to GMT (aka UTC) 12
Practice Using your Keypad 13
YOUR FIRST OBSERVING SESSION & FOR PORTABLE MOUNTS 14
Normal Startup Sequence for Mounts that are in the eld 14
Assemble Your Mount 14
Startup sequence 14
Star Sync 14
Resume Last Position 15
New Setup → New Setup Start From Park Position (press 1, 2, 3, or 4) 15
Helpful Hints 15
AUTO-CONNECT SEQUENCE – FOR PERMANENT, POLAR-ALIGNED MOUNTS 16
Important Points 16
EXTERNAL STARTUP SEQUENCE – FOR COMPUTER CONTROLLED MOUNTS 17
Important Points 17
POLAR ALIGNMENT – WHICH METHOD TO CHOOSE? 18
N Polar Calibrate - Calibrating with Polaris 18
Two-Star Calibration 19
Polar Aligning in the Daytime – Northern Hemisphere 22
Polar Aligning in the Daytime – Southern Hemisphere 24
GTO Quick Star Drift Method of Polar Alignment 26

2
GTO Quick Star Drift Method of Polar Alignment Quick Reference Sheet 29
How to Find Objects if You Have Less Than Perfect Polar Alignment or Non-Orthogonal Systems 30
What if I Lose My Calibration? 30
OBJECTS MENU – HAVE SOME FUN! 31
Tips for Using the Buttons and Menus 31
Procedures Common to all Slewing Commands 31
M, NGC, IC 32
Common Object Names 32
Solar System Objects (Sol) 32
Common Star Names - Non-scientic 33
Greek Star Names, organized by constellation 33
Abell Galaxy Clusters 33
ADS Double Stars (Aitken Double Star Catalog) 33
Search for Objects by Type, Magnitude, Catalog and All Sky vs. Current Constellation 34
What’s Up Now Function 34
Tour Objects within Constellations 35
Custom R.A. and Dec. Coordinates 35
Custom ALT / AZ Coordinates 35
Sun Warning 36
MAIN MENU FUNCTIONS 37
Brightness of the display screen 37
Directional buttons 37
Objects 37
Setup 37
Tools 37
Time/LST 37
Slew rate (S:) 37
Button rate (B:) 37
Guiding rate(A:) 38
Tracking rate (T:) 38
Casual observing 38
SETUP MENUS 39
Locations & Time Menu 39
Set Site Location 39
Set Date & Time 39
Get Time/Loc FrMnt 39
Mount Move Limits Menu 39
R.A. Backlash Adjustment (for Visual Observers) 39
Declination Backlash Adjustment (for Visual Observers) 40
Set Safe Zone Limits for Your Telescope 41
How to Determine Your Safe Zone 41
Set Your Safe Zone 41
Set Horizon Limits for Your Telescope 42
How to Determine Your Horizon Limit 42
How Horizon Limit Works 42
Set Your Horizon Limit 42
Keypad Options Menu 43
Auto-Connect 43
Reticle Illuminator Adjustment 43
Focus Adjustment 43

3
Special note for the lead-free GTOCP3 control boxes 43
Keypad Update Menu 44
PARK OPTIONS 45
Park Your Telescope 45
Park – 5 Positions 45
Power Down Wherever You Want – (a power loss will not lose your position) 46
Parking and Power Considerations 46
Calibrate Menu 46
What if I lose my calibration? 47
Specify Mount Type 47
TOOLS MENU 48
Permanent Error Memory Adjustment (PEM) 48
Record Permanent Error Memory 48
Playback PEM corrections 48
Special Features 48
Photographic Timer 49
SmartGuide 49
Why do I need SmartGuide? 49
How does SmartGuide work? 49
How do I use SmartGuide? 49
Is SmartGuiding better than Auto Guiding? 50
Status 50
SLEWING DURING THE DAY 51
Potential Dangers 51
How to Observe Safely 51
ORTHOGONALITY 52
Check Orthogonality 52
Effect of Non-orthogonality on Polar Alignment 53
Polar Alignment with Non-orthogonal Telescopes 53
Additional Tips for Non-Orthogonal Systems 54
ADVANCED FEATURES 55
Sync Function 55
Tweak Your Pointing Accuracy 56
Sync Explained in Detail and compared to Re-Calibrate 56
Meridian Delay / Advance Function 59
UNDERSTANDING THE KEYPAD AND GTO CONTROL BOX FUNCTIONS 60
Functions of the GTO Servo Control Box 60
Functions of the Keypad 60
Upgrading the GTO Servo Control Box 60
Upgrading the Keypad 61
Upgrading or Repairing the Keypad Database 61
TROUBLESHOOTING 62
APPENDIX A: COLLECTIVE RELEASE NOTES 66
Version 4.19.3 – 07-29-16 66
Version 4.19.2 – 01-19-16 66
Version 4.19.1 – 01-18-16 66
Version 4.19 – 01-18-16 66

4
Version 4.18 – Not released 66
Version 4.17 – 10-20-08 66
Version 4.12 – 09-06-04 67
Version 4.11 – 08-28-04 67
Version 4.10 – 08-26-04 67
Version 4.07 – 02-16-04 68
APPENDIX B: REMAINING KNOWN KEYPAD ISSUES 70
Summary of Remaining Keypad Issues: 70
Eastern Longitude Values 70
Western Longitudes with Eastern Time Zones 70
Incorrect GMT Offsets When Polling the Mount from the Keypad 71
Western Longitudes at Time Zone Zero 71
Eastern Longitudes and Time Zone 12 71
Eastern Longitude Limit 71
The International Date Line 71
Fractional Time Zones 72
APPENDIX C: COMMON STARS – BY CONSTELLATION 73
APPENDIX D: ALPHABETICAL STAR LIST 77
APPENDIX E: CONSTELLATION ABBREVIATIONS 82
APPENDIX F: COMMON OBJECT NAMES 83
APPENDIX G: AITKEN’S DOUBLE STAR (ADS) LIST 84
APPENDIX H: THE GREEK ALPHABET 86
APPENDIX I: SUGGESTED STARS FOR THE GTO QUICK STAR DRIFT METHOD 87
APPENDIX J: MENU LAYOUT 90

5
ASTRO-PHYSICS
GTO Keypad
Version 4.19.3
ABOUT THIS MANUAL
Historically, we have always included a keypad with all of our GTO equatorial mounts. Starting in October of 2015 we
began offering the Keypad as an optional purchase. Many users, especially those with personal observatories and those
whose principle interest is imaging, are now controlling our mounts via computer software and increasingly nd that the
Keypad has been relegated to storage. We made the decision to offer the Keypad as an option in order to accommodate
all our customers. The Keypad is a multi-function, portable, hand-held computer which gives one total freedom to set up in
the eld or at Star Parties without being tethered to the extra bulk of power-hungry computers. Using it is the best way to
truly be “portable”!
The Keypad is used with all the GoTo mounts that we have ever produced and can be used with any of the control boxes
(GTOCP1, GTOCP2, GTOCP3 and GTOCP4).
You should note that this manual is actually one component of a three document system. Since you chose to purchase the
optional Keypad, you have received this manual. The Keypad Manual applies to all mounts, detailing the keypad’s many
features and extensively explains its operation. A second manual is the GTO Servo Motor Drive System. Like the Keypad
Manual, the GTO Servo Manual is universal to all mounts that use the Astro-Physics GTO Servo Motor Drive System
with the GTOCP4 (and earlier CPx units) Servo Control Box. The nal manual is the Mount Manual and is specic to the
individual mount that is chosen.
As always, we highly recommend the Technical Support Section of our Web site for the latest information and for future
updated versions of this and other manuals.
A nal note and an apology to our friends in the southern hemisphere. Many of the instructions in this manual are written
entirely from the point of view of those of us in the northern hemisphere. Since descriptive terms like left and right are
meaningless without a dened point of reference, we tend to use east and west to avoid ambiguity. The east and west
sides of a German equatorial mount are, of course, reversed in the southern hemisphere. At one point, our thought was to
always use phrases like the following: “... on the east side (west side in the southern hemisphere) ...” This quickly became
cumbersome and made the text more difcult to read. For simplicity, we decided to leave many of the explanations in their
northern hemisphere framework. To our southern hemisphere friends: We appreciate you no less and apologize for this
unintended slight. We know, however, that you are all smart enough to make the necessary translation to “down under”
appropriate instructions. Thank you for your understanding.
Please RecoRd the Following inFoRmation FoR FutuRe ReFeRence
Keypad Serial Number: _____________________________________________
Purchase Date: _____________________________________________
User Name _____________________ Password ______________________

6
GTO KEYPAD CONTROLLER
The GTO Keypad is the communication center for the operation of your GTO mount. We have designed this unit to be
as intuitive and easy to use as possible while lling it with terric features to make your observing session productive and
pleasurable. With a few keystrokes, you can slew to objects by their common name or catalog number, set up search
parameters to nd all the open clusters (in the Messier catalog) that are visible on a given night, focus your telescope
for astrophotography, set the countdown timer for the exposure, enter R.A. and Dec.
coordinates to nd the newest super nova, and much more.
Note: Please understand that the keypad is NOT the controller / brain of the mount.
The real control is in the GTOCPx Control Box. The keypad simply provides data
for the GTOCPx to do its job. Likewise, a computer with software can also duplicate
everything that the keypad does. The mount can be operated using only the keypad,
using only a computer, or using both.
The heart of the controller is the 4-line display screen that will guide you through all
operations. The alphanumeric Keypad itself is translucent and backlit with red LEDs
for easy visibility at night. The buttons are also made with a phosphoresce material
that will glow in the dark for a brief time.
Button functions are clearly dened on the button itself or as an instruction on the
display screen. You do not have to remember shift key patterns or complex keystroke
sequences. The directional buttons are shaped like arrows to help you nd them in the
dark without looking at your Keypad. The stop button is readily accessible if you need
to cancel any slewing request immediately.
The menu system is very easy to navigate. Each screen will display several choices,
which correspond to a number button. Simply press the number button to initiate the
command, e.g. “1=M, 2=NGC”. When you press “1” the Messier entry screen will
display and you can enter the number of the object that you wish to see. Press GoTo,
which will cause the mount to slew. The <PREV and NEXT> buttons will allow you to scroll quickly through the lists of
common names or to nd more data about the object you are viewing. To adjust most settings, you will press the number
indicated on the screen several times to scroll (toggle) through your choices and stop at the one you want.
Layout and Buttons of the Keypad
Vacuum Fluorescent Display
The Keypad features a four-line, 20 character alphanumeric display. The brightness of the display is adjustable with “dim”
and “bright” settings. Please refer to the section entitled “Brightness of the display screen”. If you are using the Keypad in
the daylight, you will need to shade the screen from the direct light with your hand in order to see it more clearly.
N-S-E-W Directional Buttons
These four buttons are arranged so that the “E” and “W” buttons control the movement in right ascension and the “N” and
“S” buttons control the declination. This is the “normal” orientation of objects in the eyepiece eld. When you press the “N”
button, the star should move in an upward direction toward the top of your eyepiece eld. In addition, you can press two
buttons simultaneously for diagonal movement, e.g. the “N” and “W” buttons will cause a “NorthWest” movement. Note:
north and south buttons can be misleading concepts in movement of the Dec. axis. The reality is that “N” moves the Dec.
axis counterclockwise and “S” moves the Dec. axis clockwise.
RA/DEC REV Button:
Press the RA/DEC REV button to access these functions, then press MENU to exit from this screen. This button serves
several functions:
● Reversing R.A. and Dec.: If the star moves down when you push the “N”
button, press the RA/DEC REV button in the lower right corner of the Keypad.
A reversing menu will appear on the screen. If you want to reverse direction
of the “N” and “S” button, press “2” on the Keypad and the display will change
from “normal” to “reverse”. You can make the same adjustment with the “E”
and “W” buttons. When properly set up, the direction buttons will cause the
object to move according to your orientation at the eyepiece.
1=Rev RA :Normal
2=Rev DEC:Normal
9=Re-Calibrate
Meridian < 0W >
RA / DEC Reverse Screen

7
● Re-Calibrate: If you wish to tweak your pointing accuracy, slew to an object, use the N-S-E-W directional buttons to
center the object, then press the RA/DEC REV button and select “9”. This will re-calibrate your mount. Refer to the
section later in the manual that for more detailed information.
● Meridian Delay: Advanced astro-photographers will appreciate this feature. Refer to the “Advanced Features”
section of the manual that discusses “Meridian Swap” and the section on the “GTO Quick Star Drift” method of polar
alignment. Do not change this setting unless you understand the consequences.
STOP Button
Press the STOP button to cancel a slewing command and stop the movement of the telescope immediately. The mount
will know where it is, so you can proceed to your next command. If you move the telescope by hand, you must follow the
re-calibration procedure.
Number Buttons
The buttons labeled 1–9 and 0 are used to enter numerical data and to make menu choices.
<PREV and NEXT> Buttons
These buttons are used for the following functions depending on the commands you are entering: move from one menu
level to another, backspace to make corrections to number entry or scroll through lists of objects. The “<“ and “>“ symbols
appear on many screen displays. They signify that you can press the <PREV and NEXT> buttons for more choices or
additional information. These buttons are also used in conjunction with the FOCUS button as described below.
GoTo Button
Press the GoTo button after you have selected the object that you want to view. The mount will slew to the object. This
button is also used for other functions, i.e. saving location data.
± Button
This button has two different functions:
● Use it to toggle between “+” and “-“ when entering R.A. and Dec. coordinates.
● To change the rate of the N-S-E-W directional buttons, press the “±” button to display a selection screen. Use the
<PREV and NEXT> buttons to scroll through the rates. Also you can change the guiding rate on this menu by
pressing the “7=Guide Rate” button to scroll through the rates. These features can be accessed whenever the N-S-
E-W buttons are active.
MENU Button
Press this button to move to a previous menu level or to cancel a prompt.
FOC Button
To use this function, you must have an electric focuser with a 6–9V DC motor (available from JMI and others) plugged into
the GTO Control Panel (not available in the CP4) and the corresponding attachment to your focuser. Hold the FOCUS
button with one nger and press the <PREV and NEXT> buttons to change focus. You can change the speed of the focus
adjustment to either “High” or “Low”. Please refer to the Focus Adjustment section for detailed instructions and further
information. Note: This button does not function with modern stepper-motor focusers which have their own software. Also,
the CP4 control box does not offer a focus option.
Retractable Hanger
On the back of the controller, look for a slot with a thumb rest area. Push up to extend the hanger. A lanyard can be
attached here to allow you to hang your Keypad on one of the lanyard posts or base knobs of the mount when it is not in
use.

8
Keypad Protector
The Keypad protector is a heavy-duty molded rubber casing with a full 1/4” thickness on all impact surfaces. If you
accidentally drop your Keypad, the rubber casing will absorb much of the blow. Your display, Keypad, electronics and the
case itself will be protected from damage. In addition, the rubber prevents the Keypad from sliding when placed on a table
or other at surface and the Keypad will feel secure in your hands as your observe. The KEYPRO also offers protection
during transport and storage.
Installation:
Caution: The KEYPRO ts closely around the Keypad controller. You must work it gently into place. If you force the
rubber casing while it is being installed on your Keypad, you may tear the rubber.
1. Insert the connector and thread the cable through the opening at the bottom of the KEYPRO. Do not insert the cable
and the bottom of the Keypad all the way at this time.
2. First, insert the top portion of the Keypad (the display end) into the KEYPRO.
3. Second, gently work the bottom portion with the cable connection into place.
Keypad Care and Warranty
Warranty
Keypad: Three (3) years parts and labor.
Battery: 90 days.
The Keypad manufacturer warrants that the product is free of defects in materials and/or workmanship from the date
of shipment for a period of three years. This warranty does not apply to any products which have been subject to
misuse, accident, alteration or if the unit has been serviced by anyone other than an authorized representative. During
the warranty period, the manufacturer will, at its discretion, (1) repair the product to full working order; (2) replace the
product with a comparable product. Replacement products will be new or serviceably used, comparable in function and
performance to the original product. The product will be warranted for the remainder of the original warranty or ninety (90)
days from the date of shipment of the product, whichever is longer. DO NOT open a Keypad that is within its warranty
period or you may void the warranty!
Keypad Battery for 256K Memory Boards
Keypads with serial number 1565GTO or earlier that have the original 256K circuit board have a 3V Lithium battery that
powers the memory so that information is retained from one session to the next. Battery life is estimated 5 years at room
temperature. You can purchase replacement batteries from Astro-Physics (part # E0310) or from alternate sources.
Instructions for replacement are in the Technical Support section of our website. Battery Number: CR1632
Keypad Battery for 512K Memory Boards
This includes Keypads with serial number 1568GTO or later (and some earlier Keypads that have been repaired or
upgraded with a new 512K memory board). These Keypads also have a 3V Lithium battery with an estimated life of 5
years at room temperature. However, this battery has been wired into a special assembly, so the replacement battery
must be purchased from Astro-Physics (part # E0334), but it can be installed by the customer. If the battery fails within the
3-year warranty period, it is best to have the manufacturer replace it. Opening the unit to replace the battery within the rst
three years may void the warranty.
Cleaning Keypad Display
The display window is made with a Mylar material. It is recommended to use a commercial glass cleaner to wipe down the
display. Spray the cleaner on a cloth and rub the display lightly. Do not use solvents of any kind. Note: It is a good idea to
leave in place the protective plastic cover that ships with the Keypad, it will extend the display window’s lifespan.
Temperature Ratings
The real time clock, battery-backed RAM, Extended Temperature Vacuum Fluorescent display, and backlit panel are all
rated to –40 degrees C (-40 degrees F).

9
GETTING STARTED – DO THIS AT HOME, IF POSSIBLE
Setup your Mount and Cable Connections
Refer to the instructions in the mount assembly manual to set up your mount. The following cables must be connected:
R.A. and Dec. cables, and Keypad controller cable and power cable, preferably in that order. You do not need the
mounting plate or telescope tube assembly for these setup procedures.
Gather Basic Information
You will need to enter your local parameters to ensure that the mount functions properly. The mount needs to know the
local time (and if you are on daylight savings) and the longitude and latitude of your observing site. You can enter up to
nine observing sites to be stored in memory.
To determine your longitude and latitude, do an internet Google search or use a GPS unit. The closer you can get the
better, however, it is not necessary to be exact to the seconds (last two number entry elds) since the purpose of these
entries is to calculate which objects are above your local horizon. Please make sure that your location information is in
“Degrees: Hours: Seconds” format (i.e.: 42:22:00 Lat. 89:01:07 Long.), rather than “Decimal” format (i.e. 42.3667° Lat.
89.0186° Long.). Information on converting the format is in the Troubleshooting Section.
The time zone is determined from the Greenwich meridian. An excellent reference is the Standard Time Zones chart in
Norton’s 2000.0 Star Atlas. The Keypad will automatically determine if you are east or west of the Greenwich meridian
based on your entered longitude, so entering a positive or negative number is not needed. If you live in the eastern
hemisphere and observe daylight savings time, please consult “Using the Keypad and The Sky Together” for special
instructions about your time zone. For your reference, these are the US time zones.
US Eastern standard time 05
US Central standard time 06
US Mountain standard time 07
US Pacic standard time 08
US Hawaii standard time 10
Most of this information will be entered only once and will be remembered by the Keypad. We recommend that you make
these entries at home before you go to your observing session to ensure that you have the information that you need. If
you have a GPS (Global Positioning System) device, you may want to enter the coordinates once you reach your site and
have the proper numbers. Longitude and Latitude MUST be in degrees, minutes and seconds format. Decimal values
must be converted – see the Troubleshooting Section. We also recommend keeping a “cheat sheet” with each location’s
relevant data.
Enter Your Location, Date and Time
1. If the Location Selection Screen appears the rst time you start up your mount,
press “1” and GoTo, then proceed to step 2. If the Main Menu appears, begin
these instructions with step 3.
2. Select option “3=ResumeLastPosition”, which will allow you to bypass this
screen.
3. Main Menu should now be on the display. You will need to enter all of your Loca-
tion, Time, Daylight Savings and Date settings.
4. DO NOT ATTEMPT TO SLEW TO ANY OBJECTS AT THIS POINT. You must rst
setup your location and time as described below and follow the instructions for Your
First Observing Session.
5. Go to Keypad Options selection screen (Main Menu → 2=Setup → 3=Keypad
Options). The top line displays “1=Auto-Connect”. Press “1” to toggle to “NO” if it is
not set to “NO” already.
6. Press Menu to go back to the Setup Menu.
7. Press “1=Locations & Time”. Then, select “1=Site Location Data”.
1=Locations & Time
2=Mount Move Limits
3=Keypad Options
4=Park / Mount Opt.
Setup Menu
1=Object 5=S:1200
2=Setup 6=B:600
3=Tools 7=A:1
4=Time/LST 8=T:Side
Main Menu
1=Star-Sync
2=Polar Alignment
3=ResumeLastPosition
4=New Setup
Sync, Align, and Resume Menu
Location Selection
Enter number, then
Press GoTo to select
Location <1-9>: __
Location Selection Screen

10
8. You will now be presented with the Location Selection screen with locations 1–9 available.
9. Choose “Location 1” by entering “1” and pressing GoTo. We recommend that
you set “Location 1” to the site that you observe from the most. Enter your Longi-
tude, Latitude and Time Zone settings. Do not confuse your longitude and latitude
values. We ask for longitude rst – many sources will list latitude rst. Choose east
or west longitude and north or south latitude by using the direction buttons. If you
do not wish to change the settings that are already entered, press the GoTo button
to return to the “Locations & Time” menu. After you have entered the informa-
tion, you MUST press GoTo to save your data and return to the “Locations & Time”
menu. If you made a mistake, just use the <PREV and NEXT> keys to move back
to it and x it. The Keypad will beep when you exit to indicate that the data is
saved.
Please note: Your longitude and latitude must be entered using the “degrees:
hours: minutes” format. For help converting decimal values to this format, see the
troubleshooting section.
Note on Time Zones and Daylight Savings: Like longitude, time zones are
measured from the Prime Meridian. Time zones are entered into the Keypad as
positive numbers, even though time zone 01 for central Europe is certainly different
from time zone 01 for Iceland (2 hours different). The Keypad knows the difference because of the longitude value you
enter, in particular, whether it is E or W. Daylight Savings settings allow you to keep the Keypad’s clock correct with
respect to both your current local time and GMT without having to use a “fake” time zone setting.
Very Important – Daylight Savings Change: When the clocks change in the fall and spring, you must
change BOTH the current local time and the daylight savings setting in order to keep the Keypad’s time
consistent and correct. Please refer to “Resetting Daylight Savings and Time in the Spring and Fall” on the
following page for a detailed “step-by-step”. Once you have completed the procedure go to the Main Menu
press “4=TIME/LST”. Make sure that both your local time and GMT values are correct. If they are, you
have done everything correctly. If they are not, you have made an error somewhere.
10. If you wish to enter more locations (up to 9 different sites are available), please do the previous step again;
changing the number for each location you enter. We suggest that you write the location number and a brief de-
scription on a piece of paper and tape it to the back of the Keypad to aid your memory.
11. After your location settings are complete, enter your time, date and daylight savings settings. Press MENU to
return to the “Locations & Time” menu.
12. Press “2=Set Date & Time” on the “Locations & Time” menu. Enter the correct local time (24 – hour format),
date, and current daylight savings settings, for your current location. If you made
a mistake just use the <PREV and NEXT> keys to move back to it and x it. If the
settings are already correct, press the GoTo button to return to the “Locations &
Time” menu. To save your changes you MUST press GoTo to return to the
“Locations & Time” menu. The Keypad will beep to conrm your entries. Press-
ing MENU will exit the screen with the changes unsaved.
Please note: Incorrect time settings are a common operator error. You MUST enter the time in 24 hour format!
This is a common error when setting up in the evening. Use the correct local time as displayed on your watch AND be
sure you have the correct daylight savings setting. You don’t want to change one without changing the other at the
spring and fall time changes. As stated above, a good check is to look at the “4=Time/LST” screen from the main
menu. During normal time (winter) the difference between GMT and your local time should equal your time
zone. During daylight savings time (summer) the difference will be your time zone MINUS 1 hour for western
longitudes, and your time zone PLUS 1 hour for eastern time zones.
13. After you have competed ALL of the above entries, turn off the power to your mount for 10–15 seconds.
14. If you wish to practice with your Keypad, refer to the next section. If you are set up at your site and are ready to
observe, proceed to the section entitled “Your First Observing Session”.
IMPORTANT! There is a third choice in the “Locations and Time” menu: “3=Get Time/Loc FrMnt”. This should ONLY
be used when your control box is connected to a computer and you are running a different program like Starry Night™
or The Sky™ to control the mount. Do not press this button to “check” the time and location. Use the “4=Time/LST”
command from the Main Menu.
Time: 19:23:11
Date: 08/15/2005
Daylight Savings: 1
1=Summer 0=Winter
Time & Date Input Screen
1=Site Location Data
2=Set Date & Time
3=Get Time/Loc FrMnt
Locations and Time Menu
Location Selection
Enter number, then
Press GoTo to select
Location <1-9>: __
Location Selection Screen
Long: W 000:00:00
Lat: N 00:00:00
Time Zone: 00
GoTo=Save MENU=Exit
Location Input Screen

11
Resetting Daylight Savings and Time in the Spring and Fall
This revised procedure will allow you to maintain your pointing accuracy when changing the clock in your keypad to
accommodate the semi-annual Daylight Savings time changes. This applies primarily to permanently mounted systems
that have their keypad’s Auto-connect feature set to “YES”. The reason for this procedure is that the time change, when
saved in the keypad, is sent to the servo as the new local time. However, the DST time change also results in a change
in the net offset from GMT. The new offset is NOT sent to the servo when the time change is made, which results in a
one hour error in the servo’s calculated LST value. The following procedure will work around this problem in the current
rmware and allow you to maintain the pointing accuracy of the mount through the time change.
1. Power up your mount as normal. You can go to an object and then center and re-calibrate if you wish.
2. Set your Auto-Connect feature to “NO”
a) 2 = Setup
b) 3 = Keypad Options
c) Press the “1” to toggle to 1 = Auto- Connect: NO
d) Press “Menu” 2 X to return to Main Menu
3. Set the tracking rate to “8 = T: Stop” by successively pressing the “8” button from the main menu.
4. Send the mount to any AP Park Position (v4.19.3 or later) or to Park 1 (v4.17 or earlier)
a) 2 = Setup;
b) 4 = Park / Mount Opt.
c) Press number corresponding to desired park position
d) Wait for the mount to slew to the Park position
e) Press “Menu” 3 X to return to Main Menu - mount will unpark, but tracking is stopped
5. Change Time and Daylight Savings settings
a) 2 = Setup
b) 1 = Locations & Time
c) 2 = Date & Time
d) Enter new time data and DST setting. You MUST use 24 hour clock format.
e) Press “GO TO” to save. You should hear a beep to conrm
f) DO NOT go to any objects or re-park the mount at this point!
6. Power down the mount and wait about 10 seconds.
7. Power the mount back up
8. At the prompt, enter your location number and then press “GO TO”
9. From the next menu:
a) Choose 4 = New Setup (v4.19.3 or later); select Start from Park Position (choose same as chosen in #4 above), or
b) Choose 4 = Resume Ref Park 1 (v4.17 or earlier) and the Main Menu should appear.
10. Set the tracking rate to “8 = T : Side” by pressing the “8” button once.
11. Go to your rst object. You should be dead on.
12. Restore your preferred Auto-Connect setting if needed.

12
Setting Keypad to GMT (aka UTC)
Running everything on UTC is a great way to do things if the laptop is completely dedicated to astronomy endeavors.
Professional astronomers all generally set everything including their lives to UTC. The main thing to remember is that
EVERYTHING needs to be set to UTC. Normal commercial software intended for amateurs will often want to default you
to a time zone. Once you have everything set up though, it’s awesome.
1. From the Main menu, press 2=Setup
2. From the Setup menu, press 1=Location & Time
3. From the Location & Time menu, press 1=Site Location Data
4. On the next screen, enter the relevant site number, and then press GoTo
5. In the screen that follows, be sure to set the Time Zone = 00
6. Press GoTo to save
7. ***You MUST do this (steps 3 - 6) for all sites that you have entered
8. After the last GoTo save, press Menu to get back to the Location & Time screen.
9. Now, from the Location & Time menu, press 2=Set Date & Time
10. In the Set Date & Time screen, set the time to the current UTC time.
11. Press GoTo to save.
Hint: I often round the time up to the next minute and then watch my PC clock until it rolls over to time my press of the
GoTo button. That way, they are time-synced, at least for a short while.
12. Press Menu to get back to the Main menu.
13. Press 4=Time/LST.
14. Verify that Local time = GMT
15. DONE!! Don’t forget to set your astronomy computer to GMT.

13
Practice Using your Keypad
You may want to try out your Keypad while the mount is set up at home. We suggest that you don’t put the mounting
plate, counterweights, counterweight shaft or telescope on the mount since you won’t be truly polar-aligned and calibrating
precisely. If your telescope is attached, you may cause it to hit the pier. Read the following instructions as you use your
Keypad to simulate an observing session.
1. Use the clutches and physically move (with your hands) your mount to the Park 1 or Park 4 position as shown in the
photos (note the northern and southern hemisphere differences below). Set both axes to be level with the ground.
Although a bubble level would be important in a real observing session, for this purpose, a rough position is ne.
NOTE: For the southern hemisphere, the picture is mirror reversed (left to right). Also, be sure that the north / south
switch on the GTOCPx control box is set correctly (the GTOCP4 does not have an N/S switch).
2. When you plug in the cable of your Keypad, the words Astro-Physics and the version number of the rmware will ap-
pear briey. Then, the Location Selection screen will display since you have set Auto-Connect to NO in the procedure
above. Please select your location by entering the desired number and press GoTo.
3. From the next screen, select “4=New Setup”. The new setup screen will open and allow you to choose either Park 1,
2, 3 or 4 as your reference position. Choosing either Park 1 or Park 4 will allow you to reasonably level your mount by
eye. With this information, you can reasonably simulate an observing session.
4. Proceed to the information on the Objects Menu or other topics of interest as discussed later in the manual.
5. When you are nished with your session, be sure to leave your Keypad in the “AutoConnect: NO” setting.
PARK 1
Northern
Hemisphere
Southern Hemisphere
PARK 4
Northern
Hemisphere
Southern Hemisphere
New Setup
Start From
Park Position:
Press: 1, 2, 3, 4
New Setup Menu
1=Star-Sync
2=Polar Alignment
3=ResumeLastPosition
4=New Setup
Sync, Align, Resume, New Setup

14
YOUR FIRST OBSERVING SESSION & FOR PORTABLE MOUNTS
These instructions apply to new mounts and if you are setting up your mount in different locations, for example
when you travel to Star Parties.
In order for your mount to operate properly, it must have basic information: location, date, time, time zone and daylight
savings. This information must come from an external computer source, i.e. the Keypad. These instructions assume that
you have entered this data into your Keypad per instructions in the preceding section. Now, follow the procedures below
titled “Normal Startup Sequence”.
Normal Startup Sequence for Mounts that are in
the eld
If you are setting up your telescope in the eld at a new location,
you will have to use the normal startup procedure in order to
provide your mount with essential information: location, date and
time. Auto-Connect must be set to “NO”. Additional information
regarding the “YES” and “EXT” Auto-Connect selections is
provided in later sections.
Assemble Your Mount
Refer to the instruction manual for your mount to set up at your
observing site. Aim the polar axis toward Polaris (or the southern
celestial pole) as closely as you can by sighting up the hole in
the center of the polar axis or along the axis. Using a compass
App on your smart phone / device will greatly help the process.
Likewise, you will nd our Right-Angle Polar Alignment Scope
(RAPAS) a useful accessory for quick and easy setup.
Observers in the southern hemisphere may wish to use the
Daytime Polar Alignment Routine followed by the GTO Quick
Star Drift because of their lack of bright pole stars. The more
accurately you polar align, the more accurate will be the centering
of objects in a high-power eld-of-view. Be sure that you connect
your R.A. and Dec. cables, Keypad cable and power cable,
preferably in that order. More information follows.
Startup sequence
1. When you turn on the power, the rst display of the Keypad will briey read “Astro-Physics” and then the rmware ver-
sion number. The “Location Selection” screen will then display.
Note: If the Main Menu screen appears, that means that the Auto-Connect feature is set to “YES”. Set the Auto-Con-
nect feature to “NO” by selecting “2=Setup” and then “3=Keypad Options”. Press “1” to toggle Auto-Connect to “NO”.
Then turn power off, wait 10–15 seconds and on again (this is called power cycling the mount) to lock in the change.
2. Choose location 1–9 and press GoTo. The next menu has 4 choices: “1=Star Sync”, “2=Polar Alignment”, “3=Resume-
LastPosition”, and “4=New Setup”. If you click on Polar Alignment, you have two choices: “1=N Polar Calibrate” and
“2=2 Star Calibrate”. Each of these is described in following sections.
Important: We don’t allow the user to back out of the startup routine (press Menu button to return to the previous
screen) in order to prevent errors in the calibration process. It was possible to back out in the early versions of the
Keypad; however, users erroneously thought they were calibrated when they were not. So, we force completion of this
routine. If you enter information, then decide to change it, simply turn the power off, wait 10-15 seconds, and then turn
it back on again. This will start the process again.
Star Sync
Choose Star Sync if you are properly polar-aligned by one of the other methods (polar
scope, star drift, etc). Aim the scope at a known stellar or solar system object (at the
end of the star list). If you need to change your button-centering rate, use the “±” key
to do so. Scroll through the list to nd the object, enter the object number, press the
GoTo button (the mount will not actually go anywhere) and you are synchronized. The
Choose Star Z=13:52
1=Polaris <
2=Acamar
3=Achernar >
Star Selection Menu - Polaris

15
Main Menu will appear. You are now ready to enter any object from the Object Menu or go to the Setup Menu to make
changes, as needed.
Very Important: You must point to stars in the west when your telescope is on the east side of the mount and stars in the
east when your scope is on the west side. When the stars are high and close to the zenith, this can be tricky. However,
you can tell which side the star is on by looking at the “z” number (also called the LST) in the upper right corner of the
Choose Star screen, then comparing that number with the R.A. number of the star you choose. If the R.A. number is
larger, the star is in the east; if the R.A. is smaller, the star is in the west. If your scope is not on the correct side when you
sync, the mount will not slew properly and the telescope could strike the pier/tripod. Another way to tell is by looking at
your counterweight shaft. If your mount is situated correctly, the shaft will point down and away from the mount. Please
read the Advanced Features section of this manual for a complete discussion of the Sync command.
Resume Last Position
Choose “ResumeLastPosition” if you have previously parked the telescope after
an observing session and have not moved the scope on the axes. The screen will
advance to Main Menu and you are ready to enter objects or make changes in the
Setup Menu.
New Setup → New Setup Start From Park Position (press 1, 2, 3, or 4)
For this start position you will need to have a bubble level (or at least a good eye).
Physically move your mount to your chosen park position by setting both axes to be
properly oriented for your positional choice. When the mount is in position, select this
menu option. The Main Menu will display on the Keypad so that you can proceed with
your session. This option is particularly useful when using the Polar Aligning in the
Daytime procedure described in the next section.
Helpful Hints
● “ResumeLastPosition” is used when you parked the mount at the end of the previous session and wish to begin a new
night of observing. Selecting it will initialize the mount and you’ll be ready to go to your rst object.
● “New Setup” is only used when you are setting up the mount for the rst time or if you have readjusted scope position
via the clutches and wish to restart from a “Reference Position”.
● When resuming from a “Reference Position”, be sure that the mount is actually in the position that you wish to start in;
otherwise, the misinformation will cause the mount to be lost and it could slew into the pier.
● If you are in a permanent setup, then you should set the Keypad to “AutoConnect: YES” so that when you power up
the mount, it will automatically be initialized and ready to go to your rst object. This is the most automated of the
setups using the Keypad.
1=Star-Sync
2=Polar Alignment
3=ResumeLastPosition
4=New Setup
Sync, Align, Resume, New Setup
New Setup
Start From
Park Position:
Press: 1, 2, 3, 4
New Setup Menu

16
AUTO-CONNECT SEQUENCE – FOR PERMANENT, POLAR-ALIGNED
MOUNTS
“Auto-connect: YES” is a simplied startup sequence appropriate for mounts that meet the following requirements:
● Remains at a xed location and polar aligned.
● Telescope position was not disturbed since it was last used.
● You are not using an external computer to control your mount.
Please remember that you must follow the Normal Startup
Sequence described in the previous section during your rst
session at this location before setting your Auto-Connect to “YES”.
This feature can be activated or de-activated in the Keypad Options
menu. You can access this by pressing “2=Setup”, then pressing
“3=Keypad Options”. Press button “1” to toggle between “YES”,
“NO” and “EXT”.
When the Keypad is in the Auto-connect mode, all you need to
do is connect power and the system will remember where you left
off. The Main Menu will appear on the screen so that you can go
directly to the Objects Menu and enter the desired objects to be
viewed.
If the scope has been moved (but the mount has remained
stationary), you will have to nd a reference star, planet or other
object in the eyepiece and sync the scope on that object with the
following procedure:
1. The Main Menu will display when you power up.
2. Point your telescope to a known star or solar system object. Center in the eyepiece. (If the object drifts, you will
know that you are not truly polar-aligned).
3. Go to “1=Objects” → “5=Strs”. Note: this list also includes solar system objects at the end of the list that you can
use. The <PREV button will take you to the end of the list.
4. Select your target object. The Calibrate Star menu will appear for that object. Note the “>” sign in the upper right
corner.
5. Press NEXT> and the Sync menu will appear. Double check to be sure the object is still centered.
6. Press “1=Sync” current object and Menu to exit.
7. Note: Alternatively, you may sync through the Stars/Constellation routine. It is also possible to sync on Messier, NGC,
IC, Abell galaxies, ADS double stars and Objects/Constellation; however since these objects are not discrete points (or
have two points, as in double stars), they are not the ideal choice for syncing.
If the scope is only off a small amount after slewing to an object, you can move the object into the center of the eld with
your N-S-E-W buttons or by physically pushing the tube assembly and then hit the “9=Recalibrate” in the RA/DEC Reverse
menu (see Recalibration section).
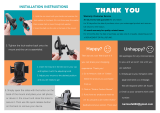
Important Points
Meridian Delay
● If you had used the Meridian Delay feature in the last observing session, then removed the power at the end of
the session – when you apply power again, the meridian delay information is used to determine the position of the
mount, then resets to zero. This forces you to set up the meridian delay for each session to prevent unintended
consequences.
● If you parked the mount, but did not remove power – when you unpark the meridian delay setting will still be active.
Be very careful to remember your settings.
10” f/14.6 Maksutov-Cassegrain on 1200GTO
in AP observatory

17
EXTERNAL STARTUP SEQUENCE – FOR COMPUTER CONTROLLED
MOUNTS
“Auto-Connect: EXT” is a simplied startup sequence appropriate for mounts that meet both of these requirements:
● Precisely polar-aligned
● Your mount is connected to a computer with telescope control software
This feature can be activated or de-activated in the Auto-Connect settings in the
Keypad Options Menu. You can access this menu by pressing “2=Setup”, then
pressing “3=Keypad Options” to enter into the Keypad Options menu. Press “1” to
toggle between: “YES”, “NO”, and “EXT”.
Once Auto-Connect is set to “EXT”, press the Menu button until you get to the Main Menu, and then power cycle the mount
(power off, wait 10–15 seconds, then power on) in order to activate this feature.
1. Prepare your computer and software. Ensure that your computer is connected to the mount. The CP1/2/3 will
connect via a serial cable to the top serial port on the control box. The CP4 has multiple options from which to choose
(see the Servo manual for explanations of the options). Check your computer’s Device Manager to see which COM
port number to choose for the software connection.
2. Power up your Mount and the External Startup Screen will appear on the Keypad. This screen will check the
mount every few seconds to see if the computer has sent it the location and time data it needs to complete the startup
(initialization) process. It will patiently wait for the software connection.
3. Connect to your mount in the computer software. Once you make the software connection to the mount, initializa-
tion via the computer will take place and the display on the Keypad will change to the Main Menu.
4. The Mount will now show the Main Menu and you are ready to use the Keypad or the computer. If your tel-
escope was moved since last time you used it, you may need to re-calibrate on a star. Refer to “Auto-Start Sequence
– For Permanent, Polar-Aligned Mounts” in your GTO Keypad manual for this procedure.
Important Points
● If you have used the External Startup Sequence, do not attempt to change the time on your Keypad. Use the
computer program to control the time.
● If your Keypad is set to “AutoConnect: EXT”, but you wish to start up
manually, then push “Menu” and follow the procedure.
1=Auto-Connect: EXT
2/3=Reticle: 0
4=Focus: Low
5=Keypad Update
Keypad Options Menu
External Startup
Press MENU to cancel
external startup
External Startup Screen

18
POLAR ALIGNMENT – WHICH METHOD TO CHOOSE?
Important Note: We highly recommend the use of the Right-Angle Polar Alignment Scope (RAPAS) as the best
and quickest way to align your mount. If you use the RAPAS for polar alignment, DO NOT follow up with either the
N. Polar Calibrate or the 2–Star Calibrate alignments described below.
Use the following alignment methods if the polar scope is not available. Please note that although we include the
“N Polar Calibrate” and the “2 Star Calibrate” below, they are the least accurate. The Daytime technique will get
you aligned and able to look at planets and stars while the sun is still up. The GTO Quick Star Drift technique will
be your most accurate method after the RAPAS.
The Keypad startup routine provides two methods: The North Polar Calibrate and the Two Star Calibrate. These two
polar alignment methods, though no longer recommended, were designed for quick and coarse alignment in the eld with
portable setups. They are for visual observers only, not imagers. The Two Star Method is the better of the two as it is less
affected by the extremely low resolution in RA near the pole and by orthogonality issues.
You need to be roughly polar-aligned before beginning the procedures. The closer you are to polar alignment when you
start, the faster the procedures will be. Use a compass with magnetic offset and a level to rough align.
How accurately you need to be polar aligned is governed by your needs. If you wish to do some quick visual observing
with low-power, wide-eld eyepieces, you don’t need to spend a lot of time aligning (see “How to Find Objects if You Have
Less than Perfect Polar Alignment”). If you need accurate alignment for CCD imaging or high-power observing, you will
want to use our Right-Angle Polar Alignment Scope (RAPAS) and follow-up with a comprehensive drift alignment (either
traditional or Pole Align Wizard with CCD camera). Refer to the Alternate Polar Calibration Routine and Tips section.
ORTHOGONALITY - If you have difculty achieving accurate polar alignment with the procedures below, refer to the
section entitled “Orthogonality.”
N Polar Calibrate - Calibrating with Polaris
Note: We do not recommend this choice of polar alignment method due to its potential inaccuracy!
This routine uses a known star in the eastern or western sky and Polaris to align the
mount. Since you are essentially using your telescope as a polar alignment scope in
this routine, it is very important that the telescope be orthogonal to the mount. If it is
not orthogonal, the stars will not converge no matter how many you use.
Try to pick a star that has a sufciently different (± four hours) right ascension from
Polaris, otherwise this method may not converge on the pole in a reasonable number
of iterations. For instance, the star Arcturus is close in right ascension to Polaris and so would not be a good candidate.
Arcturus is roughly 12 hrs different in R.A. from Polaris or 180 degrees opposite and close to the meridian in the south. So
when the mount slews between Polaris and Arcturus, it only has to move a small amount in R.A. – about 45 minutes. Not
a good choice. Your best stars for this routine will have right ascensions between 6:32 and 10:32 or between 18:32 and
22:32. Here are a few suggested stars. More possibilities can be found in Appendix I
WINTER SUMMER
Alphard Alf Hya RA 09:27:35 Altair Alf Aql RA 19:50:47
Pollux Bet Gem RA 07:45:19 Enif Eps Peg RA 21:44:11
Procyon Alf CMi RA 07:39:18 Kaus Borealis Lam Sgr RA 18:27:58
Regulus Alf Leo RA 10:08:22 Nunki Sig Sgr RA 18:55:16
Sirius Alf CMa RA 06:45:09 Vega Alf Lyr RA 18:36:56
1. Check position of mount. Be sure that the polar axis is pointed as close as possible toward Polaris (the North Star).
If not, make these adjustments now. Follow the procedures to select your location in the previous section.
2. At the Calibrate Menu, choose “1=N Polar Calibrate”. The Choose Star display
will appear. In the upper right of the screen, you will nd the zenith hour displayed
(e.g. Z=17:17). Zenith hour is synonymous with LST (local sidereal time). This
allows you to open your star atlas to the page corresponding to the sky overhead to
aid in your calibration star selection.
3. Move telescope manually (grasp the telescope by hand and move it) to a known bright star, which will be your
calibration star (Vega in this example) and center it in the eyepiece eld with the N-S-E-W directional buttons.
Calibrate Menu
1=N Polar Calibrate
2=2 Star Calibrate
Calibrate Menu
Choose Star Z=13:52
1=Polaris <
2=Acamar
3=Achernar >
Star Selection Menu - Polaris

19
We recommend that you use a reticle eyepiece.
Very Important: You must point to stars in the west when your telescope is on the east side of the mount and stars in
the east when your scope is on the west side. When the stars are high and close to the zenith, this can be tricky. How-
ever, you can tell which side the star is on by looking at the “z” number (also called the LST) in the upper right corner of
the Choose Star screen, then comparing that number with the R.A. number of the star you choose. If the R.A. number
is larger, the star is in the east; if the R.A. is smaller, the star is in the west. If your scope is not on the correct side, the
mount will not slew properly and the telescope could strike the pier/tripod.
4. Select that star on Keypad. Use the <PREV and NEXT> buttons to scroll through the star list to nd the star you
have chosen. Select this star by pressing the corresponding number. The R.A. and Dec. values of the star will be
displayed. Please note that the LST (local sidereal time) values for your screen
will be different than shown in these examples. If you have made a mistake, use
the <PREV button to choose another star. There are 200 calibration stars from
which to choose. Note: although the solar system objects display in the star list,
you cannot use them in these calibration routines. Since the R.A./Dec. positions of
these objects change with time, they are not suitable for slewing back and forth in
multiple iterations. Do not use the solar system objects.
5. Press the GoTo button. The scope will automatically slew to Polaris which should appear somewhere in the eld of a
low to medium power eyepiece. This will depend on how close your “rough” polar alignment is.
6. Center Polaris with the altitude and azimuth adjusters of your mount. Please refer back to the mount instructions.
Do not use the N-S-E-W buttons to center Polaris.
If Polaris is not in the eld at all, you will need to make larger adjustments to the
position of your mount. Be sure that the R.A. axis is pointing as close as possible
to the northern celestial pole.
7. Exit the calibration routine, or continue for more accurate alignment. Re-
member, the more accurate your polar alignment, the more accurate your nal
pointing accuracy will be.
8. To continue calibration, press GoTo again. The star list containing the previous calibration star will display for your
convenience. The mount will not slew; you are simply indicating that you wish to continue.
9. Select the same calibration star or choose a different one from the “Choose Star” display.
10. Press GoTo. The mount will slew to the star you have chosen.
11. Center the star with the N-S-E-W buttons.
12. Press Menu. The mount will slew to Polaris again.
13. Make the altitude and azimuth adjustments to center Polaris as before.
14. Repeat as needed. You can repeat this procedure any number of times until you feel that the mount is properly
aligned. Each iteration should bring you closer to polar alignment.
15. Press NEXT>. Now that you are polar aligned, press the NEXT> button. The Main Menu will display and you are
ready to observe.
Two-Star Calibration
Note: This polar alignment method is more accurate than calibrating with Polaris, but does not have the accuracy
of the Right-Angle Polar Alignment Scope.
If Polaris is not visible, you will use the 2–Star method. The accuracy of your alignment will depend on how orthogonal the
telescope is to the mount axes (refer to the “Orthogonality” section later in the manual).
If your tube assembly is not orthogonal, stay within ± 60 degrees of the celestial equator when doing a polar alignment
routine. Select two stars on one side of the mount during calibration. When you are using the mount to slew to objects
and it ips to the other side, use the procedure discussed in the section entitled “How to Find Objects if You Have Less
Than Perfect Polar Alignment” below.
1. Set up your mount so that the R.A. axis is pointing to the celestial pole as closely as you can. Refer the instruc-
< Cal Obj: Vega
RA: 18:36:56
DEC: +38:47:01 Press
LST:17:18:06 GoTo
Calibrate Star Screen - Vega
Center Polaris in
Eyepiece with Alt/Az
GoTo to re-calibrate
Next to Exit Cal. >
Center Polaris Screen
/