Page is loading ...

Revision Date: 6-27-2019 Page 1 of 8
4-PIECE SHOWER
WITH E-Z Pin
INSTALLATION
Please consult all local and state building codes and read the entire installation instructions prior to
beginning the installation of this unit to ensure that the installation is performed correctly.
IMPORTANT – Upon receipt, inspect the shower for fit, finish and any damage or defect.
Laurel Mountain’s 4-piece showers are to be stored in a dry area prior to installation to prevent
moisture from attacking the reinforcement material which could cause warpage to the unit.
Laurel Mountain's 4-piece showers with our E-Z Pin System have been designed to be able to be
installed in the framing pocket in Only 4 E-Z Steps. However, if you wish to assemble the entire unit
before installing it, you may do so. It is recommended that you disassemble and reassemble the shower
before installation so that you can apply silicone caulking to seams of the unit. Be sure to apply the
silicone caulking as described in the instructions below.
Laurel Mountain's 4-piece showers use factory installed E-Z Pin System to secure the unit for shipping.
These E-Z Pins are riveted and bonded to the multiple piece unit to align the walls of the shower or
tub/shower to the base during the installation.
To disassemble the unit: Remove shipping packaging, shipping
pins, and wing nuts on each of the E-Z Pins (See figure 1a).
These can be discarded as they are not used in the installation
process. Set all pieces of the unit in a safe location.
Fig . 1a
**Shipping Pins (Bolt and nut) are located in the front corners of the tub/shower unit.
shipping pins and nuts are no longer needed and can be discarded.
Note to installer: To simplify the installation process, the unit may be dry fitted into the pocket prior to
applying silicone caulking and securing.
Suggested Tools

Revision Date: 6-27-2019 Page 2 of 8
Step #1
Framing the Pocket
Frame a square and plumb pocket to dimension of the unit. It is suggested that the floor be clear and
level.
Step #2
Installing the Base
Set the base of the unit into the framed pocket and plumb and level it. Shims may be placed under the
leveling legs to make the unit plumb and level. Install all plumbing fixtures for the unit, making sure
not to over tighten them. Check the drain and make sure that it is sealed properly and not leaking. Use
appropriate size shims to fill any gaps between the flange at the top of the base and the framing (see
note on Fig 2). When the unit is plumb and level and any gaps are shimmed, secure the unit to the
framing with galvanized nails or screws (predrilling holes is recommended). Secure the vertical flanges
every 6” or as necessary to keep the flanges flush to the studding. Secure the horizontal flanges
wherever they come into contact with the studding.
NOTE:
In an application where the unit is installed over wall board trim/molding will required to conceal
the flange. For best results your fasteners will need to be flush with the nailing flange. Laurel
Mountain recommends centering and counter sinking a corrosion resistance fastener on the nailing
flange. Raised fasteners will result in a problematic finishing process of the trim/molding.

Revision Date: 6-27-2019 Page 3 of 8
Step #2(cont.)
Laurel Mountain’s products are designed to be self-supporting. However, in cases where the occupant
of the home has excessive weight, we recommend that the unit be installed on a bedding material of
cement or casting plaster. Use of a bedding material is required if the unit is being installed in a high
use facility. (ie: dormitory, locker room, nursing home, motel, hotel, etc.) The use of a bedding
material however is optional and done at the discretion of the customer. If a bedding material is used,
be sure to place a moisture barrier, such as plastic, between the bedding compound and the unit.
**FOAM SHOULD NEVER BE USED AS A BEDDING MATERIAL**

Revision Date: 6-27-2019 Page 4 of 8
Step #3
Figure 3
Locate the back wall section. The E-Z Pins on the top of the base section fit through holes in the
bottom of the back wall section. This will line the back wall up correctly. You can perform a dry-fit of
the wall section to the base to check fit and ensure things line up and then remove panel for preparation.
Before installing the back wall, clean seam, then apply a bead of silicone caulking (not latex caulking)
on the seam that will be between the base and back wall. Be sure that the bead goes in front of the E-Z
Pins on the base. (Figure 3) Guide the back wall section onto the installed base section. Make sure
that the back wall section is plumb. Use shims to get it plumb if needed. The side wall sections will
not install correctly if the back wall is not plumb. Once the back wall section is plumb and seated
properly on top of the base section, secure the back wall section to the studding. Secure the vertical
flanges every 6” or as necessary to keep the flanges flush to the studding. Secure the horizontal flanges
wherever they come into contact with the studding. Verify again that the wall section is plumb.

Revision Date: 6-27-2019 Page 5 of 8
Step #4
Figure 4
Locate the left hand wall section of the unit. The side walls are designed to be easy to install from the
front of the unit. You can perform a dry-fit of the wall section to the base to check fit and ensure things
line up and then remove panel for preparation. Clean seams then apply a bead of silicone caulking (not
latex caulking) on the seam that will be between the base and the side wall & the side wall and the back
wall (FIG 4.1 & 4.2). As with the back wall installation, there are E-Z Pins and mating holes to guide
the wall into place. Once the left side wall section is seated properly on top of the base section, secure
the side wall section to the studding. Secure the vertical flanges every 6” or as necessary to keep the
flanges flush to the studding. Secure the horizontal flanges wherever they come into contact with the
studding.
**Note: If installing the unit under drywall, see Fig4.3. Installation over drywall, see section, Fig 4.4
Repeat Step #4 process for the right hand wall section.

Revision Date: 6-27-2019 Page 6 of 8
Grab bar installation
The grab bars are fastened to the shower wall using the provided screws.
Review these instructions before you begin the installation.
1) Determine the location you want to install the grab bar. Suggested
dimensions are shown above. Place the grab bar in the desired location
and mark the location of each mounting hole for both ends of the grab
bar.
2) Using an 1/8” drill bit, drill each mounting hole at a depth of 1”
3) Apply silicone caulking around and in each mounting hole before
installing the grab bar.
4) Start mounting by hand, one screw in each end of the bar.
5) Use a power drill with a Philips head bit to fully install the mounting
screws.
6) Install the remaining mounting screws into the mounting holes. Snug the
screws, but do not over tighten.
7) Slide flange plate over the flange and twist into place.
8) Clean up any excess silicone caulk.
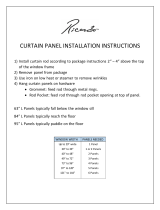
Curtain Rod Installation
The supplied curtain rod flanges are shipped loose with the supplied curtain rod. These are friction fit flanges and
need to be tapped onto the ends. To do this place a locator mark 5/8” in on both ends of the rod for reference.
Lay one of the flanges on the floor, set the rod on top and start into the hole. Place the other flange on the top in
the same orientation as the bottom flange and lightly tap the flange until both flanges are even with the marks
and/or until the overall length is 54” (use a rubber mallet or a block of wood to protect the ends). Use the same
method used in the Grab Bar Installation Above to install.
26 Nesbitt Road, Suite 257 New Castle, PA 16105
Phone: (800) 930-0050
Fax: (800) 930-0051
Email: sales@lmbath.com
www.laurelmountainbath.com

Revision Date: 6-27-2019 Page 7 of 8
Final Notes:
You can finish off your new unit with a variety of materials which are accepted by local building codes. Some
ideas are tile, drywall caulking, drywall mud, plaster, wood or plastic trim.
Clean your new shower with a liquid detergent and warm water.
Do not use any abrasive cleaners such as scouring powder or liquid abrasive cleaners.
IF A BEDDING MATERIAL IS USED UNDER A UNIT; CEMENT SLURRY, THIN MORTAR MIX, PLASTER
OF PARIS, OR A COMPARABLE FLOOR FILLING COMPOUND THAT IS NOT WATER SOLUBLE ARE
PROPER BEDDING COMPOUNDS. WATER SOLUBLE MATERIALS, FOAM AND OTHER EXPANDING
MATERIALS ARE NEVER TO BE USED AS A BEDDING COMPOUND.
IF YOU HAVE ANY QUESTIONS REGARDING INSTALLATION OF YOUR LAUREL MOUNTAIN
PRODUCT, PLEASE CALL US AT 1(800) 930-0050 OR BY E-MAIL AT sales@lmbath.com.
JOB SITE INSTALLATION OF OWNER SUPPLIED ACCESSORIES
All Laurel Mountain units purchased with supplied grab bars are custom reinforced at the factory to accommodate
the mounting of said bars. See sketch on page 6 for mounting locations.
Any grab bars installed on a Laurel Mountain unit at the job site must have proper reinforcement at all mounting
areas and should comply with ANSI A117.1, Uniform Federal Accessibility Standards (UFAS) and ASTM F446
specifications for grab bars in the bathing area.
Job-site installation of third party supplied grab bars is entirely at the risk and full responsibility of the owner. Any
damage to Laurel Mountain units or the property during or after grab bar installation, or any injuries due to
improper installation remain the sole responsibility of said owner and cannot be attributed to Laurel Mountain, Inc.
***WE SUGGEST THAT THE CUSTOMER AVOIDS USING A BATH MAT IN THE UNIT, AS IT
COULD CAUSE WATER STAINS OR BLISTERING TO THE FINISH SURFACE OF THE UNIT.
LAUREL MOUNTAIN PRODUCTS ARE CERTIFIED TO MEET NAHB STANDARDS, HUD/FHA, BOCA, HUD UM-
73A, ANSI Z124.1 AND ANSI Z124.2. FOR DETAILS, REQUEST NAHB RESEARCH CENTER CONFIRMATION.
26 Nesbitt Road, Suite 257 New Castle, PA 16105
Phone: (800) 930-0050
Fax: (800) 930-0051
Email: sales@lmbath.com
www.laurelmountainbath.com

Revision Date: 6-27-2019 Page 8 of 8
Residential Shower Warranty
Laurel Mountain showers are warranted to the original purchaser to be free from defects in material and
workmanship for the following periods. The shower shell carries a limited lifetime warranty. The grab bars, drain
and curtain rod have a limited 10 year warranty. All other parts have a limited 5 year warranty. Proof of
purchase is required. This warranty is issued to the original purchaser and shall be effective from the date of
purchase as shown on purchasers receipt.
Laurel Mountain will repair or replace (at their choice) any unit which proves to be defective in material or
workmanship under normal use and service, having been properly installed. This warranty is the only express
warranty made by Laurel Mountain and is limited to the duration of this warranty. Any labor charges and/or
damage incurred in installation, repair or replacement as well as incidental and consequential damages
connected therewith are excluded and will not be paid by Laurel Mountain. Some states do not allow the
exclusion or limitation of incidental or consequential damages, so the above limitation or exclusion may not
apply. This warranty is void for any damages to the unit due to abuse, misuse, neglect, accident, improper
installation, any use violating instruction furnished by us, or repair not authorized in writing by Laurel Mountain.
/