Page is loading ...

Studio
Freestanding Conventional Flue
with Thermostatic Remote Control
PR2306 Issue 8 (December 2019)
Instructions for Use, Installation and Servicing
For use in GB, IE (Great Britain and Republic of Ireland)
THE OUTER CASING, FRONT AND GLASS PANEL BECOME EXTREMELY HOT DURING OPERATION AND
WILL RESULT IN SERIOUS INJURY AND BURNS IF TOUCHED. IT IS THEREFORE RECOMMENDED THAT
A FIREGUARD COMPLYING WITH BS 8423 (LATEST EDITION) IS USED IN THE PRESENCE OF YOUNG
CHILDREN, THE ELDERLY OR INFIRM.
ENSURE THAT ALL COMBUSTIBLE MATERIALS ARE NOT POSITIONED ABOVE OR NEAR TO THE APPLIANCE OUTER CASING.
This product contains a heat resistant glass panel. This panel should be checked during Installation and at each servicing interval. If any
damage is observed on the front face of the glass panel (scratches, scores, cracks or other surface defects), the glass panel must be replaced
and the appliance must not be used until a replacement is installed. Under no circumstances should the appliance be used if any damage is
observed, the glass panel is removed or broken.
These Instructions must be left with the appliance for future reference and for consultation when servicing the appliance. Please make the
customer aware of the correct operation of the appliance before leaving these instructions with them.
The commissioning sheet found on Page 3 of this Instruction manual must be completed by the Installer prior to leaving the premises.
IMPORTANT
IMPORTANT:
F
OR
eAsy
TO
FOllOw
,
sTeP
by
sTeP
vIdeO
INsTRucTIONs
ON
hOw
TO
OPeRATe
ANd
MAINTAIN
yOuR
G
AzcO
ReMOTe
sysTeM
GO
TO
www
.G
AzcO
.
Tv

2
Appliance Commissioning Checklist ......................3
User Instructions .......................................................4
Installation Instructions ............................................9
Technical Specifications ............................................................. 9
Site Requirements .................................................................... 12
Installation ................................................................................14
Commissioning ......................................................................... 32
Servicing Instructions .............................................33
Fault Finding .............................................................................33
How to replace parts ................................................................ 35
Spare parts list .........................................................................41
Service Records ......................................................................46
Information Requirements.........................................................47
Studio Freestanding - Conventional Flue
Contents
Covering the models listed on page 9, Technical Specification.
It is a requirement of the Building Regulations 2010 that the installation of this appliance is notified to the Local Authority. It is
the responsibility of the GasSafe registered installer to carry out this notification to the Local Authority via the GasSafe register
Competent Persons Scheme in England and Wales (different rules apply in Scotland and Northern Ireland).
When the installation has been notified, GasSafe will send a Building Regulations Compliance Certificate to you containing details
of the work completed. Please ensure that the person responsible for the installation of this appliance completes this notification
and records it in the Appliance Commissioning Checklist on page 3.
IT IS YOUR RESPONSIBILITY TO COMPLY WITH THE BUILDING REGULATIONS AND BE ABLE TO PRODUCE THIS
CERTIFICATE SHOULD IT BE REQUIRED IN THE FUTURE.
If you have purchased your stove or fire from an authorised stockist
within our Expert Retailer Network, then automatically your product
will carry a 2 year warranty as standard. The 2 year warranty can be
further extended to a total warranty period of 5 years by registering
your Gazco Stove or Fireplace within one month of the latter of the
purchase date or installation date. Accordingly, the start date for
the warranty period is the date of purchase. During the registration
process, the Expert Retailer details will be required for your Extended
Warranty to be activated. Any product purchased outside of our Expert
Retailer Network will carry a standard 12 month, non-extendable
warranty.
It is a condition of the Extended Warranty that the installation
complies with the relevant Building Regulations and is carried out
by a suitably trained and qualified individual (GasSafe in the UK or
equivalent in other countries) with the certificate of installation and the
Commissioning Report on Page 3 completed and retained by the end
user.
Full terms and conditions are detailed in the Warranty Statement on
the Gazco website www.gazco.com. In the event of any conflict of
information the wording on the website shall prevail.
Important Note: Should any problems be experienced with your
product, claims must first be submitted to the Expert Retailer where
the appliance was purchased from who will offer immediate assistance
or contact Gazco on your behalf.

3
IMPORTANT NOTICE
Explain the operation of the appliance to the end user, hand the completed instructions to them for safe keeping,
as the information will be required when making any guaranteed claims.
To assist us in any guarantee claim please complete the following information:-
Appliance Commissioning Checklist
FLUE CHECK
PASS FAIL
1. Flue Is correct for appliance
2. Flue ow Test N/A
3. Spillage Test N/A
GAS CHECK
PASS FAIL
1. Gas soundness & let by test
2. Standing gas pressure mb
3. Appliance working pressure (on High Setting)
Minimum Pressure Requirement: NG - 17.5mbar LPG - 34.5mbar
NB All other gas appliances must be operating on full
mb
4. Gas rate m
3
/h
5. Does Ventilation meet appliance requirements N/A
SAFETY CHECK
1. Check soundness of the Thermocouple connections - including tightness and lead integrity
2. Glass checked to ensure no damage, scratches, scores or cracks
BUILDING CONTROL NOTIFICATION
YES NO
1. Installer notied GasSafe/Local Authority of installation via Competent Persons Scheme?
RETAILER AND INSTALLER INFORMATION
Retailer ...............................................
.......................................................
.......................................................
Contact No. ...........................................
Date of Purchase .....................................
Model No. ............................................
Serial No. .............................................
Gas Type .............................................
Installation Company ................................
......................................................
......................................................
Engineer. . . . . . . . . . . . . . . . . . . . . . . . . . . . . . . . . . . . . . . . . . . . .
Contact No. ..........................................
GasSafe Reg No. ....................................
Date of Installation ..................................

4
Welcome
Congratulations on purchasing your Studio fire, if installed
correctly Gazco hope it will give you many years of warmth
and pleasure for which it was designed.
The purpose of this manual is to familiarise you with your
appliance, and give guidelines for its installation, operation
and maintenance. If, after reading, you need further
information, please do not hesitate to contact your Gazco
retailer.
WARNING
In the event of a gas escape or if you can smell
gas, please take the following steps:
• Immediately turn off the gas supply at the meter/
emergency control valve
• Extinguish all sources of ignition
• Do not smoke
• Do not operate any electrical light or power
switches (On or Off)
• Ventilate the building(s) by opening doors and
windows
• Ensure access to the premises can be made
Please report the incident immediately to the
National Gas Emergency Service Call Centre on
0800 111 999 (England, Scotland and Wales) , 0800
002 001 (N. Ireland) or in the case of LPG, the gas
supplier whose details can be found on the bulk
storage vessel or cylinder.
The gas supply must not be used until remedial
action has been taken to correct the defect and
the installation has been recommissioned by a
competent person.
1. General
1.1 Installation and servicing must only be carried out by a
competent person whose name appears on the GasSafe
register. To ensure the engineer is registered with GasSafe
they should possess an ID Card carrying the following logo:
1.2 In all correspondence, please quote the appliance type
and serial number, which can be found on the data badge
located on a plate under the main burner.
1.3 Do not place curtains above the appliance:
You must have 300mm clearance between the appliance
and any curtains at either side.
1.4 No furnishings or other objects should be placed within
1 metre of the front of the appliance.
1.5 If a shelf is fitted, a distance of 400mm above the appliance
is required.
1.6 If any cracks appear in the glass panel do not use the
appliance until the panel has been replaced.
1.7 This product is guaranteed for 5 years from the date of
installation, as set out in the terms and conditions of sale
between Gazco and your local Gazco retailer. Please
consult with your local Gazco retailer if you have any
questions. In all correspondence always quote the Model
Number and Serial Number.
IMPORTANT: NEVER position a television or
screen above this appliance.
2. Operating the Appliance
The appliance is operated by thermostatic remote control.
Up
Down
1
2.1 Turning the appliance On:
Your remote can control the gas re from pilot ignition
through to shut down.
To turn the re on press the OFF button and the UP button
simultaneously. You hear several short signals.
The pilot and main burner ignite and the remote is now
in Manual Mode:
IMPORTANT: YELLOW FLAMES TYPICALLY
APPEAR WHEN THE APPLIANCE HAS REACHED
NORMAL OPERATING TEMPERATURE. THIS CAN
TAKE UP TO 30 MINUTES.
WARNING: IF THE APPLIANCE FAILS TO LIGHT
OR BECOMES EXTINGUISHED IN USE, WAIT 3
MINUTES BEFORE ATTEMPTING TO RELIGHT.
User Instructions

5
2.2 There are 3 different modes available for controlling and
operating the appliance:
1. Manual Mode
2. Temp Mode (Automatic)
3. Timer Mode (Automatic)
2.3 In MANUAL MODE you can:
— turn on the main burner using the UP button
— regulate the ame from high to low and back
— turn off the burner leaving just the pilot burning
In TEMP MODE (Automatic) you can:
— set the room temperature so the thermostat in the remote
automatically maintains that temperature
In TIMER MODE (Automatic) the re:
— turns on and off according to the set time periods
— automatically regulates the room temperature during the
set periods
NOTE: When operating the re in Temp or Timer
mode, the pilot remains lit and the re then
automatically switches on at programmed times to
bring the room to the set temperature whether or not
you are in the room.
NEVER LEAVE ANY COMBUSTIBLE MATERIALS
WITHIN 1 METRE OF THE FRONT OF THE
APPLIANCE.
Switching Between Modes
2.4 Press the SET button to change to Temperature Mode.
Press again to change to Timer Mode.
Keep pressing to run through all operating modes. These
are:
— MAN
— DAY TEMP
— NIGHT TEMP
— TIMER
and back to MAN
NOTE: MAN mode can also be reached by pressing
either the UP or DOWN button.
Manual Mode
2.5 Press the OFF button and the UP button simultaneously.
You hear several clicks and audible beeps as the re begins
the ignition process, (up to 30 seconds).
Turning the appliance Off:
Press the OFF button to turn the appliance off.
FOR SAFETY, YOU MUST WAIT 30 SECONDS BEFORE
LIGHTING THE FIRE AGAIN.
Increasing the Flame Height:
Press the UP button once to increase ame height one
stage. Press and hold the UP button to increase to
maximum.
Decreasing the Flame Height:
Press the DOWN button once to decrease ame height
one stage. Press and hold the DOWN button to decrease
to minimum. At the lowest point the re goes to 'Standby
Mode' (Only Pilot lit).
NOTE: While pressing a button a symbol indicating
transmission appears on the display. The receiver
conrms transmission with a sound signal.
Temp Mode (Automatic)
2.6 The display shows the current room temperature.
To increase or decrease the re’s output:
Press the SET button to select either the DAY TEMP or the
NIGHT TEMP mode by briey pressing the SET button.
Hold the SET button until the TEMP display ashes and
then let go.
Set the desired temperature with the UP and DOWN
arrows. (Minimum temperature 5C, maximum 40C or 40F to
99F when Fahrenheit is the preferred option).
Press the OFF button to stop the display ashing or wait
to return to TEMP mode.
NOTE: If you set a temperature that is beneath the
current room temperature, the re automatically
switches to PILOT (Stand by).
If you would like the Night temperature control to turn o
then decrease the temperature until [--] is displayed.
Timer Mode (Automatic)
2.7 There are two programmable settings you can make over
a 24 hour period, P1 and P2. These are normally used
to provide an early morning and evening setting for each
working week:
P1 + = Start Timed Setting 1
P1 + = End of Timed Setting 1
P2 + = Start Timed Setting 2
P2 + = End of Timed Setting 2
2.8 P1 - Program 1 for a Timed Setting
Press the SET button until the TIMER mode is displayed.
Hold the SET button. The displays ashes the current time
for P1. While the time displayed is ashing you can alter
the hours and minutes set.
To set the time your re rst lights, change P1 :
— Press the UP button to alter the hour
— Press the DOWN button to alter the minutes
in 10 minute increments
Press SET again to move to the end setting for P1 This is
the time your Studio rst shuts down:
— Press the UP button to alter the hour
— Press the DOWN button to alter the minutes
User Instructions

6
2.9 P2 - Program 2 for a Timed Setting
Use the same steps outlined in 2.8 to change the setting
for P2.
If you have already set P1 and want to alter the setting for
P2 only:
— Press the SET button until TIMER mode is displayed
— Hold the SET button until the display ashes the
current time for P1
— Press the SET button once again to scroll past the
settings for P1 and P1
With the time still ashing:
— Press the UP button to alter the hour
— Press the DOWN button to alter the minutes
Once all four times are set press the OFF button.
2.10 To view existing settings:
— Select Timer Mode
— Press and briey hold the SET button you see the start
time for P1
— Repeat the above step for the start and end of each
program
Low Battery
“BATT” is displayed on the remote when its batteries need
replacement.
Setting the time
Simultaneously press the up and down buttons.
Press the up button to set the hour and the down button to
set the minutes.
Press OFF to return to the manual mode or simply wait.
Setting the °C/24 Hour or °F/12 Hour clock
Press OFF and the down arrow until the display changes
from °C/24 hour clock to °F/12 hour clock and vice versa.
If the remote is removed, lost or damaged, signals
transmitted to the receiver cease. Your re will go to
standby (pilot) mode after 6 hours.
Troubleshooting
IMPORTANT: In the unlikely event that the handset
fails to communicate correctly with the appliance
it may be necessary to turn off the gas supply
at the isolation valve until any problems can be
resolved.
The gas meter and isolation valve can be located
outside in a meter box, under the stairs, beneath
the kitchen sink or in the garage. Whilst this list
is not exhaustive, it is important to be able to
identify the location of the valve in case of any gas
emergency.
To turn off the gas supply, simply turn the handle
so the lever is at 90 degrees to the upright gas
pipe.
If you smell gas, open doors and windows and
never operate any electrical switches.
Immediately call the Gas Emergency Services on
0800 111 999.
3. Cleaning the Studio
3.1 Make sure the appliance and surrounds are cool before
cleaning.
3.2 Use:
— A damp cloth for the decorative front
— A damp cloth to clean the inner panels (Black Glass
version only)
— Soap and water to clean the glass
3.3 Remove the decorative front by lifting to disengage the
xing hooks from the locating slots, see Diagram 2.
2
User Instructions

7
3.4 To open the glass door use the hexagon key provided.
3.5 Release the window locks by moving them from shut to
open towards the outer edges, see Diagram 3.
3
3.6 To completely remove the glass front:
3.7 Support the frame and lower it gently forward down to its
natural stop position, see Diagram 4.
DO NOT EXERT PRESSURE ON THE DOOR ONCE
THERE IS RESISTANCE.
4
3.8 Remove the securing spring clip from the bottom-right of the
window frame, see Diagram 5.
5
3.9 With the window frame in an upright position slide the frame
to the left so that it comes off the left hinge pin, see Diagram
6 (1).
3.10 Still keeping the frame upright drop the left side down and
forward slightly, see Diagram 6 (2).
6
1
2
3.11 Slide the frame to the right so it comes off the right hinge
pin. The window frame should now be free.
3.12 Refit the Window Frame Assembly in reverse order.
When closing the door ensure the door catches are fully
engaged.
UNDER NO CIRCUMSTANCES SHOULD THE
APPLIANCE BE USED WITHOUT THE CATCHES
HOLDING THE DOOR IN PLACE.
4. Changing the Appliance Batteries
The batteries can be accessed without removing the
decorative front.
4.1 The battery box is located between the decorative front and
the outer box on the bottom left hand side of the appliance,
see Diagram 7.
7
Battery Box
User Instructions

8
User Instructions
4.2 Pull the battery box forward as far as possible, then twist
slightly to the left to remove, see Diagram 8.
8
4.3 Remove the cover by sliding off in the direction of the arrow
as shown in Diagram 9.
9
4.4 Correctly position the 4 new AA size batteries into the
battery holder.
It is essential to use high quality batteries (Duracell or
equivalent) when replacing batteries in the handset or
control box.
4.5 Re-assemble in reverse order.
PLEASE ENSURE NO WIRES ARE TRAPPED
WHEN REPLACING THE BATTERY BOX INTO THE
BRACKET. THE LEADS ARE EASILY DAMAGED.
5. Flame Failure Device
5.1 This is a safety feature incorporated on this appliance which
automatically switches off the gas supply if the pilot goes
out and fails to heat the thermocouple.
IF THIS OCCURS DO NOT ATTEMPT TO RELIGHT THE
APPLIANCE FOR 3 MINUTES.
6. Running In
6.1 During initial use of a new GAZCO appliance a strong odour
will be encountered as various surface coatings become hot
for the rst time. Although these odours are harmless it is
recommended that the appliance is operated on maximum
for 4 to 8 hours in order to fully burn off these coatings. After
this period the odours should then disappear.
If the odours persists, please contact your installer for
advice.
6.2 During the rst few hours of burning there may be
discolouration of the ames. This will also disappear after a
short period of use.
7. Servicing
7.1 The appliance must be serviced every 12 months by a
qualied GasSafe Engineer. In all correspondence always
quote the Model number and the Serial number which may
be found on the Commissioning Checklist (Page 3).
8. Ventilation
8.1 Any purpose provided ventilation should be checked
periodically to ensure that it is free from obstruction.
9. Installation Details
9.1 Your installer should have completed the commissioning
sheet at the front of this book. This records the essential
installation details of the appliance. In all correspondence
always quote the Model number and Serial number.
10. Hot Surfaces
10.1 Parts of this appliance become hot during normal use.
10.2 Regard all parts of the appliance as a working surface.
10.3 Provide a suitable re guard to protect young children
and the inrm.
11. Appliance will not light
If you cannot light the Studio:
11.1 Check and change the batteries in the remote handset.
11.2 Check and change the appliance batteries (see Section 3).
11.3 Consult your Gazco retailer or installer if the Studio still
does not light.

9
Model Gas
CAT.
Gas Type Working
Pressure
Aeration Injector Gas Rate
m
3
/h
Input kW
(Gross)
Country
High Low
Studio 1
I
2H
Natural Gas
G20
20mbar 3mmØ (Q) 360 0.600 6.3 4.0 GB, IE
I
3P
Propane G31 37mbar Blank (A) + 16mm x 23mm 180 0.260 6.9 3.5 GB, IE
Studio 2
I
2H
Natural Gas
G20
20mbar 6mm x 15mm 530 0.809 8.5 4.4 GB, IE
I
3P
Propane G31 37mbar 5mmØ (M) + 16mm x 23mm 150 0.316 8.5 4.4 GB, IE
Studio 1 - Efciency Class 2 - 72% / NOx Class 4
Studio 2 NG - Efciency Class 2 - 81% / NOx Class 4
Studio 2 LPG - Efciency Class 1 - 82% / NOx Class 4
Flue Size - TOP EXIT 128mm ø
Gas Inlet Connection Size = 8mm ø
Minimum Flue Specication = T250/N2/0/D/1
Maximum Flue Temp = 220°C
Installation Instructions
Technical Specification
Covering the following models:
LOG
Model Studio 1 - White Studio 2 - White Studio 1 - Black Studio 2 - Black
Nat Gas LPG Nat Gas LPG Nat Gas LPG Nat Gas LPG
Vermiculite 508-055 508-490 508-315 508-646 508-011 508-533 508-346 508-599
Black Reeded 508-165 508-580 508-332 508-695 508-020 508-571 508-387 508-612
Black Glass 508-199 508-606 508-187 508-418 508-147 508-589 508-094 508-426
PEBBLE & STONE
Model Studio 1 - White Studio 2 - White Studio 1 - Black Studio 2 - Black
Nat Gas LPG Nat Gas LPG Nat Gas LPG Nat Gas LPG
Vermiculite 508-196 508-478 508-209 508-717 508-244 508-429 508-098 508-622
Black Reeded 508-307 508-500 508-260 508-731 508-398 508-437 508-191 508-630
Black Glass 508-366 508-615 508-282 508-750 508-077 508-517 508-207 508-651
DRIFTWOOD
Model Studio 1 - White Studio 2 - White Studio 1 - Black Studio 2 - Black
Nat Gas LPG Nat Gas LPG Nat Gas LPG Nat Gas LPG
Vermiculite 508-030 508-435 508-226 508-519 508-014 508-409 508-106 508-425
Black Reeded 508-059 508-456 508-272 508-538 508-029 508-420 508-145 508-487
Black Glass 508-066 508-479 508-303 508-581 508-045 508-440 508-201 508-498
The net efciency of this appliance has been measured as specied in EN613:2001 and the result after conversion to gross
using the appropriate factor from Table E4 of SAP 2012 is 66.3% for the Studio 1, 73.0% for the Studio 2 NG and 75.5% for
the Studio 2 LPG. The test data has been certied by Kiwa Nederland BV. The gross efciency value may be used in the UK
Government's Standard Assessment Procedure (SAP) for energy rating of dwellings.

10
This appliance has been certified for use in countries other than
those stated. To install this appliance in these countries, it is
essential to obtain the translated instructions and in some cases
the appliance will require modification. Contact Gazco for further
information.
Installation Instructions
Technical Specification
Model A B C D E F G H I J K L M
Studio 1 1150 910 650 130 130 324 442 43.5 896 396 148 596 300
Studio 2 1350 1110 850 130 130 324 442 43.5 896 396 148 596 300
PACKING CHECKLIST
Qty Description Fixing Kit containing:
Stone & Pebble Effect
Version
1 x White Stone Chippings
1 x Pebble Set
Log Version
1 x Log Set
1 x Lava Rock
1 x Slate
Driftwood Log Version
1 x Driftwood Log Set
1 x Lava Rock
1 x Slate
1 x Instruction Manual
1 x Handset
1 x Quick Start Guide
1 x Door Tool
1 x 8mm Elbow
8 x M5 Zinc Black Washer
1 x 9v cell battery
4 x AA cell batteries
8 x 25 Hex Head Screws
1 x Bag Embaglow material
I
J
E
G
DD
C
Viewing Area
Freestanding Studio with Bench
F
A
H
K
L
M
B
Viewing Area

11
Installation Instructions
Technical Specification
Model A B C D E F G H I J K L M N
Studio 1 1105 910 650 130 130 324 195 43.5 649 396 148 485 596 53
Studio 2 1305 1110 850 130 130 324 195 43.5 649 396 148 485 596 53
I
J
E
L
M
N
G
D
D
C
Viewing Area
Freestanding Studio with Plinth
F
A
H
K
B
Viewing Area

12
1. Flue & Chimney Requirements
WHEN INSTALLING A FLUE SYSTEM PLEASE REFER
TO THE MANUFACTURER’S INSTRUCTIONS.
The European chimney standards now describe chimneys
and ues by their temperature, pressure and resistance
to corrosion, condensation and re. To identify the correct
ue system, the minimum ue specication is shown in the
Technical Specication. Existing chimneys are not covered
by this system.
The ue must be installed in accordance with all local and
national regulations and the current rules in force:
1.1 A exible liner must be continuous from the appliance spigot
to the roof terminal.
1.2 The minimum effective height of the ue must be 3m (10').
1.3 The ue must be free from any obstruction.
1.4 Any damper plates must be removed or secured in the fully
open position and no restrictor plates tted.
1.5 The chimney should be swept immediately before installing
the appliance, but it need not be swept if you can see the
chimney is clean and free from obstruction throughout.
2. Flue Options
Top Exit only - Twin Wall Rigid 127mm (5”)
A range of Vitreous Enamel Gloss Black ue pipe is
available to compliment the appliance. Please contact
your Gazco retailer for further information.
3. Gas Supply
This appliance is intended for use on a gas installation with a
governed meter.
3.1 Make sure local distribution conditions (identication of
the type of gas and pressure) and the adjustment of the
appliance are compatible before installation.
3.2 Ensure the gas supply delivers the required amount of gas
and is in accordance with the rules in force.
3.3 Soft copper tubing can be used on the installation and soft
soldered joints outside the appliance and below the rebed.
3.4 A factory tted isolation device is part of the inlet connection;
no further isolation device is required.
3.5 All supply gas pipes must be purged of any debris that may
have entered prior to connection to the appliance.
3.6 The gas supply enters through the silicone panel located
beneath the control access panel at the base of the rebox.
Slit with a sharp knife before passing the supply pipe
through.
3.7 The gas supply must be installed in a way that does not
restrict the removal of the appliance for servicing and
inspection.
4. Ventilation
IMPORTANT: Ensure any national ventilation
requirements are taken into account during installation
of the appliance.
UK ONLY:
The Studio 1 has a nominal input not exceeding 7.0kW
and does not normally require any additional permanent
ventilation.
The Studio 2 must have permanent ventilation with a
minimum open area of 4cm2.
If however, spillage is detected when commissioning the
appliance, there may be insufcient natural ventilation and
additional ventilation may be required.
FOR THE REPUBLIC OF IRELAND REFER TO THE
RULES IN FORCE FOR VENTILATION REQUIREMENTS.
5. Appliance Location
5.1 This appliance has been designed to stand on a designated
bench or plinth.
5.2 For practical reasons, the oor should be at and solid to
allow the appliance to be levelled and secured in place.
5.3 This appliance may be situated anywhere in the room, but
due consideration should be taken to ensure that it is sited
within the constraints of the allowable ue conguration.
5.4 If the appliance is to be sited against a combustible wall, a
clearance of 50mm should be allowed between the wall and
the rear of the appliance.
5.5 This appliance must not be installed in a room that contains
a bath or shower.
5.6 Installations on a Bench or Plinth do not need a non-
combustible oor but the appliance must not be tted on a
carpet. Use a solid oor.
5.7 Installations on a Bench or Plinth do not require xing to the
oor.
5.8 To secure the appliance to the Bench or Plinth follow the
instructions on Page 15.
Installation Instructions
Site Requirements

13
Installation Instructions
Site Requirements
Minimum Clearance
5.9 The appliance is not suitable for installation against a
combustible wall. All combustible materials must be removed
from behind the appliance.
5.10 Ensure that all minimum clearances to combustible
materials are complied with, see Diagrams 1 & 2.
The specied clearances provide the minimum distance to
combustible materials. If the appliance is intended to be
installed into a non-combustible opening the clearance to the
sides and above the appliance can be reduced. However, it
is recommended that the specied clearances are maintained
irrespective of the materials used in the construction of the
opening to allow adequate air ow and access to controls.
100
225
100
1
50
100
2

14
Installation Instructions
1. Safety Precautions
1.1 For your own and other’s safety, you must install this stove
according to local and national codes of practice. Failure to
install the stove correctly could lead to prosecution. Read
these instructions before installing and using this
appliance.
1.2 These instructions must be left intact with the user.
1.3 Do not attempt to burn rubbish on this appliance.
1.4 Keep all plastic bags away from young children.
1.5 Do not place any object on or near to the appliance and
allow adequate clearance above the appliance.
IF THE APPLIANCE IS EXTINGUISHED OR GOES OUT
IN USE, WAIT 3 MINUTES BEFORE ATTEMPTING TO
RELIGHT THE APPLIANCE.
1.6 The appliance is tted with an oxygen sensitive pilot that will
act to cut off the gas supply to the appliance in the event of
incorrect operation of the ue.
If the system acts to shut off the gas supply, this indicates
that there is insufcient ue pull. Continued operation of this
safety device means that there may be a serious problem
with the ue system, and this should be inspected by a
qualied GasSafe engineer. Do not use the appliance
until an engineer says it is safe to do so.
The oxygen sensitive pilot must not be tampered with. Use
only genuine Gazco replacement parts when servicing the
appliance - refer to Servicing section.
IMPORTANT: REFER TO DATA BADGE AND
TECHNICAL SPECIFICATION AT THE FRONT OF
THE MANUAL TO ENSURE THE APPLIANCE IS
CORRECTLY ADJUSTED FOR THE GAS TYPE AND
CATEGORY APPLICABLE IN THE COUNTRY OF
USE.
FOR DETAILS OF CHANGING BETWEEN GAS TYPES
REFER TO SERVICING, SECTION 15, REPLACING
PARTS.
Unpacking
1.7 Remove the appliance from its packaging, and check that it
is complete and undamaged.
Put the loose ceramic parts to one side so that they are not
damaged during installation.
2. Installation of the Appliance
WARNING: THIS APPLIANCE IS HEAVY.
USE CAUTION WHEN INSTALLING, REMOVING
AND STORING AS THE APPLIANCE IS HEAVY AND
SHOULD BE HANDLED CAREFULLY.
AT LEAST TWO PEOPLE WILL BE REQUIRED TO
INSTALL THIS APPLIANCE.
There are two types of installation:
Bench Installation
Plinth Installation
The method of installation is the same for both types of
installation.
2.1 The following steps will need to be carried out prior to
positioning the appliance in its nal position.
2.2 Position the ue collar onto the top of the appliance.
2.3 Remove the decorative front by lifting to disengage the
xing hooks from the locating slots, see Diagram 1.
1
2.4 Place carefully to one side.
2.5 Remove the 4 screws to detach the back plate,
see Diagram 2.
2
Screws
2.6 Place carefully to one side.

15
2.10 Using a spanner secure the front of the appliance to the
Bench or Plinth with 4 washers and bolts supplied, see
Diagram 6.
6
Bench Installation shown
Washers &
Bolts
Gas Installation
The appliance is supplied with an Inlet Extension Pipe to
aid installation from the appliance to the gas supply pipe.
2.11 To open the glass door use the hexagon key provided.
2.12 Release the window locks by moving them from shut to
open towards the outer edges, see Diagram 7.
7
2.13 To completely remove the glass front:
2.14 Support the frame and lower it gently forward down to its
natural stop position, see Diagram 8.
DO NOT EXERT PRESSURE ON THE DOOR ONCE
THERE IS RESISTANCE.
8
Installation Instructions
2.7 Remove the 2 screws and detach the front bottom trim,
see Diagram 3.
The battery box is located behind the front bottom trim.
When removing the front bottom trim disconnect the cable
from the battery box.
3
Screws
2.8 Carefully align the base of the appliance with the cutout
and xing holes in the Bench or Plinth. Carefully lower into
position, see Diagram 4.
4
Bench Installation shown
Cutout
2.9 Using a spanner secure the back of the appliance to the
Bench or Plinth with 4 washers and bolts supplied, see
Diagram 5.
5
Bench Installation shown
Washers &
Bolts

16
2.15 Remove the securing spring clip from the bottom-right of the
window frame, see Diagram 9.
9
2.16 With the window frame in an upright position slide the frame
to the left so that it comes off the left hinge pin, see Diagram
10 (1).
2.17 Still keeping the frame upright drop the left side down and
forward slightly, see Diagram 10 (2).
10
1
2
2.18 Slide the frame to the right so it comes off the right hinge
pin. The window frame should now be free.
2.19 Refit the Window Frame Assembly in reverse order.
When closing the door ensure the door catches are fully
engaged.
UNDER NO CIRCUMSTANCES SHOULD THE
APPLIANCE BE USED WITHOUT THE CATCHES
HOLDING THE DOOR IN PLACE.
2.20 Remove the box from the appliance and store safely as it
contains the remote control and fuel effects, etc.
2.21 Remove the liners, burner and splitter plate, referring to
Servicing Instructions, Replacing Parts.
2.22 The gas supply enters the appliance through a silicone
panel on the oor under the access panel, see Diagram 11.
11
2.23 Slit the silicone panel with a sharp knife.
2.24 The Inlet Extension Pipe needs to be tted in the correct
orientation, see Diagram 12.
12
Longer Section
Into Appliance
Shorter Section
Out of Appliance
2.25 Remove the isolation elbow from the appliance and connect
to the longer section of the Inlet Extension Pipe.
2.26 Feed the shorter section of the Inlet Extension Pipe through
the silicone panel inside the rebox.
2.27 Using the gap at the rear of the outer box for access, guide
the Inlet Extension Pipe through the hole in the back of the
Bench or Plinth, see Diagram 13.
13
Inlet Extension Pipe
Plinth/ Bench
Appliance Outer Box
2.28 Inside the rebox, connect the isolation elbow to the
appliance gas inlet pipe, under the access panel.
14
Inlet Pipe
Isolation Elbow
Inlet Extension
Pipe
2.29 At the rear of the appliance, t the supplied 8mm elbow to
the Inlet Extension Pipe.
Installation Instructions

17
Installation Instructions
WARNING: THIS APPLIANCE IS HEAVY.
USE CAUTION WHEN INSTALLING, REMOVING
AND STORING AS THE APPLIANCE IS HEAVY AND
SHOULD BE HANDLED CAREFULLY.
AT LEAST TWO PEOPLE WILL BE REQUIRED TO
INSTALL THIS APPLIANCE.
2.30 Carefully lift the appliance into position.
Take care not to damage the oor nish.
Ensure all clearances to combustibles are observed, see
Site Requirements, Section 5.
2.31 Connect the ue system.
2.32 Connect the gas supply to the gas Inlet pipe at the back of
the appliance.
3. Gas Soundness Pressure Check
3.1 PURGE THE SUPPLY PIPE. This is essential to expel any
debris that may block the gas controls.
3.2 Connect a suitable pressure gauge to the test point located
on the inlet tting.
3.3 Turn on the gas.
The burner must be temporarily tted whilst completing
this procedure.
3.4 Light the appliance and check for leaks.
3.5 Turn the appliance to maximum and check that the supply
pressure is as stated on the data badge.
3.6 Turn off the gas and replace the test point screw.
3.7 Turn the gas back on and check the test point for leaks.
3.8 Replace the splitter plate and burner.
4. Assembling the appliance
4.1 The Studio appliances have the option of 3 different liner
finishes:
Vermiculite
Black Reeded Panels
Black Glass Linings
Vermiculite & Black Reeded
NOTE: ALL FRONT PANELS ARE IN TWO PIECES.
HOLD THE REAR PANELS UNTIL ALL THE OTHER
PANELS ARE IN PLACE AS THEY CAN FALL
FORWARD.
4.2 Place the rear panel(s) behind the locating bracket on the
rear support bar.
4.3 Centralise the rear panel(s) with the chamfers touching and
pushed together, see Diagram 15.
15
Rear Support Bar
Rear Panel(s)
4.4 Place the lower side and front panels in position so the
chamfers meet at the front edge of the burner.
4.5 Ensure the 2-piece front panels are engaged against the
centre support tags on the burner and are pushed together
in the middle, see Diagram 16.
16
Front and Lower Side Panels

18
Installation Instructions
4.6 Slide the 2 side panels up to the rear panel,
see Diagram 17.
17
Side Panels
NOTE: THE HORIZONTAL CHAMFERS MUST ALIGN ON
THE REAR AND SIDE PIECES.
Black Glass
NOTE: ALL REAR PANELS ARE ONE PIECE.
HOLD THE REAR PANEL UNTIL ALL THE OTHER
PANELS ARE IN PLACE AS THEY CAN FALL
FORWARD.
4.7 Place the lower side and front panels in position so the
chamfers meet at the front edge of the burner.
4.8 Ensure the 2-piece front panels are engaged against the
centre support tags on the burner and are pushed together
in the middle, see Diagram 18.
18
Front and Lower Side Panels
4.9 Fit and centralise the rear panel, see Diagram 19.
19
Rear Panel
4.10 Slide the 2 side panels up to the rear panel,
see Diagram 20.
20
Side Panels
5. Arrangement of the fuel bed
Advice on handling and disposal
of fire ceramics
The fuel effect of the log version of this
appliance is made from Refractory Ceramic Fibre
(RCF), a material which is commonly used for
this application.
Protective clothing is not required when handling
these articles, but we recommend you follow
normal hygiene rules of not smoking, eating or
drinking in the work area and always wash your
hands before eating or drinking.
To ensure that the release of RCF fibres are kept
to a minimum, during installation and servicing a
HEPA filtered vacuum is recommended to
remove any dust accumulated in and around the
appliance before and after working on it. When
servicing the appliance it is recommended that
the replaced items are not broken up, but are
sealed within heavy duty polythene bags and
labelled as RCF waste.
RCF waste is classed as stable, non-reactive
hazardous waste and may be disposed of at a
licensed landfill site.
Excessive exposure to these materials may
cause temporary irritation to eyes, skin and
respiratory tract; wash hands thoroughly after
handling the material.
5.1 White Stone Effect: To replace the white stone effect,
make sure they are attened so they are level with the rim of
the tray.
5.2 Lava Rock for Log & Driftwood Log Layout: Use the
entire bag of supplied Lava Rock.
TAKE CARE NOT TO SPILL THE EFFECT INTO THE
PILOT AREA.
STACK STONES EFFECT IN FRONT OF THE PILOT
SHIELD TO OBSCURE THE BLACK METAL SHIELD.
ONLY GENUINE GAZCO PARTS CAN BE USED IN THIS
APPLIANCE.

19
Installation Instructions
6. Pebble & Stone Layout
PEBBLES & STONES MUST BE POSITIONED ACCORDING TO THE FOLLOWING INSTRUCTIONS TO GIVE THE CORRECT
FLAME EFFECT.
Layout for Studio 1
All pebbles can be identied by a number (ranging 1 - 18) on their underside. Pebbles 1, 3, 4, 5 & 12 have holes which locate onto a
burner stud (please note that the Studio 1 does not have Pebble 12).
6.1 Evenly spread the white stones over the fuel bed.
6.2 Position Pebbles 3*, 4*, 5* & 1* on to the locating studs in the burner tray.
NOTE: Pebble 4 on the front left corner of the burner tray and Pebble 5 on the front edge do not have a locating stud.
Once in position, place the remaining pebbles and embers in the below order, see Diagram 21.
Sparingly spread an amount of the Embaglow bres provided, covering the ports in the burner tray, see Diagram 21.
Ensure the material is placed loosely to create a random glow.
Take care not to use more than half a packet per application.
WARNING - DO NOT PLACE NEAR THE PILOT AREA.
21
4
18
3*
5
4*
16
5*
1*
18
18
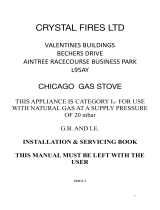
Layout for Studio 2
All pebbles can be identied by a number (ranging 1 - 18) on their underside. Pebbles 1, 3, 4, 5 & 12 have holes which locate onto a
burner stud.
6.3 Evenly spread the white stones over the fuel bed.
6.4 Position Pebbles 1*, 12*, 3*, 4*, 5* & 1* on to the locating studs in the burner tray.
NOTE: Pebble 4 on the front left corner of the burner tray and Pebble 5 on the front edge do not have a locating stud.
Once in position, place the remaining pebbles and embers in the below order, see Diagram 22.
Sparingly spread an amount of the Embaglow bres provided, covering the ports in the burner tray, see Diagram 22.
Ensure the material is placed loosely to create a random glow.
Take care not to use more than half a packet per application.
WARNING - DO NOT PLACE NEAR THE PILOT AREA.
22
4
11
1*
2
18
3*
5
12*
4*
5*
1*
16
18
18

20
Installation Instructions
7. Log Layout
LOGS MUST BE POSITIONED ACCORDING TO THE FOLLOWING INSTRUCTIONS TO GIVE THE CORRECT FLAME EFFECT.
THERE ARE TWO LOG SETS - AUTHENTIC LOG AND DRIFTWOOD. EACH SET IS FITTED USING THE SAME METHOD.
Layout for Studio 1
All logs can be identied by a letter (A - H) on their underside. Logs C and B have holes to locate each onto a burner stud (please note
that the Studio 1 does not have Logs G, E, or F).
7.1 Position log B on the left hand side of the burner tray, locating onto the middle and back left studs.
Cover the remainder of the tray in lava rock, see Diagram 23.
Take care not to spill the lava rock into the pilot area and the air gaps at the front and rear of the burner tray.
23
B
Pilot Area
Air Gaps
The Studio 1 comes with 5 embers in total, 4 small and 1 large.
7.2 Position the 2 small embers in the left and right back corners, followed by 1 ember in the back centre of the appliance
(behind Log B) and one in the front, slightly off-centre, see Diagram 24.
The nal ember is placed after all the logs are in position.
24
/