Page is loading ...

1
© 2020. All rights reserved.
AUTOMATIC EMERGENCY
BACKUP SUMP PUMP
SYSTEM
MODEL #STBB300
Purchase Date
Questions, problems, missing parts? Before returning to your retailer, call our customer
service department at 1-800-584-8089, 7:30 a.m. - 5:00 p.m., EST, Monday - Friday.
ATTACH YOUR RECEIPT HERE
Español p. 25
PN 156411 A SW1579 A
BY
BasementSentry.com
Zoeller
®
is a registered trademark of Zoeller
Co. All Rights Reserved.

2
© 2020. All rights reserved.
PACKAGE CONTENTS
SAFETY INFORMATION
DESCRIPTION QUANTITY
A 12V Pump with o-ring 1
B Controller/charger 1
C Dual Float 1
D Check Valve with o-ring 1
E Tee Fitting 1
F Pipe Clamps 2
G Battery Box 1
Please read and understand this entire manual before attempting to assemble, operate, or install the
product.
DANGER
• RISK OF CHEMICAL BURNS.
Battery acid is corrosive. Do not spill on skin, clothing or battery charger. Wear eye and head
protection when working with battery. Connect and disconnect DC output terminals only after
removing the controller from the AC outlet. Never allow the DC terminals to touch each other.
• FIRE/EXPLOSION HAZARD.
Keep sparks and flame (pilot light) away from battery.
• FIRE/EXPLOSION HAZARD.
Pump only clear water. Do not pump flammable or explosive fluids such as gasoline, fuel oil,
kerosene, etc. Do not use in a flammable and/or explosive atmosphere. Failure to follow these
warnings could result in death or serious injury and/or property damage.
• RISK OF ELECTRIC SHOCK.
These pumps have not been investigated for use in swimming pool or marine areas.
• RISK OF ELECTRIC SHOCK.
Always disconnect power source before attempting to install, service, or maintain the pump.
Never handle a pump with wet hands or when standing on wet or damp surface or in water. Fatal
electrical shock could occur.
• RISK OF ELECTRIC SHOCK.
Keep pump out of reach of children.
• PERSONAL INJURY OR PRODUCT DAMAGE MAY RESULT.
Failure to comply with instructions and designed operation of this product may void warranty.
Attempting to use a damaged pump can result in property damage, serious personal injury and/or
death.
A
B
C
D
E
F
G

3
© 2020. All rights reserved.
WARNING
• ELECTRICAL SHOCK ALERT.
Do not disassemble the motor housing. The motor has NO repairable internal parts and
disassembly may cause dangerous electrical wiring issues.
• ELECTRICAL SHOCK ALERT.
Before installing this product, have the electrical circuit checked by an electrician to ensure proper
grounding. All electrical installations must conform to the National Electric Code and all local codes.
• ELECTRICAL SHOCK ALERT.
Connect the controller to a properly-grounded 115 volt circuit equipped with a Ground Fault Circuit
Interrupter (GFCI) device. Make sure the electrical supply circuit is equipped with fuses or circuit
breakers with a minimum capacity of 15 amps.
• ELECTRICAL SHOCK ALERT.
Never use an extension cord.
• ELECTRICAL SHOCK ALERT.
Do not remove or replace the power cord.
• ELECTRICAL SHOCK ALERT.
Protect electrical cord from sharp objects, hot surfaces, oil, and chemicals. Avoid kinking the cord.
• ELECTRICAL SHOCK ALERT.
Do not lift pump by the power cord.
• PERSONAL INJURY ALERT.
Do not touch an operating motor housing. The motor is designed to operate at high temperatures.
• PERSONAL INJURY ALERT.
Release all pressure and drain all water from the system before servicing any component.
• PERSONAL INJURY ALERT.
Secure discharge line before starting pump. An unsecured discharge line can cause personal injury
and/or property damage.
• PERSONAL INJURY ALERT.
Wear safety glasses at all times when working with pumps.
• PROP65 WARNING FOR CALIFORNIA RESIDENTS:
Cancer and Reproductive Harm – www.P65Warnings.ca.gov
CAUTION
• PERSONAL INJURY OR PRODUCT DAMAGE MAY RESULT.
The controller operates on 115 volts. Make certain that the power source conforms to the
requirements of your equipment.
• PRODUCT DAMAGE MAY RESULT.
The continuous operating water temperature for this pump must not exceed 104°F (40°C).
• PRODUCT DAMAGE MAY RESULT.
This pump is designed to pump water only. It has not been evaluated for pumping chemicals or
corrosive materials. This pump is not designed for pumping effluent or sewage and should not be
used in applications involving salt water or brine.
• PRODUCT DAMAGE MAY RESULT.
Inspect the pump regularly for damage and perform routine maintenance as needed. Remove any
debris that may build up around the float.
• PRODUCT AND/OR PROPERTY DAMAGE MAY RESULT.
This pump is not designed for continuous operation.
SAFETY INFORMATION

4
© 2020. All rights reserved.
PREPARATION
Estimated Installation Time: 2-4 hours
Materials required for assembly: Basement Sentry brand deep cycle battery, 1-1/2-in. Schedule 40
PVC pipe, PVC primer and glue, 1-1/2-in ex coupling and clamps or
1-1/2-in. union.
GENERAL PUMP INFORMATION
SPECIFICATIONS
MODEL
PERFORMANCE IN GALLONS PER MINUTE
0 FT. 5 FT. 10 FT. 15 28 FT.
STBB300 45 43 35 27 Shut Off
This system features built-in WiFi to provide mobile monitoring and alerts. The system includes a
high-capacity 12V pump, controller, 7 amp battery charger, dual oat, check valve, battery box, tee
and pipe clamps.
This pump does not replace a primary, 115V sump pump. This pump provides additional protection
against basement ooding for your peace of mind when the power goes out. It is designed to work
only during power outages or if the primary pump does not work.
Choose this pump if your sump basin is at least 18-in. wide by 22-in. deep.
Place the battery in a cool, dry, well-ventilated area on a shelf or protective plywood board.
Carbon Monoxide Detectors
Whether you have a Basement Sentry backup pump system or a competitive brand, all use batteries
that give o gaseous by-products when charging. Some of these by-products can produce a rotten
egg odor. Also, some of these by-products can cause a CO detector to falsely activate. In order to
help prevent false activation, Basement Sentry recommends moving the battery as far away from the
CO detector as possible or, if necessary, vent the battery to the exterior. Basement Sentry provides
the previous statements only as guidelines to help prevent false activation of the CO detector. In
no way are they meant to supersede the instructions that accompany the detector, nor do they
supersede advice from the CO detector manufacturer.
If the audible alarm associated with your CO detector is activated, we recommend the following
actions:
1. Take immediate action for personal safety as recommended in the CO detector literature.
2. Contact the appropriate agency to determine if the CO is being produced by your furnace, water
heater, or any other device which uses natural gas.
3. If you are certain that no CO is being produced, a charging battery may be producing gaseous
by-products which are causing the CO detector to activate. Contact the manufacturer and ask for
recommendations to prevent the alarm activation.

5
© 2020. All rights reserved.
INSTALLATION INSTRUCTIONS
NOTE: Install the battery backup system when the
primary pump is not needed. Read instructions and
prepare all supplies before beginning installation.
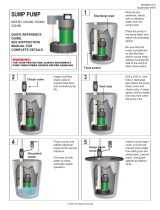
1. Disconnect power to primary sump and remove
from sump basin.
115 V
GFCI outlet
1
2. Be sure the o-ring is on the discharge of the
backup pump and slip the included stainless
steel clamp over the pump discharge. Press the
backup pump into the tee. Be sure the o-ring
is completely inside the tee and not visible. Be
sure the slit on the tee is on the bottom when
the pump is installed. Tighten the clamp over
the tee to secure the backup pump.
3. Be sure the o-ring is on the check valve and
thread the check valve into the discharge of the
primary pump. Be sure the weep hole is still
visible and hand tighten.
Check valve
assembly
Primary Pump
Discharge
O-Ring
Weep hole
3
Backup
Pump
Discharge tee
Clamp
O-Ring
Pump
Discharge
2

6
© 2020. All rights reserved.
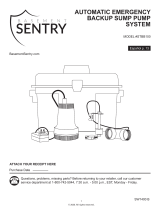
4. Slide the included stainless steel clamp over the
check valve and slide the tee (slit end down)
over the check valve. Be sure the o-ring is
completely covered. Tighten clamp over the tee
to secure the check valve.
5. NOTE: Before gluing any ttings, dry t all
connections to verify proper t.
Measure the connection from the Tee to
discharge piping and cut 1-1/2-in Sched 40
PVC to this size. Install 1-1/2-in ex coupling or
1-1/2-in union between pipe connected to the
pump and the discharge piping. Glue all pipe
and ttings once t is veried.
6. To Install the dual oat assembly on discharge
piping, locate the oat assembly so the ‘on’
level of the lower oat is above the ‘on’ position
of the primary pump. Use the included bracket
and stainless steel clamp to attach the oat to
the pipe. Tighten the clamp in place. Be sure
the oats are free to move up and down without
any interference from any part of the sump
pump system or basin.
Clamp
Mounting
Bracket
6
Measure
distance
1-1/2-in flex
coupling or
union
Check valve
assembly
Clamp
Tee
Backup
Pump
O-Ring
Weep hole
4
INSTALLATION INSTRUCTIONS
5

7
© 2020. All rights reserved.
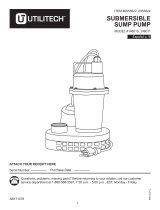
7. Use the included anchors to install the
controller. For best cooling, attach to wall. The
controller must be installed at least 3 ft. above
the sump pit.
9. Connect backup pump and oat leads to the
controller
To controller
8
AC
POWER
FLOAT
STATUS
BATTERY
DC
PUMP
SILENCE
TEST
24/7 BASEMENT
PROTECTION
USB
RESET FLOAT
DC
PUMP
FUSE
30 AMP
by
1-800-584-8089
BasementSentry.com
DC POWER
+ 15V DC 1.6A
Controller
Anchors
Minimum
3 ft.
Sump
Basin
7
INSTALLATION INSTRUCTIONS
AC
POWER
FLOAT
STATUS
BATTERY
DC
PUMP
SILENCE
TEST
24/7 BASEMENT
PROTECTION
USB
RESET FLOAT
DC
PUMP
FUSE
30 AMP
by
FW2065 A
1-800-584-8089
BasementSentry.com
PLATINUM
From float
From
backup
pump
From battery
9
8. Place the battery inside the battery box and connect
the leads from the controller to the battery terminals.
Connect positive (+) lead to positive terminal on the
battery and black negative (-) lead to the negative
battery terminal.
NOTE: If wires are not connected properly, a loud,
constant audible alarm will sound until the leads are
attached to the correct terminals.

8
© 2020. All rights reserved.
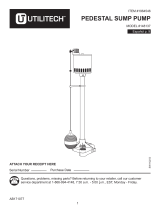
11. Reconnect power to the primary sump pump by
plugging the primary sump pump into the outlet
on the front of the controller.This will will enable
the controller and app to monitor the primary
sump pump.
This step is optional, and you can choose to
plug the primary sump pump into a standard,
GFCI protected outlet. If you use this method,
you will not have the ability to monitor the
primary sump pump.
AC
POWER
FLOAT
STATUS
BATTERY
DC
PUMP
SILENCE
TEST
24/7 BASEMENT
PROTECTION
USB
RESET FLOAT
DC
PUMP
FUSE
30 AMP
by
1-800-584-8089
BasementSentry.com
DC POWER
+ 15V DC 1.6A
GFCI Outlet
11
INSTALLATION INSTRUCTIONS
10.Plug the controller into a GFCI-protected 115V
outlet.
Test for backup pump operation by adding
water to the sump basin.
AC
POWER
FLOAT
STATUS
BATTERY
DC
PUMP
SILENCE
TEST
24/7 BASEMENT
PROTECTION
USB
RESET FLOAT
DC
PUMP
FUSE
30 AMP
by
1-800-584-8089
BasementSentry.com
DC POWER
+ 15V DC 1.6A
GFCI Outlet
10

9
© 2020. All rights reserved.
There are two buttons on the front of the controller.
1. Silence/Reset - Can be pressed to silence current
alarms for 24 hours.
Can be held for 3+ seconds to reset (or clear) alarms
and LEDs. Flashing LEDs for conditions such as bad/
disconnected battery or power outage, for example,
can’t be cleared by Silence/Reset. These conditions
must be resolved to eliminate the LED indicator.
BASEMENT SENTRY CONTROLLER FUNCTIONS
AC
POWER
FLOAT
STATUS
BATTERY
DC
PUMP
SILENCE
TEST
24/7 BASEMENT
PROTECTION
USB
RESET FLOAT
DC
PUMP
FUSE
30 AMP
by
FW2065 A
1-800-584-8089
BasementSentry.com
PLATINUM
Test
2
AC
POWER
FLOAT
STATUS
BATTERY
DC
PUMP
SILENCE
TEST
24/7 BASEMENT
PROTECTION
USB
RESET FLOAT
DC
PUMP
FUSE
30 AMP
by
FW2065 A
1-800-584-8089
BasementSentry.com
PLATINUM
Silence/
Reset
1
2. Test - Will run the pump to determine if amp draw of
pump is within range.
Controller is factory programmed to self-test the pump
for several seconds every 7 days. This schedule may
be modied once the controller is connected to the Z
Control Cloud.
Pressing the test button will start the 7 day timer for
self-testing.
Test and Silence/Reset -
Holding both buttons together for about six seconds
will initiate a factory reset. This returns the rmware’s
device conguration to the state in which it left the
factory. Any over-the-air rmware updates that have
been installed will be retained.
BASEMENT SENTRY LED LIGHT FUNCTIONS
AC
POWER
BATTERY
FLOAT
STATUS
DC
PUMP
AC
POWER
BATTERY
AC
PUMP
AC
POWER
BATTERY
FLOAT
STATUS
DC
PUMP
AC
POWER
BATTERY
AC
PUMP

10
© 2020. All rights reserved.
By connecting the controller to the Z Control
®
Cloud using the built-in WiFi, the user can set up
free alert messages via email, text, and mobile
app “push” notifications. In addition, the user
can verify controller readiness, remotely silence
alarms and reset the unit, configure settings, and
modify how notifications are sent. Other visual
information such as input status and battery level
are available through the web and app interfaces.
There are two ways to connect the Basement
Sentry controller to the Z Control
®
cloud.
Option 1 - Use the Z Control
®
mobile app. See
Use the Mobile App section below.
Option 2 - Use a mobile device or computer to
connect to the controller directly. See use Mobile
Device Page 13.
CONNECTING THE CONTROLLER TO Z CONTROL
®
Option 1 - Use the Mobile App (iOS and Android)
Before you begin:
• Know what the WiFi router is named (i.e.
SSID) and password. To prevent the most
common troubleshooting issues, double
check to be sure you know exactly how the
password is spelled, including capitalization.
• Verify that your mobile device has working
WiFi with a strong signal when you are
standing next to the Basement Sentry
controller. If the signal is questionable, the
controller may not be able to maintain a stable
connection.
• Verify your WiFi router is connected to the
internet and that it is broadcasting a visible,
secure, 2.4Ghz network.
• 2.4 Ghz network is required. If you only see 5
Ghz networks, you may need to log into your
dual band router to choose to broadcast the
networks separately.
• Band steering may need to be temporarily
turned off during setup.
• The 2.4Ghz network must use WPA or WPA2
security. WEP and open networks are not
acceptable.
• Any VPNs or other network controls may need
to be temporarily turned off during setup.
• Locate the Basement Sentry Device ID
located on the top of the controller.
• Like most internet connected devices, the
Basement Sentry controller WiFi connectivity
should be used behind the security of a
firewall. Most routers have a firewall built into
them. Consult a networking professional for
specific questions about firewalls.
NOTE: The list above will also help troubleshoot
connectivity issues.
These instructions provide an overview of what
the app will do. You may find additional steps
needed.
1. Open the app and sign in to your account, or
create an account using the link at the bottom.
If you do not have an account, you will need to
click the link at the bottom of the home screen
to create an account.
1
Click to
create
account

11
© 2020. All rights reserved.
Use the Mobile App (iOS and Android) (Continued)
2
4. Once a location is created, you will need to add
a device. To add a device, choose the desired
location name and then touch the “+” to start adding
a device. Allow access to the camera so you can
scan the data matrix.
3. Once you’re logged in to your account, create
locations by touching the “+ “ from the Locations
screen.
2. Open your profile to set up any additional
phone numbers or email addresses where
notifications should be sent.
3
Touch +
to create
locations
4
Touch +
to add a
device
CONNECTING THE CONTROLLER TO Z CONTROL
®

12
© 2020. All rights reserved.
6. When the captive screen opens, use the WiFi Scan
button to find the WiFi network you want the controller
to use, select it from the list provided at the bottom
of the screen (you may need to scroll), and type the
password in the field. The Z Control
®
LED should be
solid within a minute, indicating successful connection
to the router and the Z Control
®
Cloud. Upon first
connecting to the cloud, the Basement Sentry controller
may immediately update its firmware over-the-air (OTA),
if an update is available. If an update is taking place,
the Z Control
®
LED will flicker for up to one minute while
the update is downloaded. The Z Control
®
LED will be
solid and all other LEDs will turn off while the update is
being installed. After up to one minute, the controller will
restart and return to normal operation. The controller
alert history on the Z Control
®
Cloud will also be
updated with the firmware update information, and any
email accounts that are set up will be notified.
6
7
7. You can now return to the Z Control
®
app to find
your new device set up in the location you previously
selected. You can always change a device to a
different location in your account.
Click WiFi
Scan button
5. The app will ask you to scan the data matrix QR
code on the controller. You can also bypass this
step and manually input the SSID of the controller,
which is found on the controller label.
Use the Mobile App (iOS and Android) (Continued)
5
Click to manually input SSID
SSID input eld
CONNECTING THE CONTROLLER TO Z CONTROL
®

13
© 2020. All rights reserved.
8
8. Open the Basement Sentry app to explore current
status, configuration settings, and commands
available, such as Pump Test, Buzzer Test, Silence,
etc. Perform these test to be sure everything
works as expected. Reset all alarms when you are
finished.
Option 2 - Use your mobile device or computer to connect directly to the Basement Sentry controller
Instead of using a mobile device and the Z
Control
®
app, you can also use your mobile
device or computer to directly connect to the
controller.
Before you begin:
• Know what the WiFi router is named (i.e.
SSID) and password. To prevent the most
common troubleshooting issues, double
check to be sure you know exactly how the
password is spelled, including capitalization.
• Verify that your mobile device has working
WiFi with a strong signal when you are
standing next to the Basement Sentry
controller. If the signal is questionable, the
controller may not be able to maintain a stable
connection.
• Verify your WiFi router is connected to the
internet and that it is broadcasting a visible,
secure, 2.4Ghz network.
• 2.4 Ghz network is required. If you only see 5
Ghz networks, you may need to log into your
dual band router to choose to broadcast the
networks separately.
• Band steering may need to be temporarily
turned off during setup.
• The 2.4Ghz network must use WPA or WPA2
security. WEP and open networks are not
acceptable.
• Any VPNs or other network controls may need
to be temporarily turned off during setup.
• Create a free account at zcontrolcloud.com.
• Locate the Basement Sentry Device ID
located on the top of the controller.
NOTE: The above list also helps to troubleshoot
connectivity issues.
If the controller still will not connect after trying
the above suggestions, follow the same steps to
connect the controller to a mobile phone hotspot
instead of the home WiFi router. If the controller
successfully connects to the cloud through the
hotspot, then the conflict is probably related to
router settings.
Use the Mobile App (iOS and Android) (Continued)
CONNECTING THE CONTROLLER TO Z CONTROL
®

14
© 2020. All rights reserved.
2. Standing near the controller, use your phone, tablet,
or computer to look for the Basement Sentry controller
SSID in your WiFi settings. It will look similar to
“ZCTL_Fit_xxxx” where “xxxx” is the first 4 digits of
your controller device ID. Select this, and be sure your
device displays a check mark or similar indicator that
you are connected to the controller local network. If so,
two things will happen:
A. The Z Control
®
LED will flash quickly.
B. A Z Control
®
setup screen (Figure 3) will open. This
may take up to 30 seconds.
If the setup screen does not appear, open a browser
on the same device and type “192.168.125.1” in the
address bar. If the setup screen appears but is not used
(canceled or otherwise closed), the controller will return
to AP mode and the Z Control
®
LED will turn off until the
next WiFi setup attempt. If the setup screen still does
not appear, verify your device is still connected to the
controller SSID. If it isn’t, repeat Step 2 and be sure
your device’s WiFi stays connected to the controller.
If your device shows a warning message about no
internet or no security on the controller network, ignore
this and connect to it anyway.
2
Select the
Basement
Sentry SSID.
The last 4 digits
(underlined) will
match the rst
4 digits of the
controller
Device ID.
* AP Mode is when the controller is broadcasting its “name”, or SSID. The SSID is in a format similar
to ZCTL_Fit_xxxx where “xxxx” is the first 4 digits of your controller device ID (See Figure 2). The
Basement Sentry controller SSID will show up in your phone/tablet/computer’s list of available WiFi
options, and selecting it will give you direct connectivity to the controller. This is required in order to
give your controller the password credentials needed to connect to the WiFi of your choice.
Apply AC power to the controller. The Z
Control
®
LED will blink and then turn off,
indicating the controller is in AP Mode*
and is transmitting an SSID.
If the LED is blinking and not in AP
mode, press the Z Control
®
button for 12
seconds and let go.
The LED will now be off, indicating
the controller is in AP Mode. A pen or
toothpick or similar is required to press
the Z Control
®
button.
AC
POWER
FLOAT
STATUS
BATTERY
DC
PUMP
SILENCE
TEST
24/7 BASEMENT
PROTECTION
USB
RESET FLOAT
DC
PUMP
FUSE
30 AMP
by
FW2065 A
1-800-584-8089
BasementSentry.com
DC POWER
+ 15V DC 1.6A
PLATINUM
1
Connecting with your mobile device or computer (Continued)
CONNECTING THE CONTROLLER TO Z CONTROL
®

15
© 2020. All rights reserved.
3. On the setup screen, press the WiFi Scan button,
scroll down to see the list of WiFi signals found, and
choose the WiFi you want the Basement Sentry
controller to use for internet connectivity. Enter
the password for the router you chose in the field
indicated. If the password is correct, the controller
will connect to the router and start sending status
updates to zcontrolcloud.com. You will see the Z
Control
®
LED go from blinking to solid. This could
take up to a minute or so.
If the LED does not turn solid, then the password
entered is incorrect, the router’s security is
insufficient (see note below**), or some other
network restriction is in place (see your network
administrator). The controller will return to standby
mode if the connection to router is not successful. If
you need to force the controller into AP mode again,
press the Z Control
®
button for 12 seconds (See
Figure 1). This will cause the controller to re-enter
AP mode and begin transmitting the SSID again.
Repeat Steps 2 and 3.
4
Click WiFi
Scan
button
** The controller will not connect to
routers with ‘WEP’ or ‘OPEN’ security.
Available
WiFi will
show here.
Choose the
one you
want.
4. Once the controller LED is solid, log in to your
account (or create one) at zcontrolcloud.com.
** The controller will not connect to routers with ‘WEP’
or ‘OPEN’ security.
3
Click WiFi
Scan button
Connecting with your mobile device or computer (Continued)
CONNECTING THE CONTROLLER TO Z CONTROL
®

16
© 2020. All rights reserved.
Controller Set-Up
Your Basement Sentry controller is now online.
Be sure you have added the contact information
for phone numbers and email addresses that
should receive notification. This can done by
selecting “Manage Contacts” from the main menu
(the square with 3 lines in the upper right corner).
You can also edit how each device sends out
notifications from the device “Alarm Settings” tab.
You can now open the product’s configuration by
clicking the “View” button to modify the controller
device and notification settings. You can also
install the Z Control
®
mobile app on your mobile
device (Android and iOS versions available,
search
“Z Control
®
” in the app stores).
Firmware Updates
The Basement Sentry controller is capable
of OTA, or over-the-air firmware updates. It’s
possible that the controller could perform an
update immediately if one is available at the Z
Control
®
Cloud. If an update is taking place, the
Z Control
®
LED will flicker for up to one minute
while the update is downloaded. The Z Control
®
LED will be solid and all other LEDs will turn off
while the update is being installed. After up to
one minute, the controller will restart and return
to normal operation. The controller’s alert history
on the Z Control
®
Cloud will also be updated with
the firmware upgrade information, and notification
to email accounts will occur.
START-UP AND OPERATION
The Basement Sentry controller is able to recognize potential air lock situations and remedy the issue
with an on/off/on/off/on routine which purges air from the pump. Other potential issues such as a stuck
float can also be sensed and resolved by the controller to prevent damage to the equipment.
In addition, the following LED functions provide a visual cue to the proper function of the DC pump:
• The DC pump LED will stay yellow after pumping water, alerting you when the DC pump has
turned on and has pumped water.
• If the DC pump runs and does not pump water, the LED will not stay yellow. This can occur during
a test of the system when the float is lifted manually while the pump is above the water line. This
allows the system to be tested without having to reset it each time.
5. Choose the Add New Device button next to
the location you want the controller. Follow
the directions to add your controller by either
auto-detect or entering the Device I.D. When
successful, a Basement Sentry product tile will
appear in your account.
5
CONNECTING THE CONTROLLER TO Z CONTROL
®
Connecting with your mobile device or computer (Continued)

17
© 2020. All rights reserved.
1. WARNING: Disconnect the primary pump from
the 115V outlet before touching any component
in the sump basin.
Test the installation for leaks by running water
into the sump basin. The primary pump should
operate normally.
AC
POWER
FLOAT
STATUS
BATTERY
DC
PUMP
SILENCE
TEST
24/7 BASEMENT
PROTECTION
USB
RESET FLOAT
DC
PUMP
FUSE
30 AMP
by
1-800-584-8089
BasementSentry.com
DC POWER
+ 15V DC 1.6A
1
2. Check the controller. The system light should
be green when the unit is plugged into a 115V
outlet.
3. NOTE: When the unit is first plugged in, all
lights will flash and an alarm will sound to verify
proper operation. The charger may not begin
charging for several minutes. When the battery
begins charging, the four lights in the circle will
turn blue, with the battery light flashing blue.
AC
POWER
FLOAT
STATUS
BATTERY
DC
PUMP
SILENCE
TEST
24/7 BASEMENT
PROTECTION
USB
RESET FLOAT
DC
PUMP
FUSE
30 AMP
by
FW2065 A
1-800-584-8089
BasementSentry.com
PLATINUM
Flashing blue light
when charging
Solid blue light
when charging
3
AC
POWER
FLOAT
STATUS
BATTERY
DC
PUMP
SILENCE
TEST
24/7 BASEMENT
PROTECTION
USB
RESET FLOAT
DC
PUMP
FUSE
30 AMP
by
FW2065 A
1-800-584-8089
BasementSentry.com
PLATINUM
All lights will be green when
plugged into 115V outlet
2
START-UP AND OPERATION

18
© 2020. All rights reserved.
5. Lift the lower (operational) float on the backup pump
float switch. After one second, the backup pump will
run and the alarm will sound. Be sure the inlet of the
backup pump is above the inlet of the primary pump.
Press ‘Silence’ for 3 seconds to cancel the alarm
and reset the unit.
CAUTION: Continuously running the pump dry may
cause overheating and damage the pump. Once
the lower float is released, the backup pump will run
for an additional ten seconds or until it senses that
water is no longer being pumped.
6. Lift the upper (high water) float on the backup
pump float switch. After one second, the backup
pump will run and the alarm will sound. Be
sure the inlet of the backup pump is above the
inlet of the primary pump. Press ‘Silence’ for 3
seconds to cancel the alarm and reset the unit.
CAUTION: Continuously running the pump dry
may cause overheating and damage the pump.
Once the upper float is released, the backup
pump will run for an additional ten seconds
or until it senses that water is no longer being
pumped.
Be sure there are no obstructions around the
float.
Lift
upper
float
to test
6
Lift
lower
float
to test
5
4. Once the battery is fully charged, the four lights will
turn green. To clear any other lights or alarms, press
and hold the ‘Silence’ button for three seconds.
The following LED functions provide a visual cue to the
proper function of the DC pump:
• The DC pump LED will stay yellow after pumping
water, alerting you when the DC pump has turned on
and has pumped water.
• If the DC pump runs and does not pump water, the
LED will not stay yellow. This can occur during a test of
the system when the float is lifted manually while the
pump is above the water line. This allows the system
to be tested without having to reset it each time.
AC
POWER
FLOAT
STATUS
BATTERY
DC
PUMP
SILENCE
TEST
24/7 BASEMENT
PROTECTION
USB
RESET FLOAT
DC
PUMP
FUSE
30 AMP
by
FW2065 A
1-800-584-8089
BasementSentry.com
PLATINUM
Solid green light
when charged
Press to
silence
alarms
4
START-UP AND OPERATION

19
© 2020. All rights reserved.
7. Complete the final test of the installation. Be
sure the primary pump is still disconnected from
power. Unplug the controller from the 115V
outlet. Run water into the sump basin until the
backup pump turns on. Check all connections
for leaks.
AC
POWER
FLOAT
STATUS
BATTERY
DC
PUMP
SILENCE
TEST
24/7 BASEMENT
PROTECTION
USB
RESET FLOAT
DC
PUMP
FUSE
30 AMP
by
1-800-584-8089
BasementSentry.com
DC POWER
+ 15V DC 1.6A
7
8. Push the ‘Silence’ button when the pump is
running to turn off the alarm. The pump will
continue to run for an additional ten seconds
after the float has been lowered or until the
controller senses water is being pumped.
9. Press and hold the ‘Silence’ button for three
seconds to reset the system and clear all faults
and alarms.
AC
POWER
FLOAT
STATUS
BATTERY
DC
PUMP
SILENCE
TEST
24/7 BASEMENT
PROTECTION
USB
RESET FLOAT
DC
PUMP
FUSE
30 AMP
by
FW2065 A
1-800-584-8089
BasementSentry.com
PLATINUM
Press and
hold three
seconds to
reset
system
9
AC
POWER
FLOAT
STATUS
BATTERY
DC
PUMP
SILENCE
TEST
24/7 BASEMENT
PROTECTION
USB
RESET FLOAT
DC
PUMP
FUSE
30 AMP
by
FW2065 A
1-800-584-8089
BasementSentry.com
PLATINUM
Press to
silence
alarms
8
START-UP AND OPERATION

20
© 2020. All rights reserved.
10. Connect the controller AC power and primary
pump into the receptacle on the front of the
controller. Fill basin with water to ensure
primary pump functions normally.
AC
POWER
FLOAT
STATUS
BATTERY
DC
PUMP
SILENCE
TEST
24/7 BASEMENT
PROTECTION
USB
RESET FLOAT
DC
PUMP
FUSE
30 AMP
by
1-800-584-8089
BasementSentry.com
DC POWER
+ 15V DC 1.6A
10
START-UP AND OPERATION
11. The four circle LED’s will be blue when charging
the battery. The battery LED will flash slowly.
Once charging is complete, all four circle LED’s
will turn green.
AC
POWER
FLOAT
STATUS
BATTERY
DC
PUMP
SILENCE
TEST
24/7 BASEMENT
PROTECTION
USB
RESET FLOAT
DC
PUMP
FUSE
30 AMP
by
FW2065 A
PLATINUM
1-800-584-8089
BasementSentry.com
Solid green light
when charged
Press to
silence
alarms
11
/