Page is loading ...

User Manual
LS-QL/R5
LinkStation Quad
www.buffalotech.com v2.2

2
Introduction
Congratulations on your new LinkStation Quad. This user manual is intended to assist
you in conguring it.
Because we’re constantly updating our products, the images and text in this manual may
vary slightly from the images and text displayed by your LinkStation. These changes
are minor and should not affect the ease of setup adversely. As time passes, future user
interfaces, updated software, and later versions of this manual may be freely available for
download at our web site www.buffalotech.com.
For best results, attach the LinkStation Quad to an uninterruptable power supply (UPS).
Back up all your stored les regularly. See pages 63 - 66 for instructions on how to use
the LinkStation Quad’s built-in backup utility.
If you run into difculties or need additional help, feel free to contact our technical
support. Contact information for Buffalo Technology and our technical support is available
on pages 93 and 94.

3
Table of Contents
Layout .............................................................................................................4
Installation ...................................................................................................... 7
Using your LinkStation with a PC ................................................................. 11
Using your LinkStation with a Mac®.............................................................. 15
Add USB Devices .......................................................................................... 19
Function Button ............................................................................................ 20
Web Admin Tool ........................................................................................... 22
Language Settings ........................................................................................ 26
Network Settings ........................................................................................... 27
Disk Management ......................................................................................... 29
Shared Folders .............................................................................................. 40
Groups ......................................................................................................... 44
Users ............................................................................................................ 45
Passwords ..................................................................................................... 46
WebAccess .................................................................................................... 47
Remote Access with FTP ................................................................................ 52
Media Server ................................................................................................. 54
Direct Copy ................................................................................................... 55
Installing a Printer ........................................................................................56
Troubleshooting Multiple Shares.................................................................... 61
Backups ........................................................................................................63
Time Machine..................... ........................................................................... 67
BitTorrent Client ........................................................................................... 72
Maintenance & Notication ........................................................................... 74
UPS .............................................................................................................. 75
System Status .............................................................................................. 79
Client Utility .................................................................................................. 83
Troubleshooting ............................................................................................ 85
Replacing a Hard Drive ................................................................................. 86
Specications ................................................................................................ 92
Contact Information (USA) ............................................................................. 93
Contact Information (Europe) ....................................................................... 94
GPL Information ........................................................................................... 95

4
Front Panel Layout
USB
Function Button
Power Switch
Power/Status LED
Function LED
Disk LEDs
Green-Accessing
Red-Not mounted

5
Front Panel (Open)
USB
Function Switch
Power Switch
Power/Status LED
Function LED
Disk LEDs
Green-Access
Red-Error

6
Rear Panel Layout
Security
Mounting Point
USB
Power Mode - Auto
Manual
Power Cable
Guide
Ethernet LED
Ethernet Port (RJ45)
Power Adaptor

7
Insert the LinkNavigator CD into your computer’s CD-ROM drive.
On a PC, setup should automatically launch. If it does not, manually
launch setup.exe by clicking Start and selecting the Run... option.
When the Run dialog opens, type d:\lang.exe (where d is the drive
letter of your CD-ROM drive). Click OK to continue.
Installation
If you are installing the software on a Mac, open the CD and click
LinkNavigator to begin installation.

8
Choose your preferred language. Mac users can skip
this step.
LinkNavigator Setup
Click the Begin Installation button. Click Next to step
through the installation.

9
LinkNavigator Setup
The wizard will guide you through installation. Follow the
directions on each screen and continue clicking Next to step
through the installation.
When installation is complete, you may close the installation
window.

10
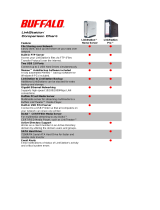
Power Mode
The “Power Mode” switch on the back of the unit has two
positions: “Auto” and “Manual”. The “Auto” position
automatically powers the unit on or off with your PC. If
your PC is turned on the LinkStation will power up; if the
PC is turned off the LinkStation will power down.
You must have installed the NASNavigator2 software on
your PC for this feature to work. Otherwise, if you move
the switch to “Auto”, your unit will power down by itself
and you will have to manually turn it back on.
Also note that the unit needs to be powered on if you
want to use the Web Access feature. When using Web
Access, it is best to leave the Power Mode switch set to
“Manual”.
Auto
Manual
To turn the LinkStation off, hold down the power button on the front panel for ve seconds. It
will take about 30 seconds to shut down. Do not unplug or interrupt power to the unit until
shutdown is complete and all LEDs are off.

11
Three new icons will be on your desktop: Buffalo NAS Navigator,
LS-QLxxx Setup results.txt, and LS-QLxxx, where xxx is the last three
characters of the unit’s MAC address. The LS-QLxxx Setup results.txt
le contains the IP address and network info for the LinkStation.
Clicking LS-QLxxx takes you directly to the folders on your
LinkStation. Share is the main folder that you can put les and
folders in. Info contains a copy of your user manual.
The Buffalo NAS Navigator icon opens the LinkStation’s client utility.
Turn to page 83 for more on using the NASNavigator2 client utility.
Using your LinkStation with a Windows PC

12
Your LinkStation uses folders to hold data. The default folder is called “share”. This
folder is where you place data that you want to share with other users. You can create
additional folders using the Shared Folders option. To start using your LinkStation, you
can either click on the LS-QLxxx shortcut on your desktop, or open My Computer, where
setup has mapped the next available drive letter to the default share in your LinkStation.
Accessing LinkStation Data from your PC

13
You can map additional drive letters to shares on your LinkStation.
From the Start menu, select Run.... Enter your LinkStation’s
hostname (if you don’t know it, you can get it from the
NASNavigator2 utility) or IP address. Click OK.
Your LinkStation will open. “Share” is a data folder in your
LinkStation by default. “Info” contains your user manuals. If you
have created other folders, they will be visible here too. You can
map drive letters to any of these folders.
Accessing LinkStation Data from your PC

14
From the Tools pull-down menu, select Map Network Drive. Choose a drive letter from the Drive:
pull down menu. To specify the folder to map, either nd it with Browse or enter \\LinkStation_
Name\share_name in the Folder: eld, where LinkStation_Name is your LinkStation’s hostname
(page 21) and share_name is the name of a folder on your LinkStation. Check the Reconnect at
logon checkbox to have Windows connect to this mapped drive everytime it starts. When nished,
click the Finish button. Your share is now mapped to a drive letter.
Accessing LinkStation Data from your PC

15
Using your LinkStation with a Mac
After installing the LinkNavigator software, your Mac will have two
new icons.
On the desktop, the LS-QLSettings.txt le contains the IP address of
your LinkStation. In the Finder, NASNavigator is the LinkStation’s
client utility.
With the information in the LS-QLSettings.txt le, you can easily
connect to the LinkStation from any of your computers on your local
network.
The NASNavigator icon opens the LinkStation’s client utility. See
page 83 for more on using the NASNavigator2 client utility.

16
You can add a link to your LinkStation’s share
folder to your desktop by adding it to the Mac’s
server list. Begin by clicking Go, and then
choose Connect to Server.
Accessing LinkStation Data from a Mac
In the Server Address eld, enter your
LinkStation’s IP address in the form smb://
ipaddress (where “ipaddress” is your
LinkStation’s IP address), and click Connect.
You can get your LinkStation’s IP address from
the LS-QLSettings.txt le on your desktop, or
see page 18.

17
Select Guest and click on Connect. Note: If you have congured share
permissions on your LinkStation, select Registered User and enter your
login credentials.
Accessing LinkStation Data from a Mac
Select the volume that you want to mount, such as share, from the list
of folders on the LinkStation.
The share will open. A link to it will appear on your desktop.

18
If you don’t know your LinkStation’s IP address, there are
several ways to get it.
One simple method is to use the NASNavigator2 client utility
(included on your CD) to nd your LinkStation(s). Just click
on the icon for your LinkStation and you’ll be able to read its
IP address.
The LS-QLSettings.txt le on your desktop contains the IP
address of the LinkStation at the time that the setup program
was run.
You can always get the LinkStation’s IP address from your
router’s conguration utility. Many Buffalo routers list this
information on the Client Monitor page, as shown to the right.
Consult your router’s documentation for instructions on
identifying the LinkStation’s IP address.
Accessing LinkStation Data from a Mac

19
Adding USB Devices
LinkStation Quad has USB 2.0 ports on the front and rear. These ports can be used for adding
external USB Hard Drives, a USB Printer, or for connecting to a UPS. LinkStation will share
connected USB devices, allowing everyone on the network to use them. To connect a USB hard
drive to your LinkStation, simply plug it into the USB port.
Once your USB hard drive is connected, turn to the “Disk Management” section of this manual
for information on conguring your LinkStation to use it.
To congure a USB printer, see “Installing a Printer”.
To congure UPS settings, see page 75.
1 or 2 USB devices may be used with the LinkStation at a time. USB hubs are not supported.

20
Using the Function Button
Direct Copy - You can copy digital media les directly to the
LinkStation Quad from a USB storage device, such as a digital
camera, USB ash drive, or external hard disk.
1. Connect your USB device to one of the USB ports on the
LinkStation. The function LED will glow solid blue for 60 seconds.
2. While the function LED is still glowing blue, press the function
button once.
The following folder is created automatically:
DirectCopy/pictures/yyyymmdd
where yyyy is the year, mm is the month,
and dd is the day.
The following types of les will be copied to the folder: avi, divx, asf, mpg, mpe, m1v, vob, mts,
m2ts, m2t, mpeg, mpeg2, vdr, spts, tp, ts, 3gp, mov, m4v, wmv, dvr-ms, xvid, mp4, m4v, jpg,
jpeg, gif, png, tif, tiff, yuv, bmp, mp3, mpa, wma, aac, apl, ac3, lpcm, pcm, wav, m3u, m4a, mp4,
m4b, aif, aiff, ac, ogg, mp2, mp1, mp4.
/