Buffalo Technology HS-DGL Series User manual

Type
User manual

This manual is also suitable for

User Manual
LinkStation MultiMedia Home Server
HS-DGL Series
www.buffalotech.com
v3.0
2
Introduction
Congratulations on your purchase! Your LinkStation Home Server gives you a central location for
storing all your media les in your local network. All your computers and media players will be
able to access les on the LinkStation.
This user manual uses images representative of LinkStation user interfaces and software at time
of publication. As time passes, future user interfaces and software may be available for download
from: http://www.buffalotech.com (Support Section - Downloads).
Due to the evolving state of the product, the images and text in this manual may vary slightly
from the images and text displayed by your LinkStation.
3
Table of Contents
LinkStation Diagram ....................................................... 4
LinkStation Quick Setup ................................................. 6
Link Navigator Setup .................................................... 11
Accessing LinkStation Data from a PC ....................... 20
Accessing LinkStation Data from a Mac .................... 23
LinkStation Expansion ................................................... 26
Transfering Files from your Digital Camera ................ 27
Basic Settings ................................................................ 28
Network Settings ........................................................... 31
Security Settings ............................................................ 36
USB Settings ................................................................... 44
USB Printer Installation ................................................. 47
Maintenance Settings .................................................. 52
LinkStation Backup ...................... ................................ 56
PCast/DLNA Settings ............................ ........................ 63
Troubleshooting ............................................................ 66
Technical Specifications .............................................. 69
Technical Support ......................................................... 70
FCC and GPL ................................................................ 70
4
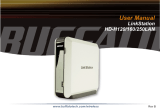
1. Power Button – The Power Button is used to
power the LinkStation on or off. The power on
process will take approximately 30 seconds to
a full minute to complete. During this time,
do not unplug the LinkStation from the wall
outlet. To turn the LinkStation off, press and
hold the power button for several seconds until
the Power LED light begins blinking. At that
time, stop pressing the button and shutdown
should complete within 30 seconds.
2. Power LED – The Power LED light will blink
during startup or shutdown, but otherwise will
remain lit up while LinkStation is powered on.
3. LINK/ACT LED – The LINK/ACT LED light will
light up if an Ethernet Cable is plugged in and
attached to another network device, such as a
router, hub, or PC. Periodically, the LED will
blink, signifying network activity.
LinkStation Diagram
5
4. Disk Full LED – When LinkStation’s internal
drive approaches 95% of its capacity, the
Disk Full LED will light up in red. For
options to increase storage capacity, see
LinkStation Expansion on page 26.
5. Diagnostic LED – The Diagnostic LED
ashes if the LinkStation encounters an
error.
6. USB Port (Front & Rear) – LinkStation
offers two USB Ports for adding external
drives or USB printers. Please see the
LinkStation Expansion section on page 26
to learn more about how to take advantage
of the USB Ports on LinkStation.
LinkStation Diagram
6
Quick Setup
Plug the LinkStation’s power cord into a power outlet.
Also, plug the included Ethernet Cable into LinkStation’s RJ-45 network port located on the back
of LinkStation.
7
Connect the other end of the Ethernet Cable into a hub, switch, or router on the network, or
connect it directly to a nearby running PC.
NOTE: It is recommended that you connect LinkStation to a hub or switch on your network.
Connecting it directly to the back of a PC should only be used if absolutely necessary. Many
features, including automatic DHCP IP Addressing, require LinkStation to be connected to a
switch or hub. If the LinkStation is connected directly to a PC, you will have to congure it
manually.
Quick Setup
8
Turn the LinkStation on by pressing the power button until the green Power LED begins to ash.
Quick Setup
9
Check the LINK/ACT light on the front of the LinkStation. If it is lit, then your LinkStation is
connected properly; please turn to page 11 to continue setup. If it is not lit, continue to the next
page.
Quick Setup
10
If the LINK/ACT LED on the front of LinkStation is lit, your LinkStation is connected properly.
If the LINK/ACT LED is not lit, make sure that:
Both LinkStation and the switch or PC are powered on.
The Ethernet Cable is securely fastened to both devices.
The Ethernet Cable is not damaged; verify this by trying another Ethernet Cable.
If problems persist, contact our technical support. Please see page 80 for support contact
information.
Quick Setup
11
Insert the Link Navigator CD into a PC’s CD-ROM drive. Depending on the PC’s conguration,
the EasySetup program may launch. If it does not automatically launch, manually launch it
by pressing the Start menu, selecting the Run... option. When the Run dialog opens, type x:
easysetup.exe (where x is the drive letter of the CD-ROM drive). Press OK to continue.
Link Navigator Setup
12
LinkNavigator is now running. Please press the Install IP Setup Utility icon, then press the Start
button. The LinkStation IP Conguration Utility will launch and scan for networks.
Link Navigator Setup
13
The IP Conguration Utility allows you to easily congure LinkStation’s network settings. The
Search button will re-scan the network for any and all LinkStations available. The drop down
menu lists all available LinkStations. If there are multiple LinkStations on the network, then
select the proper LinkStation from the pull down menu. Once the proper LinkStation has been
selected, press the Change IP Address button to continue.
Link Navigator Setup
14
This section of the program changes LinkStation’s IP address. Check the check box that states
Acquire IP Address Automatically. This will give LinkStation an IP address from the network’s
router/DHCP server. A xed (static) IP Address and Gateway can be set if preferred. The
Administrator Password eld sets an administrator password for the web-based conguration if
desired. When nished, press the OK button.
Note: If LinkStation was plugged directly into a PC, the DHCP function will timeout and give
LinkStation an IP address of 192.168.xxx.xxx, where each xxx can be any value from 1-254. The
subnet mask will default to 255.255.0.0. You will need to adjust your PC’s IP Address and subnet
mask to a different IP Address on the same subnet, or give the LinkStation a xed IP address on
the same subnet as your PC.
Link Navigator Setup
Example: if your LinkStation’s IP address has defaulted
to 192.168.11.113, you could set your PC’s IP address to
192.168.11.114. If your PC’s IP address is 192.168.14.2, you
could set the LinkStation’s IP address to 192.168.14.3. In
each case, make sure that the Subnet Mask is set the same
for both the LinkStation and the PC that will be accessing it.
15
LinkStation is now ready to be congured. The login prompt will appear. The user name is root.
There is no password by default. Only enter a password if you have congured one. Press the
OK button when nished.
In the future, your LinkStation can be accessed by typing //LINKSTATION_NAME into a Web
browser (where LINKSTATION_NAME is the name of your LinkStation set on page 17).
Link Navigator Setup
User name: root
Password: default password is blank.
Only enter a password if you have congured one.
16
Congratulations, you have logged into LinkStation. These are the main conguration menus.
Please bookmark this page for easy access. For detailed explanations of each menu and setting,
please refer to the Settings section, starting on page 28 of this manual. To continue setup, click
on the Basic link. Then, click on the LinkStation Name Setup link to continue.
Link Navigator Setup
17
This section allows you to change the name of your LinkStation. This name will be required to
access LinkStation data. A friendly, easy name is recommended. Please enter an appropriate
name in the LinkStation Name eld. The name cannot contain any spaces or special characters.
Alphanumeric characters including hyphen and underscore are allowed.
A short description of the LinkStation can be created in the LinkStation Description eld. This
description will be shown while browsing through Network Neighborhood on Windows machines.
Once the elds have been completed, press the Apply button.
Link Navigator Setup
18
By default there are two shared folders on LinkStation. One is for Windows and Mac machines,
while the other is for Macs only. Windows machines will only see one share. If you would like to
create additional shares for specic users or specic types of data, then click on the Security tab
on the left. Then click on the Shared Folder Settings link to continue. From this screen you can
add new shares/folders or edit existing shares/folders. Press the Add a New Folder button to
begin creating a new share/folder.
Link Navigator Setup
19
To begin setting up a new share, enter an appropriate share/folder name in the Shared Folder
Name eld. Set the remaining settings to the desired function. Access Restriction will turn on
security features. Please refer to the Settings section (starting on page 28) of this manual before
using the Access Restriction function. Press the Apply button when nished. A new shared folder
has been set up. Please repeat this step to set up more shared folders.
Note: OS X Macs work best with “Win” shares. Use “Mac” shares only with older Macs, as
AppleTalk entails a 2 GB lesize limitation.
Link Navigator Setup
20
Accessing LinkStation Data from a PC
To access LinkStation from a PC, press Start and choose Run.... Type “\\LinkStation_Name”,
where LinkStation_Name is the name of the LinkStation set on page 17. Press OK to continue.
  • Page 1 1
  • Page 2 2
  • Page 3 3
  • Page 4 4
  • Page 5 5
  • Page 6 6
  • Page 7 7
  • Page 8 8
  • Page 9 9
  • Page 10 10
  • Page 11 11
  • Page 12 12
  • Page 13 13
  • Page 14 14
  • Page 15 15
  • Page 16 16
  • Page 17 17
  • Page 18 18
  • Page 19 19
  • Page 20 20
  • Page 21 21
  • Page 22 22
  • Page 23 23
  • Page 24 24
  • Page 25 25
  • Page 26 26
  • Page 27 27
  • Page 28 28
  • Page 29 29
  • Page 30 30
  • Page 31 31
  • Page 32 32
  • Page 33 33
  • Page 34 34
  • Page 35 35
  • Page 36 36
  • Page 37 37
  • Page 38 38
  • Page 39 39
  • Page 40 40
  • Page 41 41
  • Page 42 42
  • Page 43 43
  • Page 44 44
  • Page 45 45
  • Page 46 46
  • Page 47 47
  • Page 48 48
  • Page 49 49
  • Page 50 50
  • Page 51 51
  • Page 52 52
  • Page 53 53
  • Page 54 54
  • Page 55 55
  • Page 56 56
  • Page 57 57
  • Page 58 58
  • Page 59 59
  • Page 60 60
  • Page 61 61
  • Page 62 62
  • Page 63 63
  • Page 64 64
  • Page 65 65
  • Page 66 66
  • Page 67 67
  • Page 68 68
  • Page 69 69
  • Page 70 70
  • Page 71 71
  • Page 72 72
  • Page 73 73

Buffalo Technology HS-DGL Series User manual

Type
User manual
This manual is also suitable for

Ask a question and I''ll find the answer in the document

Finding information in a document is now easier with AI