Page is loading ...

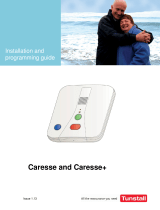
1012 & 1 yaleR 102103104 Speaker Port
Power Plug
CMDUV4
101 103
102 104
MDUV4-LX Installation Manual
6A-7500 Martin Grove Rd. Woodbridge, ON. Canada L4L 8S9 Toll Free: 1.888.790.5900 E-mail: [email protected] For complete information please visit our website at www.logenex.com
Don't open your door to the unknown
TeleDoorBell TM
“ ulti- welling- nit ”MD U Series
ADMDUV4 or ADMDUV4VC (Video Model)

SAFETY INSTRUCTIONS
When using your telephone equipment, basic safety precautions should always be followed to reduce the risk of
fire, electric shock and injury to persons, including the following:
1. Read and understand all instructions.
2. Follow all warnings and instructions marked on the product
3. Unplug this product from the wall outlet before cleaning. Do not use liquid cleaners or aerosol cleaners. Use a
damp cloth for cleaning.
4. Do not use or expose this product to direct water contact: ie: near a bathtub, wash bowl, kitchen sink, laundry
tub, in a wet basement, or near a swimming pool.
5. Dropping this product may result in serious damage to the product.
6. This product should never be operated near or over a radiator or heat register. This product should not be
placed in a built-in installation unless proper ventilation is provided.
7. This product should be operated only from the type of power source indicated on the marking label. If you are
not sure of power supply to your home, consult your dealer or local Power Company.
8. Do not allow anything to rest on the power cord. Do not locate this product where the cord will be abused by
persons walking on it.
9. Do not overload wall outlets and extension cords as this can result in risk of fire or electric shock.
10. Never push objects of any kind into this product through cabinet slots as they may touch dangerous voltage
points or short out parts that could result in a risk of fire or electric shock. Never spill liquid of any kind on the
product.
11. To reduce the risk of electric shock, do not dissemble this product, but take it to qualified service technician
when some service or repair is required. Opening or removing covers may expose you to dangerous voltages
or other risks. Incorrect re-assembly can cause electric shock when the appliance is subsequently used.
12. Unplug this product from the wall outlet and refer servicing to a qualified service personnel under the
following conditions:
* When the power supply cord or plug is damaged or frayed.
* If liquid has been spilled into the product.
* If the control unit has been exposed to rain or water.
* If the product does not operate normally by following the instructions. Adjust only those controls that
are covered by the operating instructions because improper adjustment of other controls may result in
damage and will require extensive work by a qualified technician to restore to normal operation
* If the product has been dropped or the housing has been damaged
* If the product exhibits a distinct change in performance.
13. Avoid using a telephone (other than cordless type) during an electrical storm. There may be a remote risk of
electric shock from lightning.
14. Do not use the telephone to report a gas leak near the location of the leak.
15. This device may cause harmful interference
16. This device may be susceptible to any interference including interference that may cause undesired
operation.
Complies with Part 68, FCC Rules FCC REG NO. 5ERCAN-31264-OT-N REN: 0.8B
(DOC/CSA/UL approved)
Contents
Safety Instructions and guidelines .................................................. Pg 2
Features .......................................................................................... Pg 3
.............Parts Listing ....................................................................... Pg 3
Installation Instructions ................................................................... Pg 4
Installation Diagram ........................................................................ Pg 6
Programming Instructions ................................................................. Pg 7
Trouble Shooting ............................................................................ Pg 8
Warranty ......................................................................................... Pg 9
Safety instructions and Guildlines
Page 2

Features and Parts Listings
D.O.C. NOTICE:
The Canadian Department of Communications label identifies certified equipment. The certification means that
the equipment meets certain telecommunications network protective, operational and safety requirements. The
Department does not guarantee the equipment will operate to the user’s satisfaction.
Before installing this equipment, user should ensure that it is permissible to connect to the facilities of the local
telecommunications company. The equipment must also be installed using an acceptable method of connection.
User should ensure that the telephone lines and metallic water pipe system (if present) are electrically grounded.
* Dimensions: Controller (17cmX17cmX4cm) Door-speaker (22cm H X 13cm W X 5.25cm D)
Features
The MDU-4 is a telephone based door intercom system that provides the system user(s) with the capability of
communicating to the Door Speaker Station from any installed telephone set, including most cordless phone(s).
Additional features include:
*Provides high-quality audio communications capability between any telephone connected and the Door
Station Speaker.
* Unique telephone ringing pattern when Door Speaker Station button is pressed.
* Users able to activate communications and audio monitoring to the Door Station (one User at a time) for
up to 1 minute by pressing on from premise phone.
* Two Normally Open Relays are provided for device activation (ie: door strike etc).
* LED illumination at the Door Station Speaker.
* When the Door Station Speaker’s assigned Button is pressed, the User from that premise has up to 1
minute to answer the Door Station.
The User presses on their touch-tone phone to put their existing phone call on HOLD and switch to
the Door Station Speaker Pressing again will to
the existing cal .
* Call Forwarding capability which allows the User to call forward the Door Station Visitor call to any
programmable phone number (up to 30 digits).
*#1
Each relay is rated up to: (1 Amps at 24DC Volts).
* The MDU-4 system includes a “Door Station Call Waiting” feature which allows the User to switch from an
incoming phone call conversation to the Door Station Speaker. When the Door Station Button is pressed,
the User will hear a distinctive beep tone in the phone handset to alert the user that there is a visitor calling
at the door.
switch the User from the Door Station Speaker back
phone l
.
*4
*4
Note: The “Door Station Call Waiting” features is only functional when the Door Station
Speaker button is pressed. A User on an existing phone call cannot switch to the Door Station
Speaker until the Visitor has pressed the button.
*4
Parts list
The MDU-4 system is shipped from the factory with the following components:
* (1)- MDU-4 control unit
* (1)- MDU Door Station Speaker
* (1)- CSA/UL approved class 2 Power Supply, Input 120VAC, 60Hz, Output 16Vac 250 mA.
* (4)- Modular RJ-45 to RJ45 Male-To-Male patch cord (~36” long).
* (2)- Modular RJ-11 male patch cord with open-ends
* (1)- Mounting screw #6 [2” length] Phillips Style Head (for controller unit)
* (4)- Mounting screw #8 [1” length] Phillips Style Head (for Speaker Station unit)
* (4)- Mounting screw Anchors for the #8 [1” length] Phillips Style Head (for Speaker Station unit)
* (4)- RJ31X / CA38 Data Jack
Page 3

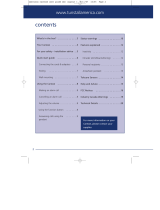
Relay 1 & 2 101102103104 Speaker Port
Power Plug
[1]
This is the relay port connection. Both relays are Normal Open.
Relay#1 (which is activated by ) is a 6 second contact closure configuration
[2]
This port
[6]
This is the port where the main speaker is connected to for communications to Premise Unit #1, #2, #3 and #4.
[7]
When "FLASHING" this lamp indicates the presence of power to the unit and that the unit is operating properly. When
LED is "OFF" it indicates the absence of power to the unit. When the LED is “ON” (not flashing) this indicates that the
unit is locked up and will need to be reset by unplugging the power for 60 seconds and then powering back up.
[8]
This jack is the connecting point for AC power supply to the unit. The supply is typically 16 VAC at a minimum of 250
mA.
2-Relay Port (Relay#1 and Relay#2)
Unit #104 Phone Line IN/OUT
Door Station Speaker Port
Power Supply Plug
*5
Relay#2 (which is activated by ) is a 10 second contact closure configuration
is the Phone Line (IN and OUT) for Premise Unit #4.
LINE-IN is the incoming line from the Phone Service Provider. LINE-OUT combines the (Incoming Phone Line Service
“LINE-IN”) with the communications and features of the MDU-4 system and Door Station Speaker.
[3]
This port is the Phone Line (IN and OUT) for Premise Unit #3.
LINE-IN is the incoming line from the Phone Service Provider. LINE-OUT combines the (Incoming Phone Line Service
“LINE-IN”) with the communications and features of the MDU-4 system and Door Station Speaker.
[4]
This port is the Phone Line (IN and OUT) for Premise Unit #2.
LINE-IN is the incoming line from the Phone Service Provider. LINE-OUT combines the (Incoming Phone Line Service
“LINE-IN”) with the communications and features of the MDU-4 system and Door Station Speaker.
[5]
This port is the Phone Line (IN and OUT) for Premise Unit #1.
LINE-IN is the incoming line from the Phone Service Provider. LINE-OUT combines the (Incoming Phone Line Service
“LINE-IN”) with the communications and features of the MDU-4 system and Door Station Speaker.
To complete the installation the installer must supply/install the following:
* RJ31X CA38A disconnect and bypass jack. (This is recommended in the event that the unit needs to be
disconnected. This will provide a bypass capability whereby the telephone line continues to work if the
unit needs to be removed from the telephone line. Note: If installation is done at a location that has an existing alarm
jack (RJ31X CA38A) then ensure that the alarm is installed before the TeleDoorBell RJ31X CA38A jack.
Otherwise, the alarm system may not have disconnect priority.
It is recommended that the system control unit be installed near the point-of-entry of the customer's main telephone
line. Please ensure that adequate AC power is available in the general vicinity.
*8
Unit #103 Phone Line IN/OUT
Unit #102 Phone Line IN/OUT
Unit #101 Phone Line IN/OUT
Power Status LED
Installation Instructions
and/or (supplied)
and/or and/or
TeleDoorBell
/ DC
IMPORTANT NOTICE:
For added protection we strongly recommend you use surge protectors on both your power supply and on the C/O line (phone
line) to protect against lightning and other energy surges. This precaution may be extremely important in rural areas.
12 6
5
4378
Installation Instructions
Connections
Page 4
CMDUV4

Surface mount the MDU Speaker
Wall /
Mounting
Surface
Fig.1
Fig.2
Fig.3 Fig.4
Installation Procedure
1) Drill (4) mounting holes and knock out (1) wire hole on the Back-
Box of the Door Speaker Station for wiring. (See Fig.1)
2) Position the Back-Box on the wall and drill mounting holes through
the brick or mounting surface.
2) Thread wire through the knockout hole openings of the Back-Box
Note: We recommend that you use silicon sealer at all hole
mountings and wiring locations to ensure a water tight seal.
3) Mount Back-Box by screwing in the four supplied mounting
screws. 2
4) Connect (2) audio wires securely into screw down terminals of the
speaker board.
** Connect (4)video wires securely into screw down terminals
(Applicable for Video Speaker Model Only). (See Fig.3)
(See Fig. )
5) Secure the front flate speaker unit to the Back-Box using the 2
mounting screws located at the top and bottom of the speaker.
(See Fig.4)
6) Slide the screw mount cover plates closed on the speaker
101 103
102 104
101 103
102 104
Video
Back of Speaker Connection
Video Connection
with separate power supply
(for Video Models only)
Audio
- 12V (-) Power
-
- Video Signal -
-
12V (+) Power
()
Video Signal (+)
V+ T
V- R
12+12-
Installation Instructions
Installation Note
Installation of the system requires that the installer install a 2-conductor wire 22
AWG, (Max Length 1000 ft) or CAT-5 wiring (for Video/Audio speaker option,
Max Length 250 ft) from the location of the Door Station Speaker to the system
control unit. It is recommended that the system control unit be installed near the
point-of-entry of the customer's main telephone line.
NOTE: To achieve 1000 ft range with video, you must use COAX Cable in-
place of the CAT-5 for the video signal.
IMPORTANT NOTICE:
For added protection we strongly recommend that you use surge protectors on both your power
supply and on the C/O line (phone line) to protect against lightning and other energy surges. This
precaution is extremely important in rural areas.
Page 5
Wall / Mounting
Surface
Knock out a
Wiring Hole
Drilled out
Mounting Holes
Green Red

101 103
102 104
Black
Yellow
Red
16V AC
Output
Video
Back of Speaker Connection
Video Connection
with separate power supply
Power Jack
CMDUV4
PRESS *5
Relay#2
(10 second activation)
for Door Strike or any
other controllable device
Relay 1 & 2 101102103104 Speaker Station
OUT
OUT
IN
IN
OUT
OUT
IN
IN
RJ31X
(CA38A)
Alarm Jack
TELEPHONE PROVIDER
C/O LINE-IN for
UNIT #101
Alarm jack
connection
only if alarm
monitored
RJ31X
(CA38A)
Data Jack
(Supplied)
To
Phones
To All Phones
in Unit #101
OUT
OUT
IN
IN
OUT
OUT
IN
IN
RJ31X
(CA38A)
Alarm Jack
TELEPHONE PROVIDER
C/O LINE-IN for
UNIT #103
Alarm jack
connection
only if alarm
monitored
RJ31X
(CA38A)
Data Jack
(Supplied)
To
Phones
To All Phones
in Unit #103
OUT
OUT
IN
IN
OUT
OUT
IN
IN
RJ31X
(CA38A)
Alarm Jack
TELEPHONE PROVIDER
C/O LINE-IN for
UNIT #104
Alarm jack
connection
only if alarm
monitored
RJ31X
(CA38A)
Data Jack
(Supplied)
To
Phones
To All Phones
in Unit #104
OUT
OUT
IN
IN
OUT
OUT
IN
IN
RJ31X
(CA38A)
Alarm Jack
TELEPHONE PROVIDER
C/O LINE-IN for
UNIT #102
Alarm jack
connection
only if alarm
monitored
RJ31X
(CA38A)
Data Jack
(Supplied)
To
Phones
To All Phones
in Unit #102
Audio
- 12V (-) Power
-
- Video Signal -
-
12V (+) Power
()
Video Signal (+)
V+ T
V- R
12+12-
PRESS *8
Green
Door strike
transformer
(If applicable) Power Supply
(eg. 120V AC)
Components and
layout may vary with
different system types
(door strike and power supply
transformer not included.)
Door
Strike
Relay#1
(6 second activation)
for Door Strike or any
other controllable device
Installation Diagram
IMPORTANT NOTICE:
For added protection we strongly recommend you use surge protectors on both your power supply
and on the C/O line (phone line) to protect against lightning and other energy surges. This
precaution is be extremely important in rural areas.
WIRING: When using twisted paired wiring types (e.g.: CAT-5) You MUST use the same coloured pair
for the Audio and likewise for the Video. Do NOT criss-cross the coloured pairs.
Page 6
(For VIDEO
Models Only)
(Optional)
Green
Green Green
Green
Red
Red Red
Red
Use a 2-conductor wire 22 AWG, (Max Length 1000 ft) or CAT-5 wiring (for
Video/Audio speaker option, Max Length 250 ft) from the location of the Door
Station Speaker to the system control unit.
NOTE: To achieve 1000 ft range with video, you must use COAX Cable
in-place of the CAT-5 for the video signal.
RELAY SPECIFICATIONS:
Normally Open Relays are rated for
up to: (1 Amps at 24DC Volts).

Programming
User Command Functions
Programming and Installers Guide
Door Station Communications
*#1
*#72
*#73
*#77
*4
*4
*5
To Connect and communicate to the Door Station Speaker
To Enable Call Forwarding
To Disable Call Forwarding
To Toggle Ringer ON/OFF
To Connect to Door Station Speaker while putting your existing
telephone caller on hold
To switch from the Door Station Speaker back to your existing
telephone caller
Activates Relay for 10 seconds
Call Forwarding
Door Station ON-HOLD
Relay Activation
(Listen for -Beep )
(Listen for -Beep )
(Listen for -Beep )
(Listen for -Beep )
2s
3s
#1 2 s
Activates Relay#2 for 6 seconds 2 s
(2-Beeps=ON, 3-Beeps=OFF)
(Speaker button must be pressed and a call
waiting tone must be heard before the command can be used)
*4
(Speaker button must be pressed and a call waiting tone
must be heard before the command can be used)
*4
*8
PRESS to go into programming mode*#0 (Listen for 2 beeps)
NOTE: All Programmed Phone
Numbers for each Dwelling Unit will be
deleted. Use only for mandatory reset
purposes only. NOT FOR END USERS
PRESS
To RESET UNIT TO
FACTORY DEFAULT
0#0 PRESS
(To Program Call Forwarding No.)
*2 (Listen for 1-Beep)
1) Enter the Phone Number you wish to Call
Forward to.
2) PRESS to SAVE
(up to 30 Digits)
130
*
#
to Digits
Note: ENTER for inserting a PAUSE (6 Second
Delay) anywhere in the dialing sequence.
(Listen for 2-Beeps)
To DELETE an existing programmed phone number you
ENTER only for Step #1 followed by to SAVE.
*#
Page 7
ENTER passcode 1111 (Default Passcode)
NOTE: When Entering any programming functions, you have up to 30 seconds idle time before the system
will hang up at which point any programming started will not be saved
Then listen for Beeps

Problem Solution
Controller not responding
My phones don't work
The Controller does not respond and the
Phone(s) don’t ring when the Door Station
Speaker Button is Pressed
The is operating but the
phones don't ring when the speaker button is
pressed
You have a dial tone feedback at the speaker
when door speaker button is pressed
When pressing (for monitoring the
door) you get an operator recording (e.g. "this
is an invalid number") and you have no
communication to the speaker
TeleDoorBell MDU
*#1
1) Check your AC and power adapter, confirm LED Power
Indicator is FLASHING
2) Check the power connection into the unit
1) Are your phones wired into the data
jack (output). To test connection, remove the RJ45 wire from
the (RJ31X CA38A) data jack which bypasses the
and connects the phones directly to the main
incoming line
2) Check for any breaks in the RJ45 wire, including Data Jack
1) The Red and Green wires may be reversed,
either at the speaker or at the controller
1) One of the phones may be causing to much of a load;
unplug all phones and begin testing with one phone at a time
till defective phone is found
Reverse the In and Out on the (RJ31X CA38A) data jack.
1) You have attached the premise phones in parallel with the
across your C/O line
2) Your telephones may not be touchtone compatible, or the
touchtone switch may be set to off position
3) (With more than one telephone line): you may have wired
the controller to the wrong phone line
(RJ31X CA38A)
2) (With more than one telephone line): you may have wired
the controller to the wrong phone line
and/or
and/or
TeleDoorBell
TeleDoorBell
and/or
In case of difficulty, try the following suggestions before seeking assistance
Trouble Shooting
Page 8

Warranty / Terms & Conditions
Page 9
Limited Warranty
International Warranty
Warranty Procedure
Conditions to Void Warranty
Disclaimer of Warranties
Logenex Innovations Inc. warrants the original purchaser that for a period of one (1) year from the date of purchase, the product shall be free of defects in
materials and workmanship under normal use.
During the warranty
period, Logenex . shall, at its option, repair or replace any defective product upon return of the product to its factory, at no charge for labor
and materials (shipping, customs and/or brokerage fees are not included in the warranty). Any replacement and/or repaired parts are warranted for the
remainder of the original warranty or sixty (60) days, whichever is longer. The original owner must promptly notify Logenex in writing that
there is a defect in material or workmanship, such written notice to be received in all events prior to expiration of the warranty period.
.
of ur manufactured product(s).
()
The warranty for international customers is the same as for any customer within Canada and the United States, with the exception that Logenex
Innovations Inc. shall not be responsible for any shipping fees, customs fees, taxes, or VAT that may be due.
To obtain service under this warranty, please return the item(s) in question to the point of purchase first for all your warranty and technical support issues.
If unable to obtain warranty service, USER / DEALER must then:
All authorized distributors and dealers must have a warranty program.
Logenex Innovations Inc. will not accept any shipment whatsoever for which prior authorization has not been obtained.
This warranty applies only to defects in parts and workmanship relating to normal use. It does not cover:
- damage incurred in shipping or handling;
- damage caused by disaster such as fire, flood, wind, earthquake or lightning;
- damage due to causes beyond the control of Logenex Innovations Inc. such as excessive voltage, mechanical shock or water damage;
- damage or in-operation of the product(s) as a result of changes made by any other Service Providers (ie: Phone, Electricity, Security, Internet
companies)
- damage caused by unauthorized attachment, alterations, modifications or foreign objects;
- damage caused by peripherals (unless such peripherals were supplied by Logenex Innovations Inc.);
- defects caused by failure to provide a suitable installation environment for the products;
- damage caused by use of the products for purposes other that those for which it was designed;
- damage from improper maintenance;
- damage arising out of any other abuse, mishandling or improper application of the product(s).
Logenex Innovations Inc.'s liability for failure to repair the product under this warranty after a reasonable number of attempts will be limed to a
replacement of the product, as the exclusive remedy for breach of warranty. Under no circumstances shall Logenex Innovations Inc. be liable for any
special, incidental, or consequential damages based upon breach of warranty, breach of contract, negligence, strict liability, or any other legal theory.
Such damages include, but are not limited to, loss of profits, loss of the product or any associated equipment, cost of capital, cost of substitute or
replacement equipment, facilities or services, down time, purchaser's time, the claims of third parties, including customers, and injury to property.
This warranty contains the entire warranty and shall be in lieu of any and all other warranties, whether expressed or implied (including all implied
warranties of merchantability or fitness for a particular purpose) and of all other obligations or liabilities on the par of Logenex Innovations Inc. Logenex
Innovations Inc. neither assumes nor authorizes any other person purporting to act on its behalf to modify or to change this warranty, nor to assure for it
any other warranty or liability concerning this product. This disclaimer of warranties and limited warranty are governed by the laws of the province of
Ontario, Canada.
Except as specifically stated herein, all express or implied warranties whatsoever, statutory or otherwise,
including without limitation, any implied warranty of merchantability and fitness for a particular purpose, are expressly excluded.
Innovations Inc
Innovations Inc
Because Logenex
Innovations Inc does not install or connect the products and because the products may be used in conjunction with products not manufactured by
Logenex Innovations Inc., Logenex Innovations Inc. cannot guarantee the performance o Logenex Innovations Inc.
obligation and liability under this warranty is expressly limited to repairing or replacing at Logenex Innovations Inc.'s option any product not meeting the
specifications. In no event shall the Logenex Innovations Inc. be liable to the buyer or any other person for any loss or damages whether direct or indirect
or consequential or incidental, including without limitation, any damages for lost profits, stolen goods or claims by any other party, caused by defective
goods or otherwise arising from the improper, incorrect or otherwise faulty installation or use of the merchandise sold.
No Dealer and no person other than an officer of Logenex Innovations Inc. may extend or modify this warranty, and no modification or extension of this
warranty shall be effective unless in writing signed by the authorized officer of Logenex Innovations Inc..
(1) USERS must provide written notice of the malfunction to an authorized Logenex Innovations Inc. Dealer within the warranty period and no later than
15 days after the date of the malfunction, whichever occurs first. If the USER is unable to identify an authorized Logenex Innovations Inc. Dealer, USER
must provide written notice of the malfunction, including proof of the date of purchase of the equipment and the serial number of the malfunctioning
Product, to Logenex Innovations Inc. at its corporate offices at 19 Kenview Blvd, Brampton, Ontario, L6T 5G6. Upon receipt of such notice and
determination by Logenex Innovations Inc. that User is eligible for Warranty service, Logenex Innovations Inc. will provide the USER with the necessary
instructions to process the warranty service.
(2) DEALERS must provide written notice of the malfunction to Logenex Innovations Inc. no later than the expiration of the warranty period or 15 days
after the date the Dealer becomes aware of the malfunction, whichever comes first. For purposes of this Warranty, the Issuance by Logenex Innovations
Inc. of a Return Material Authorization (RMA) number by telephone to an authorized Dealer shall be deemed to be written notice from the dealer with
respect to the material returned under that RMA number.
Page 1 of 2
Warranty / Terms & Conditions Continued on next page...

Warranty / Terms & Conditions
Page 10
Page 2 of 2
WARNING: Logenex Innovations Inc recommends that the entire system be completely tested on a regular basis. However, despite frequent testing,
and due to, but not limited to, criminal tampering, telephone provider breakdowns, interference or poor signal or electrical disruption, it is possible for this
product to fail to perform as expected.
Logenex Innovations Inc. will at its option repair or replace out-of-warranty products which are returned to its factory according to the following
conditions. Customers are required to contact their local installation dealer first for proper inspection and diagnostics before returning goods to Logenex
Innovations Inc. and must also obtain an authorization Return Number (RMA). Logenex Innovations Inc. will not accept any shipment whatsoever
without prior authorization and Return Number (RMA). Products which Logenex Innovations Inc. determines to be repairable will be repaired and
returned. A set fee which Logenex Innovations Inc. has predetermined and which may be revised from time to time, will be charged for each unit
repaired. Products which Logenex Innovations Inc. determines not to be repairable will be replaced by the nearest equivalent product available at that
time. The current market price of the replacement product will be charged for each replacement unit. Customer would also have the option to contact
their local dealer for product pricing and installation rates (if required).
Out of Warranty Repairs
Notification To Telephone Company
Telephone Connection Requirements
Incident of Harm
Changes in Telephone Company Equipment, Service and/or Facilities
Attachment Limitation Notice
Upon request, customer shall notify telephone company of particular line to which the connection will be made, and provide the FCC registration number
and the ringer equivalence of the protective circuit.
Except for telephone company provided ringers, all connections to the telephone network shall be made through standard plugs and telephone
company provided jacks, or equivalent, in such a manner as to allow for easy, immediate disconnection of terminal equipment.
Should terminal equipment/protective circuitry cause harm to telephone network, telephone company shall, where practicable, notify customer that
temporary disconnection of service may be required; however, where prior notice is not practicable, the telephone company may temporarily discontinue
service if action is deemed reasonable in circumstances.
The telephone company may make changes in its communication facilities, equipment operations or procedures, where such actions are reasonable,
required and proper in its business. Should any such changes render customer's terminal equipment incompatible with the telephone company facilities
or any products installed, Logenex Innovations Inc. will not held responsible for any failures or problems which may occur as a result of such changes,
failures and/or interruptions of the service.
Before installing this equipment, users should ensure that it is permissible to be connected to the facilities of the local telecommunications company.
The equipment must also be installed using an acceptable method of connection. The customer should be aware that compliance with the above
conditions may not prevent degradation of service in some situations. Users should ensure for their own protection that the electrical ground connections
of the power utility, telephone lines and internal metallic water pipe system, if present, are connected together. This precaution may be particularly
important in rural areas.
The Load Number (LN) assigned to each terminal device denotes the percentage of the total load to be connected to a telephone loop which is used by
the device to prevent overloading. The termination on a loop may consist of any combination of devices subject only to the requirement that the total of
the Load Numbers of all of the devices does not exceed 100. (Confirm Load Number (LN) with your local Phone Service Provider)
CAUTION: Users should not attempt to make such connections themselves, but should contact the appropriate
electrical inspection authority, or electrician, as appropriate.
Industry Canada certification is only applicable to installation of devices which include transformers approved by the Canadian Standards Association (CSA).
The sole obligation of Logenex Innovations Inc. under this warranty is, at the sole option of Logenex Innovations Inc., the
repair or replacement, with new or refurbished parts, of the defective or missing parts that are causing the malfunction and
which are determined to be defective be Logenex Innovations Inc., and the return shipment of such parts to the DEALER /
USER / DISTRIBUTOR. DEALER / USER / DISTRIBUTOR shall be responsible to pay for shipment of the defective part to
Logenex Innovations Inc. and for all expenses connected with their removal and reinstallation. In lieu of repair or replacement,
Logenex Innovations Inc. may, at its sole option and in full satisfaction of its warranty obligations hereunder, refund the price
charged by Logenex Innovations Inc. to its DEALER / USER / DISTRIBUTOR for such parts as are determined by Logenex to
be defective and which are returned to Logenex Innovations Inc. through an authorized dealer within the warranty period and
no later than 15 days after such malfunction, whichever occurs first.
Warranty / Terms & Conditions Continued ...

NOTES

May 2009
/