Page is loading ...

PHONE: 262.251.3800• 800.558.8744
USA/CANADA
FAX:262.251.7067•800.329.8744
U.S.A. ONLY
www.alto-shaam.com
M N - 3 5 7 5 1 • R e v 0 • 11 /1 2
p R i N t e d i N u . s . a .
Electric FRYER
FryTech Series
ASF-60B
Electric Fryer
Battery
•InstallatIon
•operatIon
•MaIntenance
ASF-60UC
UTILITY CABINET
TOP & SHELVES
ASF-60DS
DUMP STATION
ASF-60E
FRYER
OPTIONAL
AUTOMATIC
BASKET LIFTS
8-3/8" (212mm)
55-1/4" (1403mm)
36-5/16" (921mm)
3/4" (19mm)
15" (381mm)
15" (381mm)
30" (762mm)
MINIMUM
2-STATION
40-1/4" (1022mm)
WITHOUT AUTO LIFT OPTION
44-5/8" (1131mm)
LIFTS EXTEND
ANOTHER 6"
35-1/2" (901mm)
ELECTRICAL
STATIONS
OVERALL WIDTH
2
30" (762mm)
3
45" (1143mm)
4
60" (1524mm)
SAMPLE CONFIGURATION SHOWN
47-7/16" (1204mm)
DOORS OPEN

MN-35751 • Electric Fryer Battery Operation & Care Manual
Delivery .........................................1
Unpacking .......................................1
Safety Procedures and Precautions ...................2
Installation
Dimension Drawings, Weights & Capacities ........ 3
Clearance Requirements ....................... 4
Site Installation & Leveling ..................... 5
Ventilation .................................. 6
Restraint Requirements - Mobile Equipment ........ 6
Electrical Requirements ....................... 8
Operation
Oil/Shortening Requirements ................... 10
Controls Behind Access Panel ................. 11
Start Up & General Operation .................. 11
Panel Identification .......................... 12
Cook Cycle ................................ 13
Holding Timers ............................. 13
Product Count .............................. 14
Display Descriptions ......................... 14
Product Key Programming .................... 15
System Programming ........................ 18
Programming Custom Product & Action Alarms ..... 19
Suggested Frying Times ...................... 20
Cleaning
Daily Cleaning & Maintenance ................. 22
Oil Filtration ............................... 23
Boil-Out Procedure .......................... 27
Service
Control Troubleshooting ...................... 29
Unit Troubleshooting ......................... 29
Extended Limited Frypot Warranty .............. 30
ASF-60B Service Views ...................... 31
Wire Diagrams
Always refer to the wire diagram(s) included with the unit.
Warranty
Transportation Damage and Claims ...... Back Cover
Limited Warranty ..................... Back Cover

MN-35751 • Electric Fryer Battery Operation & Care Manual • 1
DELIVERY
This Alto-Shaam appliance has been
thoroughly tested and inspected to ensure only
the highest quality unit is provided. Upon
receipt, check for any possible shipping damage
and report it at once to the delivering carrier.
See Transportation Damage and Claims section
located in this manual.
This appliance, complete with unattached
items and accessories, may have been delivered
in one or more packages. Check to ensure that all
standard items and options have been received
with each model as ordered.
Save all the information and instructions
packed with the appliance. Complete and return
the warranty card to the factory as soon as
possible to ensure prompt service in the event of a
warranty parts and labor claim.
This manual must be read and understood
by all people using or installing the equipment
model. Contact the Alto-Shaam Tech Team Service
Department if you have any questions concerning
installation, operation, or maintenance.
NOTE: All claims for warranty must include the
full model number and serial number of
the unit.
UNPACKING
1. Carefully remove the
appliance from the
carton or crate.
NOTE: Do not discard the
carton and other
packaging material
until you have
inspected the unit
for hidden damage
and tested it for
proper operation.
2. Read all instructions in this manual carefully
before initiating the installation of this appliance.
DO NOT DISCARD THIS MANUAL.
This manual is considered to be part of the
appliance and is to be provided to the owner
or manager of the business or to the person
responsible for training operators. Additional
manuals are available from the Alto-Shaam
Tech Team Service Department.
3. Remove all protective plastic film, packaging
materials, and accessories from the appliance
before connecting electrical power. Store any
accessories in a convenient place for future use.
®
®
KEEP THIS MANUAL IN A CONVENIENT LOCATION FOR REFERENCE.

MN-35751 • Electric Fryer Battery Operation & Care Manual • 2
INSTALLATION
CAUTION
Used to indicate the presence of a hazard that
can or will cause minor personal injury, property
damage, or a potential unsafe practice if the
warning included with this symbol is ignored.
CAUTION
Used to indicate the presence of a
hazard that can or will cause minor or
moderate personal injury or property
damage if the warning included with
this symbol is ignored.
DANGER
Used to indicate the presence of
a hazard that WILL cause severe
personal injury, death, or substantial
property damage if the warning
included with this symbol is ignored.
WARNING
Used to indicate the presence of
a hazard that CAN cause personal
injury, possible death, or major
property damage if the warning
included with this symbol is ignored.
1. This appliance is intended to cook, hold
or process foods for the purpose of human
consumption. No other use for this appliance is
authorized or recommended.
2. This appliance is intended for use in commercial
establishments where all operators are
familiar with the purpose, limitations, and
associated hazards of this appliance. Operating
instructions and warnings must be read and
understood by all operators and users.
3. Any troubleshooting guides, component views,
and parts lists included in this manual are for
general reference only and are intended for use
by qualified technical personnel.
4.Thismanualshouldbeconsideredapermanent
part of this appliance. This manual and all
supplied instructions, diagrams, schematics,
parts lists, notices, and labels must remain with
the appliance if the item is sold or moved to
another location.
NOTE: Used to notify personnel of
installation, operation, or
maintenance information that is
important but not hazard related.
SAFETY PROCEDURES
AND PRECAUTIONS
Knowledge of proper procedures is essential to the
safe operation of electrically and/or gas energized
equipment. In accordance with generally accepted
product safety labeling guidelines for potential
hazards, the following signal words and symbols
may be used throughout this manual.
NOTE
For equipment delivered for use
in any location regulated by the
following directive:
DO NOT DISPOSE OF ELECTRICAL
OR ELECTRONIC EQUIPMENT WITH
OTHER MUNICIPAL WASTE.
INSTALLATION

MN-35751 • Electric Fryer Battery Operation & Care Manual • 3
INSTALLATION
ASF-60B GAS SPECIFICATIONS
INSTALLATION
ASF-60UC
UTILITY CABINET
TOP & SHELVES
ASF-60DS
DUMP STATION
ASF-60E
FRYER
OPTIONAL
AUTOMATIC
BASKET LIFTS
8-3/8" (212mm)
55-1/4" (1403mm)
36-5/16" (921mm)
3/4" (19mm)
15" (381mm)
15" (381mm)
30" (762mm)
MINIMUM
2-STATION
40-1/4" (1022mm)
WITHOUT AUTO LIFT OPTION
44-5/8" (1131mm)
LIFTS EXTEND
ANOTHER 6"
35-1/2" (901mm)
ELECTRICAL
STATIONS
OVERALL WIDTH
2
30" (762mm)
3
45" (1143mm)
4
60" (1524mm)
SAMPLE CONFIGURATION SHOWN
47-7/16" (1204mm)
DOORS OPEN
CAPACITY PER FRYPOT
SHORTENING/OIL: 62 lb (28 kg)
MAXIMUM
LOAD CAPACITY:8lb(4kg)
MAXIMUM
OPTIONS
Filters
Paper,7countrellpackage FI-27791
Paper,100countrellpackage FI-27794
Charcoal/Carbon, 30 count package FI-27648
ReusableMesh,singlelter FI-27014
Frypot Cover
CONTACT FACTORY
Mobile Drawer Cover 5006073
Mobile Oil Caddy (
WITH OIL DISCARD HOSE
) TO-28359
Oil Discard Hose HO-28812
Pre-Filter Sieve Kit 5010451
Strainer/Skimmer CE-27400
STANDARD ACCESSORIES
Basket, Half-Size (2 included as standard) BS-35214
Brush Set
(one 2-brush set included as standard)
scrub brush bh-28693
straight brush bh-28691
WEIGHT PER FRYPOT
EST
NET WEIGHT SHIP WEIGHT
WITHOUT LIFTS
248lb(113kg) 330 lb (150 kg)
WITH LIFTS
265 lb (120 kg) 347lb(157kg)
CARTON DIMENSIONS
(L
W
H) CONTACT FACTORY
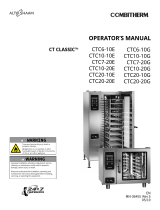
TheAlto-Shaamfryer/dumpstationbatteriescombineuptofour(4)ASF-60fryers,dumpstationand/orutilictycabinetinone
frame.Thebatteryalsoincludesanoilltrationsystem.Thebatteryisconstructedofstainlesssteelandfeaturesfront-andrear-
mounted, heavy duty leveling casters. Two fry baskets and a cleaning brush set are included with each fryer. The fryers have a
temperaturerangeof200°Fto400°F(93°Cto205°C).TheASF-60DSdumpstationfeaturesanoverheadinfraredheatingelementthat
is controlled with one (1) ON/OFF power switch. The dump station holding well includes a removable screen grid insert to collect
crumbsandsmallbitsofproductinaremovable11"x14"x4"(279x356x120mm)catchpanlocatedbehindthedoor.
Battery combinations are
customerspecic.Batteries
are ordered and labeled from
left to right.
ASF-60B = battery appliance.
The next characters will
indicate equipment piece.
1E = 1 electric fryer;
2E = 2 electric fryers;
3E = 3 electric fryers;
4E=4electricfryers;
1DS = 1 dump station;
1UC = 1 utility cabinet.
ASF-60B, 2E, 1DS, 1E would
mean that the battery includes
2 electric fryers on the farthest
left side, then one dump
station, followed by another
electric fryer.
The sample illustration at
right would be labeled as:
ASF-60B, 2E, 1DS

MN-35751 • Electric Fryer Battery Operation & Care Manual • 4
INSTALLATIONINSTALLATION
Ne pas installer à une distance inférirure à celle
indiquée ce-dessous d’une parol en matiére
combustible: Côtés 6 pouches, Arriére 6 pouches.
DANGER
IMPROPER INSTALLATION,
ALTERATION, ADJUSTMENT,
SERVICE, OR MAINTENANCE COULD
RESULT IN SEVERE INJURY, DEATH,
OR CAUSE PROPERTY DAMAGE.
READ THE INSTALLATION,
OPERATING AND MAINTENANCE
INSTRUCTIONS THOROUGHLY
BEFORE INSTALLING OR SERVICING
THIS EQUIPMENT.
DANGER
AVERTISSEMENT : UNE INSTALLATION,
UN AJUSTEMENT, UNE ALTÉRATION,
UN SERVICE OU UN ENTRETIEN NON
CONFORME AUX NORMES PEUT CAUSER
DES DOMMAGES À LA PROPRIÉTÉ, DES
BLESSURES OU LA MORT.
LIRE ATTENTIVEMENT LES DIRECTIVES
D’OPÉRATION ET D’ENTRETIEN
AVANT DE FAIRE L’INSTALLATION, OU
L’ENTRETIEN DE CET ÉQUIPEMENT.
SITE INSTALLATION
CAUTION
METAL PARTS OF THIS EQUIPMENT
BECOME EXTREMELY HOT WHEN
IN OPERATION. TO AVOID BURNS,
ALWAYS USE HAND PROTECTION
WHEN OPERATING THIS APPLIANCE.
CAUTION
DO NOT USE FORKLIFT FROM
FRONT OR REAR OF UNIT.
USE FORKLIFT FROM SIDE ONLY.
WARNING
MINIMUM CLEARANCES MUST
REMAIN UNOBSTRUCTED.
DO NOT place insulation or
any other type of materials
in clearance areas.
MINIMUM CLEARANCE REQUIREMENTS
COMBUSTIBLE
SURFACES
NON-COMBUSTIBLE
SURFACES
RIGHT
SIDE
0" (0mm) 0" (0mm)
LEFT SIDE
0" (0mm) 0" (0mm)
BACK
6" (152mm)
FRONT
25" (635mm)
PLUS: 6" (152mm) minimum between the element swing in the
extended position and the lower edge of the exhaust hood
andltermedia.
ENTRY CLEARANCE:
60" (1524mm)
4 UNIT MAXIMUM WIDTH UNCRATED
NOTE: To avoid equipment damage, remove the
Mobile Oil Trolley before moving this
appliance with a forklift or pallet lift.

MN-35751 • Electric Fryer Battery Operation & Care Manual • 5
INSTALLATIONINSTALLATION
1. It is the responsibility of the installer to verify
that this installation is in compliance with the
specicationslistedinthismanualandwithlocalcode
requirements.
2. Hood installation is required.
3. Both cooking and cleaning functions require
unobstructed access. The frypots, control panels,
and front access doors must be maintained free from
obstruction. The front access door and back panel
must be accessible for service and maintenance.
4. Locatetheapplianceonarm,levelsurfaceONLY.
The surrounding area must be kept clear of all
combustible materials.
5. FOR YOUR SAFETY DO NOT store or use any
ammableliquidsorallowammablevaporsinthe
vicinity of this fryer or any other appliance.
6. FOR YOUR SAFETY DO NOT place insulation
or any other type of materials in clearance areas.
7. Whenproperlyinstalled,thefryerisdesignedfor
operationadjacenttonon-combustibleoorsand
walls with a 6" clearance at the back. Clearances
from all combustible construction is a minimum of 6"
(152mm) at the back. Concrete, tile, terrazzo, or metal
surfaces are recommended. Metal over a combustible
material may not meet code for non-combustible
surfaces. Verify site selection with local codes for
specicrequirements.
Doit être utilisé seulement sur des planchers non
inflammables.
8. Adequate means must be provided to limit the
movement of this appliance. A restraining device is
requiredforeldinstallation.
9. DONOTinstallthisapplianceinanyareawhereit
may be affected by any adverse conditions such as
steam or dripping water, etc. DO NOT install fryer
over a drain.
10. LEVELING: Make certain the
applianceispositionedrmlyonall
supporting casters. Level from front-
to-back and side-to-side by holding
lower collar (#2) while twisting upper
collar (#1). Restraining ties can be
used for stabilization if necessary.
Use an allen wrench (#3) to lock caster
in position.
SITE INSTALLATION
CAUTION
TO PREVENT PERSONAL INJURY,
USE CAUTION WHEN MOVING OR
LEVELING THIS APPLIANCE.
DANGER
To avoid electrical shock, this
appliance MUST be adequately
grounded in accordance with local
electrical codes or, in the absence of
local codes, with the current edition
of the National Electrical Code ANSI/
NFPA No. 70. In Canada, all electrical
connections are to be made in
accordance with CSA C22.1, Canadian
Electrical Code Part 1 or local codes.
1
2
3
WARNING
BURN WARNING: Make certain the
fryer is stabilized before operation to
prevent any movement or tipping and the
possibility of severe burns caused by
hot, splashing shortening or oil.
WARNING
IMPROPER INSTALLATION
MAY RESULT IN FIRE.
Carefully read and follow all installation
instructions located in this manual.

MN-35751 • Electric Fryer Battery Operation & Care Manual • 6
INSTALLATIONINSTALLATION
VENTILATION
An adequate ventilation system is required for commercial cooking equipment. Information may be obtained by writing
totheNationalFireProtectionAssociation,BatterymarchPark,Quincy,MA02269.WhenwritingrefertoNFPANo.96.
DANGER
Installation, air ventilation requirements,
and service work must be in accordance
with all local codes and must be performed
by a qualifi ed service technician.
Ventilating hoods and exhaust systems shall be permitted to be
used to vent appliances installed in commercial applications.
Whereautomaticallyoperatedappliancesareventedthrougha
ventilating hood or exhaust system equipped with a damper or
with a power means of exhaust, provisions shall be made to allow
theowofgastothemainburnersonlywhenthedamperisopen
to a position to properly vent the appliance and when the power
means of exhaust is in operation.
in accordance With nFPa 54
coMMonWealth oF Massachusetts onlY.
WARNING
This appliance shall be installed in
conformity with the current regulations
and used only in a well ventilated location.
Consult the instructions before
installing and using this appliance.

MN-35751 • Electric Fryer Battery Operation & Care Manual • 7
INSTALLATIONINSTALLATION
The fryer must be supplied with a connector that
complies with all state and local installation codes.
Any appliance that is not furnished with a power
supply cord but that includes a set of casters must be
tethered. Adequate means must be provided to limit
the movement of this appliance without depending
on or transmitting stress to the electrical conduit.
The following requirements apply:
Castersmustbeamaximumheightof4-inches(102mm).
Such mobile appliances must be installed with the
use of a flexible connector secured to the building
structure.
RESTRAINT REQUIREMENTS - MOBILE EQUIPMENT
WARNING
RISK OF ELECTRIC SHOCK.
Appliance must be secured
to building structure.
A mounting connector for a restraining device is
located on the upper back flange of the appliance
chassis,approximately31"(787mm)fromthefloor.
A flexible connector is not supplied by nor is it
available from the factory.

MN-35751 • Electric Fryer Battery Operation & Care Manual • 8
INSTALLATIONINSTALLATION
ELECTRICAL REQUIREMENTS
An electrical wiring diagram is located in the front
access door of the fryer. The fryer must be installed by a
qualiedelectrician.Thisappliancemustbebranchcircuit
protected with proper ampacities, in accordance with
the wiring diagram located in the fryer. The fryer must
be properly grounded in accordance with the National
Electrical Code and applicable local codes. A means to
disconnecttheunitmustbeincorporatedintothexed
wiring in accordance with wiring codes.
Wiresizeforthemainincomingpowertotheunitmust
matchtheminimumsizelistedinthespecications
applicabletothespecicfryer.Forsupplyconnections,
locate the wire size posted on the label located on the
electrical control box cover, behind the service panel or
elsewhere listed in this manual.
Before operating the fryer, check all cable connections
in the electrical connection area for tightness since
connections can loosen during transport.
230V:
To prevent an electrical shock hazard between the
appliance and other appliances or metal parts in close
vicinity, an equalization-bonding stud is provided. An
equalization bonding lead must be connected to this
stud and the other appliances / metal parts to provide
sufcientprotectionagainstpotentialdifference.The
terminal is marked with the following symbol.
ELECTRICAL - ASF-60E
voltage phase cycle/hz amps kW awg
208-220 (agcY) 3 60 47.0 17.9 aWg 6
at208 3 60 45.0 16.2 aWg 6
at220 3 60 47.6 18.2 aWg 6
240
(agcY) 3 60 43.0 17.9 aWg 6
380-415
at 380 3 50 20.4 15.4 aWg 10
at415 3 50 25.4 18.3 aWg 10
440-480
(agcY) 3 60 21.8 18.1 aWg 10
at440 3 60 20.4 15.5 aWg 10
at480 3 60 22.2 18.5 aWg 10
DANGER
To avoid electrical shock, this
appliance MUST be adequately
grounded in accordance with local
electrical codes or, in the absence of
local codes, with the current edition
of the National Electrical Code ANSI/
NFPA No. 70. In Canada, all electrical
connections are to be made in
accordance with CSA C22.1, Canadian
Electrical Code Part 1 or local codes.
DANGER
ENSURE POWER SOURCE
MATCHES VOLTAGE IDENTIFIED
ON APPLIANCE RATING TAG.
DANGER
APPLIANCES WITH NO CORD
PROVIDED BY FACTORY MUST
BE EQUIPPED WITH A CORD OF
SUFFICIENT LENGTH TO PERMIT
THE APPLIANCE TO BE MOVED
FOR CLEANING.
ELECTRICAL CONNECTIONS MUST
BE MADE BY A QUALIFIED SERVICE
TECHNICIAN IN ACCORDANCE WITH
APPLICABLE ELECTRICAL CODES.
Hard wired models:
Hard wired models must be equipped with a
country certified external allpole disconnection
switch with sufficient contact separation.
If a power cord is used for the connection of the
productanoilresistantcordlikeH05RNorH07RN
or equivalent must be used.
ELECTRICAL • ASF-60DS DUMP STATION
VOLTAGE PHASE CYCLE/HZ AMPS
kW
CORD & PLUG
120 1 60 8.3 1.0 NEMA 5-15P
15A-125
V PLUG
230 1 50 4.4 1.0
CEE 7/7
220-230
V PLUG

MN-35751 • Electric Fryer Battery Operation & Care Manual • 9
INSTALLATION
1. Refer to the nameplate. Verify the electrical service power. Voltage and phase must match the nameplate
specifications and available electrical service amperage must meet or exceed the specifications listed.
Wiregauge,insulationtypeandtemperaturerating,aswellastype,sizeandconstruction
of conduit, must meet or exceed applicable specifications of local codes and of the National
Electrical Code.
2. The fryer is shipped from the factory wired for 3-phase electrical service. This fryer is not
approved for conversion to single phase. Converting to single phase will void the
warranty and invalidate the ETL certification.
IMPORTANT: Field wiring must be routed and secured away from the frypot, tubing, and filter pump
and motor. Field wiring must allow access to the rear of the fryer for cleaning and for
.
Warning!
440-480V - 3 Phase Only
The pump motor should rotate clockwise when viewed
from the rear of the fryer.
To change rotation, swap any two lines of 3 Phase incoming power.
ELECTRICAL INSTALLATION
DANGER
ENSURE POWER SOURCE
MATCHES VOLTAGE IDENTIFIED
ON APPLIANCE RATING TAG.
DANGER
ELECTRICAL CONNECTIONS MUST
BE MADE BY A QUALIFIED SERVICE
TECHNICIAN IN ACCORDANCE WITH
APPLICABLE ELECTRICAL CODES.

MN-35751 • Electric Fryer Battery Operation & Care Manual • 10
OPERATION OPERATION
OIL/SHORTENING REQUIREMENTS
Each ASF-60E frypot requires 62-pounds (28 kg) of oil or
shortening. Use only quality, high-grade oil/shortening
in the fryer. The high moisture content of lower grade
shortening will result in excessive foaming and boil over.
The cold oil/shortening level requirement for the fryer is
indicated below.
NOTE: ALWAYS maintain the proper level of
shortening by adding fresh oil/shortening
to the frypot whenever needed.
Check the quality of the oil/shortening in the frypots on a
daily basis for signs of deterioration. Use an approved test
kit. Signs of shortening deterioration include excessive
boiling, smoking, foaming, bad taste, and rancid odor.
Discard any shortening before it degrades to the point
ofaffectingproductquality.Alwaysltertheoilona
regular basis and keep the frypot clean.
Remove ice crystals and ensure that food is dry before
frying. Excessive water and ice can cause oil to splatter
oroverow.Donotoverllthebasket.Foodneedstobe
surrounded by oil for best frying results.
Maximum shortening life is achieved by lowering the
temperature of the fryer to 250°F (121°C) or turning the
fryer station off when not in use. In multiple-station units,
heat only the component fryers necessary to meet cooking
needs.
CAUTION
METAL PARTS OF THIS EQUIPMENT
BECOME EXTREMELY HOT WHEN
IN OPERATION. TO AVOID BURNS,
ALWAYS USE HAND PROTECTION
WHEN OPERATING THIS APPLIANCE.
CAUTION
Cold oil or shortening expands as
the temperature increases. To avoid
injury and equipment damage, allow for
expansion by fi lling to the cold oil fi ll line.
WARNING
FAILURE TO PLACE SOLID SHORTENING
DIRECTLY ON THE BOTTOM OF THE
FRYPOT CAN CAUSE SERIOUS
EQUIPMENT DAMAGE.
CAUTION
ENSURE THERE IS NO WATER IN THE FRYPOT
BEFORE FILLING WITH OIL/SHORTENING. WHEN
COOKING COMPOUNDS ARE HEATED TO COOKING
TEMPERATURE, WATER IN THE FRYPOT WILL CAUSE
OIL TO SPLATTER AND MAY BE A BURN HAZARD.
CAUTION
FIRE OR EQUIPMENT DAMAGE CAN RESULT FROM
IMPROPER SHORTENING LEVELS. THE LEVEL OF
SHORTENING MUST ALWAYS BE ABOVE THE HEAT
EXCHANGERS WHEN THE FRYER IS OPERATING.
THE REQUIRED SHORTENING LEVEL MUST ALWAYS
BE ABOVE THE MINIMUM HOT OIL FILL LINE.
DANGER
The flash point of shortening
occurs at a lower temperature
the longer the shortening is
used. Discard any shortening
showing signs of deterioration
to avoid serious burns, fire,
and property damage.
FRONT
MAXIMUM HOT
OIL FILL LINE
MINIMUM
HOT OIL FILL LINE
TOP BEND INSIDE
OIL KETTLE
COLD OIL
FILL LINE
fryer cross-section
oil
/shortening levels
OIL/SHORTENING REQUIREMENTS

MN-35751 • Electric Fryer Battery Operation & Care Manual • 11
OPERATION
NOTE: Perform an initial Boil-Out to
clean and sanitize the kettle(s)
before operating.
1. Service is to be performed by an authorized
Alto-Shaam service agent.
2. Ensurealllocalelectricalcodes,recodes,andall
other requirements such as hood installation have
been met in the process of installation.
3. Open front access door and ensure Kettle Drain valve
is in the CLOSED position.
4. Fill frypot with frying compound as indicated.
(see
illustration on the oil/shortening requirements page)
5. The Master Power Switch is located behind the front
access door. Turn Master Power Switch “ON.”
6. Press the ON/OFF power button on the control.
7. “READY” will be displayed when fryer reaches set
temperature.
More detailed operating guidelines along with
information on programming are located within
this manual.
8. To shutdown the fryer, turn the Master Power Switch
located behind the front access door to the “OFF”
position.
NOTE: for your protection The fryer is furnished
with a hi-limit safety shutoff that will disengage
the control if the frying compound temperature
inthefrypotwouldeverexceed406°F(208°C).
The LED will display “HI”, the heat will shut
off, the timer will be cancelled, and a constant
alarm will sound. In this event, allow the frying
compoundtemperaturetodropbelow375°F
(191°C).Openthefrontaccessdoorandpress
the OIL HI-LIMIT RESET button for a period
of 3 seconds to restart the control.
START UP & GENERAL OPERATION
MASTER
POWER
SWITCH
OIL
HI
-LIMIT
RESET
ASF-60E BATTERY
FRONT
ACCESS
DOOR
KETTLE
DRAIN
SELECTOR
KETTLE
FILL
SELECTOR
RINSE
NOZZLE
HOSE
CONNECTION
OIL
FILTRATION
PUMP
SWITCH
OIL
FILTRATION
SELECTOR
OIL
FILTRATION
CONNECTION
TO
MOBILE
OIL
DRAWER

MN-35751 • Electric Fryer Battery Operation & Care Manual • 12
OPERATION
PANEL IDENTIFICATION
1
6
7
2 4
8
9
1. LED DispLay
2. HoLD inDicator
3. HEat inDicator
4. MELt cycLE inDicator
5. prograM inDicator
6. proDUct KEy inDicator LigHts:
Illuminate during active cook cycle or
programming mode.
7. prEprograMMED proDUct KEys: Press
to start a cook cycle. Also used in programming.
rEpLacEaBLE MEnU strip: Make menu
changes quickly and easily.
8. prograMMing cEntEr: Easy cell phone-
like programming. Access programming mode,
preprogrammed menu items, and change cooking
parameters.
9. FEatUrE KEys: Used to access programming
functions and controller features.
LEFT BASKET (1-5)
PRODUCT KEY PRESET TIMES:
1 - 2:45 minutes
2 - 3:00 minutes
3 - 3:15 minutes
4 - 3:30 minutes
5 - 3:45 minutes
RIGHT BASKET (6-10)
PRODUCT KEY PRESET TIMES:
6 - 2:45 minutes
7 - 3:00 minutes
8 - 3:15 minutes
9 - 3:30 minutes
10 - 3:45 minutes
FEATURE KEYS
Shows time left
between recipe / baskets
Used while entering
your own menu / time
Displays remaining
hold time
Reverts to reduced
oil temperature while fryer is idle
(not enabled)
3
5

MN-35751 • Electric Fryer Battery Operation & Care Manual • 13
OPERATION
Start a Cook Cycle
Press any product key to start a cook cycle. If the key is
programmed, the cooking time will be displayed and
will immediately start to count down in minutes
and seconds. DONE will display when the cook cycle
has ended.
The pressure solenoid will also close if programmed to
do so, or a basket lift will lower if so equipped.
If DONE is displayed immediately and the unit starts
to beep, the product key being pressed is not
programmed.
Stop a Cook Cycle
Press and hold an active product key for 3 seconds.
Timing will stop, and basket will lift is so equipped.
Respond to a DONE Alarm
Cancel the signal by pressing the same product key
used to start the cook cycle.
Action Alarms
If the controller is programmed for action alarms, they
will signal at a preset time during the cooking cycle. The
signal, a dual-rhythm beeping, will last 5 seconds and
then self-cancel. The display will flash the action alarm
time and the controller will start counting toward 0:00 .
Holding Timers
If the product menu is programmed with holding
times, they will automatically start counting upon
expiration of the cooking cycle.
When there are active hold times, the HOLD indicator
light will be lit.
To View All Active Hold Times , press and hold the
HOLD key. Upon expiration, the timer will display HOLD
and pulse with a beep.
To Cancel, press the HOLD key.
OPERATING THE CONTROL
PRODUCT
KEY
Press any product key to start a cook cycle. If the key
is programmed, the cooking time will be displayed
and will immediately start to count down in minutes
and seconds. DONE will display when the cook cycle
has ended.
The pressure solenoid will also close if programmed
to do so, or a basket lift will lower if so equipped.
If DONE is displayed immediately and the unit
starts to beep, the product key being pressed is
not programmed.
Press and hold an active product key for 3 seconds.
Timing will stop, and basket will lift if so equipped.
Cancel the signal by pressing the same product key
used to start the cook cycle.
If the controller is programmed for action alarms, they
will signal at a preset time during the cooking cycle.
The signal, a dual-rhythm beeping, will last 5 seconds
andthenself-cancel.Thedisplaywillashthe
action alarm time and the controller will start counting
toward 0:00.
If the product menu is programmed with holding
times, they will automatically start counting upon
expiration of the cook cycle.
Whenthereareactiveholdtimes,theHOLD
indicator light will be lit.
To view all active hold times, press and hold the
key. Upon expiration, the timer will display HOLD
and pulse with a beep.
To Cancel, press the key.

MN-35751 • Electric Fryer Battery Operation & Care Manual • 14
OPERATION
To Check Product Counts : press and hold the P key for
3 seconds. COUNTS
will be displayed.
Press the P key.
PROD 1 will be displayed then the number
of cooks that were completed on that key. To see the
number for each key, continue to press the P key and
each product will display
PROD X then the number of
cooks.
Resetting the Product Counts : Once you go through
all keys, the display will show
CLRPROD
then
NO
. Use the
left and right arrow keys to toggle between
YES and NO.
Choose YES to reset your product count or NO to save the
cook counts that have already been completed. Then
press the P key.
The display will show GLOBAL. This is the total product
count of all keys combined. Press the P key again.
CLRGLOBLthen NO will be displayed. Use the left and right
arrow keys to toggle between YES and NO. Choose YES to
reset your total product count or
NO to save the total
cook counts that have already been completed. Then
press the P key.
TOTALX10 is displayed, then a number.
Press the P key again.
To Exit Product Counts : COUNTS
will be displayed. Press
the up arrow key.
EXIT will be displayed. Press the P key.
The controller will exit programming mode.
Display
Descriptions
Controller is in Operating Mode. Actual vat temperature
is within the proper cooking temperature range. The vat
is ready to start a cook cycle.
Controller is in Operating Mode. The actual vat temper-
ature is more than 40 degrees above the highest
programmed vat temperature. A continuous audible
alarm will sound.
Controller is in Operating Mode and a cook cycle is in
progress.
Controller is in Operating Mode and a cook cycle has
been completed.
Action alarm status is displayed.
Controller is in Appliance Type Programming Mode.
Controller is waiting for a pass code to be entered.
Press and hold the key for 3 seconds. COUNTS
will be displayed.
Press the
key. PRODT will be displayed then the
number of cooks that were completed on that key. To
see the number for each key, continue to press the
key and each product will display PROD X then
the number of cooks.
Once you go through all keys, the display will show
CLRPROD then NO. Use the left and right arrow keys
to toggle between YES and NO. Choose YES to reset
your product count or NO to save the cook counts that
have already been completed. Then press the
key.
The display will show GLOBAL. This is the total
product count of all keys combined. Press the
key
again. CLRGLOBL then NO will be displayed.
Use the left and right arrow keys to toggle between
YES and NO. Choose YES to reset your total product
count or NO to save the total cook counts that have
already been completed Then press the
key.
TOTALXTD is displayed, then a number. Press the
key again.
COUNTS will be displayed. Press the up arrow
key. EXIT will be displayed. Press the
key. The
controller will exit programming mode.
Controller is in Operating Mode and a cook cycle is in
progress.
Controller is in Operating Mode. Actual vat
temperature is within the proper cooking temperature
range. The vat is ready to start a cook cycle.
Action alarm status is displayed.
Controller is in Appliance Type Programming Mode.
Controller is waiting for a pass code to be entered.
Controller is in Operating Mode and a cook cycle has
been completed.
Controller is in Operating Mode. The actual vat
temperatureismorethan40degreesabovethehighest
programmed vat temperature. A continuous audible
signal will sound.

MN-35751 • Electric Fryer Battery Operation & Care Manual • 15
OPERATION
Product Key
Programming
10 button controllers have a single, dual-purpose display that will alternate
information; for example:
then
ENTER PROGRAMMING
MODE.
Press and hold the P key for 3
seconds.
Press the down arrow key.
PROGRAM will be displayed.
Press the P key.
Operating Instructions
Controller is in Product Key Programming Standby
mode.
Stage cooking time.
Stage cooking temperature.
Stage timing mode (flex or straight).
Controller is in System Programming Standby Mode.
Controller is in Fahrenheit or Celsius Programming
Mode.
Controller is in Operating Mode. Actual vat temperature
is more than 10 degrees below the programmed vat
temperature.
Controller’s probe is either open or shorted. Display will
be accompanied with an audible alarm if shorted.
Check or replace the probe.
RECIPE
PROGRAMMING
CODE
(left A, right A,
left B, left D)
MANAGER
Controller is in Operating Mode. The actual vat
temperature is more than 10 degrees below the
programmed vat temperature.
Controller’s probe is either open or shorted. Display
will be accompanied with an audible alarm if shorted.
Check or replace the probe.
Controller is in Product Key Programming Standby
mode.
Controller is in System Programming Standby Mode.
Stage cooking temperature.
Controller is in Fahrenheit or Celsius Programming
Mode.
Stage cooking time.
Stagetimingmode(exorstraight).
10-button controllers have a single, dual-purpose display that will
alternate information; for example:
TIME then 2:00
ENTER PROGRAMMING
MODE.
Press and hold the
key for
3 seconds.
Press the down arrow key.
PROGRAM will be displayed.
Press the
key.
PRODUCT KEY PROGRAMMING

MN-35751 • Electric Fryer Battery Operation & Care Manual • 16
OPERATION
Type in 1 7 2 4 using the
product keys. Press the
P key.
Press the P key. All product key
LEDs will light up.
PROGRAM A PRODUCT
KEY.
Press the product key you
want to program. Press the P
key.
Depending on model,
you can either press
the P key to change
all programmable set-
tings or you can scroll
using the arrow keys
to any of the specific
options.
Press the P key.
SET COOK TIME. Actual
set time will be displayed. To
change, press toggle clear to
change the time to zero. Type
in a new time using the prod-
uct keys. Press the P key.
SET TIMING MODE. Use
the left and/or right arrow keys
to choose Straight, Flex or
Sensitivity. Press the P key.
SET PRODUCT DISPLAY
NAME.
NAME will be dis-
played then the actual product
name. Use the up and down
arrow keys to scroll through
the library. Press the P key to
lock in your choice.
SET ACTION ALARM
.
Actual alarm time 1 will be dis-
played. To change, press toggle
clear to change the time to
zero. Type in a new time using
the product keys. Press the P
key.
SET ACTION ALARM
NAME.
ALMNAME1 will be
displayed, then the actual
action alarm name. Use the up
and down arrow keys to scroll
through the library. Press the P
key to either go to next action
alarm name, or continue
through programming.
SET HOLD TIME. Actual
hold time will be displayed. To
change, press toggle clear to
change the time to zero. Type
in a new time using the prod-
uct keys. Press the P key.
EXIT PROGRAMMING
MODE.
Press the up arrow
key.
Press the P key.
Press the product key you want
to program. Press the
key.
Press the key. All product
key LEDs will light up.
Typein1724usingthe
product keys. Press the
key.
PRODUCT KEY PROGRAMMING (CONTINUED)
Note: The Recipe Library
contains more than 100
different choices.
Press .
NAME will be
displayed then the actual
product name. Use the up and
down arrow keys to scroll
through the library. Press
to lock in your choice.
Actual set
time will be displayed. To
change, press toggle clear to
change the time to zero. Type
in a new time using the
product keys. Press
.
ALMNAME1 will be
displayed, then the actual
action alarm name. Use the up
and down arrow keys to scroll
through the library. Press
to either go to next action
alarm name, or continue
through programming.
Actual alarm time 1 will be
displayed. To change, press
toggle clear to change the time
to zero. Type in a new time
using the product keys.
Press
.
Use
the left and/or right arrow
keys to choose Straight, Flex
or Sensitivity. Press
.
Press .
Actual
hold time will be displayed.
To change, press toggle clear
to change the time to zero.
Type in a new time using the
product keys. Press
.
Press the up
arrow key.
Depending on model,
you can either press
the
key to change
all programmable
settings or you can
scroll using the arrow
keys to any of the
specicoptions.

MN-35751 • Electric Fryer Battery Operation & Care Manual • 17
OPERATION
Press the P key. Press the up
arrow key.
Press the P key.
Either press another product
key to program and repeat the
programming instructions, or
continue by pressing the down
arrow key.
OR
SET GLOBAL TEMPERA-
TURE. Press the P key.
SET TEMP, then Actual Temp
will be displayed. To change,
use the number keys and then
press the P key.
NOTE: If you have a two-probe unit, the display will show
SETTEMPL (Left) and then SETTEMPR (Right). You will
have the option to change the temperature on both
sides.
To Exit, press the down arrow
key.
PRODUCT KEY PROGRAMMING (CONTINUED)
Press .
Press the up
arrow key.
To Exit, press the down
arrow key.
Either press another product
key to program and repeat the
programming instructions,
or continue by pressing the
down arrow key.
Press
.
SET TEMP, then Actual Temp will
be displayed. To change, use the
number keys and then press
.
Press .

MN-35751 • Electric Fryer Battery Operation & Care Manual • 18
OPERATION
ENTER SYSTEM PRO-
GRAMMING MODE.
Press and hold the P key for 3
seconds.
Type in 3 2 2 8 using the
product keys. Press the
P key.
Press the down arrow key.
Press the P key.
SET APPLIANCE MODE.
Use the left and/or right arrow
keys to choose Gas, Electric or
Generic. Press the P key.
SET CONTROL TYPE. Use
the left and/or right arrow keys
to choose Temperature or Time
Control. Press the P key.
SET TEMPERATURE
SCALE.
Use the left and/or
right arrow keys to choose
Fahrenheit (F) or Celsius (C).
Press the P key.
SET PREHEAT MODE.
Use
the left and/or right arrow keys
to choose Yes or No. Press the P
key.
PROGRAM will be displayed.
Press the P key.
SET COOK TIME UNIT.
Use the left and/or right arrow
keys to choose
Minutes/Seconds or
Hours/Minutes. Press the P key.
EXIT SYSTEM PRO-
GRAMMING MODE.
Press the up arrow key.
Press the P key.
You have now EXITED System
Programming Mode and can
operate the controller.
SYSTEM CODE
(3228)
MANAGER
SYSTEM PROGRAMMING
Note: Preheat is also known as
a melt cycle. Yes is used for solid
shortening, No is used for oil.
Press the down arrow key.
Press and hold
for
3 seconds.
Press .
Press .
Type in 3 2 2 8 using the
product keys. Press
.
PROGRAM will be displayed.
Press
.
Use the left and/or right arrow
keys to choose Gas, Electric or
Generic. Press
.
Use the left and/or right arrow
keys to choose Yes or No.
Press
.
Use the left and/or right arrow
keys to choose Fahrenheit (F)
or Celsius (C). Press
.
Use
the left and/or right arrow
keys to choose Temperature or
Time Control. Press
.
Use the left and/or right arrow
keys to choose Minutes/
Seconds or Hours/Minutes.
Press
.
Press the up arrow key.
You have now EXITED System
Programming Mode and can
operate the controller.
/