Page is loading ...

6
PLANNING
Basic Information
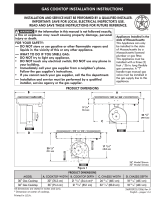
A qualied technician must complete the installation of this
appliance. This downdraft blower system is designed to be
used to exhaust airborne contaminants when cooking with
a variety of gas, electric or induction cooktops.
It can be mounted in island, peninsula, or conventional
wall locations.
This unit is installed following these basic steps:
• Cut out the countertop opening.
• Mount the unit in the cabinet.
• Connect the ductwork and electrical.
• Install the cooktop.
Take Measurements
Refer to the cooktop installation instructions for dimensions
of the cooktop, countertop cut-out and cabinet requirements.
It is recommended that oversized cabinets be used for easier
installation.
Cooktop depth can vary greatly from one unit to another.
This may cause the t of the cooktop and the telescopic
downdraft appliances to be tight in the countertop depending
upon the overall depth of the countertop.
Countertop
Cooktop
Chassis
Housing
Front to back
Inside cabinet depth
2
5
/
16
”
(5.8 cm)
2
1
/
16
”
(5.2 cm)
1
/
8
”
(0.3 cm)
Countertop
A
B
Cooktop
Chassis
Housing
Front to back
Inside cabinet depth
2
5
/
16
”
(5.8 cm)
2
1
/
16
”
(5.2 cm)
1
/
8
”
(0.3 cm)
1
/
4
” Min.
(0.6 cm)
1
/
4
” Min.
(0.6 cm)
clearance
behind
downdraft
CAUTION
The high level of air ow of this appliance may affect the
gas ame on some gas cooktop models. Extreme caution
must be used to assure proper ame is generated and
maintained through the operating range of the vent.
Refer to cooktop Installation Instructions and Use and
Care guide for proper gas burner setup. Gas Cooktop
installation and service must be performed by a qualied
installer, service agency or gas supplier.
NOTE
Preformed countertops with a raised lip and/or backsplash
as illustrated in (A) or (B) may not allow enough at
countertop for proper installation. Note that a minimum
of 2
5
/
16
” of flat countertop is required behind cooktop
and that 2
1
/
16
” is necessary between the back edge of
the cooktop and the inside of cabinet back.
Typical Installation
5-7/8” Minimum
(14.9 cm)
10-13/16”
(27.5 cm)
4-1/2”
(11.4 cm)
Chassis Housing
Downdraft
Top Trim
Cooktop
Countertop
Blower & Motor
Maximum gap to
cabinet back allowed
before installation of a
wood support is
required for mounting
stabilizing brackets

7
Plan the Ductwork
This downdraft blower system is designed for use with 3¼
x 10” ductwork (can be transitioned to 6” round).
For best performance, choose the ducting option which
allows the shortest length of ductwork and a minimum
number of elbows and transitions.
The system will operate most efciently when the ductwork
does not exceed 60 feet of equivalent duct. The downdraft
will operate properly with ductwork up to 100 equivalent feet
of duct. See page 12 for Calculated Duct Length Table.
PLANNING
The blower can be mounted to the vent chassis housing to
provide exhaust discharge down, as supplied (Fig. 1), or
90° to the left (Fig. 2) or 90° to the right (Fig. 3). Position
the blower before installing the vent chassis housing in the
countertop.
Plan the Discharge
Fig. 1 - Discharge down (as supplied)
Fig. 2 - Discharge left
Fig. 3 - Discharge right
Slide Plate
Adjustment
Use the 2
outermost
screw holes
for the blower
slide plate.
Hex Head Screw
Inner
Hole
NOTE
For left or right discharge, the blower housing needs to
be rotated for proper venting. See page 9 for instructions
on rotating the blower.
The blower is mounted on a slide plate which may be
adjusted 3½” (8.9cm) left or right to help avoid duct
interference with joists or other obstructions. To adjust the
slide plate, loosen the 2 hex head (¼” driver) screws and
move the slide plate to the desired position and tighten
the screws.
CAUTION
To reduce risk of re and to properly exhaust air, be sure
to duct air outside – Do not vent exhaust air into spaces
within walls or ceilings or into attics, crawl spaces, or
garages.

8
Plan the Electrical Connection
The downdraft blower system draws 2.8 AMPS and requires
a 120 VAC, 60 Hz circuit.
The unit has a 28 inches long power cord with a 3 pronged
plug. Plan to provide a grounded outlet in a location which
will allow the unit’s power cord to reach.
PLANNING
NOTE
If the 30” model is being installed in a 30” wide cabinet
or the 36” model in a 36” wide cabinet, the outlet cannot
be located on the back wall of cabinet.
Outlet may also be wall-mounted with access hole in
cabinet.
Recommended Electrical
Outlet Locations
(All Shaded Areas)
All vertical dimensions relative to top surface of the countertop.
All horizontal dimensions relative to cutout in the countertop.
Ensure that access to the electrical outlet will not be blocked by
the ducting after installation.
Electrical Outlet Location
Model M - From Center
FH30DD50MS 13 ½” (34.3 cm)
FH36DD50MS 16 ½” (42.0 cm)
7-7/8”
(20 cm)
8-3/4”
(22.2 cm)
M M
6-1/2”
(16.5 cm)
19-1/16”
(48.4 cm)
23-3/4”
(60.3 cm)
4-5/8"
(11.8 cm)
9-1/2"
(24.1cm)
14-3/4"
(37.5 cm)
22-1/8"
(56.2 cm)

9
1. Cut Countertop Opening
- Lay out and cut the cooktop cut-out far enough forward
so downdraft will t behind it (refer to cooktop installation
instructions).
- Set cooktop in place and slide it as far forward as possible.
Center and square it with edges of countertop.
3. Prepare the Downdraft Blower
System Duct Connection
The downdraft is shipped with blower oriented for exhaust
discharge down. Follow directions below to change to left
or right exhaust discharge.
Remove the blower and slide plate from the chassis housing
by removing the two Phillips screws from the bottom slots
and detaching the slide plate from the top tabs.
Remove the four 1/4” nylon insert nuts from the blower
studs and detach the slide plate. Rotate the blower 90
degrees left or right as required for ducting and reattach
to the slide plate. Re-install the four 1/4” nylon insert nuts
on the blower studs.
Replace the blower and slide plate assembly by placing the
slide plate underneath the top tabs and re-installing the two
Hex Head screws in the bottom slots.
- Place the template against the back ange of the cooktop
and center it. Trace around template to mark the downdraft
opening.
- Remove cooktop from countertop.
- Cut downdraft opening. Be careful not to chop edges of
countertop. Mask the countertop to help prevent scratching
the surface.
- A ½” minimum clearance behind cutout must be maintained
behind the telescopic downdraft for proper installation.
INSTALLATION
NOTE
Cabinet constructions may vary. Be sure to take cabinet
frame members into account. They may have to be
removed or relocated. Do not compromise the structural
integrity of the cabinet in doing so.
A ½” minimum
clearance behind
cutout must be
maintained for
proper installation.
Template
2. Install Electrical Outlet
- Mount a standard wiring box, with
3-pronged grounded receptacle,
inside the cabinet. Make sure the
downdraft’s power cord can easily
reach it.
- Run appropriate power cable
into cabinet and connect it to
receptacle.
Rotate Left or Right
1/4” Nylon Insert Nuts
Slide Plate
Blower
Hex Head Screw
(1 Each Side)
Top Tab
Chassis Housing

10
4. Install Duct Transition to Blower
Install the duct transition on the blower, using the three
wide head Phillips screws. It is recommended for all duct
joints, the seam between the blower and the duct transition
should be sealed with duct tape over the screws.
Remove screws from
the chassis housing
and re-use to install the
brackets.
Alternate bracket location:
Remove the screw from the
left side of the control box
and re-use to install the left
bracket. Required for left
side blower discharge.
5. Mount the Unit
Set downdraft into opening and position with the back of
the unit contacting the back edge of the cutout.
Stabilizing brackets should be installed at the bottom of
the vent chassis housing and just below the bottom of the
cooktop chassis.
Lower stabilizing brackets Down and Right
Blower Discharge:
One stabilizing bracket should be installed on each side of
the vent chassis housing.
Remove the hex head screws from the bottom of the vent
chassis housing and use them to attach each bracket to the
bottom of the housing. Slide the brackets to the back wall
of the cabinet so that the vent chassis housing is vertical,
check the level of the vent on both the right and left sides,
and tighten the screws.
Lower stabilizing brackets Left Blower
Discharge:
One stabilizing bracket should be installed on the right side
of the vent chassis housing and one on the left side of the
control box.
Remove the hex head screws from the bottom of the vent
chassis housing and use them to attach each bracket to the
bottom of the housing. Slide the brackets to the back wall
INSTALLATION
Duct Transition
Blower
(3) Wide Head
Phillips Screws
DO NOT
Screw Top
Stabilizing
Brackets to
Chassis
Housing
of the cabinet so that the vent chassis housing is vertical,
check the level of the vent on both the right and left sides,
and tighten the screws.
Attach the stabilizing brackets to the back wall using the
appropriate screws for your cabinet material and thickness.
These screws are not supplied with downdraft system.
The end of the stabilizing bracket may have to be bent down
for transition duct clearance.
Upper stabilizing brackets:
Caution: Do not attach the upper bracket to the vent
with screws, doing so may jam the vent.
Attach a stabilizing bracket to the left and right cabinet
walls just below the bottom of the cooktop chassis. The
long leg of the bracket must be in contact with the vent
chassis housing.

DUCT TAPE OVER SEAM AND SCREW
Screw
Air Flow
Duct Tape Over
Seam and Screw
DUCT ON-THE-FLOOR
DUCT THROUGH-THE-FLOOR
11
6. Install Ductwork
- Use galvanized or aluminum duct in 6” round or 3 ¼” x
10” size, or a combination of both. PVC duct should be used
if installing under a poured concrete slab. Use the shortest
and straightest duct run possible.
The system will operate most efciently when the ductwork
does not exceed 60 feet of equivalent duct. The downdraft
will operate properly with ductwork up to 100 equivalent feet
of duct. See page 12 for Calculated Duct Length Table.
INSTALLATION
7. Connect Downdraft to Power
- Plug the downdraft’s power cord into the outlet.
- Make sure the power cord is routed beneath the appliance
and away from heat generated by the cooktop.
8. Install Cooktop
- Align the cooktop with the downdraft and fasten cooktop
in place.
NOTE
Local building codes must be followed in specifying
approved type and specication of ALL duct used. Always
use an appropriate roof or wall cap with damper.
IMPORTANT
All ductworks must be installed as per local codes.
NOTE
Accurate alignment of cooktop and downdraft is necessary
to ensure that there is no interference when air vent
is raised and lowered. There should be a gap of 1/8”
between the back of the cooktop and the front of the
downdraft cover.

DUCT PIECES
EQUIVALENT
LENGTH X
NUMBER
USED =
EQUIVALENT
LENGTH
6" (15.2cm) Round
Straight **
1 Ft. (0.3m) Ft. or m
6" (15.2cm) Round Metal Flex
No Bends **
1.5 Ft. (0.45m) Ft. or m
6" (15.2cm)
90° Elbow
10 Ft. (3m) Ft. or m
6" (15.2cm)
45° Elbow
5 Ft. (1.5m) Ft. or m
3¼" x 10" (8.2cm x 25.4cm)
Straight **
1 Ft. (0.3m) Ft. or m
3¼" x 10" (8.2cm x 25.4cm)
90° Elbow
10 Ft. (3m) Ft. or m
3¼" x 10" (8.2cm x 25.4cm)
45° Elbow
5 Ft. (1.5m) Ft. or m
3¼" x 10" (8.2cm x 25.4cm)
90° Flat Elbow
10 Ft. (3m) Ft. or m
3¼" x 10" (8.2cm x 25.4cm) to 6"
(15.2cm) Round Transition 90° Elbow
30 Ft. (9m) Ft. or m
6" (15.2cm) Round to 3¼" x 10"
(8.2cm x 25.4cm) Transition
90° Elbow
30 Ft. (9m) Ft. or m
3¼" x 10" (8.2cm x 25.4cm) to 6"
(15.2cm) Round Transition
5 Ft. (1.5m) Ft. or m
6" (15.2cm) Round to 3¼" x 10"
(8.2cm x 25.4cm) Transition
5 Ft. (1.5m) Ft. or m
6" (15.2cm) Round Wall Cap with
Damper
30 Ft. (9m) Ft. or m
3¼" x 10" (8.2cm x 25.4cm) Wall
Cap with Damper
30 Ft. (9m) Ft. or m
6" (15.2cm) Round Roof Cap 30 Ft. (9m) Ft. or m
TOTAL DUCTWORK Ft. or m
** For Straight Round / Rectangular Duct, measure actual linear feet
used and then multiply by Equivalent Length shown.
Calculating Duct Length Table
For maximum efciency, use the shortest and straightest duct possible. The system will operate most efciently when
the ductwork does not exceed 60 feet of equivalent duct. The downdraft will operate properly with ductwork up to 100
equivalent feet of duct.
Calculations are approximate and based on HVAC industry standards.
12
INSTALLATION
/