Panasonic DMCFX70EB Quick start guide

Category
Camcorders
Type
Quick start guide

Panasonic DMCFX70EB: Capture stunning photos and videos with its 12.1-megapixel sensor, 5x optical zoom lens, and HD video recording capabilities. Unleash your creativity with automatic modes like Intelligent Auto and Creative Control, while manual controls provide flexibility for advanced photographers. Easily share your memories via Wi-Fi or HDMI connectivity.

Panasonic DMCFX70EB: Capture stunning photos and videos with its 12.1-megapixel sensor, 5x optical zoom lens, and HD video recording capabilities. Unleash your creativity with automatic modes like Intelligent Auto and Creative Control, while manual controls provide flexibility for advanced photographers. Easily share your memories via Wi-Fi or HDMI connectivity.

Basic Operating Instructions
Digital Camera
Model No. DMC-FX70
Before use, please read these instructions completely.
Please also refer to the Operating
Instructions (PDF format)
contained on the CD-ROM
(supplied).
You can learn about advanced operation methods
and check the Troubleshooting.
until
2010/6/30
EB
Web Site: http://www.panasonic-europe.com
VQT2V57
Model number suffix “EB” denotes UK model.
DMC-FX70&FX75-VQT2V47_eng.book 1 ページ 2010年6月7日 月曜日 午後8時1
VQT2V57 (ENG)
2
Dear Customer,
We would like to take this opportunity to thank you for purchasing this Panasonic
Digital Camera. Please read these Operating Instructions carefully and keep them
handy for future reference. Please note that the actual controls and components,
menu items, etc. of your Digital Camera may look somewhat different from those
shown in the illustrations in these Operating Instructions.
Carefully observe copyright laws.
Recording of pre-recorded tapes or discs or other published or broadcast
material for purposes other than your own private use may infringe copyright
laws. Even for the purpose of private use, recording of certain material may be
restricted.
Information for Your Safety
Product identification marking
WARNING:
TO REDUCE THE RISK OF FIRE, ELECTRIC SHOCK OR PRODUCT
DAMAGE,
DO NOT EXPOSE THIS APPARATUS TO RAIN, MOISTURE, DRIPPING
OR SPLASHING AND THAT NO OBJECTS FILLED WITH LIQUIDS, SUCH
AS VASES, SHALL BE PLACED ON THE APPARATUS.
USE ONLY THE RECOMMENDED ACCESSORIES.
DO NOT REMOVE THE COVER (OR BACK); THERE ARE NO USER
SERVICEABLE PARTS INSIDE. REFER SERVICING TO QUALIFIED
SERVICE PERSONNEL.
THE SOCKET OUTLET SHALL BE INSTALLED NEAR THE EQUIPMENT
AND SHALL BE EASILY ACCESSIBLE.
Product Location
Digital camera Bottom
Battery charger Bottom
DMC-FX70&FX75-VQT2V47_eng.book 2 ページ 2010年6月17日 木曜日 午後4時6分
3
(ENG) VQT2V57
Caution for AC mains lead
For your safety, please read the following
text carefully.
This appliance is supplied with a moulded
three pin mains plug for your safety and
convenience.
A 5-ampere fuse is fitted in this plug.
Should the fuse need to be replaced
please ensure that the replacement fuse
has a rating of 5-ampere and that it is
approved by ASTA or BSI to BS1362.
Check for the ASTA mark or the BSI
mark on the body of the fuse.
If the plug contains a removable fuse
cover you must ensure that it is refitted
when the fuse is replaced.
If you lose the fuse cover the plug must
not be used until a replacement cover is
obtained.
A replacement fuse cover can be
purchased from your local dealer.
CAUTION!
IF THE FITTED MOULDED PLUG IS
UNSUITABLE FOR THE SOCKET
OUTLET IN YOUR HOME THEN THE
FUSE SHOULD BE REMOVED AND
THE PLUG CUT OFF AND DISPOSED
OF SAFELY.
THERE IS A DANGER OF SEVERE
ELECTRICAL SHOCK IF THE CUT OFF
PLUG IS INSERTED INTO ANY 13-
AMPERE SOCKET.
If a new plug is to be fitted please
observe the wiring code as stated below.
If in any doubt please consult a qualified
electrician.
IMPORTANT
The wires in this mains lead are coloured
in accordance with the following code:
Blue: Neutral, Brown: Live.
As these colours may not correspond with
the coloured markings identifying the
terminals in your plug, proceed as follows:
The wire which is coloured Blue must be
connected to the terminal which is marked
with the letter N or coloured Black or Blue.
The wire which is coloured Brown must be
connected to the terminal which is marked
with the letter L or coloured Brown or Red.
WARNING: DO NOT CONNECT EITHER
WIRE TO THE EARTH TERMINAL
WHICH IS MARKED WITH THE LETTER
E, BY THE EARTH SYMBOL OR
COLOURED GREEN OR
GREEN/YELLOW.
THIS PLUG IS NOT WATERPROOF-
KEEP DRY.
Before use
Remove the connector cover.
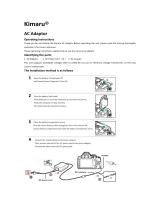
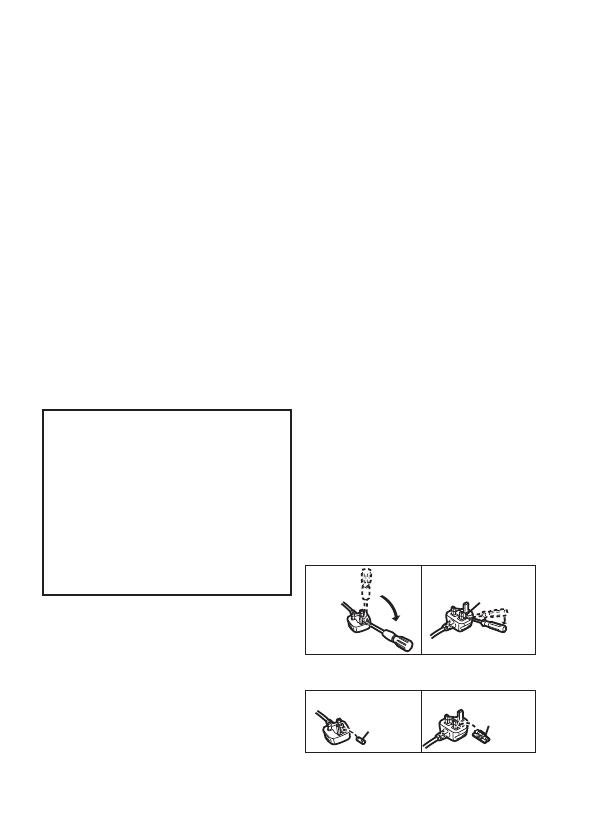
How to replace the fuse
The location of the fuse differ according to
the type of AC mains plug (figures A and
B). Confirm the AC mains plug fitted and
follow the instructions below.
Illustrations may differ from actual AC
mains plug.
1. Open the fuse cover with a screwdriver.
2. Replace the fuse and close or attach
the fuse cover.
Fuse cover
Figure A Figure B
Figure A Figure B
Fuse
(5 ampere)
Fuse
(5 ampere)
DMC-FX70&FX75-VQT2V47_eng.book 3 ページ 2010年6月7日 月曜日 午後8時1
VQT2V57 (ENG)
4
About the battery pack
Do not heat or expose to flame.
Do not leave the battery(ies) in an automobile exposed to direct sunlight for a
long period of time with doors and windows closed.
CAUTION
Danger of explosion if battery is incorrectly replaced. Replace only with the
same or equivalent type recommended by the manufacturer. Dispose of used
batteries according to the manufacturers instructions.
Warning
Risk of fire, explosion and burns. Do not disassemble, heat above 60 xC or
incinerate.
DMC-FX70&FX75-VQT2V47_eng.book 4 ページ 2010年6月7日 月曜日 午後8時1
5
(ENG) VQT2V57
About the battery charger
The battery charger is in the standby condition when the AC power supply cord
is connected. The primary circuit is always “live” as long as the power cord is
connected to an electrical outlet.
Cautions for Use
Do not use any other AV cables except the supplied one.
Always use a genuine Panasonic HDMI mini cable (RP-CDHM15, RP-CDHM30;
optional).
Part numbers: RP-CDHM15 (1.5 m) (5 feet), RP-CDHM30 (3.0 m) (10 feet)
Do not use any other USB connection cables except the supplied one.
Keep this unit as far away as possible from electromagnetic equipment
(such as microwave ovens, TVs, video games etc.).
If you use this unit on top of or near a TV, the pictures and/or sound on this unit
may be disrupted by electromagnetic wave radiation.
Do not use this unit near cell phones because doing so may result in noise
adversely affecting the pictures and/or sound.
Recorded data may be damaged, or pictures may be distorted, by strong
magnetic fields created by speakers or large motors.
Electromagnetic wave radiation generated by microprocessors may adversely
affect this unit, disturbing the pictures and/or sound.
If this unit is adversely affected by electromagnetic equipment and stops
functioning properly, turn this unit off and remove the battery or disconnect AC
adaptor (DMW-AC5E; optional). Then reinsert the battery or reconnect AC
adaptor and turn this unit on.
Do not use this unit near radio transmitters or high-voltage lines.
If you record near radio transmitters or high-voltage lines, the recorded pictures
and/or sound may be adversely affected.
CAUTION!
DO NOT INSTALL OR PLACE THIS UNIT IN A BOOKCASE, BUILT-IN
CABINET OR IN ANOTHER CONFINED SPACE. ENSURE THE UNIT IS
WELL VENTILATED. TO PREVENT RISK OF ELECTRIC SHOCK OR FIRE
HAZARD DUE TO OVERHEATING, ENSURE THAT CURTAINS AND ANY
OTHER MATERIALS DO NOT OBSTRUCT THE VENTILATION VENTS.
DO NOT OBSTRUCT THE UNIT’S VENTILATION OPENINGS WITH
NEWSPAPERS, TABLECLOTHS, CURTAINS, AND SIMILAR ITEMS.
DO NOT PLACE SOURCES OF NAKED FLAMES, SUCH AS LIGHTED
CANDLES, ON THE UNIT.
DISPOSE OF BATTERIES IN AN ENVIRONMENTALLY FRIENDLY
MANNER.
DMC-FX70&FX75-VQT2V47_eng.book 5 ページ 2010年6月7日 月曜日 午後8時1
VQT2V57 (ENG)
6
Information for Users on Collection and Disposal of Old Equipment
and used Batteries
These symbols on the products, packaging, and/or
accompanying documents mean that used electrical and
electronic products and batteries should not be mixed with
general household waste.
For proper treatment, recovery and recycling of old
products and used batteries, please take them to applicable
collection points, in accordance with your national
legislation and the Directives 2002/96/EC and 2006/66/EC.
By disposing of these products and batteries correctly, you
will help to save valuable resources and prevent any
potential negative effects on human health and the
environment which could otherwise arise from inappropriate
waste handling.
For more information about collection and recycling of old
products and batteries, please contact your local
municipality, your waste disposal service or the point of sale
where you purchased the items.
Penalties may be applicable for incorrect disposal of this
waste, in accordance with national legislation.
For business users in the European Union
If you wish to discard electrical and electronic equipment,
please contact your dealer or supplier for further
information.
[Information on Disposal in other Countries outside the
European Union]
These symbols are only valid in the European Union. If you
wish to discard these items, please contact your local
authorities or dealer and ask for the correct method of
disposal.
Note for the battery symbol (bottom two symbol
examples):
This symbol might be used in combination with a chemical
symbol. In this case it complies with the requirement set by
the Directive for the chemical involved.
Cd
VQT2V57~Safety_eng.fm 6 ページ 2010年6月17日 木曜日 午後4時20分
7
(ENG) VQT2V57
Contents
Information for Your Safety ........................................................................... 2
Standard Accessories ................................................................................... 8
Names of the Components ......................................................................... 10
How to Use the Touch Panel ...................................................................... 12
Charging the Battery ................................................................................... 14
About the Built-in Memory/the Card ............................................................ 16
Inserting and Removing the Card (optional)/the Battery ............................. 17
Setting Date/Time (Clock Set)..................................................................... 18
• Changing the Clock Setting .................................................................. 18
Setting the Menu ......................................................................................... 19
Selecting the [REC] Mode........................................................................... 20
Taking Pictures Using the Automatic Function
(
ñ: Intelligent Auto Mode)......................................................................... 21
• Scene Detection.................................................................................... 22
• AF Tracking Function ............................................................................ 22
Recording Motion Pictures .......................................................................... 23
Playing Back Pictures ([NORMAL PLAY]) .................................................. 24
Deleting Pictures ......................................................................................... 25
Reading the Operating Instructions (PDF format)....................................... 26
Specifications .............................................................................................. 28
DMC-FX70&FX75-VQT2V47_eng.book 7 ページ 2010年6月7日 月曜日 午後8時1
VQT2V57 (ENG)
8
Standard Accessories
Check that all the accessories are supplied before using the camera.
Product numbers correct as of June 2010. These may be subject to change.
1 Battery Pack
(Indicated as battery pack or
battery in the text)
Charge the battery before use.
2 Battery Charger
(Indicated as battery charger or
charger in the text)
3 AC Mains Lead
4 USB Connection Cable
5AV Cable
6 CD-ROM
Software:
Use it to install the software to your
PC.
Operating Instructions
7 Hand Strap
8 Battery Case
9Stylus Pen
SD Memory Card, SDHC Memory Card
and SDXC Memory Card are indicated
as card in the text.
The card is optional.
You can record or play back pictures
on the built-in memory when you are
not using a card.
Consult the dealer or your nearest
Service Centre if you lose the supplied
accessories. (You can purchase the
accessories separately.)
3
12
4
56
78
DMW-BCF10E
K2CT39A00002
VFC4297
DE-A60A
VGQ0D56
K1HA08AD0002
K1HA08CD0028 VFF0651
VGQ0C14
9
DMC-FX70&FX75-VQT2V47_eng.book 8 ページ 2010年6月17日 木曜日 午後4時6分
9
(ENG) VQT2V57
Sales and Support Information
Customer Care Centre
For customers within the UK: 0844 844 3852
For customers within the Republic of Ireland: 01 289 8333
Visit our website for product information
www.panasonic.co.uk.
E-mail: customer.care@panasonic.co.uk
Technical Support for AV Software
For customers within the UK: 0844 844 3869
For customers within the Republic of Ireland: 01 289 8333
Direct Sales at Panasonic UK
For customers: 0844 844 3856
Order accessory and consumable items for your product with ease and confidence
by phoning our Customer Care Centre Monday Thursday 9.00 a.m. 5.30 p.m.,
Friday 9.30 a.m. 5.30 p.m. (Excluding public holidays)
Or go on line through our Internet Accessory ordering application at
www.pas-europe.com.
Most major credit and debit cards accepted.
All enquiries transactions and distribution facilities are provided directly by
Panasonic UK Ltd.
It couldn’t be simpler!
Also available through our Internet is direct shopping for a wide range of finished
products, take a browse on our website for further details.
Optional Accessories
SDXC Memory Card
64 GB: RP-SDW64GE1K
48 GB: RP-SDW48GE1K
SDHC Memory Card
32 GB: RP-SDW32GE1K/RP-SDP32GE1K
24 GB: RP-SDP24GE1K
16 GB: RP-SDW16GE1K/RP-SDP16GE1K
8 GB: RP-SDW08GE1K/RP-SDP08GE1K/RP-SDR08GE1A
4 GB: RP-SDW04GE1K/RP-SDP04GE1K/RP-SDR04GE1A
SD Memory Card
2 GB: RP-SDP02GE1K/RP-SDR02GE1A
¢ The AC Adaptor (optional) can only be used with the designated Panasonic
DC coupler (optional).
Some optional accessories may not be available in some countries.
Battery Pack
DMW-BCF10E
AC Adaptor
¢
DMW-AC5EB
HDMI mini cable:
RP-CDHM15/RP-CDHM30
DC Coupler
¢
DMW-DCC4E
DMC-FX70&FX75-VQT2V47_eng.book 9 ページ 2010年6月17日 木曜日 午後4時6分
VQT2V57 (ENG)
10
Names of the Components
1Flash
2 Lens
3 Self-timer indicator
AF assist lamp
4 Hand strap eyelet
Be sure to attach the hand strap
when using the camera to ensure
that you will not drop it.
5 Touch panel/LCD monitor
6 [REC]/[PLAYBACK] selector switch
7 [MODE] button
8 [MENU] button
123
4
7 8
65
DMC-FX70&FX75-VQT2V47_eng.book 10 ページ 2010年6月7日 月曜日 午後8時1分
11
(ENG) VQT2V57
9 Camera ON/OFF switch
10 Zoom lever
11 Motion picture button
12 Speaker
13 Microphone
14 Shutter button
15 Lens barrel
16 [HDMI] socket
17 [AV OUT/DIGITAL] socket
18 Tripod receptacle
When you use a tripod, make sure the
tripod is stable when the camera is
attached to it.
19 Card/Battery door
20 Release lever
21 DC coupler cover
When using an AC adaptor, ensure that
the Panasonic DC coupler (DMW-DCC4;
optional) and AC adaptor (DMW-AC5E;
optional) are used.
Always use a genuine Panasonic AC
adaptor (DMW-AC5E; optional).
When using an AC adaptor, use the AC
cable supplied with the AC adaptor.
We recommend you use a battery with
sufficient battery power or the AC adaptor
when recording motion pictures.
If while recording motion pictures using the
AC adaptor and the power supply is cut off
due to a power outage or if the AC adaptor
is disconnected etc., the motion picture
being recorded will not be recorded.
11
14
12
13
10
9
1
6
1
7
1
5
18
19
2021
VQT2V57~Body1_eng.fm 11 ページ 2010年6月24日 木曜日 午前9時32分
VQT2V57 (ENG)
12
How to Use the Touch Panel
This touch panel is a type that detects pressure.
Operation or settings are performed by directly touching the icons displayed
on the LCD monitor (touch panel) or by moving while touching the touch
panel (dragging) using your fingers or the supplied stylus pen.
Touch the screen
To touch and release the touch panel.
Drag
A movement without releasing the
touch panel.
Use this to perform tasks such as selecting
icons or images displayed on the touch
panel.
You can make settings by touching the
items displayed on the screen.
You can exit without saving the settings
by touching [CANCEL].
It may not operate properly when
multiple icons are touched
simultaneously, so try to touch the
centre of the icon.
This is used when performing tasks
such as moving to the next image by
dragging horizontally, or changing the
range of the displayed image.
This can also be used to perform tasks
such as switching the screen by
operating the slide bar.
If you select wrong icon, you can
drag to different icon, and it will
select that icon by releasing the
finger.
DMC-FX70&FX75-VQT2V47_eng.book 12 ページ 2010年6月17日 木曜日 午後4時6分
13
(ENG) VQT2V57
Note
The touch panel does not operate when the LCD
monitor is turned off.
If you use a commercially available liquid crystal
protection sheet, please follow the instructions that
accompany the sheet. (Some liquid crystal
protection sheets may impair visibility or
operability.)
Apply a little extra pressure when touching if you
have a commercially available protection sheet affixed or if you feel it is not
responding well.
Touch panel will not operate properly when the hand holding this unit is pressing
on the touch panel.
Do not press using anything with a sharp tip or anything hard, except for the
supplied stylus pen.
Do not operate with your fingernails.
Wipe the LCD monitor with dry soft cloth when it gets dirty with finger prints and
others.
Do not scratch or press the LCD monitor too hard.
About the Stylus pen
It is easier to use the stylus pen (supplied) for
detailed operation or if it is hard to operate with
your fingers.
Do not place it where small children can reach.
Do not place the stylus pen on the LCD monitor
when storing. LCD monitor may break when the
stylus pen is pressed strongly against the LCD
monitor.
DMC-FX70&FX75-VQT2V47_eng.book 13 ページ 2010年6月17日 木曜日 午後4時6分
VQT2V57 (ENG)
14
Charging the Battery
About batteries that you can use with this unit
The battery that can be used with this unit is DMW-BCF10E.
Use the dedicated charger and battery.
The camera has a function for distinguishing batteries which can be used
safely. The dedicated battery (DMW-BCF10E) supports this function. The
only batteries suitable for use with this unit are genuine Panasonic
products and batteries manufactured by other companies and certified by
Panasonic. (Batteries which do not support this function cannot be used).
Panasonic cannot in any way guarantee the quality, performance or safety
of batteries which have been manufactured by other companies and are
not genuine Panasonic products.
Charging
The battery is not charged when the camera is shipped. Charge the battery
before use.
Charge the battery with the charger indoors.
It is recommended to charge the battery in a temperature between 10 oC to
30 oC (50 oF to 86 oF). (The battery temperature should also be the same.)
It has been found that counterfeit battery packs which look very similar
to the genuine product are made available to purchase in some markets.
Some of these battery packs are not adequately protected with internal
protection to meet the requirements of appropriate safety standards.
There is a possibility that these battery packs may lead to fire or
explosion. Please be advised that we are not liable for any accident or
failure occurring as a result of use of a counterfeit battery pack. To
ensure that safe products are used we would recommend that a genuine
Panasonic battery pack is used.
Attach the battery paying
attention to the direction of the
battery.
DMC-FX70&FX75-VQT2V47_eng.book 14 ページ 2010年6月17日 木曜日 午後4時6分
15
(ENG) VQT2V57
About the [CHARGE] indicator
When the [CHARGE] indicator flashes
The battery temperature is too high or too low. It is recommended to charge
the battery again in an ambient temperature of between 10 oC to 30 oC (50 oF
to 86oF).
The terminals of the charger or the battery are dirty. In this case, wipe them
with a dry cloth.
Charging time
Approximate operating time and number of recordable pictures
Recording conditions by CIPA standard
CIPA is an abbreviation of [Camera & Imaging Products Association].
Normal Picture Mode
Temperature: 23 oC (73.4 oF)/Humidity: 50%RH when LCD monitor is on.
Using a Panasonic SD Memory Card (32 MB).
Using the supplied battery.
Starting recording 30 seconds after the camera is turned on. (When the Optical
Image Stabilizer function is set to [AUTO].)
Recording once every 30 seconds with full flash every second recording.
Rotating the zoom lever from Tele to Wide or vice versa in every recording.
Turning the camera off every 10 recordings and leaving it until the temperature
of the battery decreases.
Connect the AC mains lead.
Disconnect the charger from the
electrical socket and detach the battery
after charging is completed.
The [CHARGE]
indicator turns on:
The [CHARGE] indicator
A
is turned on and charging will start.
The [CHARGE]
indicator turns off: The [CHARGE] indicator A of the charger will turn off once
the charging has completed without any problem.
Charging time Approx. 130 min
Number of recordable pictures Approx. 360 pictures
Recording time Approx. 180 min
Playback time Approx. 350 min
DMC-FX70&FX75-VQT2V47_eng.book 15 ページ 2010年6月17日 木曜日 午後4時6分
VQT2V57 (ENG)
16
About the Built-in Memory/the Card
Memory size: Approx. 40 MB
The built-in memory can be used as a temporary storage device when the card
being used becomes full.
The access time for the built-in memory may be longer than the access time for
a card.
The following cards which conform to the SD video standard can be used with this
unit.
(These cards are indicated as card in the text.)
Only cards bearing the SDHC logo (indicating that the card conforms to SD
video standards) may be used as 4 GB to 32 GB cards.
Only cards bearing the SDXC logo (indicating that the card conforms to SD
video standards) may be used as 48 GB, 64 GB cards
Use a card with SD Speed Class
¢
with “Class 4” or higher when recording
motion pictures in [AVCHD Lite]. Also, use a card with SD Speed Class with
“Class 6” or higher when recording motion pictures in [MOTION JPEG].
¢ SD Speed Class is the speed standard regarding continuous writing.
Please confirm the latest information on the following website.
http://panasonic.jp/support/global/cs/dsc/
(This Site is English only.)
Note
Keep the Memory Card out of reach of children to prevent swallowing.
Built-in Memory
Card
Type of card which can
be used with this unit
Remarks
SD Memory Card
(8 MB to 2 GB)
SDHC Memory Card can be used with SDHC
Memory Card or SDXC Memory Card compatible
equipment.
SDXC Memory Card can only be used with SDXC
Memory Card compatible equipment.
Check that the PC and other equipment are
compatible when using the SDXC Memory Cards.
http://panasonic.net/avc/sdcard/information/
SDXC.html
SDHC Memory Card
(4 GB to 32 GB)
SDXC Memory Card
(48 GB, 64 GB)
DMC-FX70&FX75-VQT2V47_eng.book 16 ページ 2010年6月17日 木曜日 午後4時6分
17
(ENG) VQT2V57
Inserting and Removing the Card
(optional)/the Battery
Check that this unit is turned off.
We recommend using a Panasonic card.
Slide the release lever in the
direction of the arrow and open
the card/battery door.
Always use genuine Panasonic
batteries (DMW-BCF10E).
If you use other batteries, we cannot
guarantee the quality of this product.
Battery: Insert until it is locked by
the lever A being careful about
the direction you insert it. Pull the
lever A in the direction of the
arrow to remove the battery.
Card: Push it fully until it clicks
being careful about the direction
you insert it. To remove the card,
push the card until it clicks, then
pull the card out upright.
B: Do not touch the connection terminals of the card.
The card may be damaged if it is not fully inserted.
1:Close the card/battery door.
2:Slide the release lever in the
direction of the arrow.
DMC-FX70&FX75-VQT2V47_eng.book 17 ページ 2010年6月7日 月曜日 午後8時1分
VQT2V57 (ENG)
18
Setting Date/Time (Clock Set)
The clock is not set when the camera is shipped.
Touch [CLOCK SET].
Touch the items you wish to set
(Year/Month/Day/Hours/Minutes), and
set using [3]/[4].
Touch [CANCEL] to cancel the date and time
settings without setting a date and time.
Touch [SET] to set.
Touch [SET].
Touch [CANCEL] to return to the settings screen.
Select [CLOCK SET] in the [REC] or [SETUP] menu.
It can be changed in steps 3 and 4 to set the clock.
Turn the camera on.
Changing the Clock Setting
DMC-FX70&FX75-VQT2V47_eng.book 18 ページ 2010年6月17日 木曜日 午後4時6分
19
(ENG) VQT2V57
Setting the Menu
This section describes how to select the [REC] Mode menu settings, and the
same setting can be used for the [MOTION PICTURE] Mode menu, [PLAYBACK]
Mode menu and [SETUP] menu as well.
Example: Setting [AF MODE] from [
Ø] to [š] in the Normal Picture Mode
Press [MENU] to display the menu.
Touch [AF MODE].
Touch [š].
Depending on the item, its setting may not appear
or it may be displayed in a different way.
Touch [EXIT] to close the menu.
Switching to other menus
e.g.: Switching to the [SETUP] menu
Touch the [SETUP] menu icon [ ]
Select a menu item next and set it.
DMC-FX70&FX75-VQT2V47_eng.book 19 ページ 2010年6月17日 木曜日 午後4時6分
VQT2V57 (ENG)
20
Mode switching
Selecting the [REC] Mode
List of [REC] Modes
Turn the camera on.
A [REC]/[PLAYBACK] selector switch
B [MODE] button
Slide the [REC]/[PLAYBACK] selector
switch to [!], and then press [MODE].
Touch the mode.
¦ [INTELLIGENT AUTO]
The subjects are recorded using settings automatically selected by the camera.
! [NORMAL PICTURE]
The subjects are recorded using your own settings.
[COSMETIC MODE]
Takes a picture adjusting the skin texture.
Û [SCENE MODE]
This allows you to take pictures that match the scene being recorded.
DMC-FX70&FX75-VQT2V47_eng.book 20 ページ 2010年6月7日 月曜日 午後8時1分
  • Page 1 1
  • Page 2 2
  • Page 3 3
  • Page 4 4
  • Page 5 5
  • Page 6 6
  • Page 7 7
  • Page 8 8
  • Page 9 9
  • Page 10 10
  • Page 11 11
  • Page 12 12
  • Page 13 13
  • Page 14 14
  • Page 15 15
  • Page 16 16
  • Page 17 17
  • Page 18 18
  • Page 19 19
  • Page 20 20
  • Page 21 21
  • Page 22 22
  • Page 23 23
  • Page 24 24
  • Page 25 25
  • Page 26 26
  • Page 27 27
  • Page 28 28
  • Page 29 29
  • Page 30 30
  • Page 31 31
  • Page 32 32

Panasonic DMCFX70EB Quick start guide

Category
Camcorders
Type
Quick start guide

Panasonic DMCFX70EB: Capture stunning photos and videos with its 12.1-megapixel sensor, 5x optical zoom lens, and HD video recording capabilities. Unleash your creativity with automatic modes like Intelligent Auto and Creative Control, while manual controls provide flexibility for advanced photographers. Easily share your memories via Wi-Fi or HDMI connectivity.

Ask a question and I''ll find the answer in the document

Finding information in a document is now easier with AI