Page is loading ...

BODYWORX
BODY WORX
Version A
Retain this owner’s manual for future reference
Read and follow all instructions in this owner’s manual
Body Weight Gym
Model No:
LBWG

‐1‐
PARTS LIST

‐2‐
PARTS LIST

‐3‐
PARTS LIST
‐

‐4‐
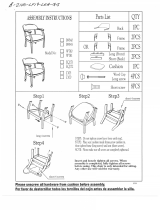
ASSEMBLY INSTRUCTION
STEP1:
1. Attach three Bumpers (long) (43) to the Front Base Frame (1) and the Base Frame (2).
2. Attach the Front Base Frame (1) and the Rear Base Frame (3) to the Base Frame (2),
using four M10 x 100mm Hex Bolts (69), eight M10 Arc Washers (82) and four M10 Nylon
Nuts (85).
3. Slide the Slider Assembly (5) onto the Weight Selector Tube (4), then tap two Oil
Bushings (small) (32) into the Weight Selector Tube (4).
4. Attach two Pulleys (29) to the Weight Selector Tube (4), using two M10 x 40mm Hex Bolts
(74), four M10 Washers (80) and two M10 Nylon Nut (85).

‐5‐
ASSEMBLY INSTRUCTION
STEP2:
1. Attach the Weight Selector Tube (4) to the Base Frame (2), using one M12 x 75mm Hex
Bolt (67), two M12 Washers (79) and one M12 Nylon Nut (84).
2. Attach the Foot Plate (10) to the Lower Main Frame (8), using three M10 x 40mm Hex
Bolts (74), six M10 Washers (80) and three M10 Nylon Nuts (85).
NOTE: Oil Bushing (big) (33) have been Pre-assembled into Lower Arm (6).
3. Attach two Lower Arms (6) to the Base Frame (2) and the Lower Main Frame (8), using
two Shafts (L 292mm) (65), four M16 Washers (78) and four M16 Nylon Nuts (83).

‐6‐
ASSEMBLY INSTRUCTION
STEP3:
1. Attach the Middle Main Frame (16), the Back rest Adjustment Base (19) and one Connect
Plate (23) to the Lower Main Frame (8), using four M10 x 70mm Hex Bolts (71), two
M10 x 15mm Hex Bolts (75), ten M10 Washers (80) and four M10 Nylon Nuts (85).
NOTE: Oil Bushing (big) (33) have been Pre-assembled into Upper Arm (7).
2. Attach two Upper Arms (7) to the Base Frame (2) and the Middle Main Frame (16), using
two Shafts (L 224mm) (64), four M16 Washers (78) and four M16 Nylon Nuts (83).
3. Attach the Upper Main Frame (9) and two Connect Plates (23) to the Middle Main Frame
(16), using four M10 x 70mm Hex Bolts (71), two M10 x 15mm Hex Bolts (75), ten M10
Washers (80) and four M10 Nylon Nuts (85).

‐7‐
ASSEMBLY INSTRUCTION
STEP4:
NOTE: Oil Bushing (small) (32) have been Pre-assembled into Upper Main Frame (9).
1. Attach the Press Arm Mount (13) to the Upper Main Frame (9), using one
M12 x 100mm Hex Bolt (66), two M12 Washers (79) and one M12 Nylon Nut (84).
2. Attach the Right Press Arm (12) to the Left Press Arm (11), using one M12 x 65mm Hex
Bolt (68) and one ¢32X¢12 Washer (77).
NOTE: Oil Bushing (big) (33) have been Pre-assembled into Press Arm Mount (13).
3. Attach the Left Press Arm (11) and the Right Press Arm (12) to the Press Arm Mount (13),
using one Shaft (L 160mm) (63), two M16 Washers (78) and two M16 Nylon Nuts (83).
4. Insert the Quick Knob (long) (41) through the single hole on the Right Press Arm (12) to
any one of the holes on the fan type plate.

‐8‐
ASSEMBLY INSTRUCTION
STEP5:
1. Attach the Leg Extension Frame (17) to the Lower Main Frame (8), using one
M10 x 75mm Hex Bolt (70), two M10 Washers (80) and one M10 Nylon Nut (85).
2. Attach the Seat Cushion (24) to the Seat Frame (15), using two M8 x 40mm Hex Bolts (76)
and two M8 Washers (81).
3. Insert the Seat Frame (15) into the Lower Main Frame (8), using one Knob (40).
4. Attach the Back Cushion (25) to the Backrest Frame (14), using two M8 x 40mm Hex
Bolts (76) and two M8 Washers (81).
5. Insert the Backrest Frame (14) into the Backrest Support Frame (19), using one
Knob (40).

‐9‐
ASSEMBLY INSTRUCTION
STEP6:
1. Insert the Foam Tube (18) into the Leg Extension Frame (17) and the Lower Main
Frame (8), and then slide the Leg Foam Roller (26) onto the Foam Tube (18).
2. Attach two Handle Clips (36) to the Left Press Arm (11) and the Right Press Arm (12),
using two M6 x 20mm Screws (62).
3. Attach two Straps (31) to the Left Press Arm (11) and the Right Press Arm (12), using
two M8 x 10mm Bolts (86) and two M8 Washers (81).
4. Insert the handle Bar of the Strap (31) into the Handle Clips (36).

‐10‐
ASSEMBLY INSTRUCTION

‐11‐
ASSEMBLY INSTRUCTION

‐12‐
ASSEMBLY INSTRUCTION
STEP6: Assembly the Cable (27)
1. Install Pulley NO.1 & NO.2 (29) to Upper Main Frame (9), using two M10 x 40mm Hex
Bolts (74), four M10 Washers (80) and two M10 Nylon Nuts (85).
2. Install Pulley NO.3 (29) to Press Arm Mount (13), using one M10 x 40mm Hex Bolt (74),
two M10 Washers (80) and one M10 Nylon Nut (85).
3. Install Pulley NO.4 (29) to Upper Main Frame (9), using one M10 x 40mm Hex Bolt (74),
two M10 Washers (80) and one M10 Nylon Nut (85).
4. Install Pulley NO.5 (29) to Press Arm Mount (13), using one M10 x 40mm Hex Bolt (74),
two M10 Washers (80) and one M10 Nylon Nut (85).
5. Install Pulley NO.6 (29) to Upper Main Frame (9), using one M10 x 40mm Hex Bolt (74),
two M10 Washers (80) and one M10 Nylon Nut (85).
6. Pierce the end of Cable (27) under Pulley NO.7 (29).
7. Attach the Pulley U (21) to the Lower Main Frame (8), using one Plum Blossom Nut (38),
then Install Pulley NO.8 (29) to the Pulley U (24), using one M10 x 50mm Hex Bolt (73), two
M10 Washers (80) and one M10 Nylon Nut (85).
8. Pierce the end of Cable (27) under Pulley NO.9 (29).
9. Install Pulley NO.10 (29) and two Pulley Bushings (48) to Lower Main Frame (8), using
one M10 x 70mm Hex Bolt (71), two M10 Washers (80) and one M10 Nylon Nut (85).
10. Attach the end of Cable (27) to the Leg Extension Frame (17), using one M10 x 65mm
Hex Bolt (72), two M10 Washers (80) and one M10 Nylon Nut (85).
11. Attach Lat Bar (20) to the other end of Cable (27), using one Pothook (35).

‐13‐
ASSEMBLY INSTRUCTION
FINAL ADJUSTMENT: (if needed)
You will find the weight selector below the seat. Grab the weight selector handle and pull the
pin. Slide the weight selector from position one to ten. The rollers should move freely. If the
weight selector rollers bind, lift the Foot Plate and adjust the three Bumpers up slightly. This
will ease the pressure on the rollers and allow the weight selector mechanism to slide freely.
If you feel the cable is too loose, adjust Plum Blossom Nut until you feel the cable is tight
enough. Also note that Nylon Nut can not be locked too tight.

‐14‐
EXPLODED DRAWING

BODYWORX
BODYWORX
Model No: LBWG
To register your warranty, please go to
www.gpisports.com.au
/