Page is loading ...

Visit the Peerless Web Site at www.peerlessmounts.com
ISSUED: 11-18-10 SHEET #: 125-9159-1
This product is intended for use with UL
Listed products and must be installed by a
qualied professional installer.
Maximum UL Load Capacity:
35 lb (15.8 kg)
Model: BM-3001N
Installation and Assembly:
Dual Stud Short Throw Projector Wall Mount

Visit the Peerless Web Site at www.peerlessmounts.com
Note: Read entire instruction sheet before you start installation and assembly.
Table of Contents
Parts List.................................................................................................................................................................................3
Installation to Wood ...............................................................................................................................................................4
Installation to Concrete/Cinder Block ....................................................................................................................................5
Assembly of Adjustment Tube ...............................................................................................................................................8
Installing Projector Mount ......................................................................................................................................................8
Routing Cables .......................................................................................................................................................................9
2 of 13
ISSUED: 11-18-10 SHEET #: 125-9159-1
• DonotbegintoinstallyourPeerlessproductuntilyouhavereadandunderstoodtheinstructionsandwarnings
containedinthisInstallationSheet.Ifyouhaveanyquestionsregardinganyoftheinstructionsorwarnings,please
call Peerless customer care at 1-800-865-2112.
• Thisproductshouldonlybeinstalledbysomeoneofgoodmechanicalaptitude,hasexperiencewithbasicbuilding
construction,andfullyunderstandstheseinstructions.
• Makesurethatthesupportingsurfacewillsafelysupportthecombinedloadoftheequipmentandallattachedhard-
ware and components.
• NeverexceedtheMaximumULLoadCapacity.Seepage1.
• Ifmountingtowoodstuds,makesurethatmountingscrewsareanchoredintothecenterofthestuds.Useofan
“edgetoedge”studnderishighlyrecommended.
• Alwaysuseanassistantormechanicalliftingequipmenttosafelyliftandpositionequipment.
• Tightenscrewsrmly,butdonotovertighten.Overtighteningcandamagetheitems,greatlyreducingtheirholding
power.
• Thisproductisintendedforindooruseonly.Useofthisproductoutdoorscouldleadtoproductfailureandpersonal
injury.
• Thisproductwasdesignedandintendedtobemountedtothefollowingsupportingsurfacescheckedbelowwith
thehardwareincludedinthisproductasspeciedintheinstallationsheet.Tomountthisproducttoanalternative
supportingsurface,contactPeerlesscustomercareat1800865-2112.
• Thisproductwasdesignedtobeinstalledonthefollowingwallconstructiononly;
WALL CONSTRUCTION ADDITIONAL HARDWARE REQUIRED
x WoodStud None
x SolidConcrete None
x CinderBlock None
MetalStud ContactCustomerService(NotEvaluatedByUL)
Brick ContactCustomerService(NotEvaluatedByUL)
Otherorunsure? ContactCustomerService
WARNING
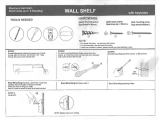
Tools Needed for Assembly
• studnder(“edgetoedge”studnderrecommended)
• level
• drill
• 5/32” bit (wood installation)
• 1/4” bit (concrete/cinder block installation)
• phillipsscrewdriver
Accessories
• WSP320
(requiredforinstallationtometalstuds)(NotEvaluatedbyUL)
• ACC-MIS550
(requiredforinstallationtometalstuds)(NotEvaluatedbyUL)
• ACC020ProjectorSecurityCable(NotEvaluatedbyUL)
• WBK100
(wallplateaccessorykit)(NotEvaluatedbyUL)

A
B
C
D
E
F
G
H
I
J
K
L
M
3 of 13
ISSUED: 11-18-10 SHEET #: 125-9159-1
Before you start check the parts list to insure all of the parts shown are included.
N
O P
Q
R
S
T U
V
W
X
Y Z
Compatible Projector Models: EX525ST,TX610ST,TW610ST
AA
Description Qty. Part #
A
wall arm 1
055-1912
B
adjustment tube 1
055-1911
C 4 mm allen wrench 1 560-9646
D
M5x10mmserratedsocketpinscrew 2
510-1126
E
#14-x2.5phillipsheadwoodscrew 4
5S1-015-C03
F tube cap 1 590-1263
G concrete anchor 4 590-0320
H 1/4"-20 socket pin screw 2 520-1054
I 1/4"-20 flat washer 2 540-1078
J
precision gear projector mount 1 055-KPRGU-B-3
K wall plate 1 055-1923
L 5/16-18x1/2carriagebolt 4 520-9207
M 5/16 - 18 serrated flanged lock nut 4 530-1016
N
adapter plate 1 XXX-XXXX
O
10-32x3/8"socketpinserratedwasherheadscrew
2
520-1151
P
.219IDx.5ODx.125spacer
6
540-1032
Q
10-32x1/4"socketpinwithlockpatch 1 520-1196
R
#8 flat washer 8 540-1001
S
connection block
1
580-1065
T
extensionbracket 4 055-1940
U
M3x12mmsocketpinserratedwasherheadscrew 4 510-1003
V
M4x8mmsocketpinserratedwasherheadscrew
4
510-1005
W M4x12mmknob 2 560-1154
X .198x.313x.375spacers 1 590-2020
Y M4x16mmscrew 4 510-1087
Z M3x20mmknob 1 560-1149
AA 2 mm allen wrench 1 560-1097
Parts List
NOTE: Some parts may appear slightly different than illustrated.

Visit the Peerless Web Site at www.peerlessmounts.com
4 of 13
Installation to Wood Stud Walls
Useastudndertolocatetheedgesofthestud.Useofanedge-to-edgestudnderishighlyrecommended.
Basedonitsedges,drawaverticallinedownthestud’scenter.Placewallarm(A) on wall as a template. Mark the
center of the four mounting holes. Drill four 5/32” (4 mm) dia. holes 2-1/2” (65 mm) deep. Secure wall arm (A) to
woodstudusingfour#14x2-1/2”woodscrews(E) as shown.
Optional: Rotate wall arm 180
°
to position the arm closer to the ceiling.
Skip to Step 2.
• Installermustverifythatthesupportingsurfacewillsafelysupportthecombinedloadoftheequipmentandall
attached hardware and components.
• Tightenwoodscrewssothatwallplateisrmlyattached,butdonotovertighten.Overtighteningcandamagethe
screws,greatlyreducingtheirholdingpower.
• Nevertighteninexcessof80in.•lb(9N.M.).
• Makesurethatmountingscrewsareanchoredintothecenterofthestud.Theuseofan“edgetoedge”studnder
is highly recommended.
• Hardwareprovidedisforattachmentofmountthroughstandardthicknessdrywallorplasterintowoodstuds.
Installersareresponsibletoprovidehardwareforothertypesofmountingsituations(NotEvaluatedByUL).
WARNING
1
ISSUED: 11-18-10 SHEET #: 125-9159-1
A
E
Note: For mounting using wall plate (K),refertopage6.

Visit the Peerless Web Site at www.peerlessmounts.com
5 of 13
Installation to a concrete or cinder block wall
Drill four 5/16” (8 mm) dia. holes to a minimum depth of 2.5” (64 mm). Insert anchors (G)inholesushwith
wall as shown. Attach wall arm (A)usingfour#14x2-1/2”woodscrews(E) as shown in Illustration A and 1,
2,and3. Tighten all fasteners. Optional: Rotate wall arm 180
°
to position the arm closer to the ceiling.
1
• Tightenwoodscrewsrmly,butdonotovertighten.
Overtighteningcandamagethescrews,greatlyre-
ducing their holding power.
• Nevertighteninexcessof80in•lb(9N.M.).
WARNING
WARNING
• WheninstallingPeerlesswallmountsoncinderblock,verifythatyouhaveaminimumof1-3/8”ofactualcon-
crete surface in the hole to be used for the concrete anchors. Do not drill into mortar joints! Be sure to mount in
asolidpartoftheblock,generally1”minimumfromthesideoftheblock.CinderblockmustmeetASTMC-90
specications.Itissuggestedthatastandardelectricdrillonslowsettingisusedtodrilltheholeinsteadofa
hammerdrilltoavoidbreakingoutthebackoftheholewhenenteringavoidorcavity.
• Concretemustbe2000psidensityminimum.Lighterdensityconcretemaynotholdconcreteanchor.
• Makesurethatthewallwillsafelysupportfourtimesthecombinedloadoftheequipmentandallattachedhard-
ware and components.
E
G
Illustration A
A
ISSUED: 11-18-10 SHEET #: 125-9159-1
1
3
2
Tighten all fasteners.
concrete
surface
C
UTAWAY VIEW
INCORRECT CORRECT
wall
plate
wall
plate
plaster/
dry wall
plaster/
dry wall
concrete
concrete
Drill holes and insert anchors (G).
Place wall arm (A)overanchors(G) and secure with
screws (E).
Tighten all fasteners.
E
E
A
G
G
G
• Concreteanchorsarenot intended for attachment to
concretewallcoveredwithalayerofplaster,drywall,
orothernishingmaterial.Ifmountingtoconcrete
wallcoveredwithplaster/drywallisunavoidable(Not
EvaluatedByUL),plaster/drywall(upto5/8”thick)
must be counterbored as shown right. If plaster/dry-
wallisthickerthan5/8”,customfastenersmustbe
suppliedbyinstaller(NotEvaluatedByUL).
WARNING
CUTAWAY VIEW
INCORRECT CORRECT
wall
plate
wall
plate
plaster/
dry wall
plaster/
dry wall
concrete
concrete
Note: For mounting using wall plate (K),refertopage6.

Visit the Peerless Web Site at www.peerlessmounts.com
Secure wall arm (A) to wall plate (K) using four carriage bolts (L) and lock nuts (M).
K
L
M
K
E
1
Installation to Wall Plate
Useastudndertolocatetheedgesofthestud.Useofanedge-to-edgestudnderishighlyrecommended.
Basedonitsedges,drawaverticallinedownthestud’scenter.Placewallplate(K) on wall as a template. Mark
the center of the four mounting holes. Drill four 5/32” (4 mm) dia. holes 2-1/2” (65 mm) deep. Secure wall plate (K)
towoodstudusingfour#14x2-1/2”woodscrews(E) as shown. Skip to Step 2.
Optional: Rotate wall arm 180
°
to position the arm closer to the ceiling.
• Installermustverifythatthesupportingsurfacewillsafelysupportthecombinedloadoftheequipmentandall
attached hardware and components.
• Tightenwoodscrewssothatwallplateisrmlyattached,butdonotovertighten.Overtighteningcandamagethe
screws,greatlyreducingtheirholdingpower.
• Nevertighteninexcessof80in.•lb(9N.M.).
• Makesurethatmountingscrewsareanchoredintothecenterofthestud.Theuseofan“edgetoedge”studnder
is highly recommended.
• Hardwareprovidedisforattachmentofmountthroughstandardthicknessdrywallorplasterintowoodstuds.
Installersareresponsibletoprovidehardwareforothertypesofmountingsituations.(NotEvaluatedByUL)
WARNING
6 of 13
ISSUED: 11-18-10 SHEET #: 125-9159-1
Installation to Wood Stud Walls
A
1-1

Visit the Peerless Web Site at www.peerlessmounts.com
Installation to a concrete or cinder block wall
Drill four 5/16” (8 mm) dia. holes to a minimum
depth of 2.5” (64 mm). Insert anchors (G) in holes
ushwithwallasshown.Attachwallplate(K) using
four#14x2-1/2”woodscrews(E) as shown in
Illustration A and 1,2,and3. Tighten all fasteners.
Optional: Rotate wall arm 180
°
to position the arm
closer to the ceiling.
• Tightenwoodscrewsrmly,butdonotovertighten.
Overtighteningcandamagethescrews,greatlyre-
ducing their holding power.
• Nevertighteninexcessof80in•lb(9N.M.).
WARNING
WARNING
• WheninstallingPeerlesswallmountsoncinderblock,verifythatyouhaveaminimumof1-3/8”ofactualcon-
crete surface in the hole to be used for the concrete anchors. Do not drill into mortar joints! Be sure to mount in
asolidpartoftheblock,generally1”minimumfromthesideoftheblock.CinderblockmustmeetASTMC-90
specications.Itissuggestedthatastandardelectricdrillonslowsettingisusedtodrilltheholeinsteadofa
hammerdrilltoavoidbreakingoutthebackoftheholewhenenteringavoidorcavity.
• Concretemustbe2000psidensityminimum.Lighterdensityconcretemaynotholdconcreteanchor.
• Makesurethatthewallwillsafelysupportfourtimesthecombinedloadoftheequipmentandallattachedhard-
ware and components.
E
G
Illustration A
K
7 of 13
ISSUED: 11-18-10 SHEET #: 125-9159-1
1
3
2
Tighten all fasteners.
concrete
surface
C
UTAWAY VIEW
INCORRECT CORRECT
wall
plate
wall
plate
plaster/
dry wall
plaster/
dry wall
concrete
concrete
Drill holes and insert anchors (G).
Place wall plate (K)overanchors(G) and secure with
screws (E).
Tighten all fasteners.
E
E
K
G
G
G
• Concreteanchorsarenot intended for attachment to
concretewallcoveredwithalayerofplaster,drywall,
orothernishingmaterial.Ifmountingtoconcrete
wallcoveredwithplaster/drywallisunavoidable(Not
EvaluatedByUL),plaster/drywall(upto5/8”thick)
must be counter bored as shown right. If plaster/
drywallisthickerthan5/8”,customfastenersmustbe
suppliedbyinstaller(NotEvaluatedByUL).
WARNING
CUTAWAY VIEW
INCORRECT CORRECT
wall
plate
wall
plate
plaster/
dry wall
plaster/
dry wall
concrete
concrete
1-2

Visit the Peerless Web Site at www.peerlessmounts.com
8 of 13
3
2
Slide adjustment tube (B) into wall arm (A) and adjust to the desired projector throw distance as shown. Using two
separate slots on wall arm (A),lockpositionusingtwoM5x10mmscrews(D) as shown below.
B
A
Assembly of Adjustment Tube
ISSUED: 11-18-10 SHEET #: 125-9159-1
Installing Precision Gear Projector Mount
Installing PRG projector mount to wall arm assembly: Attach precision gear projector mount (J) to
adjustment tube (B) using two 1/4-20 socket pin screws (H)andtwoatwashers(I)
as shown in Figure 3.1.
g. 3.1
D
ARROW
INDICATES
FRONTOF
PROJECTOR
H
I
J
MAXIMUM EXTENSION SHOWN
Note: Securing adjustment tube (B) into wall arm (A)requirestwoslots.
TWO SCREWS (D)
REQUIRED THROUGH
TWO SLOTS
B
A
B

Visit the Peerless Web Site at www.peerlessmounts.com
9 of 13
4
ISSUED: 11-18-10 SHEET #: 125-9159-1
Routing Cables
Routing Cables through precision gear projector mount (J) and wall arm assembly: Guide
projector cables into openings in projector mount and wall arm assembly as shown below.
Insert tube cap (F) into end of adjustment tube (B).
J
F
PROJECTOR CABLES
Note:Cablesmustberemovedfromprojectorbeforeroutingthroughwallarm.
PROJECTOR CABLES
B
A
Model Configuration Page
EX525ST 1 10
TW610ST 2 11
TX610ST 2 11
5
Checkyourprojectorforthecorrespondingcongurationandpage.

Visit the Peerless Web Site at www.peerlessmounts.com
10 of 13
ISSUED: 11-18-10 SHEET #: 125-9159-1
6
Conguration 1
Attach connection block (S) to adapter plate (N)
usingtwo#10-32x3/8"serratedsocketpinscrews(O)
and.219IDx.5ODx.125"spacers(P).
Note:Whenattachingextensionbrackets(T) be sure to
keep fasteners in the center of the slot.
POSITIONSCREW,
SPACERANDWASHER
INCENTEROFSLOT
CORRECT
INCORRECT
T
T
Attachfourextensionbrackets(T) to main adapter plate (N)usingtwoM4x8mmserratedsocketpinscrews(V),
twoM4x16mmsocketpinserratedwasherheadscrews(Y),andtwo.198x.313x.375"spacers(X).
Attachextensionbrackets(T)toprojectorusingfour.219IDx.5ODx.125"spacers(P),two#8atwashers(R),
twoM4x16mmsocketpinserratedwasherheadscrews(Y),andtwoM4x12mmknobs(W).
Tighten using 4mm security allen wrench (C).
7
FRONTOF
PROJECTOR FRONTOFPROJECTOR
T
MOUNTPLATE(N)USINGMOUNTINGHOLESASSHOWN
P
Y
P
W
X
V
R
Y
N
SHOULDER
FRONTOF
PROJECTOR
N
S
O
P

Visit the Peerless Web Site at www.peerlessmounts.com
11 of 13
ISSUED: 11-18-10 SHEET #: 125-9159-1
7
Conguration 2
Attach adapter plate (N)toprojectorusingtwo.219IDx.5ODx.125"spacers(P),two
M3x12mmsocketpinserratedwasherheadscrews(U),one.198x.313x.375"spacer(X),andone
M3x20mmknob(Z). Tighten using 2mm security allen wrench (AA).
FRONTOF
PROJECTOR
FRONTOFPROJECTOR
N
MOUNTPLATE(N)USINGMOUNTINGHOLESASSHOWN
6
Attach connection block (S) to adapter plate (N) using
two#10-32x3/8"serratedsocketpinscrews(O) and
.219IDx.5ODx.125"spacers(P).
SHOULDER
FRONTOF
PROJECTOR
N
S
O
P
P
U
Z
X

Visit the Peerless Web Site at www.peerlessmounts.com
12 of 13
ISSUED: 11-18-10 SHEET #: 125-9159-1
Slide connection block (S) through precision gear projector mount (J) as shown.
Tightencaptivescrewtosecureprecisiongearprojectormount(J).
• Donotliftmoreweightthanyoucanhandle.Useadditionalmanpowerormechanicalliftingequipmenttosafely
handle placement of the screen.
WARNING
Attaching Adapter Plate to Projector Mount
S
J
FRONTOFMOUNT
CAPTIVE SCREW
ARROW
INDICATES
FRONTOF
MOUNT
8
IMPORTANT:Forsecurityinstallations,insertone#10-32x1/4"socketpinscrew(Q) through
precision gear projector mount (J) and into connection block (S) as shown. Tighten screw using
4mm security allen wrench (C).
J
Q
9
S

Visit the Peerless Web Site at www.peerlessmounts.com
13 of 13
ISSUED: 11-18-10 SHEET #: 125-9159-1
©2010,PeerlessIndustries,Inc.Allrightsreserved.
Allotherbrandandproductnamesaretrademarksorregisteredtrademarksoftheirrespectiveowners.
Toaccesstheprojectorlightbulb,removetwoM4x12mmknobs(W)attachedtofrontextensionbracketsas
shown below.
NOTE:Don’tdiscardtwo.219IDx.5ODx.125”spacers(P).
10
Accessing Projector Light Bulb
Conguration 1
Conguration 2
Z
W
PROJECTOR
PROJECTOR
FRONTOF
PROJECTOR
FRONTOF
PROJECTOR
Toaccesstheprojectorlightbulb,removeoneM3x20mmknob(Z)attachedtofrontextensionbracketsasshown
below.
NOTE:Don’tdiscard.219IDx.5ODx.125”spacers(P).
10
/