Page is loading ...

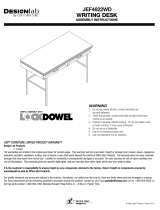
ASSEMBLY INSTRUCTIONS
A
ITEM
1Back Rest
PART NAME QTY ITEM HARDWARE NAME DESCRIPTION QTY
JCBC Bolt M6 x 50mm 4 PCS
2Front Leg
(Low) C
D
Spring Washer 1/4" 12 PCS
ECSK Screw
M4 x 32mm 4 PCS
Allan Key M4 1 PC
F
3Back Leg
(High)
1 PC
B8 PCS
JCBC Bolt M6 x 40mm
4Support Bar Wrap
(L=1pc & R=1pc) 2 PCS
5Cushion Seat
1 PC
8 PCS
Wood Dowel 8 x 30mm
Wood Button
G
8 PCS
STEP 1
FULLY ASSEMBLE
MODEL : RDC 794S-AC
Flat Washer M6
H
12 PCS
1 PC
1 PC
4 L
4 R
3
2
A
ATTENTION
Do Not Fully
Tighten The Screw
ATTENTION
Do Not Fully Tighten The Screw
ATTENTION
Do Not Fully Tighten The
Screw
STEP 2
C
D
FG
A
C
D
F
G
D
C
B
G
1

ATTENTION
Fully Tighten The Screw
ATTENTION
Fully Tighten The Screw
STEP 3
STEP 4
DCB
G
G
B
H
1st
2nd
ATTENTION
Do "1st" Step First And "2nd" For The Last.
H2nd
1st
2nd
ATTENTION
Do "1st" Step First And "2nd" For The Last.

G
E
STEP 5
STEP 6
5
Place Cushion Seat.
ATTENTION
Fully Tighten The All Screw From
"Step 1"
A
/