iRobot Roomba Owner's manual

Category
Robotic vacuum cleaners
Type
Owner's manual
www.irobot.com
500 Series
Dear iRobot Roomba owner,
Welcome to the world of iRobot! As an owner of an iRobot
Roomba Vacuum Cleaning Robot, you join a world-wide
community of people who enjoy more free time. Roomba cleans
routinely, so you don’t have to. Now you can spend your time on
more enjoyable and important tasks.
The Roomba 500 series is the 5th generation of our award-
winning iRobot Roomba Vacuum Cleaning Robot. In developing
this newest version, we incorporated feedback and suggestions
from Roomba owners across the globe to make this robot more
efficient and easier to use than its predecessors.
Many advancements are made to our products based on
suggestions and feedback from home robot owners like you.
To share your feedback, stories or ask questions about your
new home robot, please visit our Service and Support site at
www.irobot.com.
We encourage you to register your robot, either online or by mail.
As a registered home robot owner, you’ll receive information and
updates personalized to your robot and you can save helpful tips
and product information in your account. To register online, go to
www.irobot.com.
Thank you for joining the iRobot community. We look forward
to your valued input as we continue to deliver groundbreaking
products to change and improve your world.
On behalf of the entire iRobot team,
Colin Angle
Co-Founder and CEO
iRobot Corporation
4iRobot Roomba 500 Series
Important Tips
Roomba contains electronic parts. DO NOT submerge Roomba or spray it
with water. Clean with a dry cloth only.
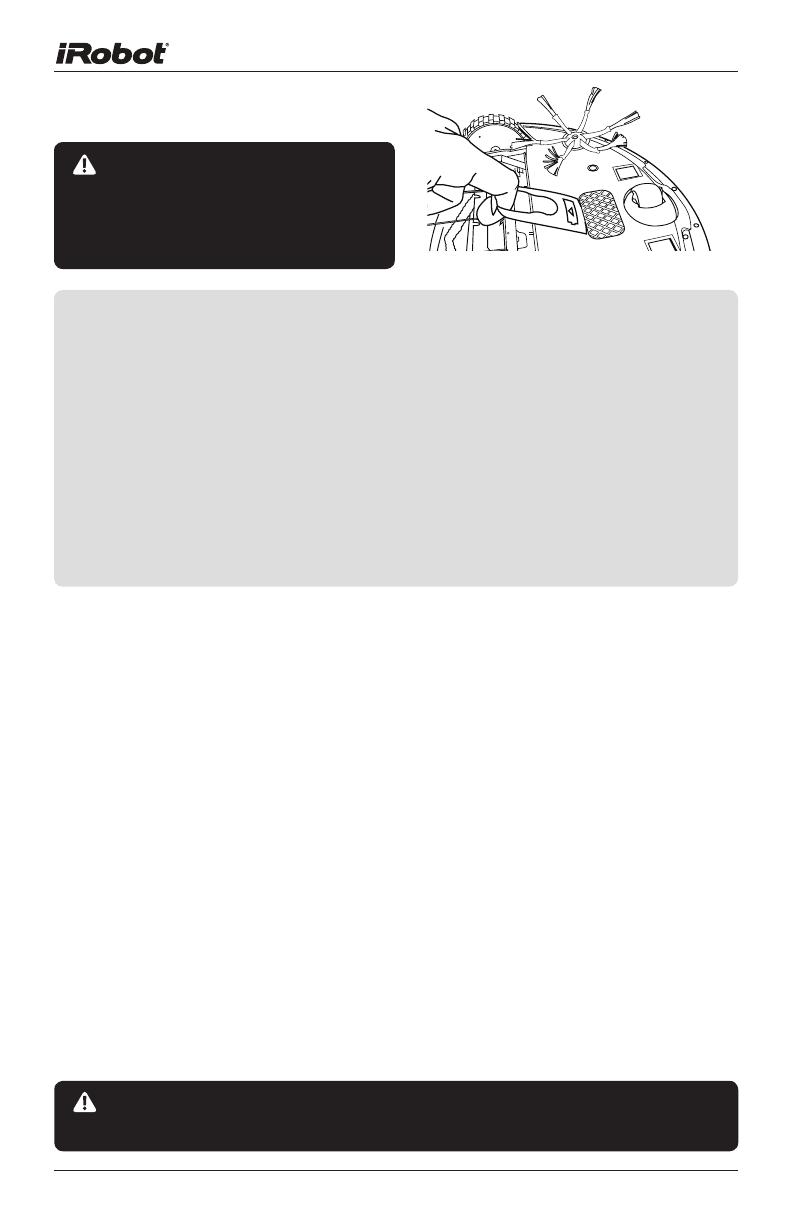
Before using Roomba the first
time, you need to activate Roomba
by removing the battery pull tab.
You should also charge the battery
overnight for best results. Remove battery pull tab
For Best Performance
• Remove and clean Roomba’s brushes after every use.
• Empty Roomba’s bin and clean its lter after every use.
Use the Virtual Walls® or Virtual Wall® Lighthouses™ to keep Roomba
cleaning where you want it.
• Use your Roomba frequently.
Battery Life
To extend the battery life, iRobot recommends always storing Roomba
plugged in.
Voice Demonstration
Roomba® features a voice demonstration to walk you through using
Roomba.
To start the voice demonstration, make sure the CLEAN light is illuminated
and then press and hold the DOCK/DEMO button. On model 510, press
and release “demo.
To exit the voice demonstration, press and hold the CLEAN button until the
robot shuts down.
Turning Roomba on and off
• Roomba does not have a power button.
To turn Roomba ON, press CLEAN once. You will hear a beep
and the CLEAN button will light.
To start a cleaning cycle, press CLEAN again. Roomba will start a
cleaning cycle.
• To pause Roomba, press CLEAN while Roomba is cleaning.
To turn Roomba OFF, press and hold the CLEAN button until
Roomba’s lights turn OFF.
• To resume the cleaning cycle, press CLEAN again.
For more detailed information, visit: www.irobot.com 5
Table of Contents
iRobot Roomba Anatomy ............................................ 6
Cleaning Pattern ........................................................ 7
Cleaning System ....................................................... 8
Cleaning Modes ........................................................ 9
Battery Storage and Charging ............................ 10 - 11
Virtual Walls® ......................................................... 12
Virtual Wall® Lighthouses™ ............................... 13 - 15
Scheduling Roomba ......................................... 16 - 17
Home Base® .......................................................... 18
Wireless Command Center ....................................... 19
Maintenance ................................................... 20 - 22
Troubleshooting ....................................................... 23
Frequently Asked Questions ..................................... 24
Replaceable Modules .............................................. 25
iRobot Customer Care ............................................. 26
Important Safety Instructions ................................... 27
6iRobot Roomba 500 Series
iRobot Roomba Anatomy
Spot Cleaning Button
Clean/Power
Button
Dock/Demo
Button
Dirt Detect™
Infrared Sensor
Bin Release
Button Battery Charger
Socket
Handle
Flexible
Brush
Cliff Sensor
Openings
Edge-Cleaning
Side Brush
Dirt Detect
Sensor
Left Wheel
Module
Right Wheel
Module
Contact
Points for
Home Base
Replaceable
Squeegee
Brush Guard Release Tabs
(yellow)
Brush
Bearings
Brush
Guard
Removable
Caster Wheel Brush
Caps
Buttons and Lights
Bottom View
Buttons and Lights
(Models 510 - 545) (Models 550 and above)
Scheduling
Interface
Main
Brush
Troubleshooting Light
Troubleshooting
Light
For more detailed information, visit: www.irobot.com 7
Cleaning Pattern
Roomba is a robot that cleans floors differently than the way most people
clean their floors. Roomba uses its robot intelligence to efficiently clean the
whole floor, under and around furniture and along walls.
Roomba calculates the optimal cleaning path as it cleans and determines
when to use its various cleaning behaviors:
Spiraling: Roomba uses
a spiral motion to clean a
concentrated area.
Wall Following: Roomba
uses this technique to clean
the full perimeter of the
room and navigate around
furniture and obstacles.
Room Crossing: Roomba
crisscrosses the room
to ensure full cleaning
coverage.
Dirt Detection: When
Roomba senses dirt, the
blue Dirt Detect™ light is lit
and Roomba cleans more
intensely in that area.
TIP: Roomba takes approximately 25 minutes to clean an average room and
will pass over the same area of the floor multiple times to ensure total
floor coverage.
TIP: For most efficient cleaning, clear your floor of clutter and use a Virtual Wall
to confine Roomba to one room.
Brush
Caps
Cleaning Modes: While cleaning, Roomba automatically calculates the room
size and adjusts its cleaning time appropriately.
Spot Mode: Roomba will spiral approximately 3 feet in diameter and then
spiral back to where it started, intensely cleaning a localized area.
8iRobot Roomba 500 Series
Cleaning System
Roomba features a patented three-stage cleaning system.
Floor Surfaces
Roomba works on wood, carpet, tile, vinyl, and linoleum, and adjusts
automatically to different floor types.
Roomba automatically senses stairs and other cliffs. Roomba might stall
when confronting rounded edges and might slide over particularly slippery
surfaces. Extremely dark-colored oors may contribute to Roomba’s sensors
working less effectively.
Anti-tangle system
Roomba won’t get stuck on cords, carpet fringe or tassels. When Roomba
senses it has picked up a cord or tassel, it will automatically stop its main
brushes or side brush and try to escape. Roomba may make a clicking noise
when anti-tangle is activated.
1
Side brush sweeps
along edge of walls
and into corners.
2
Two counter-
rotating brushes
scoop up dirt,
hair, and debris
into the bin.
3
Powerful vacuum picks up the
remaining fine particles, dirt, and
hair. The filter traps dust and
small particles.
Filter
For more detailed information, visit: www.irobot.com 9
Cleaning Modes
Roomba will clean based on the cleaning mode you select. Roomba has three
cleaning modes.
Clean Mode (all models)
Roomba automatically calculates the room size and adjusts its cleaning time
appropriately.
Spot Mode (all models)
Roomba will spiral approximately three feet in diameter and then spiral back
to where it started, intensely cleaning a localized area.
Scheduled Cleaning Mode (Models 550 and above)
When a future cleaning time is programmed, Roomba enters Scheduled
Cleaning Mode. When scheduled to clean, Roomba will occasionally flash
its next cleaning time to remind you of its schedule. At the specied time,
Roomba leaves its Home Base, cleans, and then returns to the Home Base to
recharge when it’s done.
10 iRobot Roomba 500 Series
Battery Storage and Charging
TIP: For best performance, charge Roomba’s battery overnight before using
Roomba for the first time. Always leave the battery inside Roomba with
Roomba plugged in or on the Home Base.
Roomba is powered by a rechargeable battery. Roomba’s battery can last for
hundreds of cleaning cycles before a replacement is necessary.
Battery Life
To extend the battery life, iRobot recommends always storing Roomba
plugged in. For more details on how to maintain Roomba’s battery life,
visit www.irobot.com.
Tip: If Roomba’s battery is warm, Roomba will wait for the battery to cool down
before beginning a charge cycle.
Tip: For long-term storage, iRobot recommends that the battery be fully charged
and then removed from the robot and stored in a cool, dry place.
Cleaning Time
You should fully charge Roomba’s battery before each cleaning cycle. When
fully charged, Roomba’s battery will last for at least one full clean cycle.
16-Hour Refresh Charge
If Roomba has been left off the Home Base/charger for an extended period,
Roomba will initiate a special 16-hour charge cycle. This extensive charge
refreshes Roomba’s battery and extends the battery life. While charging,
Roomba’s Clean light button will pulse quickly. Note: For best results, do not
interrupt this Refresh Charge.
For more detailed information, visit: www.irobot.com 11
Clean button light What it means
Red Battery empty
Amber pulsing Charging
Green solid Fully charged
Amber flashing 16-hour refresh charge
TIP: When Roomba is on the Home Base, always make sure that the Home Base
Power and Docked lights are on.
Or
Charging Roomba
Charge Roomba in one of two ways:
Roomba uses the “Clean” button light to indicate that it is charging. Use this
chart to determine the status of the battery:
Clean Button
Light
Using the Home
Base
Using the Power Supply
Only
12 iRobot Roomba 500 Series
Virtual Walls® (included with Models 510 - 530)
The iRobot Roomba Virtual Walls create an invisible barrier that Roomba will
not cross. This invisible barrier can be used to confine Roomba to a particular
room or area, and prevent it from getting too close to electrical or computer
cords, delicate objects on the floor, etc.
The Virtual Walls can be set to block an area up to eight feet long or longer, in
three-step increments: 0-3 ft., 4-7 ft., 8+ ft. Note that the width of the Virtual
Walls’ beam also increases as its length increases, creating a cone-shaped
area which Roomba cannot pass. The Virtual Wall also creates a halo of
protection around itself, preventing Roomba from getting too close.
D Alkaline
Batteries
(not included)
Battery
Door
Distance
Range
Battery Installation
The Virtual Wall requires two “D”
alkaline batteries and
automatically shuts off after 135
minutes. If the power light blinks
green, the batteries will soon
need
to be replaced.
Range Adjustment
Use the slider bar to adjust
the length of the barrier. A
longer range will drain the
battery faster.
TIP: Point the iRobot Roomba logo on the Virtual Wall towards the area you
would like to block.
TIP: For best performance, place the Virtual Wall on the outside of the doorway
you wish to block. Set the Virtual Wall to the shortest setting possible to
extend the Virtual Wall battery life.
Additional Virtual Walls may be purchased at www.irobot.com.
Virtual Walls are compatible with all 500 Series Roomba vacuuming robots.
For more detailed information, visit: www.irobot.com 13
Virtual Wall Lighthouses(Models 535 and above)
Virtual Wall Lighthouses can be switched between Lighthouse mode and
Virtual Wall mode.
In Lighthouse mode they help Roomba navigate around your home, nd the
Home Base, and allow Roomba to clean one room before starting the next.
In Virtual Wall mode, they keep Roomba cleaning where you want and out of
off-limit areas.
Lighthouse
Virtual W a ll
Distance
0m-1
1-5m
3m+
Range
Power
Light
TIP: Virtual Wall Lighthouses turn on and off automatically as Roomba is turned
on or off. When they are on, a light will illuminate on the top of the Virtual
Wall Lighthouse. To conserve their battery life, remove the batteries if you
are not planning on using the Virtual Wall Lighthouse when cleaning.
Lighthouse
Virtual Wa ll
Mode
Selector
C Alkaline
Batteries
(not included)
Use the Mode Selector to set the Virtual Wall Lighthouse to Virtual Wall or
Lighthouse mode.
Virtual Wall Lighthouses indicate that their batteries will soon need to be
replaced by flashing the power light repeatedly.
14 iRobot Roomba 500 Series
Virtual Wall Lighthouses(Models 535 and above)
Lighthouse Mode
In Lighthouse mode, the Virtual Wall Lighthouse helps Roomba navigate
around your home and allows Roomba to clean room-to-room.
Place a Lighthouse in the doorway between to rooms with the iRobot Roomba
logo facing forward. Roomba will clean the room it starts in, navigate to the next
room, and then clean the second room. When Roomba has completed cleaning,
it will use the Lighthouse to navigate back to the Home Base.
With two Virtual Wall
Lighthouses in lighthouse
mode, Roomba will clean
Room 1 for approximately
25 minutes, then clean
Rooms 2 and 3 for 25
minutes each, and then
return to the Home Base.
Home
Base
Lighthouse
Room 1 Room 2
Room 3
Lighthouse
Place Lighthouse
in the center of
the door frame
Start
Roomba
here
For more detailed information, visit: www.irobot.com 15
Virtual Wall Lighthouses(Models 535 and above)
Virtual Wall Mode
In Virtual Wall mode, the Lighthouse creates an invisible barrier that
Roomba will not cross.
Use the slider bar to adjust the length of the barrier. A longer range will drain
the battery faster.
In Virtual Wall mode, the Lighthouse blocks an area up to eight feet or longer,
in three-step increments: 0-3 ft., 4-7 ft., 8+ ft. A small halo prevents Roomba
from bumping into the Lighthouse and a larger cone-shaped area blocks off
areas of your home where you don’t want Roomba to go.
Additional Virtual Wall Lighthouses may be purchased at www.irobot.com.
Virtual Wall Lighthouses are compatible with Models 535 and above.
Distance
Range
Selector
TIP: Use Virtual Wall Lighthouses in Virtual Wall mode to block doorways or to
keep Roomba out of off-limit areas.
TIP: In Virtual Wall mode, iRobot recommends setting up the Virtual Wall
Lighthouse behind the door jamb as shown on pg. 12.
TIP: Don’t manually move Roomba while it is cleaning. Avoid placing
Lighthouses or Virtual Walls too close to each other, the Home Base or
furniture that could block the beams. Doing so could prevent Roomba from
recognizing the Lighthouses or returning to the Home Base.
16 iRobot Roomba 500 Series
Scheduling Roomba (Models 550 and above)
Setting the Time
You must set the time before scheduling Roomba to clean.
1
Press and hold CLOCK.
2
While holding CLOCK, use the DAY, HOUR, and
MINUTE buttons to set the correct time.
3
Release CLOCK. Roomba will beep to indicate
that the time has been set.
Setting a Schedule
You can schedule Roomba to clean once per day, up to seven times per
week. You must set the time before setting a schedule.
To set a schedule:
1
Press and hold SCHEDULE.
2
While holding SCHEDULE, use the DAY, HOUR,
and MINUTE buttons to set the schedule.
3
Release SCHEDULE. Roomba will beep to
indicate that the schedule has been set.
Viewing and Deleting Schedules
To view Roomba’s scheduled cleaning times:
1
Press and hold SCHEDULE.
2
While holding SCHEDULE, press the DAY
button to cycle through Roomba’s scheduled
cleaning times.
3
Release SCHEDULE.
For more detailed information, visit: www.irobot.com 17
To Delete a Schedule
1
Press and hold SCHEDULE.
2
While holding SCHEDULE, press the DAY button
to cycle through Roomba’s scheduled cleaning
times.
3
When Roomba is displaying the scheduled
cleaning time you’d like to delete, press and
hold DAY to delete the scheduled cleaning time.
Roomba will beep to indicate the schedule has
been deleted.
4
Release SCHEDULE.
To Change a Schedule
1
Press and hold SCHEDULE.
2
While holding SCHEDULE, press the DAY button
to cycle through Roomba’s scheduled cleaning
times.
3
When Roomba is displaying the scheduled
cleaning time you’d like to change, press the
HOUR and MINUTE buttons to change the
scheduled cleaning time.
4
Release SCHEDULE. Roomba will beep to
confirm that the schedule has been changed.
Models 535 and above may also be scheduled with the Wireless Command
Center (sold separately).
18 iRobot Roomba 500 Series
Home Base®
Roomba returns to the Home Base at the end of a cleaning cycle or when its
battery is running low. Roomba needs to find the infrared signal of the Home
Base in order to return.
Always keep the Home Base plugged in. When Roomba is on the Home Base,
the Power and Docked lights will be green to indicate Roomba is charging.
Home Base Location
You should position the Home Base on a hard level surface and in an area
where Roomba has a clear path to return at the end of a cleaning cycle.
Locate the Home Base against a wall or other immovable object to prevent it
from sliding during docking. If Roomba is unable to dock on its first attempt, it
will try again until it docks successfully.
Chair Table
Home
Base
Stairs
Area Rug
To have Roomba look for the Home Base and recharge its battery, simply
press the “Dock” button.
For more detailed information, visit: www.irobot.com 19
Wireless Command Center
The Wireless Command Center is compatible with Models 535 and above only.
It is included with Models 570 and above, and is otherwise available as an
accessory.
The Wireless Command Center lets
you conveniently control Roomba’s
functions. You can use it to turn
Roomba on and off, schedule Roomba
to clean, and steer Roomba around
your room.
To schedule Roomba to clean, use the
buttons on the Wireless Command
Center as if they were on the robot
itself. See page 16 for details on
setting Roomba’s clock and setting,
changing and deleting schedules.
Before using your Wireless Command Center for
the first time, install four AA alkaline batteries.
All Command Centers are setup to control only one Roomba. To pair a wireless
command center with a robot, first install new batteries while holding down the
left turn button, the lights will flash in a sequence from Saturday to Sunday.
Second, place the Command Center directly on top of the robot you would like
to pair it with and hold the “Day” and “Minute” buttons until the robot flashes
and beeps once. The robot and Command Center are now paired.
TIP: When powered on, the lights on the Wireless Command Center will
sequence from Sunday to Saturday until the robot is under its control.
Battery Indicator
Troubleshooting Indicator
20 iRobot Roomba 500 Series
Maintenance
To keep Roomba running at peak performance, it is recommended that you
perform the following maintenance regularly:
TIP: Bin emptying and brush cleaning should be done after every cleaning cycle.
Also be sure to regularly check the front caster wheel for hair build up.
TIP: If you notice Roomba picking up less debris from your floor, empty the bin
and clean the brushes.
Empty bin
A. Clean or replace filter.*
B. Clean filter
compartment.
Visit www.irobot.com for information on keeping Roomba running at peak performance.
*Replace filter every 2 months
1
Remove and empty Roomba’s bin after each use
2
Clean Roomba’s filter compartment
Press button and pull
to remove bin.
  • Page 1 1
  • Page 2 2
  • Page 3 3
  • Page 4 4
  • Page 5 5
  • Page 6 6
  • Page 7 7
  • Page 8 8
  • Page 9 9
  • Page 10 10
  • Page 11 11
  • Page 12 12
  • Page 13 13
  • Page 14 14
  • Page 15 15
  • Page 16 16
  • Page 17 17
  • Page 18 18
  • Page 19 19
  • Page 20 20
  • Page 21 21
  • Page 22 22
  • Page 23 23
  • Page 24 24
  • Page 25 25
  • Page 26 26
  • Page 27 27
  • Page 28 28

iRobot Roomba Owner's manual

Category
Robotic vacuum cleaners
Type
Owner's manual

Ask a question and I''ll find the answer in the document

Finding information in a document is now easier with AI