Xerox AltaLink B8045 Maintenance

Category
Toners & Laser Cartridges
Type
Maintenance

Xerox AltaLink B8045 is a versatile multifunction printer that offers advanced features for efficient document handling. With its ability to print, copy, scan, and fax, it's an ideal choice for small offices or workgroups with moderate to high-volume printing needs. Equipped with cutting-edge technology, the AltaLink B8045 delivers crisp and professional-looking outputs, making it perfect for producing reports, presentations, marketing materials, and more. Its user-friendly interface and intuitive touchscreen display ensure easy navigation and operation.

Xerox AltaLink B8045 is a versatile multifunction printer that offers advanced features for efficient document handling. With its ability to print, copy, scan, and fax, it's an ideal choice for small offices or workgroups with moderate to high-volume printing needs. Equipped with cutting-edge technology, the AltaLink B8045 delivers crisp and professional-looking outputs, making it perfect for producing reports, presentations, marketing materials, and more. Its user-friendly interface and intuitive touchscreen display ensure easy navigation and operation.

Xerox® AltaLink® B8045/55/65/75/90
Multifunction Printer Customer Training Maintenance
Consumables are supplies that are depleted during the operation of the device. The device can
be configured to display an alert on the touch screen and via email if a consumable is nearing
the end of its life and needs replacing. If a consumable has reached the end of its life and must
be replaced, an error message is displayed on the touch screen.
Genuine Xerox consumables are specially formulated to provide the best image quality and
most reliable printing. Customers can order Xerox consumables online or by contacting their
local Xerox Representative and giving the company name, product number and the machine
serial number. The Supplies Plan feature on the device can be used so that it contacts Xerox®
automatically to re-order consumables.
To replace a consumable, follow the instructions on the touch screen or use the instructions
provided with the consumable. For guidance, orange colored information labels are affixed to
parts of the device. WARNING When replacing consumables do not remove the covers or guards that are
fastened with screws. You cannot maintain or service any of the parts that are behind these covers and
guards. Do not attempt any maintenance procedure that is not specifically described in the
documentation supplied with your device.
You can replace the following consumables:
Toner Cartridge Print Cartridge
Fuser Module Transfer Roller
Replacing the Toner Cartridge R1
1. Open the front door.
2. Rotate the orange toner cartridge locking lever
counterclockwise to release the toner.
3. Remove the used toner cartridge and dispose of it according to the
instructions provided in the box.
4. Unpack the new toner cartridge and shake the cartridge gently from
side to side to loosen the toner. Keep the cartridge upright to avoid
spilling any toner.
NOTE: If you spill toner onto your skin or clothing, shake off as much as
possible then brush with a dry cloth. Use a vacuum cleaner to remove
spills from carpet.
5. Insert the new cartridge into the device.
6. Rotate the orange toner cartridge locking lever clockwise to lock the
toner cartridge into place and close the front door.
Replacing the Print Cartridge R2
WARNING Keep print cartridges upright to avoid spillage and do not
place on unprotected surfaces.
1&2. Open the front door. Immediately open and gently lower
the clearance door on the left side of the device using the handle.
Open left side clearance door BEFORE removing R2 Print
Cartridge.
3. Open the new print cartridge box, remove the card liner and
place it next to the box.
4. Open the re-sealable bag, Remove the top packaging and place
it on top of the card liner.
5. Unpack the new print cartridge and place it on top of the
packaging, next to the box.
6. Rotate the orange print cartridge locking lever counterclockwise
until it clicks. The lever is to the right of the print cartridge R2.
7. Lift the orange cartridge handle slightly and pull the cartridge
half out of the device. Lift the carrying handle on the top of the
cartridge and use it to support the weight while you remove it
from the device.
8. Place the old print cartridge in the box the new cartridge came
in and reseal the bag.
9. Insert the new print cartridge into the device using the orange
handle on the top to lift it. Rotate the orange lever clockwise to
latch the print cartridge into place.
10. Close the front door.
11. Close the door on the left side of the device, lift and gently
push it towards the device until you hear it click into place.
Clean the Print Head
Replacing the Fuser Module Careful in this area may be HOT
1. Power off the device, then disconnect the power cord from the
device.
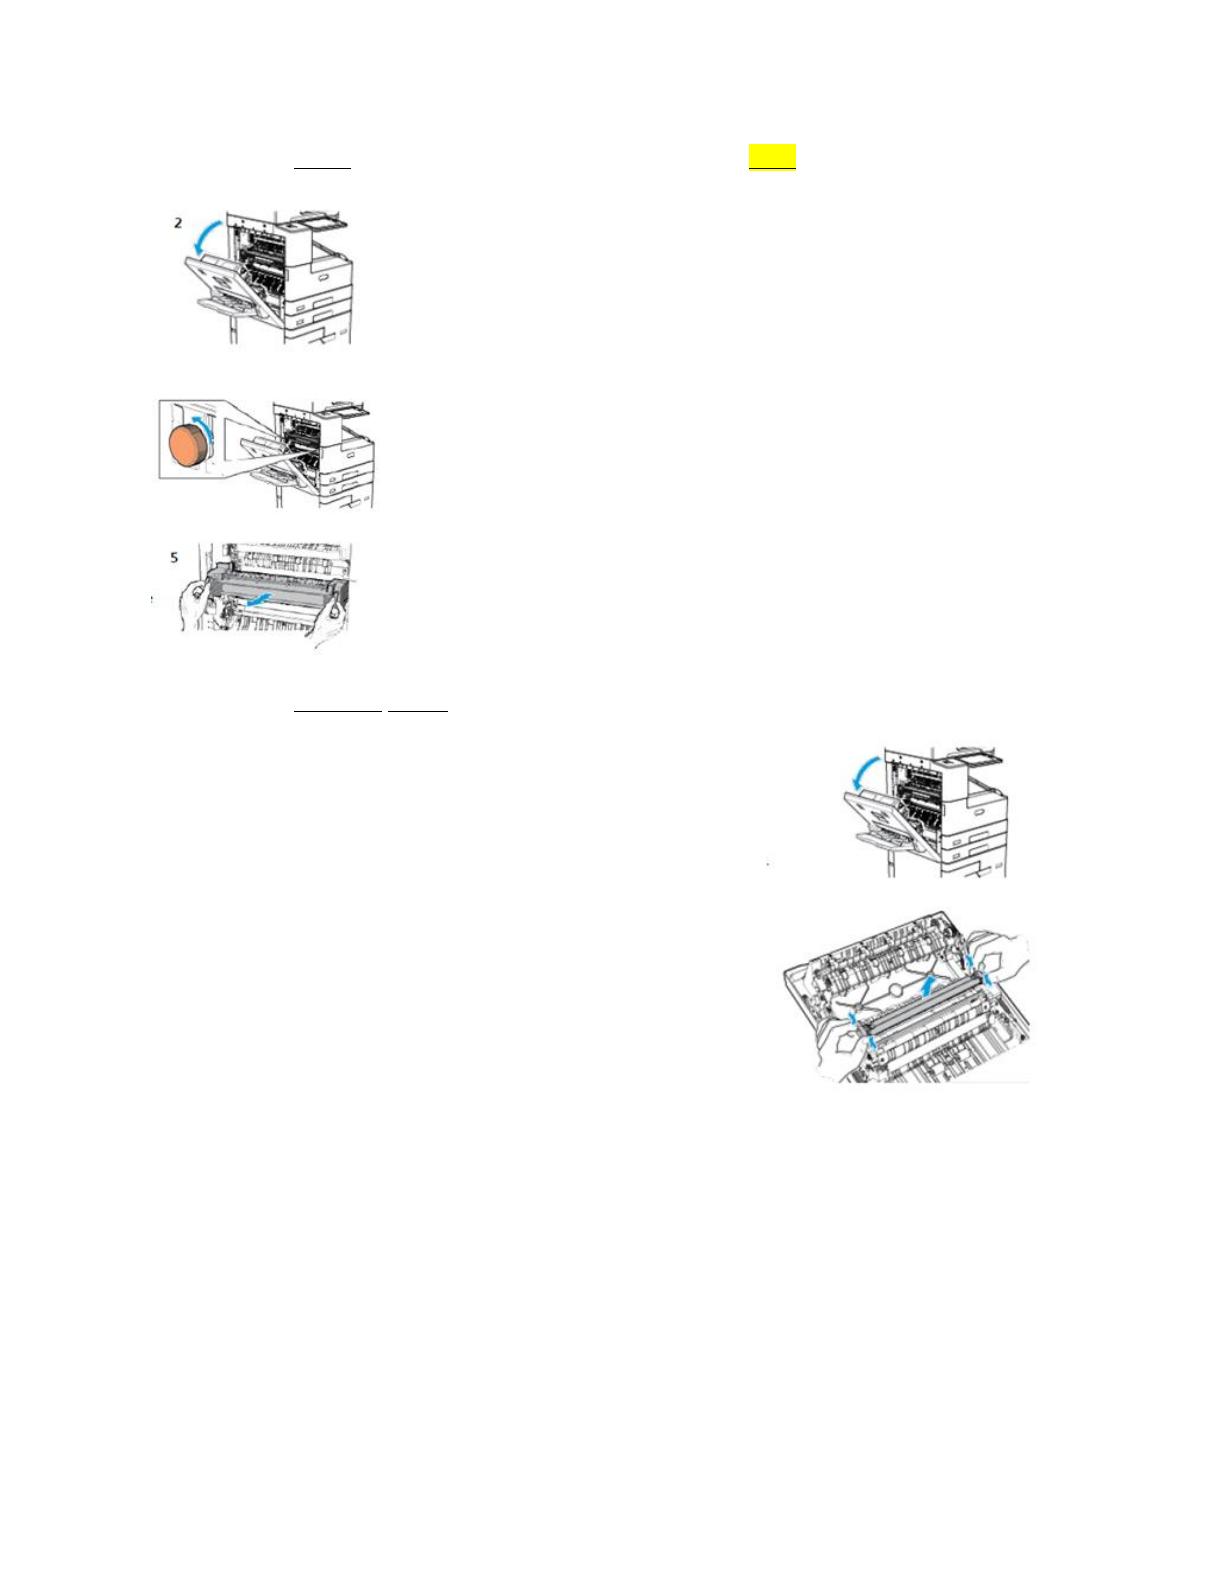
2. Remove any paper from Tray 5. Open the left side door of the
device.
3. Locate the fuser module in the side of the printer. It is labeled R3.
4. To release the fuser module, rotate the orange thumbscrews
counterclockwise. The thumbscrews are at each end of the fuser
module.
5. Pull out the used fuser module.
6. Unpack the new fuser module. Retain the packaging.
7. Insert the new fuser module.
8. To fasten the fuser module, rotate the orange thumbscrews
clockwise.
9. Place the used fuser module in the packaging that came with the
new fuser module.
10. Close the left side door of the device. Reconnect the device to the
power cord, then power up the device.
Replacing the Transfer Roller - When the Transfer Roller is replaced you must reset the Supply
Counter.
1. Power off the device, then disconnect the power cord from
the device.
2. Remove any paper from Tray 5.
3. Open the left side door of the device.
4. Locate the transfer roller in the printer side door. It is
labeled R4.
5. To remove the used transfer roller, squeeze the orange tabs
at both ends of the transfer roller and lift the transfer roller
out of the printer.
6. Unpack the new transfer roller. Retain the packaging.
7. To install the new transfer roller, position the transfer roller
in the side door as shown. Squeeze the orange tabs at both
ends of the transfer roller and press down gently, until it clicks
into place.
8. Place the used transfer roller in the packaging that came with the new transfer roller.
9. Close the left side door of the device.
10. Reset the supply life counter. To reset the counter manually:
1. Touch Device and then Tools.
2. Touch Device Settings and then in the Features list, touch Supplies > Supply Counter
Reset.
3. Touch Transfer Roller and then Reset Counter. The Reset Confirmation Counter screen is
displayed.
4. To reset the counter, touch Reset. The counter is set to 100% remaining.
5. Close the window.
Cleaning the Device
WARNING When cleaning the device, do not:
Use organic or strong chemical solvents or aerosol cleaners. Do not pour fluids directly onto any area.
Do not use pressurized air-spray cleaning aids on or in this equipment.
WARNING Keep all cleaning materials out of the reach of children.
Clean the exterior of the device once a month. Wipe the paper tray, output tray, control
panel, and other parts with a damp, soft cloth. After cleaning, wipe with a dry, soft cloth. For
stubborn stains, apply a small amount of mild detergent to the cloth and gently wipe the
stain off.
To maintain print quality, the print head should be cleaned regularly. The print head can be
cleaned at any time - we recommend that it is cleaned when toner is replaced.
To clean the control panel, touch screen, Document Feeder and output trays, use a soft, lint-free
cloth, lightly dampened with water to wipe clean the control panel, including the touch screen.
Wipe clean the Document Feeder, output trays, paper trays and other outside areas of your
device. Remove any residue with a clean cloth or paper towel.
Document Feeder rollers should be cleaned once a month. To clean the document feeder
rollers in the document handler:
1. Open the top cover of the document feeder.
2. While turning the rollers, wipe each one with a clean,
lint free cloth moistened with water.
3. Wipe the separation pad until it is clean.
4. Once completed close the document feeder.
Clean the Glass - To ensure optimum print quality by
preventing output with streaks, smears and other marks
that may transfer from the glass areas when scanning,
you should regularly clean the glass areas of the device.
See the User Guide or xerox.com/support for additional support information.
1 / 1

Xerox AltaLink B8045 Maintenance

Category
Toners & Laser Cartridges
Type
Maintenance

Xerox AltaLink B8045 is a versatile multifunction printer that offers advanced features for efficient document handling. With its ability to print, copy, scan, and fax, it's an ideal choice for small offices or workgroups with moderate to high-volume printing needs. Equipped with cutting-edge technology, the AltaLink B8045 delivers crisp and professional-looking outputs, making it perfect for producing reports, presentations, marketing materials, and more. Its user-friendly interface and intuitive touchscreen display ensure easy navigation and operation.

Ask a question and I''ll find the answer in the document

Finding information in a document is now easier with AI

Ask the document