Page is loading ...

INSTALLATION INSTRUCTIONS
07/27/2007
WARNING! SHUT POWER OFF AT FUSE OR CIRCUIT BREAKER.
Fig. 1
Fig. 2
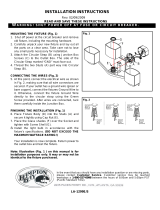
MOUNTING THE FIXTURE (Fig. 1)
1. Shut off power at the circuit breaker and remove old
fixture from ceiling, including the crossbar.
2. Carefully unpack your new fixture and lay out all the
parts on a clear area. Take care not to lose any small
parts necessary for installation.
3. Attach the Circular Strap (A) to the Junction Box with
the two Junction box Screws (B) as shown. The side
of the Circular Strap marked “GND” must face out.
4. Thread the Studs (C) into the pre-drilled holes of the
Circular Strap (A) space the same distance apart as
the hole in the Canopy (D).
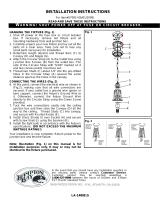
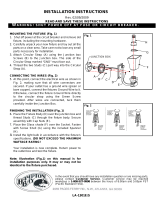
CONNECTING THE WIRES (Fig. 2)
5. Connect the fixture wires to the junction box wires as
shown in the wiring diagram. Making sure all wire
connectors are secured and do not easily pull off with
a slight tug. If there is no Green Ground wire from the
junction box, connect the Fixture Ground Wire to the
Circular Strap with the green Screw provided.
COMPLETING THE INSTALLATION (Fig. 1)
6. Thread Canopy (D) onto Studs (C) and secure with
Knurled Knobs (E).
7. Place the Glass Shade (G) and Metal Tube (H) over
the socket (F), fasten with Screw Shell (I) by using
the Spanner (J) provided.
8. Install the light bulb in accordance with the fixture’s
specifications. (DO NOT EXCEED THE MAXIMUM
WATTAGE RATING!)
Your installation is now complete. Return power to
the outlet box and test the fixture.
Note: Illustration (Fig. 1) on this manual is for
installation purposes only. It may or may not be
identical to the fixture purchased.
L
A
-1170E
/
S
FIXTURE
WIRES
Black or
Smooth
H
O
USE
WIRES
Black
(Hot)
FIXTURE
WIRES
White or
Ribbed
H
O
USE
WIRES
White
(Neutral)
FIXTURE
WIRES
Bare
Copper
(Ground)
H
O
USE
WIRES
Green
(Ground)
In the event that you should have any installation question
or are missing parts, please contact Customer Service.
Customer service may be reached weekdays a
1-800-527-0998 between the hours of 8:00am and 5:00pm
PST
(
Pacific Standard Time
)
.
I
D
J
F
C
A
B
G
E
H
/