Page is loading ...

M965106
Installation
Instructions
Certified to comply with ANSI A112.18.1M
1
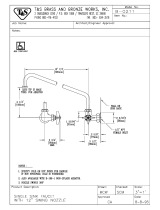
INSTALL FAUCET
Installation with MOUNTING RING: Place MOUNTING RING (1)
over the hole in the sink or mounting surface. Make sure SEAL (4)
is installed into the recess of the MOUNTING RING (1). Insert all
HOSES (2) and SHANK (3) through MOUNTING RING (1) and
mounting surface. Figure A.
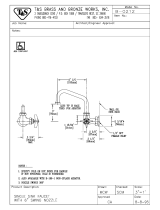
Assemble RUBBER WASHER (6), BRASS WASHER (7)
and threaded LOCKNUT (8) onto SHANK (3) from
underside of sink or mounting surface. Hand tighten
LOCKNUT (8). Check that rotation of HANDLE (5)
from HOT to COLD is centered. Figure B.
Thank you for selecting American-Standard...the benchmark of fine
quality for over 100 years.
To ensure that your installation proceeds smoothly--please read these
instructions carefully before you begin.
The system and installation shall comply with applicable state and local regulations.
RECOMMENDED TOOLS
Adjustable WrenchRegular Screwdriver Phillips Screwdriver
Turn off water at
main supply.
CAUTION
Channel Locks
1
6
7
8
FILTER HOUSING
MOUNTING BRACKET
FILTER HOUSING
FILTER FAUCET
ASSEMBLY
All American Standard Products Are Water Tested At Our Factory.
Some Residual Water May Remain In The Valve During Shipping.
UNPACKING
1. Remove the Filter Faucet items from the carton. The illustration below shows all items after they have been
removed from the carton. Some items may be packaged partially assembled to other items.
FACTORY
INSTALLED
SEAL
5
2
3
5
Figure A.
Figure B.
HOT
COLD
FILTER
H
a
n
d
l
e
t
r
a
v
e
l
i
s
c
e
n
t
e
r
e
d
4
SINGLE CONTROL
KITCHEN FILTER FAUCET
4662.001
1
MOUNTING KIT
MOUNTING RING
AND SEAL
MOUNTING
SURFACE
*WATER
BOTTLE
F30
FILTER
*Note: The water bottle has not been evaluated
to the NSF/ANSI 42 and 53 standards.

M965106
SECURE FILTER FAUCET TO MOUNTING SURFACE
2
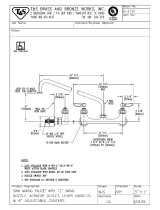
CONNECT HOT AND COLD WATER SUPPLIES
3
1
2
Use a screwdriver to tighten SCREWS (1) on LOCKNUT (2).
Work your way around LOCKNUT (2), tightening the SCREWS (1)
slightly each time until all are snug to ensure even pressure.
RUBBER WASHER
METAL WASHER
HOT
COLD
SUPPLY
VALVES
LOOP SUPPLIES
IF REQUIRED
2
1
Turn off hot and cold water supplies before beginning.
Connect FLEXIBLE SUPPLIES (1, 2) directly to wall supplies.
Connection on fitting supplies are 3/8" compression. Connect
left supply (Red Stripe) to Hot and right supply (Blue Stripe) to
the Cold wall supply. Use adjustable wrench to tighten
connections. Do not over tighten.
Faucet supplies are 20-1/2" long from base of faucet.
Note: If longer supply length is required, installer
must purchase additional parts separately.
Important: If SUPPLY HOSES (1, 2) are
too long, loop as illustrated to avoid kinking.
RED STRIPE
20-1/2"
BLUE
STRIPE
2

M965106
2
1
4
3
PUSH HOSES UP UNTIL
FULLY ENGAGED
INTO FILTER HOUSING
BLUE AND WHITE
CONNECTORS
(Push in to remove
HOSES)
BLUE
WHITE
1
3
2
ATTACH FILTER LINES
Push the BLUE HOSE (1) into the Blue Quick Connect Union and the WHITE HOSE (2) into the White Quick Connect Union
at bottom of the FILTER HOUSING (3). The HOSES (1, 2) must be fully engaged or the connection will leak.
Note: How to disconnect the HOSES (1, 2) from the FILTER HOUSING (3). Push and hold the Blue or White
connector in. While holding the connector in, pull out the Hose.
5
FILTER HOUSING BRACKET INSTALLATION (Below counter)
Important: Before mounting the FILTER HOUSING
MOUNTING BRACKET make sure that the Blue and
White Hoses will be able to reach the connectors
on the FILTER HOUSING bottom. Do not kink the
Blue and White Hoses.
Attach the FILTER HOUSING MOUNTING BRACKET (1)
to the inside of the kitchen cabinet below the counter.
Use the SCREWS (2) provided.

M965106
MARK MONTH
AND DAY
FIGURE C.
FIGURE B.
FIGURE A.
4
NOTCH
Soak FILTER (1) in clean water for 15 minutes to saturate the carbon based FILTER (1).
Insert the FILTER (1) into the top of the FILTER HOUSING (2). FIGURE A.
Turn the FILTER (1) clockwise to engage the threads and continue to
turn until the notch on the FILTER (1) faces forward and is aligned
with notch in the FILTER HOUSING (2) thread ring. FIGURE B.
Use permanent ink to mark the filter replacement
date (month and day) on the INDICATOR STICKER (4).
This date should be 3 months from the date of
installation. FIGURE C.
Push the FILTER HOUSING (2) with the installed
FILTER (1) into the FILTER HOUSING MOUNTING
BRACKET (3). FIGURE B.
FILTER INSTALLATION
6
CLOCKWISE
1
1
2
NOTCH
IN FILTER
FRONT NOTCH
IN FILTER HOUSING
THREAD RING
4
2
3

M965106
SPOUT
TESTING INSTALLED FAUCET AND FILTER OPERATION
HANDLE
OPERATION
HOT
OFF
COLD
FILTER
Move handle into "OFF" position and remove Aerator (1).
Turn on water supplies and check connections for leaks.
Operate handle up and down, left and right to flush water lines thoroughly.
Move the Faucet Handle in filtered water position (handle in the off, far right position). There will be a small
resistance as the Handle is moved into the filter position.
Flush to drain for 5 minutes.
Replace the aerator.
The Filter Faucet installation is now complete. Please carefully read the operation instructions to
ensure optimal performance.
7
1
HANDLE
HANDLE
5
WATER
SUPPLIES

NOTCH
FILTER
HOUSING
MOUNTING
BRACKET
F30 FILTER
(Remove and replace
with new F30 Filter)
FILTER
NOTCH
M965106
6
HOT COLD
FILTER
HANDLE
Filter Cartridge Replacement
Replacement (F30) filters can be purchased online at www.americanstandard-us.com.
Enter “F30” in the search bar at the top and follow the ordering instructions.
OR
Scan the QR code with your web enabled smart phone to load the web page to place
order. Carrier charges may apply.
The Filter Cartridge should be left in protective film until ready for installation. The F30
Filter Cartridge is a high performance carbon based filter developed specially by
American Standard for the “streaming™ Filter Faucet”.
Note: Use only F30 Filter Cartridges with the streaming™ Filter Faucet.
QR Code
• Remove the Filter Housing from the Mounting Bracket.
• Turn the Filter counter clockwise until the Filter pops out of the Filter
Housing. Discard the old Filter.
• Remove the protective wrapping from the replacement Filter Cartridge.
Important: Soak Filter in clean water for 15 minutes to saturate.
• Insert the Filter into the top of the Filter Housing.
• Turn the Filter clockwise to engage the threads and continue to turn until the
notch on the Filter faces forward and is aligned with notch in the Filter Housing
thread ring.
• Use permanent ink to mark the Filter replacement date (month and day) on the
Indicator Sticker. This date should be 3 months from the date of installation.
Refer to Step 6 in the installation instructions for more detailed information.
• Push the Filter Housing with the new Filter into the Filter Housing Mounting Bracket.
• Turn the faucet handle to the filtered water position and allow filtered water to flow.
• Allow cold water to run through the new filter to flush the system for 5 minutes.
How To Replace the OLD Filter with a NEW Filter
System Tested and Certified by NSF International against
ANSI/NSF Standard 42 for the reduction of Chlorine,
Taste and Odor, Particulate, Class I, and against ANSI/NSF
Standard 53 for the reduction of Lead.
NSF
Do not use with water that is microbiologically unsafe or of unknown quality
without adequate disinfection before or after the system.
"Important Notice; Read the Manufacturer's Performance Data Sheet"
Water Filtering System
Faucet Operating Instructions
Water Delivery
• The Filter Faucet provides four options for water delivery:
Unfiltered cold, mixed or hot water and Filtered cold water.
• Unfiltered water is delivered from the normal faucet Aerator.
Filtered water is delivered from the Filter Water Nozzle, which
is positioned in back of Aerator.
• COLD, FILTERED WATER:
With the Faucet handle in the closed position move the faucet
handle to the right. Push the Faucet Handle past the resistance
and filtered water will begin to flow from the Filter Water Nozzle.
Operating Specifications
• Capacity: Streaming™ Filter has a rated service life of 250 gallons (930L)
• Pressure requirement: 20 - 125 psi (0.7 - 8.6 bar)
• Temperature: 35 - 100°F (2-38°C)
• Flow Rate: 0.70 gpm (2.65 lpg)

M911261-0070A
SPOUT SEAL
M962146-0070A
MOUNTING RING KIT
M921540-0070A
“U” CONNECTOR
M965106
M922262-0070A
*WATER BOTTLE
M952460-0070A
STREAMING FILTER
CARTRIDGE (F-30)
M953325-0070A
FILTER HOUSING
M923510-0070A
FILTER HOUSING
MOUNTING BRACKET
CHROME
STAINLESS STEEL
002
075
REPLACE THE "YYY" WITH
APPROPRIATE FINISH CODE
066070-YYY0A
AERATOR
For toll-free information and answers to your questions, call:
One Centennial Avenue, Piscataway, NJ 08855
1-800-442-1902
Weekdays 8:00 a.m. to 6:00 p.m. EST
IN CANADA 1-800-387-0369 (TORONTO 1-905-306-1093)
Weekdays 8:00 a.m. to 7:00 p.m. EST
IN MEXICO 01-800-839-1200
Product names listed herein are trademarks of American Standard Inc.
© AS America, Inc. 2010
HOT LINE FOR HELP
MODEL NUMBERS
SINGLE CONTROL
KITCHEN FILTER FAUCET
4662.001
M961772-0070A
FILTER CLUTCH
A918585-0070A
CARTRIDGE SCREWS
030126-0070A
BUTTON AND SCREW KIT
M962007-YYY0A
HANDLE KIT
M907312-YYY0A
CARTRIDGE CAP
A913877-0070A
CAP HOLDER
A954410-0070A
CARTRIDGE AND SEALS
A912746-OO7OA
MANIFOLD O-RING
7
M962010-YYYOA
MOUNTING RING KIT
*Note: The water bottle has not been evaluated
to the NSF/ANSI 42 and 53 standards.
/