Page is loading ...

ML– ACR
Automatic Charging Relays
PN 7620 / PN 7621 (without manual control)
PN 7622 / PN 7623 (with manual control)
990180180 Rev.005
• Magnetic Latch (ML)—draws very low current in the ON or OFF states, and draws moderate current for very
short time when changing state
•StartIsolation(SI)—canbeconguredfortemporaryisolationofHouseloadsfromEnginecircuitduringengine
crankingtoprotectsensitiveelectronics
•EngineIsolation(EI)—canbeconguredforisolationoftwoengineswhilebotharerunningtoprotectengine
electronicsandmaximizealternatoroutput
• Senses charging on two battery banks
•LEDoutputtoremotelyindicatewhenbatteriesarecombinedorisolated
•Tin-platedcopperstudsformaximumconductivityandcorrosionresistance
•Labelrecessesforcircuitidentication
•Silveralloycontactsprovidehighreliabilityforswitchingliveloads
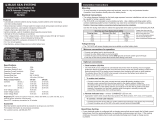
Specications 12V DC 24V DC
Cranking Rating See table below See table below
Intermittent Rating See table below See table below
Continuous Rating See table below See table below
ML-Coil Function Bi-stable Bi-stable
AmperageOperatingCurrent continuous <13mA @ 25°C nominal voltage <13mA @ 25°C nominal voltage
changing stage (20 ms) <7A @ 25°C nominal voltage <4A @ 25°C nominal voltage
OperatingVoltage(contacts) 19-6VDC 18-32VDC
ControlVoltage 19-6VDC 18-32VDC
Relay Contact Position:
-Combine(30sec.) 13.5V 27.0V
-Combine(90sec.) 13.0V 26.0V
-OpenLow(10sec.) 12.35V 24.7V
-OpenLow(30sec.) 12.75V 25.5V
-OpenHigh 16.2V 32.4V
LiveCurrentSwitching 300A@12VDC-10,000Cycles 150A@24VDC-10,000Cycles
Terminal Stud Size 3/8"-16 3/8"-16
Maximum Terminal Stud Torque 140 in-lb (15.8 N•m) 140 in-lb (15.8 N•m)
Ring Terminal Size 3/8" (M10) 3/8" (M10)
TerminalRingDiameterClearance 1.18" (30 mm) 1.18" (30 mm)
ControlCircuitCurrentDraw <40mA <40mA
Remote Switch 2146
Action SustainedSPDTON-OFF-ON
Seals Internal&ExternalGasketPanelSeal
MountingHole 0.83"x 1.45"(21.08mmx36.83mm)
LEDRating 100,000hourshalf-life
Regulatory Meets ISO 8846 and SAE J1171 external ignition protection requirements, CE marked, Rated IP66
Guarantee
BlueSeaSystemsstandsbehinditsproductsforaslongasyouownthem.
Finddetailedinformationatwww.bluesea.com/about.Forcustomerservice,call800.222.7617.
MarineElectricalProd
ucts
Overview of Application
The ML-Series ACR automatically combines batteries during charging, and isolates batteries when there is no
charging sensed on either battery bank.
ML-Series ACR Function 12 Volt DC Operation 24 Volt DC Operation
Automatically combines battery
banks when sensed voltage
levels are:
Above 13.5V for 30 sec.
Above 13.0V for 90 sec.
Above 27.0V for 30 sec.
Above 26.0V for 90 sec.
Automatically isolates battery
banks when sensed voltage
levels are:
Below 9.6V (undervoltage lockout)
Below 12.35V for 10 sec.
Below 12.75V for 30 sec.
Above 16.2V (overvoltage lockout)
Below 19.2V (undervoltage lockout)
Below 24.7V for 10 sec.
Below 25.5V for 30 sec.
Above 32.4V (overvoltage lockout)
Start Isolation or Engine Isolation.Theisolationinputsenableoneoftwofunctionsdependingon
howtheinputsarecongured.
NOTE: The ML-Series ACR can be congured for Start Isolation or Engine Isolation, but not both.
• Start Isolation-Temporaryisolation(3−5 minutes) of house loads from the engine circuit during engine
crankingtoprotectsensitiveelectronics.CongureStartIsolationwhenthereareheavycrankingloads
causingsagsandspikesthatmightdamageelectronicsintheHousecircuit.Seepage3.
• Engine Isolation-Isolatetwoengineswhilebotharerunningtoprotectengineelectronics,andto
maximizealternatoroutput.CongureEngineIsolationwhentheenginemanufacturerrequiresit,and
whenthereareseparatebatteriesforeachengine.Seepage3.
Undervoltage or Overvoltage Lockout.
• Undervoltagelockoutpreventsbatteriesfrombeingcombinedwheneitherbatteryisbelow9.6V@12VDC
operationor19.2V@24VDCoperation.
• Overvoltagelockoutpreventsbatteriesfrombeingcombinedwheneitherbatteryisabove16.2V@12VDC
operationor32.4V@24VDCoperation.
Control Switch Remote Operation. IncludedConturaControlSwitch—sustained(SPDT)ON-OFF-ON.
The Control Switch should be mounted in a convenient location near helm controls to allow for quick access.
NOTE: Alternatively use a momentary (SPDT) (ON)-OFF-(ON) or momentary push button switch to provide cross connect and/or battery isolation.
To cross connect
(combine) battery banks
Switchto“ON”combinesbatterybankstoprovidemorebatterypowerinhard
starting situations.
To isolate battery banks
Switch to “OFF”- when the battery banks are isolated using the Control
Switch, the battery banks remain isolated, and for at least 30 seconds after
thecontrolswitchisreturnedtothe“AUTO”position.
Control Switch Remote Indication or ML-ACR Status
NOTE: The remote switch has two LEDs (top and bottom). These LEDs operate simultaneously-either they are both ON or both OFF.
page1of4
PN Termination
Manual
Control
Control
Circuit
7620 Tinned Wires No 12VDC
7621 Tinned Wires No 24VDC
PN Termination
Manual
Control
Control
Circuit
7622 Tinned Wires Yes 12VDC
7623 Tinned Wires Yes 24VDC
LED INDICATION ACR STATE OR CONDITION
Remote Switch Set to “AUTO” or no Remote Switch Installed
LEDsOFF Batteries are isolated
LEDsON Batteries are combined
LEDsslowsteadyblink,ON-OFF StartorEngineIsolationiscausingbatteriestobeisolated
LEDsquicksteadyblink,ON-OFF
Undervoltage lockout--either battery is below 9.6V@12V DC
operation or 19.2V@24V DC operation.
Overvoltage lockout--either battery is above 16.2V@12V DC
operation or 32.4V@24V DC operation.
Remote Switch Set to OVERRIDE “ON” or “OFF”—Automatic operation is suspended for 10 minutes
after remote switch is returned to “AUTO”
LEDsdoubleblink,
Blink-Blink-Pause,Repeat
Manual override--check ACR for switch states OR
ACR mechanical failure
Wire Size and Current Ratings
Wire Size
Cranking
30 sec.
Intermittent
5 min.
Continuous
(UL 1107)
2/0AWG(70mm²) 1,000A 400A 225A
4/0AWG(120mm²) 1,100A 400A 300A
2×4/0AWG(2x120mm²) 1,450A 700A 500A
Blue Sea Systems, Inc.
4600RyzexWay
Bellingham, WA
98226USA
Phone360.738.8230
www.bluesea.com

Installation Instructions
Mounting
InstalltheML-SeriesACRascloseaspossibletobothbatterybankssothatpositiveandnegativewiresare
asshortaspossible,andvoltagedropinthesewiresiskepttoaminimum
‡
. To avoid corrosion to terminals
andconnectingwires,mountinadryandprotectedlocation.Avoidmountingdirectlyaboveventedleadacid
batteriessothattheACRisnotexposedtocorrosivegassesexpelledfromthebatteries.
‡
BecausetheACRsensesthevoltagebetweenitsnegativegroundconnectionanditspositivesense
connections,bothpositiveandnegativewiresshouldbeasshortaspossiblesothattheinuenceof
voltagedroponsensedvoltagelevelsisminimized.
High Current Primary Circuit Connections (stud terminals A and B)
Forhelpselectingtheappropriatewiresizeandcircuitprotectionrating,gotowww.bluesea.comandclickthe
Circuit Wizard quick link.
To connect high current circuit wires:
1. Connect the battery banks to the stud terminals marked A and B.
2. Torque the high current terminal stud nuts to 140 in-lbs (15.5 N•m) maximum.
NOTES:StudterminalsAandBareinterchangeable.EitherbatterybankcanbeconnectedtoAorB.
If the ACR is to be used for cross connect, fuses between ACR terminals A and B and each battery
positivearenotrequiredaccordingtoABYCguidelines.IftheACRisnotusedforcrossconnect,
installfusestopreventahazardifthereisdamagetothewiresconnectingthebatteriestotheACR.
Thefusesshouldbeplacedascloseaspossibletothebatteriessothatmostofthewireisprotected.
Control Circuit Connection (wire contained in the wire harness)
Ground Connection
ConnecttheblackwireinthewireharnesstoDCgroundatthemaingroundterminalbusbar.
Optional Control Circuit Connections (wires contained in the wire harness)
Cross Connect or Isolate Battery Banks
UsetheincludedControlSwitch—sustained(SPDT)ON-OFF-ON.
Alternativelyuseamomentary(SPDT)(ON)-OFF-(ON)ormomentarypushbuttonswitch(soldseparately)to
providecrossconnectand/orbatteryisolation.TheControlSwitchshouldbemountedinaconvenientlocation
near helm controls to allow for quick access.
NOTE:Use16AWG
wire for all Control Circuit connections to meet ABYC minimum wire size requirement.
Cross Connect or Isolate Battery Banks Using Optional Control Switch
UseControlSwitch–momentaryorsustainedsinglepoledoublethrow(SPDT)toprovidethesesettings:
• CROSS CONNECT ( I )-Batterybanksarecombinedtoprovidemorebatterypowerinhard
starting situations.
• ISOLATE (O) - Battery banks are isolated until the Control Switch is returned to AUTO (center position).
When the Control Switch is returned to AUTO, the ACR returns to automatic mode.
To enable cross connect and isolation, connect:
• Redwirefromharnesstocenter(common)ofSPDTswitch.
• Cross ConnectterminalofSPDTswitchtoDCpositivethrough2Acircuitprotection.
• Isolate terminalofSPDTswitchtoDCnegative(ground).
To enable temporary cross connect using momentary push-button switch:
• Connecttheredwirefromtheharnesstoonesideofamomentarypush-buttonswitch(soldseparately).
• ConnecttheothersideofthepushbuttonswitchtoDCpositivethrough2Acircuitprotection.
page2of4
Overview of Application (continued)
To Connect Sustained (SPDT) ON-OFF-ON Contura Control Switch:
1.Connectpin3oftheControlSwitchtoDC+througha2A(min)circuitprotectiondevice.
2.Connectpin1toDCground.
3.Connectpin2toACR“REMOTE”wire(red).
4.Connectpin8toDC+througha2A(min)circuitprotectiondevice.
5.Connectpin7toACR“LED”groundwire(yellow).
1.965"
49.91m
m
1.010"
25.65mm
.549"
13.95mm
1.125"
28.58mm
TEST CUT
HOLE IN
ACTUAL
CENTER
1.450"
36.83mm
0.830"
21.08mm
Theseinstructionsareintendedtoprovideassistancewiththeinstallationofthisproduct,andare
notasubstituteforamorecomprehensiveunderstandingofelectricalsystems.Westrongly
recommendthatacompetentelectricalprofessionalperformtheinstallationofthisproduct.
Theillustratedwiringdiagramrepresentsacommoninstallationandisnotmeanttobeaguideforwiring
aspecicvessel.Thewiringdiagramshowsasinglebatterybankinstallation.
Disconnectallnegativebatteryconnectionsbeforebeginningtheinstallation.
All unused control wires should be carefully insulated from each other and from accidental contact
usingheatshrinktubingorelectricaltape.Externalcontactorshortingbetweencontrolwirescanlead
to malfunction.
CAUTION
Manual Control Override Knob PN 7622 / PN 7623
The Manual Control Override Knob provides:
• anaddedlevelofsafetythatallowsmanualON-OFFcontrolwithorwithoutpower
• LOCK OFF for servicing the electrical system
RemoteLEDsincontrolswitchindicatewhenML-SeriesACRisinmanualoverridecondition.
Manual Control Override Knob Operations*
†
To combine battery banks
WithOverrideKnobinREMOTEposition,
pushbuttonuntillatched(PushtoLatchOn).
To isolate battery banks that
are connected
Rotate Override Knob to right to release button
fromLatchOnmode(buttonpopsup).Rotate
OverrideKnobtoleft(REMOTEposition).
Topreventremoteoperation
Rotate Override Knob to right
(LOCKOFFposition).
To secure for servicing
WithOverrideKnobinLOCKOFFposition,
passcabletiethroughhole.
1
2
* OperatingtheManualControlOverrideKnobwilloverrideautomaticoperationoftheML-SeriesACRfor
10 minutes if the override forces a change in switch state.
†
TheML-SeriesACRwillwait10minutesifitattemptstoautomaticallyclosewhilethemanualknobis
rotated to LOCK OFF.
990180180 Rev.005

REMOTE (Red)
AB
LED (Yellow)
ISOLATION #1 (Brown)
GROUND (Black)
LED
1
2
START
BATTERY
ENGINE
ML-SERIES
REMOTE
BATTERY
SWITCH
HOUSE
BATTERY
HOUSE
DISTIBUTION
ISOLATION #2 (Green)
ISOLATION #3 (Orange)
2 AMPS
ENGINE
START
SWITCH
ON
OFF
START
3
+8
-7
ENGINE
ENGINE
START SWITCH
ON
OFF
START
ML-SERIES
REMOTE
BATTERY
SWITCH
ML-SERIES
AUTOMATIC
CHARGING
RELAY
LED
NOTE: The remote
switch has two LEDs.
These LEDs operate
simultaneously and
are either both ON
or both OFF.
NOTE: Use circuit protection
only if ACR is not used for
emergency cross-connect.
Engine Isolation
TheML-SeriesACRcanbeconguredtoautomaticallyopenwhentwoenginesaresimultaneouslyrunning
toensurethattworunningenginesareneverelectricallyconnected.Enablethisfeaturetoreduce
noiseandcommunicationcross-talkbetweenengines,andtomaximizetotalpotentialalternatoroutput.
To enable Engine Isolation for two engines:
• Connect the brown wire (ISOLATION #1) from the harness to the ON terminal of the start key switch on
oneengine.Makethisconnectionthrougha2Ampin-linefuse.Thisconnectionmustbetothelinethat
ispositivewhiletheengineisnormallyrunning.
• Connectthegreenwire(ISOLATION#2)toENGINE#2inthesamemannerasabove.
To enable Engine Isolation for three engines:
• Connectthebrownwire(ISOLATION#1)toENGINE#1,thegreenwire(ISOLATION#2)toENGINE#2,and
theorangewire(ISOLATION#3)toENGINE#3inthesamemannerasabove.
990180180 Rev.005
page3of4
REMOTE (Red)
AB
LED (Yellow)
ISOLATION #1 (Brown)
GROUND (Black)
LED
1
2
START
BATTERY
ENGINE
ML-SERIES
REMOTE
BATTERY
SWITCH
ML-SERIES
REMOTE
BATTERY
SWITCH
HOUSE
BATTERY
HOUSE
DISTRIBUTION
ISOLATION #2 (Green)
ISOLATION #3 (Orange)
2 AMPS
ENGINE
START
SWITCH
ON
OFF
START
ML-SERIES
AUTOMATIC
CHARGING
RELAY
3
+8
-7
LED
NOTE: The remote
switch has two LEDs.
These LEDs operate
simultaneously and
are either both ON
or both OFF.
NOTE: Use circuit protection
only if ACR is not used for
emergency cross-connect.
Installation Instructions
Start Isolation
TheML-SeriesACRcanbeconguredtoautomaticallyopentemporarily(3-5minutes)whenvoltageis
sensedonanyoneofuptothreestart-isolationinputs.EnablethisfeaturetoisolateStartcircuitsfromthe
Housecircuitandpreventstartingcurrenttransientsfrominterferingwithsensitivehouseelectronics.
To enable Start Isolation:
• Connect the brown wire (ISOLATION #1) from the harness to the terminal or wire running from the start
keyswitchtothestartersolenoid.Makethisconnectionthrougha2Ampin-linefuse.Thisconnection
canbemadeatthestartkeyswitchoratthestartersolenoid,butmustbetothelinethatispositiveonly
when cranking the engine. as shown below.
To enable Start Isolation for two or three engines starting from the same battery:
• Connectthegreenwire(ISOLATION#2)toENGINE#2inthesamemannerasabove.
• Connecttheorangewire(ISOLATION#3)toENGINE#3inthesamemannerasabove.
Start Isolation Installation
Installation Instructions (continued)
Engine Isolation Installation
Legend
Optionalconnection
Legend
Optionalconnection

To install a remote LED indicator:
• Connectswitchpin8toDCpositiveprotectedbya2Ampin-linefuse.
• Connectpin7totheyellowwirefromtheharness.
4.50"
114.30mm
3.00"
76.20mm
5.47"
138.94mm
3.75"
95.25mm
2.03"
51.56mm
1.90"
48.26mm
1.03"
26.16mm
Installation Instructions (continued)
page4of4
990180180 Rev.005
/