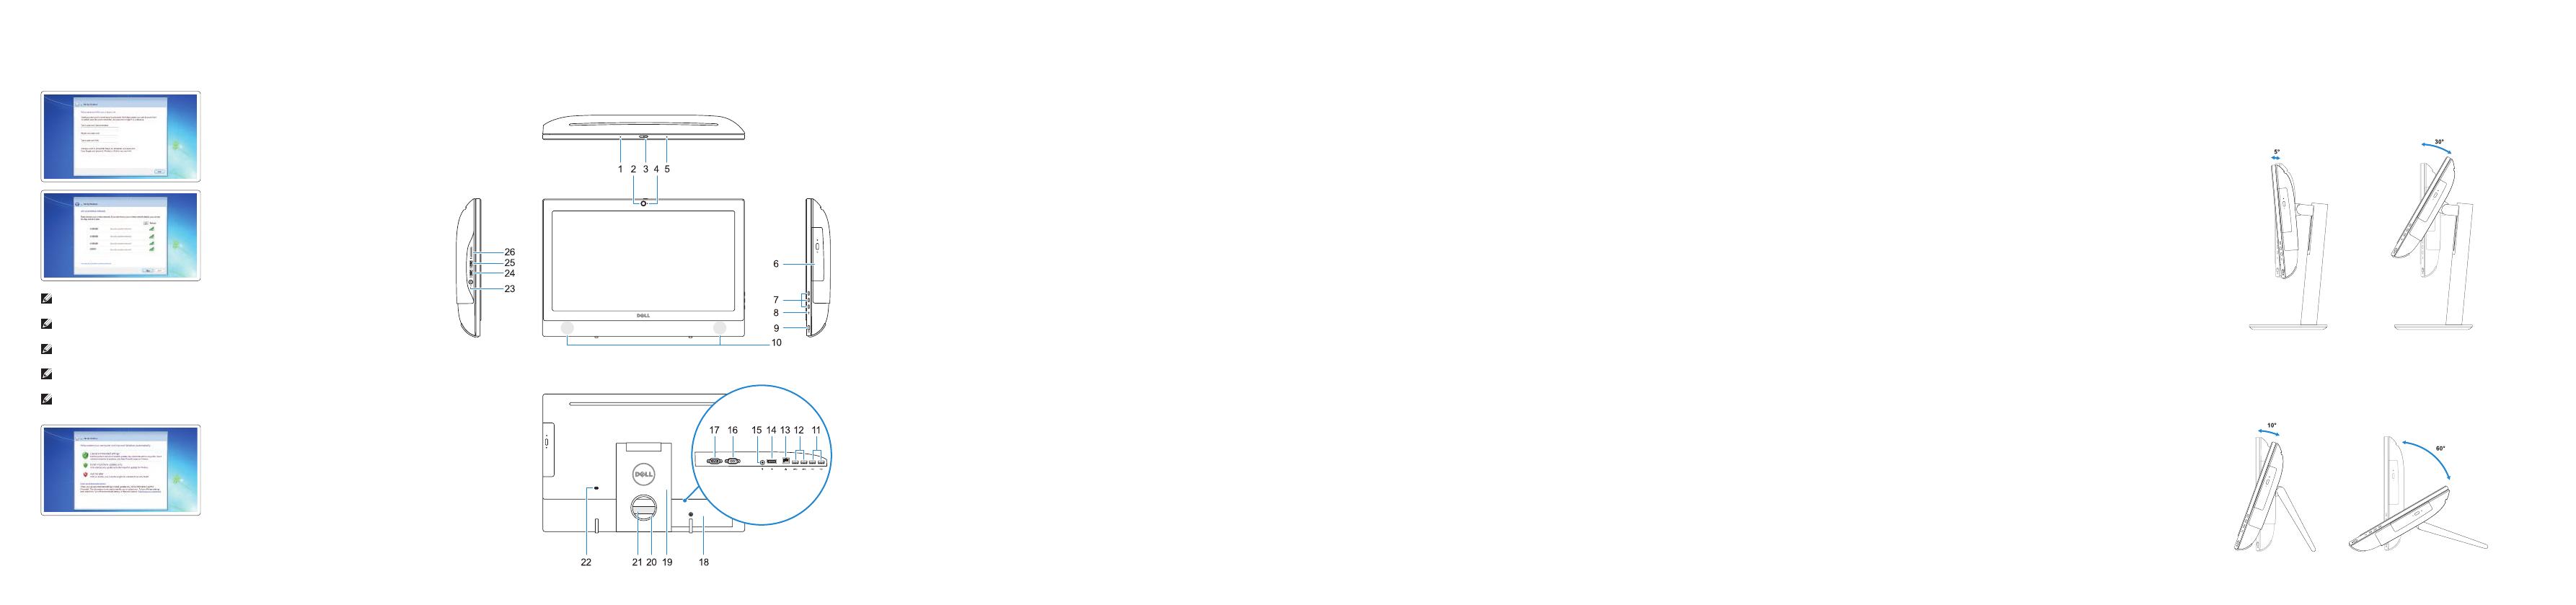
Features
Kenmerken | Caractéristiques | Funktionen | Funzioni
1. Microfoon
2. Camera (optioneel)
3. Camera-privacyvergrendeling
(optioneel)
4. Camera-statuslampje (optioneel)
5. Microfoon
6. Optisch station (optioneel)
7. On-screen display (OSD)-knoppen
8. Activiteitenlampje vaste schijf
9. Aan/uit-knop en voedingsstatuslampje
10. Stereoluidsprekers
11. USB 2.0-poorten
12. USB 3.0-poorten
13. Netwerkpoort
14. DisplayPort
15. Netadapterpoort
16. HDMI-ingang (optioneel)
17. Seriële poort (optioneel)
18. Kabelafdekplaatje
19. Standaard
20. Kabelgeleidingssleuf
21. Servicetaglabel
22. Sleuf voor beveiligingskabel
23. Headsetpoort
24. USB 3.0-poort met PowerShare
25. USB 3.0-poort
26. SD-kaartleesapparaat
1. Microphone
2. Webcam (en option)
3. Loquet du volet de la webcam (en option)
4. Voyant d'état de la webcam (en option)
5. Microphone
6. Lecteur optique (en option)
7. Boutons de menu à l'écran (OSD)
8. Voyant d'activité du disque dur
9. Bouton et voyant d'alimentation
10. Haut-parleurs stéréo
11. Ports USB2.0
12. Ports USB3.0
13. Port réseau
14. DisplayPort
15. Port du connecteur d'alimentation
16. Port VGA (en option)
17. Port de série (en option)
18. Cache-câbles
19. Socle
20. Emplacement pour routage de câbles
21. Étiquette du numéro de service
22. Passage du câble de sécurité
23. Port pour casque
24. Port USB3.0 avec PowerShare
25. Port USB3.0
26. Lecteur de carte SD
1. Mikrofon
2. Kamera (optional)
3. Kamera-Privatsphäreriegel (optional)
4. Kamerastatusanzeige (optional)
5. Mikrofon
6. Optisches Laufwerk (optional)
7. OSD-Tasten (On-Screen-Display,
Bildschirmanzeige)
8. Festplatten-Aktivitätsanzeige
9. Betriebsschalter- und
Stromversorgungsanzeige
10. Stereolautsprecher
11. USB2.0-Anschlüsse
12. USB3.0-Anschlüsse
13. Netzwerkanschluss
14. DisplayPort-Anschluss
15. Netzanschluss-Port
16. VGA-Anschluss (optional)
17. Serielle Schnittstelle (optional)
18. Kabelabdeckung
19. Standrahmen
20. Kabelführungsschlitz
21. Service-Tag-Etikett
22. Sicherheitskabeleinschub
23. Kopfhöreranschluss
24. USB3.0-Anschluss mit PowerShare
25. USB3.0-Anschluss
26. SD-Kartenleser
1. Microfono
2. Fotocamera (opzionale)
3. Dispositivo di chiusura privacy della
fotocamera (opzionale)
4. Indicatore di stato della fotocamera
(opzionale)
5. Microfono
6. Unità ottica (opzionale)
7. Pulsanti OSD (On Screen Display)
8. Indicatore di attività del disco rigido
9. Indicatore stato alimentazione e
pulsante di alimentazione
10. Altoparlanti stereo
11. Porte USB 2.0
12. Porte USB 3.0
13. Porta di rete
14. DisplayPort
15. Porta connettore di alimentazione
16. Porta VGA (opzionale)
17. Porta seriale (opzionale)
18. Coperchio del cavo
19. Piedistallo
20. Slot di instradamento del cavo
21. Etichetta Numero di servizio
22. Slot per cavo di sicurezza
23. Porta auricolare
24. Porta USB 3.0 con PowerShare
25. Porta USB 3.0
26. Lettore di schede SD
Tilt
Kantelen | Inclinaison | Neigung | Inclinazione
Height adjustable stand
In hoogte verstelbare standaard | Socle à hauteur réglable
Höhenverstellbarer Standrahmen | Piedistallo ad altezza regolabile
Easel stand
Ezelstandaard | Socle inclinable
Staffeleistandrahmen | Piedistallo a cavalletto
6 Finish Windows 7 setup
Voltooi de installatie van Windows 7 | Terminer l'installation de Windows 7
Windows 7-Setup abschließen | Terminare l'installazione di Windows 7
Set a password for Windows
Stel een wachtwoord voor Windows in
Définir un mot de passe pour Windows
Kennwort für Windows einrichten
Impostare una password per Windows
Connect to your network
Maak verbinding met uw netwerk
Se connecter au réseau
Mit dem Netzwerk verbinden
Connettere alla rete
NOTE: If you are connecting to a secured wireless network, enter the password for the
wireless network access when prompted.
N.B.: als u verbinding maakt met een beveiligd draadloos netwerk, vul dan het wachtwoord voor
het netwerk in wanneer daar om gevraagd wordt.
REMARQUE: si vous vous connectez à un réseau sans fil sécurisé, saisissez le mot de passe
d'accès au réseau sans fil lorsque vous y êtes invité.
ANMERKUNG: Wenn Sie sich mit einem geschützten Wireless-Netzwerk verbinden, geben Sie
das Kennwort für das Wireless-Netzwerk ein, wenn Sie dazu aufgefordert werden.
N.B.: per collegarsi a una rete senza fili protetta, inserire la password di accesso alla rete senza fili
quando richiesto.
Protect your computer
Beveilig de computer
Protéger votre ordinateur
Computer schützen
Proteggere il computer
1. Microphone
2. Camera (optional)
3. Camera privacy latch (optional)
4. Camera status light (optional)
5. Microphone
6. Optical drive (optional)
7. On screen display (OSD) buttons
8. Hard drive activity light
9. Power button and power status light
10. Stereo speakers
11. USB 2.0 ports
12. USB 3.0 ports
13. Network port
14. DisplayPort
15. Power connector port
16. VGA port (optional)
17. Serial port (optional)
18. Cable cover
19. Stand
20. Cable routing slot
21. Service tag label
22. Security cable slot
23. Headset port
24. USB 3.0 port with PowerShare
25. USB 3.0 port
26. SD Card reader

