Page is loading ...

DSD 412
DSD 412 DC Elevator Drive
Technical Manual
To properly use the product, read this manual thoroughly and retain for easy reference, inspection,
and maintenance. Ensure that the end user receives this manual.
CS00407 rev 11
© Magnetek Elevator 2016
U39 / U40 97SA407x-0010 Rv16
U13 / U14 97SA404x-0008 Rv08

Warranty
Standard products manufactured by the Company are warranted to be free from defects in
workmanship and material for a period of one year from the date of shipment, and any
products, which are defective in workmanship or material, will be repaired or replaced, at the
Company’s option, at no charge to the Buyer. Final determination as to whether a product is
actually defective rests with the Company. The obligation of the Company hereunder shall
be limited solely to repair or replace, at the Company’s discretion, products that fall within
the foregoing limitations, and shall be conditioned upon receipt by the Company of written
notice of any alleged defects or deficiency promptly after discovery and within the warranty
period, and in the case of components or units purchased by the Company, the obligation of
the Company shall not exceed the settlement that the Company is able to obtain from the
supplier thereof. No products shall be returned to the Company without its prior consent.
Products, which the company consents to have returned, shall be shipped prepaid f.o.b. the
Company factory. The Company cannot assume responsibility or accept invoices for
unauthorized repairs to its components, even though defective. The life of the products the
Company depends, to a large extent, upon type of usage thereof and THE COMPANY
MAKES NO WARRANTY AS TO FITNESS OF ITS PRODUCTS FOR THE SPECIFIC
APPLICATIONS BY THE BUYER NOR AS TO PERIOD OF SERVICE UNLESS THE
COMPANY SPECIFICALLY AGREES OTHERWISE IN WRITING AFTER PROPOSED
USAGE HAS BEEN MADE KNOWN TO IT.
This warranty does not apply to experimental products for which no warranty is made or
given and Buyer waives any claim thereto.
THE FOREGOING WARRANTY IS EXCLUSIVE AND IN LIEU OF ALL OTHER
WARRANTIES, EXPRESSED OR IMPLIED, INCLUDING, BUT LIMITED TO, ANY
WARRANTY OF MECHANTIBILITY OR OF FITNESS FOR A PARTICULAR PURPOSE
AND BUYER HEREBY WAIVES ANY AND ALL CLAIMS THEREFORE.
Limitations Of Liability
IN NO EVENT SHALL MAGNETEK BE LIABLE FOR LOSS OF PROFIT, INDIRECT,
CONSEQUENTIAL OR INCIDENTAL DAMAGES WHETHER ARISING OUT OF
WARRANTY, BREACH OF CONTRACT OR TORT.
DSD 412 is a trademark of Magnetek, Inc.
All rights reserved. No part of this publication may be reproduced or used in any form or by any means - graphic, electronic, or
mechanical including photocopying, recording, taping, or information storage and retrieval systems - without written permission
of the publisher.
2016 Magnetek, Inc.

1
Table of Contents
Introduction ............................................................................................................. 11
Drive Description ............................................................................................................................. 11
The Standard Control Display Unit (SCDU) .................................................................................... 11
The Portable Control Display Unit (PCDU) ..................................................................................... 11
Drive Ratings and Specifications ................................................................................................... 11
Basic Drive Specifications ............................................................................................................... 11
Service Conditions .......................................................................................................................... 11
Protective Features ......................................................................................................................... 11
Software Operating Features .......................................................................................................... 12
Power Conversion Unit .................................................................................................................... 17
Description ...................................................................................................................................... 17
Hardware Descriptions .................................................................................................................... 17
DSD 412 Power Supply PCB (A4) .................................................................................................. 17
Armature Interface PCB (A2) .......................................................................................................... 17
SCR's .............................................................................................................................................. 18
Field Interface PCB (A3) ................................................................................................................. 18
Cell snubber PCB (A5) .................................................................................................................... 18
Drive Control PCB (A1) ................................................................................................................... 18
Precautionary Statements ............................................................................................................... 20
How To Contact Magnetek .............................................................................................................. 20
Pre-Installation Considerations ...................................................................................................... 21
Receipt of Shipment ........................................................................................................................ 21
Unpacking Instructions .................................................................................................................... 21
Packing Instructions for Reshipment or Storage ............................................................................ 21
Physical Installation ........................................................................................................................ 21
Selecting, Mounting and Wiring of the Digital Encoder ............................................................... 21
Encoder Selection ........................................................................................................................... 21
Mounting ......................................................................................................................................... 21
Coupling .......................................................................................................................................... 22
Exceeding Operating Specification ................................................................................................. 22
Electrical Hook up ........................................................................................................................... 23
Power Connections ......................................................................................................................... 23
Signal Connections ......................................................................................................................... 23
Grounding ....................................................................................................................................... 23
Pre-power Check ............................................................................................................................ 23
Drive Start up .................................................................................................................................... 24
Drive power-up sequence ............................................................................................................... 24
Abnormal Display Conditions .......................................................................................................... 24
Fan Check ....................................................................................................................................... 24
Verify Parameters ........................................................................................................................... 24
Interconnect Drawings .................................................................................................................... 25
Standard Control/Display Unit Operation ............................................................. 31
General ........................................................................................................................................... 31
Start-Up Operation .......................................................................................................................... 31
After Power-Up ................................................................................................................................ 32
Changing Parameter Functions ...................................................................................................... 32
Viewing Monitor Functions .............................................................................................................. 33
Error Reporting ................................................................................................................................ 33
Fault Display/Clear .......................................................................................................................... 35
Error Display ................................................................................................................................... 35
Non-Volatile Ram Access ............................................................................................................... 36
Load Default Function ..................................................................................................................... 37

2
Self Tune Function .......................................................................................................................... 37
Power Conversion Diagnostics ....................................................................................................... 39
Drive Setup & Adjustments .................................................................................... 41
Motor Field Current Control ............................................................................................................ 41
Analog Velocity Follower ................................................................................................................. 41
Internal Preset Speed & Profile Generator ..................................................................................... 41
Serial Link Follower ......................................................................................................................... 41
Armature Voltage Feedback ........................................................................................................... 41
Pre-Torque, Function #114 ............................................................................................................. 41
Current Ramp-Down, Function #85 ................................................................................................ 41
Electronic Motor Over-Load ............................................................................................................ 42
External/Auto Fault Reset, Function #101 ...................................................................................... 42
Over-Speed Test, Functions #80 and #81 ...................................................................................... 42
Brake Control Logic, Functions #186 and #183 .............................................................................. 42
Speed Regulator Adjustment/E-Reg ............................................................................................... 43
Field Regulator Set-Up ................................................................................................................... 45
AC Input Voltage Requirement & Adjustment ................................................................................. 45
Adjustment Function Descriptions ................................................................................................ 59
Display Monitor Functions .............................................................................................................. 76
Miscellaneous Functions ................................................................................................................ 78
Drive Faults ............................................................................................................. 79
Function Error Code Listing ........................................................................................................... 79
Troubleshooting .............................................................................................................................. 80
Input – Output Signal Verification ......................................................................... 89
Maintenance ............................................................................................................ 91
Preventive Maintenance ................................................................................................................. 91
Repair and Replacement Procedures ............................................................................................. 91
Printed Circuit Boards ..................................................................................................................... 91
Drive Control PCB Replacement .................................................................................................... 97
IC Replacement .............................................................................................................................. 97
Testing and Replacement of Power Components. ......................................................................... 97
Testing and Replacement of Power Semiconductors and Snubber Components. ........................ 98
Testing and Replacement of the Motor Field Control Module and PCB ......................................... 98
Repair of the 195Amp Assembly .................................................................................................... 99
Repair of the 300Amp Assembly .................................................................................................. 100
Appendix ................................................................................................................ 104
Drive Ratings for Elevator Applications ...................................................................................... 104
Power Loss ..................................................................................................................................... 105
Wire Terminal Specs ...................................................................................................................... 106
Power Terminal Wire Sizes ........................................................................................................... 106
Ground Wire Sizes ........................................................................................................................ 106
Field Interface Board (TB1, TB4) .................................................................................................. 106
Spare Parts ..................................................................................................................................... 107
Packing Instructions ...................................................................................................................... 110
Outline Drawings ............................................................................................................................ 111
Index ....................................................................................................................... 117

Quick Reference for Setup Parameters
3
FNCT. # DESCRIPTION UNIT RANGE DEFAULT SITE SETTING
1 CURRENT LIMIT. % 0 - 300 250
2
USE SELF- TUNE
VALUES
LOGIC 0 - 1 0=OFF
3 RTD. ARMATURE AMPS ADC 2.0 - 1250.0 50.0
4 ARMATURE OHMS OHMS 0.001 - 5.000 0.100
6
ARMATURE
INDUCTANCE
HNY 0.0010 -1.000 0.0100
7 RTD. ARMATURE VOLTS VDC 150 - 550 240
8 I REG CROSSOVER RAD 100 - 1000 500
9 NOMINAL AC INPUT VAC 150 - 525 230
10 ENCODER PPR P/R 600 - 19999 1024
11 RATED MOTOR RPM RPM 50.0 - 1999.0 1150.0
12 OVERSPEED % % 0.0 - 150.0 110.0
14 V SENSE % % 0.0 - 100.0 25.0
15 T SENSE % % 0.0 - 100.0 5.0
16 ENCDR / MTR RATIO - 1.000 - 19.000 1.000
17 RATED CAR SPEED - 1.0 - 1900.0 400.0
21 EXT ACCEL LIMIT - 2.00 - 10.00 4.20
22 ERROR LIST RESET LOGIC 0 - 1 0=OFF
32 FULL FIELD DETECT % 30 - 90 80
38 ARM VLT RESPONSE RAD 1.0 - 4.0 2.0
39 HI SPEED BANDWIDTH RAD 1.0 – 15.0 6.0
40 LO SPEED BANDWIDTH RAD 1.0 – 15.0 6.0
41 PER-UNIT INERTIA SEC 0.10 - 9.99 2.00

Quick Reference for Setup Parameters
4
FNCT. # DESCRIPTION UNIT RANGE DEFAULT SITE SETTING
42 STIFFNESS - 0.2 - 9.9 1.0
49 WEAK FIELD CURRENT ADC 0.20 - 40.00 40.00
50 FULL FIELD CURRENT ADC 0.20 - 40.00 1.90
51 MOTOR FIELD L/R SEC 0.10 - 10.00 0.54
52 RTD. FIELD VOLTS DC VDC 50 - 525 240
53 STANDBY FIELD AMPS % 10 - 100 25
54 FIELD RESPONSE RAD 1.0 - 10.0 5.0
55
FIELD CONTROL AC
SOURCE VOLTS
VAC 0 - 525 0
63 U/D PICK-UP % 0.01 - 100.00 0.10
64
LOW SPEED
THRESHOLD
% 0.1 - 100.0 2.0
80 OVER SPEED TEST LOGIC 0 - 1 0=OFF
81 OVER SPEED MULT - 1.00 - 1.50 1.00
82 REFERENCE MULT - -2.000 - 2.000 1.000
83 MOTOR OVERLD TIME SEC 2.0 - 500.0 48.0
84 MOTOR OVERLD LEVEL PU 0.50 – 2.00 1.15
85 I DECAY RAMP SEC 0.01 - 2.50 0.20
86 ANALOG SPD REF ZERO PU -0.2000 - +0.2000 0.0000
87 PRE-TORQUE MULT - 0.25 - 2.00 1.00
88 DSPR DELAY TIME MIN 0 - 60 0 (OFF)
89 BRAKE PICK TIMER SEC 0.5 - 5.0 1.0
90 BRAKE DROP TIMER SEC 0.5 - 5.0 1.5
91 MUST STOP TIMER SEC 0.1 - 5.0 2.0

Quick Reference for Setup Parameters
5
FNCT. # DESCRIPTION UNIT RANGE DEFAULT SITE SETTING
92 BRAKE AUTO STOP ON LOGIC 0 - 1 0=OFF
93 ANALOG OUT 0 BIAS - -1.00 - +1.00 0.00
94 ANALOG OUT 1 BIAS - -1.00 - +1.00 0.00
95
ANALOG OUT 0 SELECT
TB1(45)
NUM 0 - 8 1
96
ANALOG OUT 1 SELECT
TB1(46)
NUM 0 - 8 3
97 ANALOG OUT 0 MULT - 00.10 - 10.00 0.80
98 ANALOG OUT 1 MULT - 00.10 - 10.00 0.80
99
SPEED ERROR TRIP
TIME
SEC 0.20 - 5.00 5.00
100
SPEED ERROR TRIP
LEVEL
% 0.0 - 100.0 100.0
101 AUTO FAULT RESET ON LOGIC 0 - 1 0=OFF
102 3S LOOP FLT LOGIC 0 - 1 0=OFF
104 SERIAL GAIN SWITCH LOGIC 0 - 1 0=OFF
105 GAIN SWITCH SPEED PU 0.00 - 1.10 1.10
107 TACH RATE GAIN % 0.0 - 30.0 0.0
110
REFERENCE MODE
SELECT
NUM 1 – 5 2
111 ARCH TRAV DISABLE LOGIC 0 - 1 1=ON
112 FEEDBACK SELECT NUM 0 - 1
1 =
ENCODER
113
ARM VOLTS @ MAX
SPEED
VDC 0.0 – 650.0 100.0
114 PRE-TORQUE ENABLE LOGIC 0 - 1 0=OFF
115 RNUP RNDN ENABLE LOGIC 0 - 1 0=OFF
116 DECEL RATE LATCH LOGIC 0 - 1 0=OFF
117 PRETORQUE BIAS PU 0.00 – 1.00 0.00

Quick Reference for Setup Parameters
6
FNCT. # DESCRIPTION UNIT RANGE DEFAULT SITE SETTING
120
SPEED ERROR DETECT
TIME
SEC 0.0 – 5.0 0.5
121
SPEED ERROR
THRESHOLD
% 0.0 – 15.0 2.0
130 ARB MODE NUM 0 – 2 0 (OFF)
131 ARB BANDWIDTH RAD 1.0 – 15.0 6.0
132 ARB DAMPING - 0.01 –20.00 2.00
133 ARB SPD THRESHOLD % 0.0 – 10.0 0.0
150 BINARY SELECT ON LOGIC 0 – 1 1=ON
151 PRESET SPEED #1 - 0.0 – 1900.0 0.0
152 PRESET SPEED #2 - 0.0 –1900.0 0.0
153 PRESET SPEED #3 - 0.0 – 1900.0 0.0
154 PRESET SPEED #4 - 0.0 – 1900.0 0.0
155 PRESET SPEED #5 - 0.0 – 1900.0 0.0
156 PRESET SPEED #6 - 0.0 – 1900.0 0.0
157 PRESET SPEED #7 - 0.0 – 1900.0 0.0
170 ACCEL #1 TIME SEC 1.00 – 15.00 5.00
171 ACCEL #2 TIME SEC 1.00 – 15.00 5.00
172 DECEL #1 TIME SEC 1.00 – 15.00 5.00
173 DECEL #2 TIME SEC 1.00 – 15.00 5.00
174 ACCEL #1 % S % 0.1 – 100.0 25.0
175 ACCEL #2 % S % 0.1 – 100.0 25.0
176 DECEL #1 % S % 0.1 – 100.0 25.0

Quick Reference for Setup Parameters
7
FNCT. # DESCRIPTION UNIT RANGE DEFAULT SITE SETTING
177 DECEL #2 % S % 0.1 – 100.0 25.0
178 ACCEL #3 TIME SEC 1.00 – 15.00 5.00
179 DECEL #3 TIME SEC 1.00 – 15.00 5.00
180 ACCEL #3 % S % 0.1 – 100.0 25.0
181 DECEL #3 % S % 0.1 – 100.0 25.0
182 INVERT ALARM RELAY LOGIC 0 – 1 0=OFF
183 K3 LGC OUT SELCT NUM 1 – 4 1
184 K4 LGC OUT SELCT NUM 1 – 4 1
185 K5 LGC OUT SELCT NUM 1 – 4 1
186 K6 LGC OUT SELCT NUM 1 – 4 1
187 K7 LGC OUT SELCT NUM 1 – 4 1
190 NOTCH DEPTH - 0 – 10 0
191 NOTCH PERIOD - 0 – 10 7
192 F413 DETECTION LVL PU 0.05 – 0.50 0.05
Table 1: Drive Parameters

Read-Out and Control Parameters
8
FNCT. # DESCRIPTION UNIT
600 CAR SPEED -
601 MOTOR RPM RPM
602 SPEED REF -
603 PRE-TORQ SIGNL %
609 CEMF VOLTS VDC
610 MOTOR ARM V VDC
611 MOTOR ARM I ADC
612 MOTOR FIELD I ADC
613 MEASURED R OHM
614 MEASURED L HNY
615 MEAS. FIELD L/R SEC
616
MEASURED SPEED
ERROR
%
617 LINE FREQ HZ
618 HEAT SINK TEMP DEG C
619
MEASURED AC LINE
VOLTS
VAC
620 FIELD TRACKING PU
621 SERIAL COMM ON LOGIC
688 CUBE I.D. -
689 FIELD RANGE -
FNCT. # DESCRIPTION UNIT
690 PCU - VERSION -
691 PCU - RELEASE -
692 DAY -
693 MONTH -
695 YEAR -
696 BETA “P” -
697 VERSION “SA” -
698 DCU -RELEASE -
699 CUSTOMER ID -
Table 2: Monitor Functions
FNCT. # DESCRIPTION
22 CLEAR ERRORS LIST
000 VIEW FAULT LIST
800 VIEW ERROR LIST
801 FAULT/ERROR ACTIONS
980 TRACE MONITOR
981 VERIFY I/O
993 CLEAR NV RAM
994 SAVE/RECALL FUNCTION
995 LOAD DEFAULTS
997 SELF TUNE
998 PCU DIAGNOSTICS
Table 3: Misc Commands

Common Fault References
9
FAULT # DESCRIPTION
97 OVERSPEED TRIP
98 TACH/ENCODER LOSS
99 REVERSE TACH/ENCODER
117/118 SERIAL COM FAULT
400 MOTOR OVERLOAD
401
EXCESSIVE FIELD
CURRENT
402 CONTACTOR FAULT
403 5 MIN FULL FIELD FAULT
404
OPEN ARMATURE CIRCUIT
FAULT
405 SAFETY CIRCUIT FAULT
406 10% LOW LINE ALARM
407 DCU CEMF ALARM
408 PCU CEMF FAULT
409 PCU RESET FAULT
410 SPEED ERROR TRIP FAULT
411
MAXIMUM AUTO RESETS
FAULT
413
FIELD CURRENT TRACKING
FAULT
FAULT # DESCRIPTION
414
SOFTWARE
COMPATABILITY FAULT
Prot CORRUPTED NV RAM DATA
900 PCU LOOP FAULT
901 PCU IST FAULT
902 POWER SUPPLY FAULT
903 LINE SYNC FAILURE
904 LOW LINE FAULT
905 FIELD LOSS
907 THERMISTOR FAULT
908 OVER TEMPERATURE
909 EXCESSIVE RIPPLE
910 BLOWN FUSE
915 PARAMETER SETUP
917
REVERSE ARM. V.
FEEDBACK
919
RATED VAC. SETTING
ERROR
920
RATED ARM. VOLT.
SETTING
921 BRIDGE RATING FAULT

Common Fault References
10
FAULT # DESCRIPTION
923
RATED ARM. I. SETTING
ERROR
924
RATED FIELD I. SETTING
ERROR
925 FIELD PCB SENSE FAULT
926 PCU WATCHDOG
929
IFLD FB CANNOT BE
REDUCED TO ZERO
DURING SELFTUNE.
930
IFLD FB CANNOT GET TO
RATED
931
EXCESS OPEN CIRCUIT
VOLTAGE DURING
SELFTUNE.
932
ARMATURE CEMF
VOLTAGE IN XCESS
DURING SELFTUNE.
933
IARM DOES NOT INCREASE
TO NEAR TEST AMPS
DURING SELFTUNE.
FAULT # DESCRIPTION
934
CALC ARML IS UNDER
RANGE DURING SELFTUNE.
935
VOLTAGE FEEDBACK AND
BUS VOLTAGE DOESN’T
MATCH DURING SELFTUNE
936
ESTOP CONTACT WAS
OPENED DURING SELF
TUNE
937
LOW READ BACK VOLTAGE
FEEDBACK DURING
SELFTUNE
938
LOW READ BACK FROM DC
BUS CIRCUIT DURING
SELFTUNE
939
FAULTY HARDWARE IN THE
FIELD INTERFACE CIRCUIT
940
FIELD A/D READING IS
SATURATED
941
MOTOR THERMOSTAT
OPEN
Table 4: Fault References

Introduction
11
Introduction
Drive Description
The DSD 412 Drive is a complete digital
system drive that provides individual drive and
system control in one compact package. It is
of 12SCR Regenerative configuration.
The drive uses two microprocessors, one for
the Power Conversion Unit (PCU) circuitry,
and one for the Drive Control Unit (DCU)
circuitry. Interface to other equipment is
provided with Local I/O [Input/Output], or RS-
232 & RS-422 serial communications.
Extensive diagnostics and setup capability are
provided through two Control/Display Units.
Depending on rating of the unit, the power
cube is in one of four chassis sizes. Refer to
the outline dimension drawings furnished in
section 6. Each power cube is designed for
mounting inside a qualified electrical
enclosure. Space allowances for air
circulation, additional components, outgoing
terminals, and wire bends must be provided.
Hinged door swing-out clearance is the same
as the width dimension.
The Standard Control Display Unit
(SCDU)
The SCDU is mounted on the Drive Control
PCB and consists of a 4-1/2 digit numeric LED
display, four push buttons and READ/WRITE
colored LEDs. The SCDU can be used for all
setup functions and many diagnostics.
The Portable Control Display Unit
(PCDU)
The PCDU is an optional hand-held device
that can be plugged into any analog controlled
DSD drive and used for all the same functions
as the SCDU plus some advanced diagnostics.
There exists a version of this PCDU, which will
work with the serial version DSD 412, contact
Magnetek for more information. The PCDU
has two lines of sixteen alphanumeric
characters and a thirty-key keypad.
Parameters are entered and displayed in
common understandable units. The drive can
be completely setup prior to actual running and
changes can be made during operation.
Keypad entry of changed parameters,
protected memory, and factory default values
allow the operator to modify data with
minimum risk to the process.
Drive Ratings and Specifications
The DSD 412 Elevator Drive is designed for
connection to a three wire ungrounded power
system, or a four wire grounded or ungrounded
power system.
Basic Drive Specifications
10-300 Amps (Special order up to 1285Amps or
600VAC)
3 Phase, 48/62 Hz
Service Factor
150% full load current for one minute
250% full load current for 5 seconds
Full-wave six-pulse SCR control
Regulation (of set speed) to 0.05% with digital
encoder speed feedback
Current regulated shunt field control
Automatic Field weakening
Self-adapting to incoming line power
Service Conditions
Line voltage 150-525 Vac, ±10%, 3 phase.
115 volt, ±10%, 1 phase control power from a
separate source
Frequency 48-62 Hz
Operating Temperature 0-45° C (55° C max at
DSD chassis)
Altitude to 3300 feet above sea level, derate 5%
for each 1,000 ft above 3300 ft
Relative Humidity 95% (noncondensing)
Protective Features
Programmed memory protection
Self-protected Control V power supply
Fast phase-back of loop current
Contactor interlock for E-Stop
I
2
t motor overload protection
AC line current limiting fuses
Automatic power up test
Control power supply loss detection
Isolated and grounded electronics
Encoder/Tachometer monitoring and loss
protection
Input line monitoring
Phase sequence insensitive
dv/dt protection (snubbers)
1400 PRV Thyristors
Instantaneous over-current protection
Phase loss protection
DC bus fuse
Field current economizer and loss protection

Introduction
12
Software Operating Features
The DSD 412 is configured by software to
operate geared and gearless elevators and lifts.
The SA407 Drive Control software contains
desirable feature improvements from the
previous version, SA274. Basic features include:
User choice of operating speed reference
External analog reference follower
Serial link reference follower
Internal reference generator with S-Curve
smoothing, to one of 7 preset speeds (8 speeds
including zero)
User choice of ft/min or m/sec speed
programming and display units
User choice between binary or progressive relay
selected internal preset speeds.
Selectable input control logic for Run-Up / Run-
Down or Run / Direction relay control with
internal preset speeds.
Magnetek exclusive E-Reg, elevator velocity
regulator
Simplified analog or serial link Pre-Torque
operation to prevent roll-back on starts
Controlled Current Ramp-Down to prevent
elevator brake thumping at stops
Internal frequency notch filter to reject rope
resonance interference.
Closed loop motor field current regulator with
simplified motor field weakening and stand-by
adjustments
Maintenance Armature Voltage Feedback mode.
User selectable choices for relay logic output,
including:
Drive OK / No Faults relay
Invert/Noninvert Alarms Relay
Drive operating, OK to release brake
Car above/below speed X threshold
Car above/below Zero speed threshold
Car Moving Up
Car Moving Down
Speed Error above/below X threshold for Y
seconds.
Drive Standby Power Reduction
User selectable analog diagnostic trace outputs
Diagnostic indicator for verifying logic input and
output conditions
Analog speed reference zero adjustment
Alarm Relay to indicate important but non-critical
conditions
Motor or transformer thermostat over-
temperature
Motor Over-Load
Drive Over-Heating
Low Utility Line Input
Safety related fault trapping with diagnostics,
including:
Motor Over-Current
Motor field Malfunction
Contactor Failure
Severe Utility Line disturbances
Encoder Loss
Over-Speed Trip
User selectable automatic or external
commanded Fault Reset
New features have been arranged to be
compatible with present installations of DSD 412
using General Elevator software SA274. The
factory default settings of software SA407 are
such that it will act like SA274 software. The
user must consciously re-program one or more
selectable features to do otherwise.
Several new useful features have been added
for SA407, plus more diagnostic codes to help
pinpoint the cause of problems when things go
wrong during commissioning. See the
appropriate sections for explanations of Anti-
Rollback, Brake Control, Drive Standby Power
Reduction, and operation with a Uni-Polar
Analog reference. Ramp rates 3 are now
activated by external logic command at A1TB1-
10.

Introduction
13
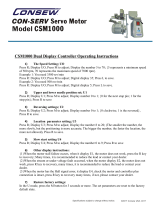
Figure 1: DSD 412 Block Diagram A
ISOLATION
TRANSFORMER
50/60 Hz
UTILITY
POWER
CUSTOMER
DISCONNECT
F1
F2
F3
SNUBBER PCB
AND
COMPONENTS
L1
L2
L3
LPR
LOOP
PICK-UP
RELAY
K1
CONTACTOR
PILOT
RELAY
MOTOR &
TRANSFORMER
THERMOSTATS
E-STOP
SENSE
K1
SAFETY
CHAIN
LPR
ME
LOOP
CONTACTOR
CONTROL
POWER
XFMR
POWER
SUPPLY
PCB
HEAT SINK
COOLING FAN
CONTACTOR
CONTROL
SIGNAL
SENSING
LOW VOLTAGE
POWER
115 VAC
MOTOR FIELD
CONTROL
HOIST
MOTOR
FIELD
+
FIELD CURR.
SIGNAL
FIELD CONTROL
SCR GATING

Introduction
14
SCR POWER BRIDGE
12 SCR REGEN
F4
CURRENT
SENSOR
RIPPLE FILTER
MOTOR
ARM.
ME
SCR
GATE
SIGNALS
RT1
ARMATURE
INTERFACE
PCB
DB
RESISTOR
CONTROL SIGNAL
WIRING
LOCAL CDU
STATUS
LEDS
+18888
UN PROT
NV MEM
MEM PROT
SWITCH
RE-
SET
POWER CONVERSION UNIT
MICROPROCESSOR
DUAL PORT
MEMORY
RAM &
EPROMS
NV-RAM, RAM
& EPROMS
DRIVE CONTROL UNIT
MICROPROCESSOR
IN-OUT
DRIVERS
TB1 LOCAL CONTROL I / O
DRIVE CONTROL PCB
ME
ME
RS-232 OR RS-422
SERIAL PORT
OPTIONAL
PCDU
PROGRAMMER
OR
OPTIONAL
SERIAL LINK
TO CAR
CONTROLLER
Figure 2: DSD 412 Block Diagram B

Introduction
15
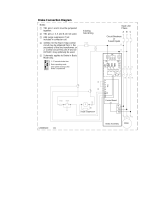
Figure 3: Component Layout Front View
Q7, FIELD
SCR
SCR'S
A2TB5
SNUBBER
PCB
AC INPUT
FOR FIELD
SUPPLY
DC OUTPUT
FIELD
SUPPLY
ARMATURE
CURRENT
TRANSDUCER
DC
ARMATURE
FUSE F4
AC LINES
FUSES
F1-3
INPUT
POWER
LUGS
GROUND
LUG
ARMATURE
INTERFACE
PCB
BRIDGE
THERMISTOR
CUBE I.D.
PCB

Introduction
16
Figure 4: Component Layout Right Side View
POWER
SUPPLY
COVER
A4
POWER
SUPPLY
A4 TB3
A1 MAIN
CONTROL
PCB

Introduction
17
Power Conversion Unit
Description
The Power Conversion Unit circuitry has three
major functions:
1. It converts three phase AC input power to
variable DC voltage for application to a
motor armature.
2. It converts motor generated DC power to
three-phase power to feed back to the line.
3. It converts single phase AC input power to
a variable DC voltage for application to a
motor field.
Two sources of power are required. A three-
phase power isolation transformer adjusts the
utility mains voltage to that required to operate
DSD 412 efficiently with the needs of the DC
hoist motor. 115VAC control power from a
separate source is used to power the low
voltage power supply, cooling fans, relay and
contactor logic.
Three phase input power is applied through
the AC line fuses to twin 6-SCR power bridges
for forward and reverse control. The PCU
microprocessor controls armature current
based on a reference received from the Drive
Control Unit microprocessor. Output from the
PCU microprocessor is sent to the Armature
Interface PCB, which produces the gating
signals for power SCRs. The SCR bridge
output is an adjustable DC voltage, which is
applied to the motor armature circuit. Power
circuit AC and DC measurement signals are
routed to voltage dividers on the Armature
Interface PCB, and scaled values are sent to
the PCU microprocessor. Armature current is
also measured and the feedback signal is
routed through the Armature Interface PCB to
the PCU microprocessor. An over current trip
function monitors this signal to initiate an
instantaneous static trip (IST) in the event of
excessive output current.
Single-phase power is also applied through the
AC line fuses to the Field Rectifier Module.
SCR gating signals from the PCU
microprocessor control the field rectifier SCRs.
A separate current measuring device is used
to monitor the DC current flowing to the motor
field. Additional connections allow for a
separate step-up or step-down transformer to
be used to power the motor field rectifier from
voltage mains different from that for the motor
armature.
If optional dynamic braking resistors (DBR) are
present they are applied across the motor
armature to dissipate rotational energy
whenever the loop contactor is dropped out.
This helps to bring the motor to a stop even
when utility power is lost.
The largest component of the PCU is the SCR
bridge (Heat Sink Assembly). The heat sink is
an extruded aluminum structure that dissipates
the heat generated by the SCRs mounted on
the front surface (or between heat sink
sections, in large size power cubes). The
SCRs control the current to the motor armature
and in turn are controlled by the Armature
Interface PCB mounted in front of the SCRs.
Three input power line fuses are provided. A
DC Bus fuse protects the motor armature
circuit. A thermistor (and thermostat on some
ratings) senses heat sink temperature and
gives an over-temperature warning if an over-
temperature occurs.
Access to the SCR Bridge is obtained by
opening the hinged door containing the Drive
Control PCB A1.
WARNING
Opening the hinged door with power applied to
the drive exposes dangerous voltage levels.
The hinged door should only be opened by a
qualified service technician, and only when the
power to the drive is turned off.
Hardware Descriptions
DSD 412 Power Supply PCB (A4)
Provides +5V, +15V, -15V, and +24V to the
control circuits and has fold-back current limit
protection. It also provides 115VAC
connections for the main contactor, motor
thermostat and fans.
Armature Interface PCB (A2)
Provides the interface circuitry between the
digital firing pulses generated by the Drive
Control PCB and the high current SCR gating
pulses controlling the armature current. It also
provides feedback signals from the power
section to the Drive Control PCB. A small
‘cube ID’ circuit board is attached to the
Armature Interface PCB to identify the ampere
capacity of the SCR power bridge to the PCU
processor.

Introduction
18
SCR's
The drive uses different selections of doubler
packs or individual “hockey puck” SCRs
according to the horsepower ranges specified
below:
MOTOR ARMATURE
CURRENT
SCR
TYPE
25A - 195 A Doubler
300 - 1285 A "Hockey Puck"
Field Interface PCB (A3)
Provides the interface circuitry between the
digital firing pulses generated by the Drive
Control PCB and transformer isolated SCR
gating pulses controlling the field current. It
also contains the field feedback circuitry and
the field SCR snubber circuit.
Cell snubber PCB (A5)
Is provided for SCR protection. These are
selected to work efficiently with utility line
impedance between 2 and 8 percent, including
that of the power input transformer.
Drive Control PCB (A1)
Mounted on the hinged door, this board
provides the microprocessors, memory and
support circuits needed to control drive
operation. Two control circuits are provided on
this PCB. One for controlling the Power
Conversion Unit (PCU), and another for speed
regulation and higher-level functions, called
the Drive Control Unit (DCU). These two
circuits communicate primarily through a Dual-
Port Random Access Memory (DPRAM) IC
(integrated circuit) device.
Drive Control Unit
The major element of the DCU is a 16/32-bit
Motorola 68000 microprocessor. Random
Access Memory (RAM) provides memory
space to store values that are maintained only
while power is on. Non Volatile Random
Access Memory (NVRAM) maintains drive
control parameters for the DCU when the
power is off. Two EPROM’s (Electrically
Programmable Read Only Memory) devices,
U39 & U40, contain the specific drive program
instructions for the DCU microprocessor.
Power Conversion Unit Control
The major element of the PCU control circuit
is a 16-bit Intel 80C196 microprocessor.
Again, RAM and EPROM devices, U13 & U14,
provide memory space and computer
instructions for the PCU. Any PCU parameters
that need to be maintained while power is off
are kept in NVRAM of the DCU and passed
through the DPRAM.
Local I/O
In an elevator application, the Local I/O
[Input/Output] allow the drive to have inputs
and outputs (I/O) such as RUN, STOP,
Encoder Feedback, Analog Reference Input,
Fault condition relay logic output, etc.
connected directly to the drive or passing
through a serial communications device.
Connection to the Local I/O is made via A1TB1
and/or the serial interface connection at
terminal point J1 mounted directly on the Drive
Control PCB (A1).
Front Panel Controls and Indicators
The upper right corner of the power cube cover
contains the operator controls and indicators.
Although accessible with the cover in place, all
of these components are part of the Drive
Control PCB (A1).
DRIVE RESET Button (S1)
Pressing this button causes the drive to clear
critical and non-critical faults and to restore
drive operation when faults are present. This
button will have no affect when the drive in
enabled.
/