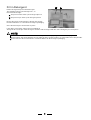
White Knight DW0945WA User manual
- Category
- Dishwashers
- Type
- User manual

DW0945WA

Di shw as h er Fe at ure s.. . ... .. .. .. . .. ........ . . ... ...... .. ... 3
A Wate r So ftener... ... ...... ....... .. .... ... ... ... ..... ..4ʙ ..
At tentio n b efore or after loadi ng the Dis hwash er
Baskets..........................................................9
Filtering System. .................... ......... ............... 14
Caring for the Dishwasher..................... .........15.
B L oad in g th e Sal t into the S of t en er...... ...... ... . .5ʙ
C Fill the Rinse Aid Dispenser.........................5ʙ
D Function of Detergent .................................6
ʙ
Loading the upper ...............................10Ba sket
Loa ding the Lower ..... ..........................10Basket
Th e recommended method loading big
dishw ar e................................................... . ...11
Wash Cycle Table...........................................12
Turning on the Appliance................................13
Change the Programme...... ........ ................13....
At the end of the Wash Cycle................. ..........13
Positioning the Appliance................... ..........16..
Wate r C onnecti on. ...... .... .. . ... .. ... . ... ..... . .. ..... ..17.
A bout Power Conne c tion.. .. . ..... ... . ... ..... . . ...... .1 6.
Start of dishwasher................ ................ ... ...18..
Before calling for servi ce........................... .....19.
Error codes.................................... ..............20.
Technical information .............................. .....21..
Control Panel...................................................3
To r eview the sect ion o n tro ubleshooting Ti ps
will help you to solve some common problems
by your self .
Please carefully read this manual before using the
dishwasher, it will help you to use and maintain the
di shw a sher pro perl y.
Pass it on to any subsequent owner of the appliance.
Thi s ma nua l c on tai ns se ct ion s on safety In struct io n s,
Operating Instructions, Installation Instructions and
Tr oubleshoo ti ng Tips , etc .
Th e man ufa cture r, fo llowi ng a pol icy o f con stant
development and updating of the product, may
make m odificatio ns w itho ut g iving prior not ice.
Keep it to r efer to it at a later date.
If yo u can not solv e the pro blem s by yo urself ,
please ask fo r the help o f profe ssiona l techn icia ns.
This applian ce is intended for normal domestic use only.
Dear Cu stom er
,

This appliance can be used by children aged from 8
years and above and persons with reduced physical,
sensory or mental capabilities or lack of experience
and knowledge if they have been given supervision
or instruction concerning use of the appliance in a
safe way and understand the hazards involved.
Children shall not play with the appliance. Cleaning
and user maintenance shall not be made by children
without supervision.
This appliance is for indoor use only, for household
use only.
To protect against the risk of electrical shock, do not
immerse the unit, cord or plug in water or other liquid.
Please unplug before cleaning and maintaining the
appliance .
This appliance is intended for normal domestic use
only.
Wh en usin g your dis hw asher,
follow the pre cautions listed below:

This appliance must be earthed. In the event of a
malfunction or breakdown, eart hing will reduce the risk
of anelectric shock by providing a path of least
resistance of electric current. This appliance is equipped
with a cord having an equipment-earthing conductor
and a grounding plug.
The plug must be plugged into an appropriate outlet that
is installed and earthed in accordance with all local
codes and ordinances.
Improper connection of the equipment-earthing
conductor can result in the risk of an electric shock.
Check with a qualified electrician or service
representative if you are in doubt w hether the appliance
is properly grounded.
Do not modify t he plug provided with the appliance;
If it does not fit the outlet.
Have a proper outlet installed by a qualified electrician.
Do not abuse, sit on, or stand on the door or dish rack of
the dishwasher.
Do not operate your dishwasher unless all enclosure
panels are properly in place.
Open the door very carefully if the dishwasher is
operating, there is a risk of water squirting out.
Do not place any heavy objects on or stand on the door
when it is open. The appliance could tip forw ard.
When loading items to be washed:
1) Locate sharp items so that they are not likely to
damage the door se al;

2) Warning: Knives and other utensils with sharp points
must be loaded in the basket with their points down or
placed in a horizontal position .
Check that the detergent powder is empty after
completion of the wash cycle.
Do not wash plastic items unless they are marked
dishwasher safe or the equivalent.
For plastic items n
ot so marked,
check the manufacturer's
recommendations.
Use only detergent and rinse additives designed for
an automatic dishwasher.
Never use soap, laundry detergent, or hand washing
detergent in your dishwasher.
Children should be supervised to ensure that they do not
play with the appliance.
The door should not be left open, since this could increase
the risk of tripping.
If the supply cord is damaged, it must be replaced by the
manufacturer or its serv ice agent or a s imilarly qualified
person in order t o avoid a hazard.
During installation, the power supply must not be
excessively or dangerously bent or flattened.
Do not tamper with controls.
The appliance is to be connected to the water mains using
new hose sets and that old hose-sets should not be reused.
The maximum number of place settings to be washed
is 9.
The maximum permissible inlet water pressure is 1MPa.
The minimum permissible inlet water pressure is 0.04MPa.

Di spose of the d ishwasher packaging mater ial c orrectly.
Al l packaging mate rial s can b e recycled.
Pl asti c pa rts are m arked wi th the stand ard i nternati onal a bbreviation s:
PE for polyet hylene, e. g. sh eet wrap ping ma terial
PS for po l yst y re ne, e .g . pa d din g m at e ria l
POM p olyoxy met hylene, e.g . plast ic cl ips
PP polypropyle ne, e. g. Sal t filler
ABS Acrylo nitr il e Butad iene S tyrene, e.g. Con trol P anel .
Packagingmaterialcouldbedangerousforchildren!
F or di sp osi ng o f pa c kag e and th e appliance ple as e go to a recyc l ing cen t re . T herefo re c ut o ff the po wer
supply cable an d make the door closing device unusable.
Cardb oard packaging is manufactured from recycled paper and shou ld be disposed in the w aste paper
co llect ion for recycli ng.
B y en suri ng thi s pro duct is d i spo s ed of co rr ect ly, y o u w il l hel p pr ev ent pot e ntial neg a tiv e co n seq uen c es
fo r t he e nv ir onm ent and h um a n h e alth, wh ic h coul d o th er wis e be c au sed by i n a ppr opr ia te w a ste h an dl ing
of this product.
F or mor e d et ail ed inform a tio n ab o ut r e cyc li ng of th is pr od uc t, pl e ase con t a ct y our lo ca l ci ty offi c e an d yo ur
household waste disposal service.
DISPOSAL: Do not dispose this product as unsorted municipal w aste. Collect ion of such waste separately
fo r sp ec ial t rea t men t i s n e ce ss ar y.

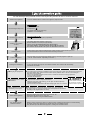
Witheachwashcycle.
Compartment
For programmes with pre-wash only.
(Follow the us er instructions!)
Electric indicator on control panel (if provided).
Check the rinse aid level
(On models w ith water softener system only.)
Electric indicator on control panel (if provided).
If there is no salt warning light in the control panel
(for some models), you can estimate when to fill the salt into
the softener by the number of cycles the dishwasher has run.
Check th e regeneration
salt level
Load the baskets
Select a programme
T urn on the w ater tap and press t he Start/reset button. The machine will start working
after about 10 seconds.
Running the dishw asher
Switch off the appliance
Turn off the water tap,
unload the baskets
Fill the detergent dispenser
Warning: wait a few minutes (about 15 minutes) before unloading the dishwasher to avoid handling
the dishes and utens ils while they are still hot and more susceptible to break.
The y will a lso dry better.Unload t he appliance, starting fro m the lower b asket.
Changing the programme
Add forgotten dishes in the
dishwasher.
Scrape off any large amount of leftover food. Soften r emnants of burnt food in pa ns,
then load the baskets. Refe r to the dishwasher loading instruc tions.
Close the door , Press the Programme button until the selecte d programme lights up.
( See the section entitled Operationg instruction )Ŷŷ
When the working cycle has finished, the buzzer of the
dishwasher will sound 8 tim es, then stop.
Turn off the appliance using the ON /OFF button.
If the appliance is switched
off during a wash cycle.
Op en t he do or c aref ull y.
Hot st eam m ay escape
when the doo r is open ed!
If the appliance is switched off during a wash cycle, whe n switched
o n again, please re-select the washing cycle and opera te the dishwasher
according to the original Power-on sta te ).
Switch on the appliance Press the On/Off button to switch on the applianc e, Open the door.
1.Open the door a little to st o p the dishwasher .
2.After the spray arms stop working, you can open the door completely.
3.Add the forgotten dishes.
4.Close the door, the dishwasher will start running again after 10 seconds.
For detailed operating method read the corresponding content on the instructio n manual.
1. A running cycle can only be modified if it has been running for a short time. O therwise the detergent
m ay ha ve already been released and the water already drained. If this is the case, the detergent
dispenser must be refilled.
2. Pres s the Start/Reset button for more than 3 seconds to cancel the running programme .
3. Select a new programme .
4. Restart the dishwasher.
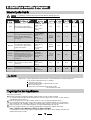
AB

11 12
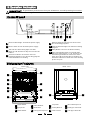
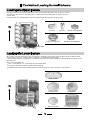
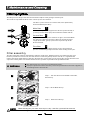
Ba ck Vie w
1
2
3
4
5
6
7
8
9
10
on
Of f
Front view
Main Filter
Dete rgent D ispenser
Cup Shelf
Cutlery Basket
Coarse Filter
Rinse Aid Dispenser
Inle t pipe c onnecto r
Drain pipe connector
Lower Basket
Sp ra y A rms
Upper Basket
1
Salt Container
before using it for the first time.
To get the best perform ance from your dishwasher, read all operating instructions
5
6
7
8
9
10
12
11
3
2
4
2
3
4
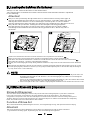
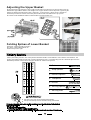
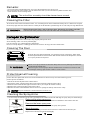
Powe r in dica tor l ight : To show t he po wer supply.
Start /Reset button: To start the selected
washi ng pr ogram or re se t t he wa s hi ng p ro gram
w hen the mach ine is w orking.
Salt a nd r inse aid warning light s: To sh ow
when the salt container or dispenser need to be
refilled.
Powe r sw itch: To t urn on/ off the po wer supp ly.
5
Washi ng P rogr am Selector : To select o ne of
the six was hing pro grams.
7
8
6
Pr og ra m indi cator l igh ts: To show t he w ashi ng
pr ogra m.
DelayButton:ToPressthebuttontodelay.
D ela y tim e /Wash in g Ph a se s in dic ator light:
When you delay time(3, 6, 9, or 12 hours), the
indicators light will be on to show one of the
delay t ime. W hen t he m achine is wo rkin g, th e
indicators w i ll be on to show o ne of t h e was h in g
phase s of cycle.
3
1
6
578
4 2

Be fo re u sing you r di shwasher for th e first time:
Th e wat er so ften er must be s et m anu ally, usin g the w ater ha rd ness dia l.
Th e wat er so ften er is des igned to rem ove min era ls an d sa lts fr om t he w ater, wh ich woul d ha ve
a de trim enta l o r adve rs e effect on the op eration of the app liance . The h igher the
content of th es e mineral s and sa lts, the harder your w ater is. The softe ner s hould be
adju sted acco rding t o the ha rdness o f the wat er in you r area. Your loca l Wa ter A uthority
can advise you on the hardness of the water in your area.
Adjusting Salt Consumption
The dishwas her is de signed to al low f or a djus tment i n the am ount of sa lt co nsumed bas ed o n the ha rd ness of
the water used. This is intended to optimise and customise the level o f salt consumption.
1. Unscrew the cap from the salt container.
2. T here i s a r ing o n the con tai ne r wit h an a rrow o n it (see fig ure
on the side), if necessary, rotate the ring in the anticlockwise
direction fro m th e "-" Setting toward the "+" sign, based on the
hardne ss o f the wat er be ing u se d.
It is rec omm end ed t hat a djust me nts shou ld be made in
acco rd ance wit h the f oll owin g sch em e:
WAT ER SOFTENER
Th e har dness o f the wa ter v arie s from p lace t o plac e. If hard water i s used i n the dis hwa she r, de posits wil l
form on the dish es a nd ute nsils.
Th e appl iance i s eq uipp ed with a sp ecial soften er tha t u ses a sal t c onta iner specific ally des igned to el imi nate
lime a nd mi nera ls fr om the wat er.
Contact yo ur l ocal w ater bo ard for i nformat io n on the hardne ss of your w ater su pply.
dH
mm ol /l
0~1 40~8 0~1.4
/
0
/
14~398~22 1.4~3.9 - 20 50
39~8022~45 3.9~8 Mid 40 25
+
60 16
fH
0~10
10~28
28~56
Clar ke
WATER HARDNESS
Selector Position
Salt consumption
(gram/ cycle)
Aut o n o my
(cycles/1kgs)
Pl ease fol low the s teps bel ow for a djus tmen t in salt consum ptio n.
""/
"-"
"+ "
"Mid"
Settingtowardthe"+"sign
Settingtowardthe"-"sign
Settingtowardbetween
the "-" si gn and "+" sign
No salt n eed adde d
45~60 80~107 56~75 8~11
If your m odel doe s not have any water softene r, you may skip this secti on.
A. Set the wate r sof tener
B. Add 1.5Kg di shw ash er sa lt an d th en ful l fil l the sal t con tainer w ith w ater
C. Filltherinseaiddispenser
D. Fi l l in de t e rgent
Clarke: B ritish degree
fH: French degree
dH: German degree
dH =1.25 Clarke=1.78 fH=0.178mmol/l
1

1. The salt con tainer must onl y be refil led when the s alt wa rn ing l igh t in t he cont rol pan el com es on.
Depend ing on how wel l t he salt diss olve s, t he sa lt warnin g light may stil l be on even tho ugh the
salt contai ner is filled .
If there is n o salt w arning light in the con trol panel ( for so me M ode ls),you c an estim ate wh en to f ill
the s alt i nto the so ftene r by th e cyc les t hat the dishw asher has run.
2. I f ther e are spill s o f the salt , a soak or a r apid pr ogram s hould be run to remove the excessiv e sa lt.
Always u se the salt i ntended for u se wi th di shwasher.
The sa lt c ont ain er i s locat ed beneath the l ower basket and sh ould b e fill ed as e xplained
in t he foll owing:
Attention!
Only use salt spe cif ically desi gne d f or the use i n di shwa shers! E very other type of
salt n ot specif ical ly de sig ned fo r the u se in a d ishwas her, espe cially tab le salt, will
damage t he w ater sof tener. I n case of da mages caused b y the use o f un suit able
salt t he ma nuf act ure r doe s not g ive any wa rranty nor is liable for a ny damage s cau sed.
Only f il l wi th s alt ju st b efo re sta rting one o f the co mp let e washi ng p ro grams.
This wi ll p revent any g rains of s alt or salt y wate r, w hi ch ma y have b een spill ed,
remain ing on the bottom o f th e machine for any pe riod of t ime, which m ay cau se
c o rrosion.
Th e ri nse aid i s relea se d d uring t he final rin se to prevent wat er fro m f orming dr oplets o n yo ur dis hes, w hich can
leave spots and s treaks. It also improv es dry ing by allowing wate r t o r oll off t he dishes. Your d ishwasher i s
designed to use liquid rinse aids. The rinse aid dispenser is located inside the door next to the detergent dispenser.
To fil l the di spens er, open th e c ap a nd pour t he rinse ai d i nto th e d isp ens er until t he l e vel i ndi cator tu rns c omplete ly
black. The v olume of the ri nse a id co ntainer is about 110m l.
Rinse Aid Dispenser
Function of Rinse Aid
Rinse aid is aut omat ic ally a dded d uri ng t he l ast r inse, ensur ing thor ough rin sing, and spo t an d s treak f ree drying.
Attention!
Only use branded rinse aid for dishwasher. Never fill the rinse aid dispenser with any other substances
(e.g. Di shw asher cleani ng ag ent, liq uid d eterg ent). Th is wou ld dam age the a pp lian ce .
A Remove the lower basket and then unscrew and remove the cap from the salt container.
B Pl ace th e en d of the funn el(sup plied ) in to t he h ole an d i ntro duce abo ut 1. 5kg of d ishw ash er salt .
C Full fill the salt container with water.It is normal for a small amount of water to come out of the salt container.
D Afte r f il ling th e co ntainer , sc rew the c ap t ightly b ac k cloc kwise.
E Usu ally, t he s alt warni ng li ght wi ll stop bei ng i llumi nated with in 2-6 days af te r th e sa lt c ont ain er ha s be en filled wi t h
sal t.
F Imm ed iately a fter f illin g t he s alt into th e sa lt co ntainer, a w ashing progr am should be s ta rted
progr am Oth erwis e the fil ter syst em , pump or ot her impo rtan t part s of the m achine m ay be d amaged
by salty water. This is out of warranty.
(We su ggest to use t he
soak or rapid ).

To op en th e di spens er, tur n the cap to t he " ope n" ( left ) a rrow a nd l if t i t o ut.
Po ur t he ri nse ai d int o th e dispe nser, be ing c aref ul n ot to o verfi ll .
Replace the cap by in se rting i t a ligned with "open " arrow and t urning it to t he cl osed (righ t) arrow.
Adjusting Rinse A id Dispenser
The ri nse aid dispe nser has si x or four s ett ings. Al ways sta rt with the d ispens er
set o n "4". I f spot s and p oo r dryin g are a proble m, i ncre ase the amo unt o f r inse
aid d isp ensed b y r em oving the d ispe nser l id an d rot ating t he d ial to "5". If t he
dishes s til l are not d ryi ng pr operly o r are show s pots, a dj ust th e dial to t he n ext
highe r lev er un til your dishes a re sp ot-f ree. The recom men ded set ting is "4".
(Factory value is "4".)
Increase the dose if there are drops of water or lime spots on the dishes after washing.
Redu ce i t i f th ere a re st icky whit is h sta ins on yo ur di sh es o r a b luish fil m on g lassw are o r
knife blades.
1
2
3
As t he ri nse aid d imin ishe s, th e siz e o f the black do t
on the rinse aid level indicator changes, as illustrated below.
Full
3/4full
1/2full
1 / 4 full - Should refill to eliminate spotting
Em pt y
When to Refill the Rinse Aid Dispenser
If th ere i s no ri ns e-aid warnin g light in t he c ont rol panel , you can est imat e the am ount fro m th e col our
of th e op tical level ind icator C loc ated next to t he cap. When th e rin se-a id c onta iner is fu ll, the wh ole
indicato r wil l be dark . As t he r inse -aid dim inish es, th e size o f the dark dot de creases. You shou ld neve r l et
t he rinse ai d l ev el f a l l 1 / 4 ful l.
durin g the nex t wash.
Don' t for get t o re plac e the cap be fore you close dis hwa sher d oor.
Clean u p a n y r i ns e aid sp ill ed whi l e du rin g filli ng w i th a n abso rbe nt cl ot h to avoi d ex cessi v e f oam i n g
Deterge nt s wi th its chem ical ingr edients a re ne ce ss ary t o re move dir t, c rus h dirt an d trans port it o ut of t he di shw asher.
Most of the commercial quality detergents are suitable for this purpose.
Detergents
The re a re 3 sor ts of dete rge nt s
1.With phosphate and with chlorine
2.With phos phate and wit hout c hlo rine
3.Wi thou t phosph ate and without chlor ine

Amount of Detergent to Use
Proper U se o f De terg ent
Use only det erge nt speci fically m ade for the u se in dis hwas hers. Ke ep your det ergent fr esh and dry.
Don't put powdered detergent into the dispenser until you're ready to wash dishes.
Dishwash er de tergent is co rrosi ve! Take c are to kee p it out of reach of c hildren.
Based on their chemical composition, detergents can be split in two basic types:
Deterg ent tabl ets of different bra nd s diss olve at d iffer ent speeds. For t his rea son some
deterge nt t ablets ca nnot d issolve an d devel op the ir full cl eaning power d uring sho rt
prog rams. T here fo re ple ase use long pr ogram s w hen usin g dete rg ent tabl ets, t o
ens ure the c omplete remov al of de tergen t residua ls.
Th e disp enser m us t be re fille d bef ore the start of e ach wash cy cle f ollowing the i nst ructi ons
provided in t he w ash cycle t able . You r dis hwa sher uses less de terg ent and rins e aid tha n
Conventional dishwasher. Generally, only one tablespoon of detergent is needed for
a normal wash load. More heavily soiled items need more detergent. Always add the
dete rgen t j us t be fore st arting the dishwas her, oth erw ise it coul d ge t da mp a nd will n ot
di s sol v e pr ope r ly.
Concentrated Detergent
Detergent Tablets
Detergent Dispenser
Always add the d etergent just b efore st art ing ea ch wash cycle.
Only use branded detergent aid for dishwasher.
If the lid i s close d: pr ess r ele ase butt on. T he l id will sp ri ng ope n.
conventional, alkaline dete rgents with caustic components
l ow a lk aline concent r at ed det erge nts w it h natur a l e n zy mes
Normally new pu lverised det ergent is with out phospha te. T hus the wate r soften er fu ncti on o f
phos ph ate i s not give n. In th i s ca se w e r e commend t o fill sal t i n the sa lt co nta i n er e ven when
the h ard ne ss of wate r is o nly 6 d H. If dete rgen ts w it ho ut ph osphate are used in the case of h ard wat er
often whi te spot s app ear on d ish es an d glasse s. In this cas e pl ease add mo re d eter gent to r each
better resu l ts . D ete rg en ts wit h o ut chl or ine d o only ble ach a l i ttle. Str o ng a nd c olo u red spo t s will no t
be re moved com plete ly. I n th is ca se p lease ch oo se a p rog ram with a hi gher tempera ture.

Fill t he d eter gent dispens er w it h deter gen t.
Th e mar k ing i n d icates th e dosing l evels , as
i ll us tra ted o n t he ri gh t:
Th e p lace o f main w ash cyc le deterg ent plac ed.
Th e p lace o f pr e-wa sh cycle det erge nt p lace d.
Please o bserve th e m anufa ct urer s dosing and storage
Recommendations as stated on the detergent packaging.
Close the lid and press until it locks in place.
I f th e di sh es are h eav i ly so i l ed , pl ac e an ad diti o nal
detergen t do se i n the pre- was h det erg ent cha mber. This d etergen t will take effe ct durin g the pre- wa sh phas e.
A
B
Fill in Detergent
You fi nd in form atio n ab out the a mo unt o f det erg ent for th e si ngle program me on t he l ast p age .
Pl eas e aw are, tha t accordi ng t o t he lev el soi ling and the spec ific har dness of wa ter d iffer enc es ar e possib le.
Please observe the manufacturer's recommendations on the detergent packaging.
A
B

Cutlery with wooden, horn china or
mother -of-pearl han dle s
Plast ic i te ms t hat ar e not h eat resis tant
Older cut lery with glued par ts t hat a re n ot
temperature resistant
Bonded c utlery ite ms or dishes
Pewter or coop er ite ms
Crystal gla ss
Steel items su bject to rusti ng
Wooden p latte rs
Items made from synthetic fibres
So me t ypes of gl as ses c an becom e
dull afte r a large number of washes
Silv er a nd a lumi num par ts ha ve a
tendency to discolour during washing
Glazed patterns may fade if machine
washed freq ue ntly
Are not suitable
Are of limited suitability
Dishes and items of cutlery must not lie inside one another, or cover each other.
To av oid da mage to gl asse s, th ey m ust not t ouc h.
Lo ad large ite ms w hich are most difficul t to c lea n int o the l owe r bask et.
The uppe r bas ket is de sig ned to ho ld mor e delicate and li ghter d ishware such as glasses , coffee
and tea cups
Lo ng bladed kni ve s sto red i n an uprigh t po sition are a p otenti al hazard !
Lo ng and/or s harp item s o f cut lery such as carvi ng kniv es m ust be p ositione d
h orizon ta lly in t he upper b asket.
P lease do not o ve rloa d your di shwashe r. T his is import ant for g ood resu lts a nd fo r
r easonab le consu mpt ion o f en ergy.
Load holl ow ite ms suc h as cup s, gl asses, p ans etc. With t he opening f aci ng dow nwa rd s s o that
w a t er c ann o t c o l l ect i n t he c ont a i n e r or a dee p ba se.
Consider buying utensils which are identified as dishwasher-proof.
Use a mild detergent that is described as 'kind to dishes'. If necessary, seek further
information from the detergent manufacturers.
For part icu lar items, se lect a p ro gr am wit h as low a te mp era ture a s p ossib le.
To pr event dama ge, d o not t ake gla ss a nd c utler y out of the dishw asher i mmed iately
aft er t he p rogr amm e h as e nde d.
(For best per formance of the di shwasher, fol low the se load ing gu ide lines.
Featu res and ap pearance of baske ts and cutler y ba skets may var y from your mod el.)
Scrape off any larg e amount s o f left over fo od. S often rem nants o f burnt food in pans.
It is no t necess ary to ri nse t he d ish es under runni ng water.
Pl ace objects i n the dis hwasher in foll owing wa y:
1.Items su ch a s cups, g la sses, po ts /pa ns, e tc. a re fa ced dow nwa rds.
2.Curved it ems, or ones wit h recess es, shoul d be loade d asla nt s o th at w ater can run off.
3.All u tensils a re st acked secu rely and can not ti p o ver.
4.All u tens ils a re pl aced in t he way t hat the spray ar ms can r otate f reely d urin g wa shin g.
Very sm al l it ems sho uld n ot b e washe d in the dishwas her as th ey c ould ea sily fal l out o f th e basket .
To pre ven t wa ter drippi ng fr om the uppe r ba sket i nto t he lower ba ske t, we rec ommend tha t you
empty the lower basket f irst an d the n the upper ba sket.

The upper basket is designed to hold more delicate and lighter dishware such as glasses, coffee
and tea cups a nd s auc ers , as we ll a s p lat es, sm all b owls an d shal lo w pa ns (as long a s the y are
not too dirty).
Po siti on the dish es an d co ok war e so that t h ey w ill n ot g et mov ed b y t h e s p ra y of wa te r.
We sugg est that you plac e large i tems and t he mo st d ifficu lt to clean it ems are t o be plac ed into the l ower ba sket :
such as pots, pan s, lid s, s ervi ng di she s an d b owls, as s ho wn in the figure b elow.
It is pref erab le to place ser vin g dishes and lids on the si de of th e ra cks in o rder to a void block ing the rota tion of t he
top spray arm.
Pots, serv in g bowl s, etc, must always b e pl aced top d own .
Deep pots s ho uld be s lanted to allo w w ater t o fl ow out.
Please be rem ind e d that:
Th e B ottom Bas ket f eat ure s foldi ng spikes s o tha t larg er or mo re pots and pan s can be l oaded .
1
4
5
3
3
1
2
6
Sauc ers
5
Lar ge s er ving b o w l
Small serv ing bowl
4
6
Medium serving bowl
3
Gl asse s
2
1
Cup s
10
Gravy ladle
7
Oval platter
8
Dinner plates
9
So up pla te s
Dessert dishes
10
Cutle ry basket
11
7
8
9
2
10
10
9
9
8
11

Cutlery should be pla ced in t he cut lery baske t wit h the han dles at the bo ttom. If the r ack has side bas kets , th e
spoons should be loaded sep arat ely int o the ap propriate s lots, espe cially long uten sil s shoul d b e place d in the
hori zontal positi on at t he fron t of t he uppe r bask et as s how n in the p icture.
Folding Spikes of Lower Basket
Fo r bett er st acki ng o f po ts and pa ns,
the spikes c an b e fol ded down as
sho w in the p ict u re right.
D o no t let any item e xte nd th rough th e bot tom.
Al ways lo ad sh arp u ten sils wi th t he sharp poi nt down!
Adjusting the Upper Basket
Th e heig ht o f the upper b asket ca n be adjus ted in order to cre ate mor e space fo r lar ge utensils
both f or the upper/l ower basket. The he ight of the upp er b asket ca n be adjust ed by pl acing the
wheels o n d ifferent h eig ht of the r ails. Long it ems, se rving cutl ery, sala d server s and knives
should b e pl aced on the shel f so t hat they do not o bstru ct the rotat ion o f the s pray a rms.
Th e she lf ca n be fold ed b ack or be re mo ved w hen not requ ired for use.
Teaspoons
4
Soup spoons
2
Forks
1
Serv ing fork s
7
Serving spoons
6
Knives
5
3
Dessert spoons
4
2
2
2
4
2
2
4
3
3
3
6
33
3
3
3
3
4
44
4
4
4
2
2
2
2
11
11
11
1
1
1
7
6
5
5
5
5
5
5
55
5

13.5
ECO
Intensive
Normal
( *EN 50242)
150
1.08
3in1
(or )3in1
4/23g
(or )3in1
4/2 3g
(or )3in1
4/ 2 3 g
27g
3in1
Rapid
1Hour
Pre-wash(50 )
Was h ( 6 5 )
Rins e
Rins e
Rinse (55 )
Dryin g
ć
ć
ć
Pre-wash(50 )
Was h ( 5 5 )
Rins e
Rinse (65 )
Dryin g
ć
ć
ć
Wash (50 )
Ri n se
Dryi ng
Pre-wash
(60 )
ć
ć
Wash ( 40 )
Rins e
Rins e (40 )
ć
ć
15g
Was h (60 )
Rin se
Rin se (50 )
Dryi ng
ć
ć
Pre-w ash 5 0
Was h 5 5
Rinse
Rinse 65
Drying
˄ć˅
˄ć˅
˄ć˅
155
160
120
30
60
1.09
0. 77
1.13
0.50
0.77
16.0
13.0
10 .5
10.0
9.0
Means: need to fill rinse into the Rinse-Aid Dispenser.
()
*EN 5024 2 : Thi s pro gra mme i s the te st cycl e. Th e inform ation for comp ar abil ity test
in acco rdance w ith E N 5024 2, as f ollows:
Capacity: 9 setting
Position Upper basket: upper wheels on rails
Rins e ai d s etti ng : 6
Th e p owe r consum pti on o f off-mo de i s 0W
left-on mode is 0.4W
Star tin g a cyc le wash
Dr aw out the lowe r and up per basket, l oad the d ish es and p ush them back.
I t is c ommended t o lo ad th e lo wer basket f i rst, t hen the uppe r one (see th e sec tion en title d
Loading the Dishwasher ).
Pour in the d eterg ent (see the sect ion e nt it led Sal t, D etergent and Rinse Ai d ) .
I nse rt the plu g int o the socket. The pow er s upply i s 220-240 VAC / 50 HZ , th e speci ficat ion
of th e so cket is 1 0A 2 50VAC. Make su re that the w ater supply is tu rned on to full pres sure.
Clo se the do or, pr ess the ON/OFF butt on, and t he O N/O FF l ight wi ll turn on.
Ŷŷ
Ŷŷ
ECO-
Pr ess the pro gram button , the w ash pr ogram will b e change d a s foll ows dire ction :
I f a p rogram is se lect ed , t he respo nse ligh t wi ll ligh t. Th en p ress the Start/ Res et butt on, t he
dish wash er b egin s to start.
3in1->Intensive->Normal-> >1 Hour->Rapid;
For normally soiled loads,
such as pots glasses and
ligh tly s oile d pans .
ʙ
For normally soiled loads,
use m ultif unction al d etergen t
A sh orter w ash for l ightly
so iled loads and q uick wash
Fo r l ig htly s oil ed l oa d tha t
do no t n eed excel lent dryin g
ef f icie n c y.
Fo r heaviest soiled c rockery,
andnormallysoiledpots
pa n s dish es et c wi th dried
on s oi li ng
ʙ
ʙ
This is standard programme, it is
su it a bl e to cl ean norma lly soiled
tabl ewar e and it is the most
effici ent progr amm e in t e rms o f
its combined en ergy a nd wat er
consumption for that type of
tabl ewar e
.

It is dan gerou s t o ope n th e do or when w as hi ng , be c a use the hot wate r may scald y ou .
W h en the w or ki n g cy cle has finished, t he buz zer of t he d i s hwa she r will s o u nd f or 8 seco n d s , then s top . Turn o ff
t he a ppli ance usi ng th e O N/O FF b utto n, sh ut o ff t he wa ter s upp ly and op en t he d oor of t he di shwashe r.
Wait for a few mi nutes b efore unlo adi ng th e dis hwa she r to a voi d ha ndlin g the dishes and ute nsil s wh ile th ey
are s til l h ot a nd m ore susc eptible to br eak age. The y wil l als o d ry be tter.
Switch Off the Dishwasher
1.S witch off the di shwasher by p re ssing t he O N/OFF butto n.
2.Turn off the water tap!
The pro gram l igh t is off , o nly in t his cas e the pr ogramme has ende d.
Open the door carefully.
Hot dishes are sensi tive t o knocks. The di shes shou ld t herefore b e a llow ed to cool d own ar ound 15 minutes
before removing from the appliance.
Open t he d ishwas her's door, leave i t aj ar and w ait a few m inutes bef ore rem oving the dis hes. I n this way they
will be cool er an d the dr ying wi ll be im proved .
Unloading the dishwasher
It is norm al that t he di shw as her is wet insid e.
Empty th e low er basket f ir st and then the up per on e. This w ill avoi d water dr ipp ing f ro m the upper Bas ket on to
the dis hes in th e low er on e.
If you open the door , the machine will pause. The program light will
stop blinking and the buzzer will mooing every minute unless you close the door . After
you c lo se t he doo r ,the m achin e wil l ke ep o n w orkin g af ter 10 s econ ds.
during a wash cycle
Premi se:
A cycle that is un derway ca n on ly be mod ifi ed if it ha s on ly been r unning for a s hort t ime. Ot herwis e, the
de tergent m ay hav e a lready be en re lea sed, a nd the appli ance m ay have alrea dy dr ained the w ash wa ter.
If t his i s the case , the dete rgent disp enser mu st be r efi lled ( see the sec tion ent itl ed " Load ing the
Det ergent " ).
Pr ess the st art/rese t but ton , the m achine wil l be i n standb y st ate, then you can
ch ange t he pr ogram t o t he d esired c ycle setting ( see th e section en tit led " Star ting a was h cy cle. . ." ) .
mo re t han 3 second s
The p ro gram l ights sho w the stat e of the dish washer:
a) All p rogram lights off--------------------- -----------------------stand by
b) One of the p ro gram lights on--------------------------------------pause
c) One o f the program lights blinking-----------------------------------run
c) Some of the up three program lights bl in king fleetly------------e rror
1
2
3
A forgotten dish can be added any time before the detergent cup opens.
Add forgotte n dishes.
Close the door
After the spray arms stop working,you can open the door
comp letely.
2
3
Open the door a little to stop the washing.
1
4
5
6
Press the start/reset button
Press the start/reset button, the dishwasher will run
after 10 seconds.
When you press the Start/Reset button to pause during washing, the program light will
stop blinking and the dishwasher will mooing every minute unless you press the
S ta r t/R e set bu t ton t o s tart.

The filter prev ent s lar ger remn ant s of food or o ther obj ects from get ting inside th e pu m.
The residues may block the filter, in this case they must be removed.
The filter system c onsi sts of a coar se f ilte r, a flat ( Main f ilter )
A n d a mi c ro fil t e r( F i ne fi l ter).
Food and soil particles trapped in this filter are pulverized by a
special jet on the lower spray arm and washed down to drain.
Larg er i tem s, s uc h as pi e c es of bo ne s or gla s s, t ha t c oul d b lock
the drain are trapped in the coarse filter. To remove the items
caugh t by the filter, gent ly s que eze the tap on th e top of this
filter and lift out.
This filter holds soil and food residues in the sump area a nd
prevents it from being redeposit on the dishes during wash cycle.
Main filter
1
Coarse filter
2
Fine filter
3
2
3
1
Filter assembly
The filter efficiently
For b est perfo rm ance and res ults, t he filte r must b e cleane d re gula rly. t his r eason, it i s a goo d ide a to
r emo ve t he la rge r fo od pa rticl es tr app ed in the f ilte r aft er e ach was h cy cle b y rin sing t he s em icirc ula r filte r and
c up unde r ru nnin g wa ter. To r emove th e f il ter d evice , pull th e c up handle in t he u pward d irection.
re mo ves f ood parti cle s fro m the wa sh w ater, al lowin g it to be rec ycle d du ring the cycl e.
For
T he dish was her mus t ne ver be used w i t ho ut t he filter s.
Imp ro per repl ace ment of the f ilter may re duce the perform anc e level o f the applian ce
and damage dishes and utensils.
1
2
St ep 1 Turn the filter in ant i-clockwis e direct io n,
t hen li ft it up.
˖
St ep 2 lif t the Ma in fil te r up˖
3
Step 3 lift the F ine filter up˖
When following this procedure from step1 to step 3, the filter system will be removed;
when following it from Step 3 to Step 1, the f ilter system will be installed.

Th e cont rol p anel c an be clea ned by using a lig htly dampen ed cloth .
Aft er cle an in g, m ake sure to dry it tho roughly.
For the ext e ri or, use a good a pp li an c e poli s h wax .
Never u se shar p obj ects, sco uring pa ds o r h ar sh c lean ers on a ny p art o f the dis hwa sher.
Protect Against Freezing
1.Cut off the electrical power to the dishwasher.
2.Turn of f the wat er su ppl y an d disco nnect the wat er i nl et pipe from the w ate r valve.
3.Drain the water from the inlet pipe and water valve. (Use a pan to catch the water)
4.Reconnect the water inl et pipe to the wa te r val ve.
5.Remove t he f ilter at t he bott om of the tub and use a spong e to s oak up wate r in the sum p.
pl ease t ake fros t pr ot ection meas ures o n t he dishw asher in winter. Ever y fter wa shing c ycle s,
pl ease op erate as foll ows
time a
˖
- Ins pect the filte rs fo r blo cking a fter e very time th e dis hwa she r ha s been us ed.
- By uns crew ing the coar se fi lter, you can remove the filter system . Re move a ny foo d re mna nts and
clean the filters under running water.
Remarks:
Cleaning the Filter
Cleaning The Door
To c lean th e c o a rs e filt er a nd t he fin e filt e r, us e a clean i n g bru sh. Re as sem bl e th e filt er par t s as shown in th e f i gur es
on t h e la st pa ge a nd r eins ert t he e nti re ass emb ly in the dis hwa sher, po sitio ning i t in i ts s eat and pres sing dow nwa rds .
The entire filter assembly should be cleaned once a week.
When cleaning the filters, don't knock on them. Otherwise, the filters could be
contorted and the performance of the dishwasher could be decreased.
To cle an th e e dge ar ound t he door, you sho uld u se o nly a soft warm, d am p clot h.
To avoi d pene trat ion o f wate r into t he door lock and elect rical componen ts, do not
use a spray cleaner of any ki nd.
Never u se a spr ay c leaner t o cle an t he d oor panel as it m ay dam age the door loc k
and electrical components.
Ab rasive ag ents o r some paper towels s hou ld not b e use d b ecau se o f t he ris k of
sc r a t c hi ng o r l eavin g s p ots on th e stai nles s st eel sur fa ce.
I f your dishwa sher cannot work beca use of t he ice,
pl ease con tact prof essional service person s.
Cleaning the Spray Arms
It is nece ssary to cl ean the sp ra y a rms re gularly fo r hard water ch emi cals will clog the spray ar m j ets an d b earings.
To remove the upper spray arm, screw off the nut clockwise then remove the arm.
Rem ove t he upper s pray arm
To rem ove the low er spray arm, pul l out .the spray ar m u pward
Remove the lower spray arm
Wash th e arms
Wash th e arms in soa py a nd warm w ater an d u se a soft brus h to clean t he je ts .
Repl ace th em af ter rin sing t hem thoro ughl y.
16-- 065
6/4$3&8
VQQFS
MPXFS
Page is loading ...
Page is loading ...
Page is loading ...
Page is loading ...
Page is loading ...
Page is loading ...
Page is loading ...
Page is loading ...
-
 1
1
-
 2
2
-
 3
3
-
 4
4
-
 5
5
-
 6
6
-
 7
7
-
 8
8
-
 9
9
-
 10
10
-
 11
11
-
 12
12
-
 13
13
-
 14
14
-
 15
15
-
 16
16
-
 17
17
-
 18
18
-
 19
19
-
 20
20
-
 21
21
-
 22
22
-
 23
23
-
 24
24
-
 25
25
-
 26
26
-
 27
27
-
 28
28


White Knight DW0945WA User manual
- Category
- Dishwashers
- Type
- User manual
Ask a question and I''ll find the answer in the document
Finding information in a document is now easier with AI
Related papers
Other documents
-
Elba EDW-B1461 Owner's manual
-
Daewoo DDW-M1215 User manual
-
Whirlpool ADP 590 IX User guide
-
Whirlpool ADP 690 IX User guide
-
Whirlpool ADP 650 WH User guide
-
-
Whirlpool ADP 790 WH User guide
-
-
Campomatic DW909E DW909XE Owner's manual
-