Page is loading ...

©2014 DJI. All Rights Reserved.
DJI LIGHTBRIDGE
User Manual V1.04
2015.01

©2014 DJI. All Rights Reserved. 2
Disclaimer
Thank you for purchasing the DJI LIGHTBRIDGE. Please visit the DJI LIGHTBRIDGE page on www.dji.com
regularly to keep up with product information, technical updates and manual corrections. Information in this
manual is subject to change without notice in line with product upgrades and updates.
Users must comply with local radio transmission laws and regulations when using this product. In using this
product, you hereby agree to this disclaimer and signify that you have understood all points completely. When
assembling this product, follow all instructions carefully. The manufacturer and seller assume no liability for any
damage or injury arising from the use of this product.
DJI is a registered trademark of DJI. Names of product, brand, etc., appearing in this manual are trademarks or
registered trademarks of their respective owner companies. This product and manual are copyrighted by DJI
with all rights reserved. No part of this product or manual shall be reproduced in any form without the prior
written consent or authorization of DJI.

©2014 DJI. All Rights Reserved. 3
Profile
A complete DJI LIGHTBIRDGE comprises of an air system and a ground system. It is a high definition video
transmitter, flight controller On Screen Display (OSD) and supports remote controls using the 2.4GHz
frequency band. As it is small, power efficient and highly sensitive, the DJI LIGHTBRIDGE can be used for
many activities. The air system must be attached to the aircraft and the ground system must be connected to a
monitor to display the video and flight controller OSD information.
When the DJI LIGHTBRIDGE transmits the video and flight controller OSD information, the air system is the
transmitter while the ground is the receiver. The air system pulls video from the camera and OSD information
from the flight controller then modulates it and transmits to the ground system. The ground system then
receives the information, demodulates it and sends it to a monitor or mobile device. The DJI LIGHTBRIDGE
App, available for smart devices is required for an ideal viewing experience.
When the DJI LIGHTBRIDGE transmits the remote control signal the ground system works as a transmitter
while the air system works as a receiver. The ground system can connect to two remote controls, one for
aircraft and the other for gimbal control. A DJI flight control system with DBUS port is required as the built in
receiver only supports the DJI DBUS protocol.
* 2.4GHz remote controls must be connected correctly to the ground system. Incorrect connection may lead to
malfunction due to interference.

©2014 DJI. All Rights Reserved. 4
Caution
Aircraft in flight can cause serious damage or injury. Please fly safely at all times.
Assembly Cautions
(1) Install antennas before powering on ground system or air system.
(2) Point air system antennas downward when in use, do not twist or bend antennas. Avoid obstructing
antennas to ensure transmission quality.
(3) Keep both ends of air system antennas as further as possible to achieve optimal transmission
performance. In addition, keep these antennas away from metals.
(4) Use only DJI approved antennas and installed them correctly. Other antennas are incompatible.
(5) Only 2.4GHz remote control can be connected to ground system of DJI LIGHTBRIDGE. Chose the
remote control with PPM trainer output.
(6) 2.4GHz remote controls must be connected to ground system for aircraft and gimbal control through
training ports. RF functions must be switched off.
(7) Do not create shorts or open circuits when soldering.
(8) Do not rotate gimbal if connected to camera HDMI port using DJI AV gimbal. This will cause gimbal
or HDMI cable damage.
(9) Disconnect HDMI cable from the camera when powering on the DJI non-HD gimbal. Failure to do so
might damage HDMI cable.
(10) Keep HDMI cable away from on-board GPS module.
(11) Do not modify DJI LIGHTBRIDGE.
Usage Cautions
(1) Check that all connections are correct and firm before every use.
(2) Check ground system battery capacity before every use. If the battery capacity is lower than 25%,
charge ground system. If ground system powers off, the air system will enter failsafe mode.
(3) Check environment before every use to ensure no 2.4GHz device interference (e.g. other 2.4GHz
remote controls, Phantom 2 Visions).
(4) Check remote control channels using DJI LIGHTBRIDGE Assistant before every use to ensure a good
connection and normal functionality.
(5) The air system built-in receiver will go into failsafe mode if the remote control and ground system are
disconnected during use.
(6) Turn smart device sound volume to maximum to hear alarms more clearly, e.g. bad remote control
signal and low aircraft battery capacity.

©2014 DJI. All Rights Reserved. 5
(7) Flight control system OSD work best when more than 6 GPS satellites are searched.
(8) Land slowly (≤1.5m/s) with the Phantom 2, as rapid landings can cause it to spin.
Others
(1) We strongly recommend using as many DJI parts as possible.
(2) If you have problems you cannot resolve, please contact your dealer or DJI customer service.

©2014 DJI. All Rights Reserved. 6
Contents
Disclaimer .......................................................................................................................................................................................................2
Profile ............................................................................................................................................................................................................. 3
Caution........................................................................................................................................................................................................... 4
Contents ........................................................................................................................................................................................................ 6
In the Box ...................................................................................................................................................................................................... 7
1 Introduction ............................................................................................................................................................................................. 10
1.1 Air system ..................................................................................................................................................................................... 10
1.2 Ground System .......................................................................................................................................................................... 12
2 Installation ................................................................................................................................................................................................ 14
2.1 Air System Installation ............................................................................................................................................................. 14
2.1.1 Installing Antennas ............................................................................................................................................................ 14
2.2 Ground System Installation .................................................................................................................................................. 14
2.2.1 Installing Antennas ........................................................................................................................................................... 14
2.2.2 Remote Control Connection ....................................................................................................................................... 15
2.2.3 Remote Control Configuration ................................................................................................................................... 16
2.2.4 Video Output Connection ............................................................................................................................................ 17
2.3 Connection Scenario .............................................................................................................................................................. 18
2.3.1 DJI HD Gimbal ................................................................................................................................................................... 18
2.3.2 DJI non-HD Gimbal ........................................................................................................................................................ 23
2.3.3 Phantom 2 Mode ............................................................................................................................................................. 24
2.3.4 Phantom 2 Vision+ Mode ............................................................................................................................................. 26
2.3.5 DIY Mode ........................................................................................................................................................................... 26
3 Using DJI LIGHTBRIDGE .................................................................................................................................................................. 27
3.1 Master-Slave Mode.................................................................................................................................................................. 27
4 Using DJI LIGHTBRIDGE App ........................................................................................................................................................ 28
4.1 Downloading DJI LIGHTBRIDGE App ............................................................................................................................. 28
4.2 Register and Login ................................................................................................................................................................. 28
4.3 DJI LIGHTBRIDGE App Usage ......................................................................................................................................... 30
4.4 DJI LIGHTBRIDGE App Settings ....................................................................................................................................... 31
4.5 Using Ground System ........................................................................................................................................................... 35
5 Assistant................................................................................................................................................................................................... 36
5.1 Installing Driver and Assistant ............................................................................................................................................. 36
5.2 Using Assistant ......................................................................................................................................................................... 36
5.2.1 Using LIGHTBRIDGE Assistant................................................................................................................................... 37
5.2.2 Remote Control Channel Settings ........................................................................................................................... 37
5.2.3 Firmware Upgrade .......................................................................................................................................................... 39
6 Specification ............................................................................................................................................................................................ 41
7 Appendix ................................................................................................................................................................................................. 42
7.1 Supported DJI Products ........................................................................................................................................................ 42
7.2 Relinking ..................................................................................................................................................................................... 42
7.3 Recharging Ground System ................................................................................................................................................ 42
7.4 Supported Resolution ........................................................................................................................................................... 43
7.5 Supported Remote Control ............................................................................................................................................... 44
8 FAQ ........................................................................................................................................................................................................... 45
FCC and IC Statements ........................................................................................................................................................................48

©2014 DJI. All Rights Reserved. 7
In the Box
Modules
Air System ×1
Ground System ×1
Air system paddle antenna ×2
Ground system antenna ×2
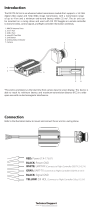
Air System Cables
GIMBAL cable ×1 (A)
If used with PHANTOM 2, connect cable to
reserved 6-PIN port on central board for air system
power supply and OSD info input.
DBUS cable ×1
Connect to flight control system DBUS port for
communication.
Air system power and CAN cable ×1
Connect to Air system GIMBAL port,
one end for power, the other for CAN port.
AV cable ×1
Connect camera’s AV output to AV input port.
HDMI cable (D-D) ×1
Connection for camera’s HDMI output.
GIMBAL cable x1 (B)
Use this cable to connect your gimbal’s GCU port
with the Lightbridge air system.

©2014 DJI. All Rights Reserved. 8
Ground System Cables
Remote control cable ×1
For remote control training port connection.
Connect red port 1 to a remote control for aircraft
control and black port 2 to a remote control for
gimbal control.
Remote control training cable×1
Connect the red jack to the aircraft remote
control to control.
Training port cables(rectangle)×2
Remote control training port connection.
Charger ×1
Connect to ground system when charging.
USB upgrade cable ×1
Connect to a PC when upgrading firmware.
PHANTOM training port cable x1
Connect one end of the cable to the PHANTOM
remote controller training port and the other end
to the Lightbridge remote controller cable.
Optional Packet
Optional packet
(1)
HDMI cable (D-D) ×1
Ground system holder ×1
Smart phone holder ×1
Optional packet
(2)
HDMI cable for Zenmuse ×1

©2014 DJI. All Rights Reserved. 9
PHANTOM training port
cable x1
GIMBAL cable x1 (B)
Optional packet
(3)
Air system antenna
extension cables x2
Air system antenna mount
x2

©2014 DJI. All Rights Reserved. 10
1 Introduction
1.1 Air system
Front View
[1] GIMBAL PORT
This port be connected to the G7 port on a DJI HD gimbal or to other ports for the functions listed below:
a) Power supply: (V+,V-) On-board battery (3S~6S) power connection. Non-DJI HD gimbal users must
use a seperate power cable or air system power CAN cable to connect air system and on-board
battery.
b) CAN-Bus: (L,H) OSD information from the flight system. For non-DJI HD gimbal users, connect to
the CAN-Bus port (for DJI A2 user, use the CAN 1 Bus port) on the flight control system with a
seperated CAN-Bus cable.
c) DVSB: (G-,+) DVSB video input from DJI HD gimbal.
[2] DBUS port
Connect built in receiver interface to DJI flight control system DBUS port, usually located on the main
controller labled X2. No other receiver requried when DBUS is used. The A2’s built in reciever will
automatically be disabled when DBUS port is used.
[3] UPGRADE port
Connect to PC to upgrade firmware using DJI LIGHTBRIDGE Assistant.
[4] LINK button
Press to link air system with ground system.
[5] CONTROL indicator
Remote control link indicator displays communtation status of air and ground systems.
Indicator
Description
Action
Linking in progress.
Link button has been pressed. Air system is
attempting to link with ground system.
Signal detected but not linked.
Link required.
Successful link.
Normal.
[]1
[]2
[]3
[]4 []5
[]6

©2014 DJI. All Rights Reserved. 11
No detected signal.
Power on Ground system. Check distance
between ground and air systems.
[6] VIDEO indicator
Video link indicator shows video source transmission status.
Indicator
Description
Instruction
AV/HDMI signal detected and functioning
normally.
Normal.
AV/HDMI signal detected. Transmission
failed.
Air system or ground system power
cycle required.
No video source detected.
Check camera and connection.
Top View
[1] Ventilation inlet
Do not obstruct ventilation fan outlet to ensure maximum cooling efficiency.
Side View
[1] HDMI IN Port
Connect to HDMI input device. Maximum input rate is 1920*1080@60fps.
[2] AV Port
Connect to AV input, including:
a) AV output from camera
b) AV output from DJI AV gimbal control unit (GCU)
[]1
[]1
[]2

©2014 DJI. All Rights Reserved. 12
1.2 Ground System
Front View
[]1 []2
[]3 []4 []5
[1] Power Adapter Port (11V~26V)
Connect to power adapter or 3S~6S battery to charge built-in battery. When ground system is connected
with an external power adapter or battery, the built-in battery will disable. Ensure the input voltage range
does not exceed the operating range of 12~24V. Use supplied charger to charge the battery.
[2] UPGRADE Port
Connect to PC to upgrade firmware through DJI LIGHTBRIDGE Assistant.
[3] CONTROL IN Port
Connect to training port on remote control using remote control cable and rectangle headed training port
cable. Connect gimbal and aircraft controllers to control both simultaneously. 2.4GHz remote controls
must be connected to this port with RF switched off to avoid interference. Remote controls working at
other frequencies cannot be connected to the Control In port using the remote control link.
[4] HDMI OUT Port
Connect to HDMI supported monitor for video viewing. Maximum output rate is 1080i60.
[5] USB Port
Connect to smart device to view video and flight control system OSD using DJI LIGHTBRIDGE App.
Top View
[]1 []2
[]3

©2014 DJI. All Rights Reserved. 13
[1] VIDEO Indicator
Vedio like indicator displays connection status between air and ground systems.
Indicator
Description
Signal detected from air system. Ground system working normally.
No signal from air system. Ground system working normally.
[2] POWER Indicator
Battery capacity display for ground system.
Indicator
Battery Capacity
87.5%~100%
75%~87.5%
62.5%~75%
50%~62.5%
37.5%~50%
25%~37.5%
12.5%~25%
0%~12.5%
=0%
Solid green
Flashing green
Off
[3] POWER Button
Power on: When battery is off, press power button once, then again and hold for 2 seconds to power on.
Power off: When battery is off, press power button once, then again and hold for 2 seconds to power off.
Show capacity: When battery is off, press power button once to display battery capacity.

©2014 DJI. All Rights Reserved. 14
2 Installation
2.1 Air System Installation
2.1.1 Installing Antennas
Insert antennas into positions shown below. Ensure they click into place.
Notes
(1) Install antennas before powering on air system.
(2) Point antennas downward when in use and avoid obstructions to ensure transmission quality.
(3) Use only DJI antennas and install them correctly. Other antennas are incompatible.
(4) Do not unplug the antennas unless it is absolutely necessary. Use tweezers to clamp on the metal part
of the antennas when unplugging the antennas. Do not apply excessive force on the antennas
otherwise it may cause damages to the antennas.
(5) For use with large aircraft. Connect the antenna extension cable to the panel antenna before attaching
the air system.
(6) Designed for DJI Spreading Wings aircraft. Place the panel antenna into the antenna mount, and then
place the antenna mount onto the landing gear of the aircraft. Note that the panel antenna should be
at a 90 degree angle to the landing gear. Watch the video tutorials on the DJI website for more details.
2.2 Ground System Installation
2.2.1 Installing Antennas
Attach two antennas to ground system according to example below. Screw them in tight.

©2014 DJI. All Rights Reserved. 15
Notes
(1) Attach antennas before powering on to avoid damage.
(2) Use only DJI antennas and install them correctly. Other antennas are incompatible.
2.2.2 Remote Control Connection
Connect training port and Control In port on ground system using rectangle headed training port cable and
remote control cable. Supported remote controls include Futaba, Spektrum, Devention and JR. Refer to
remote control manuals for details.
Two remote controls can be connected to the ground system at once. See example below for details.
Red jack connects to aircraft remote control.
Black jack connects to gimbal remote control.
Notes
(1) 2.4GHz remote controls must be connected to ground system for aircraft and gimbal control through
training ports, whose RF function should be switched off. Ground system will relay signals, remote

©2014 DJI. All Rights Reserved. 16
control will act as control system.
(2) 5.8GHz remote controls cannot be connected to ground system. Remote control signal is transmitted
by the remote control itself. Flight control system will communicate with receiver at 5.8GHz.
Additionally, DBUS on air system does not need connection.
2.2.3 Remote Control Configuration
Remote control must be configured through Assistant for the flight control system before performing this step.
Pay special attention to the below:
1. Select AERO as TX model. Set all curves (pitch, throttle, expo, rates, etc.) to default. Set endpoints of all
channels to default (100%) and all trims and sub-trims to zero.
2. Check all channel outputs are “Basic” -> “RC” page.
Refer to remote control manual for configuration. The below configuration process is based on a Futaba T8FG.
1. Switch off RF.
a) Press and hold “RTN” button to switch on remote control.
b) Enter “POWER MODE” menu, select “RF OFF”.
POWER MODE
RANGE CHECK
RF OFF
RF ON
c) RF indicator will turn off.
2. Set “TRAVEL” value of each channel within 100.
a) Double click “LINK” button to enter “LINKAGE” menu. Select “END POINT”.
b) Enter “END POINT” menu, set “TRAVEL” value of each channel within 100.
END POINT 1/3
TRAVEL
1 AIL 135 100 100 135
2 ELE 135 100 100 135
3 THR 135 100 100 135
4RUD 135 100 100 135

©2014 DJI. All Rights Reserved. 17
Note
In some cases (namely Futaba T8J remote controls), actual “TRAVEL” value may exceed 100 even when
set to correctly. This inconsistency can be observed by viewing the “SERVO” in the “LINKAGE”, as
shown below. Actual GUI may vary between models.
SERVO
1 2
3
4 5 6 7
8
-100 -100 +100 -100 -100 +0 +0 +0
OFF
DG1
DG2
Check that actual “TRAVEL” value does not exceed 100. If it does, reconfigure as necessary.
2.2.4 Video Output Connection
HDMI and USB ports output video, however the output options are mutually exclusive. Select either HDMI
or USB output base on your choice of device.
Connect monitor with HDMI support to HDMI Out port on ground system for video.
Connect smart device to USB port on ground system with USB cable. Use DJI LIGHTBRIDGE App for
video and OSD. The below example uses the USB port connection.
Note
Do not attach HDMI and USB devices to the ground system simultaneously. This will cause HDMI device to

©2014 DJI. All Rights Reserved. 18
2.3 Connection Scenario
DJI LIGHTBRIDGE offers several solutions to connect the gimbal to the flight controller based on gimbal model.
This section provides information about the most commonly seen solutions and their connection diagram. Follow
the connection described in the solutions that best suits your requirements.
2.3.1 DJI HD Gimbal
When using with DJI HD gimbal such as Z15-BMPCC, you can select either single or dual video source. By single
video source mode, it means the air system relays either the gimbal camera video or the FPV camera video signal
to the ground system. These two video sources are mutually exclusive under single video source mode. On the
hand, the air system simultaneously relays gimbal camera and FPV camera video signal to the ground system.
The ground system can one of the video signal from the air system. Note that video output source is defaulted
to “HDMI/AV”, user should manually select “HD gimbal” when they are connecting DJI HD gimbal to the air
system.
Scenario 1 – Dual Video Source with Dual Remote Control
Use two remote controls to control gimbal and aircraft independently. Map the gimbal and aircraft control
channels to both of the remote controls through DJI LIGHTBRIDGE Assistant. In dual video source mode,
aircraft operator receives the FPV camera video feed from the master ground station, while the gimbal
operator receives DJI HD gimbal video feed from the slave ground station.
Air system connection:
1. Connect Gimbal Port on air system to G7 port on DJI HD gimbal with supplied Gimbal cable (DJI HD
gimbal).
2. Connect HDMI /AV port to the FPV camera.
3. Connect DBUS port on air system to DBUS port (X2 port) on flight control system with DBUS cable.
4. Refer to gimbal and flight control system manuals to complete connection.
Ground system connection:
5. Connect remote control to the ground station via training port.
6. Connect mobile devices or HDMI monitor to the master and slave ground station.
7. Launch DJI LIGHTBRIDGE App and configure the Master –Slave mode in “App Settings”. It is
recommended to use “Master” ground system to receive FPV video signal and “Slave” ground
display normally but USB device will not.

©2014 DJI. All Rights Reserved. 19
system to receive gimbal video signal.
Scenario 2 - Dual Video Source with Single Remote Control
Use single remote control to control gimbal and aircraft independently. Map the gimbal and aircraft control
channels to the remote control through DJI LIGHTBRIDGE Assistant. In single video source mode, aircraft
operator receives the FPV camera video feed from the master ground station, while the gimbal operator
receives DJI HD gimbal video feed from the slave ground station.
Air system connection:
1. Connect Gimbal Port on air system to G7 port on DJI HD gimbal with supplied Gimbal cable (DJI HD
FPV Camera
Gimbal Camera
FPV Camera
Video

©2014 DJI. All Rights Reserved. 20
gimbal).
2. Connect HDMI /AV port to the FPV camera.
3. Connect DBUS port on air system to DBUS port (X2 port) on flight control system with DBUS cable.
4. Refer to gimbal and flight control system manuals to complete connection.
Ground system connection:
5. Connect remote control to the ground station via training port.
6. Connect mobile devices or HDMI monitor to the master and slave ground station.
7. Launch DJI LIGHTBRIDGE App and configure the Master –Slave mode in “App Settings”. It is
recommended to use “Master” ground system to receive FPV video signal and “Slave” ground
system to receive gimbal video signal.
FPV Camera
Video
FPV Camera
Gimbal Camera
/