LevelOne FNS-7000B User manual
- Category
- NAS & storage servers
- Type
- User manual

FNS-7000B
4-Bay Tower SATA NAS w/ 2-Port Gigabit Ethernet
User Manual
Ver1.00-0603
LIMITED WARRANTY
In no event shall the liability of Digital Data Communication Co., Ltd. (LevelOne) exceed
the price paid for the product from direct, indirect, special, incidental, or consequential
software, or its documentation. LevelOne offers no refunds for its products. LevelOne
makes no warranty or representation, expressed, implied, or statutory, with respect to
its products or the contents or use of this documentation and all accompanying software,
and specifically disclaims its quality, performance, merchantability, or fitness for any
particular purpose. LevelOne reserves the right to revise or update its products, software,

or documentation without obligation to notify any individual or entity.
CAUTION
1 Back up your system periodically to avoid any potential data loss. LevelOne
disclaims any responsibility of all sorts of data loss or recovery.
2 Should you return any components of FNS-7000B Turbo Server package for
refund or maintenance, make sure they are carefully packed for shipping. Any form of
damages due to improper packaging will not be compensated.
Table of Contents
Chapter 1 Overview..............................................................................6
1.1 Introduction....................................................................................6
1.2 Package Contents ............................................................................6
1.3 System Overview.............................................................................7
Chapter 2 Installation ..........................................................................8
2.1 Install Hard Disk..............................................................................8
2.2 Hard Disk Recommendation List ...................................................... 12
2.3 Connect FNS-7000B to Office Network ............................................. 13Chapter
3 LCD Panel Control ..............................................................15Chapter 4 Quick
Install Wizard...........................................................19Chapter 5 Use
Services.......................................................................27
5.1 File Server....................................................................................27
5.2 FTP Server.................................................................................... 27
5.3 Backup Server............................................................................... 28
5.4 Network Printer Service.................................................................. 28

Chapter 6 Administer .........................................................................29
6.1 Access Administration Page............................................................. 30
6.2 Server Administration .................................................................... 32
6.3 Quick Configuration
........................................................33
6.4 System Settings
............................................................39
6.4.1 Server Name............................................................................ 39
6.4.2 Date & Time............................................................................. 40
6.4.3 Language Setting ..................................................................... 42
6.4.4 View System Settings ............................................................... 42
6.5 Network Settings
..........................................................
.43
6.5.1 TCP/ IP Configuration................................................................ 43
6.5.2 Microsoft Networking ................................................................ 49
6.5.3 Apple Network.......................................................................... 51
6.5.4 Linux (NFS) Service .................................................................. 51
6.5.5 Web Service............................................................................. 52

6.5.6 FTP Service.............................................................................. 52
6.5.7 Network Printer Service............................................................. 53
6.5.8 View Network Settings .............................................................. 56
6.6 Disk Configuration
..........................................................
58
6.6.1 Create Disk Volume .................................................................. 58
6.6.2 Delete Disk Volume................................................................... 60
6.6.3 Examine Disk Volume................................................................ 61
6.6.4 Format Disk Volume.................................................................. 62
6.6.5 View Disk& VolumeStatus........................................................62
6.7 User Management
..........................................................
63
6.7.1 Users ...................................................................................... 63
6.7.2 User Groups............................................................................. 65
6.7.3 Quota ..................................................................................... 70
6.8 Network Share Management
............................................ 72
6.8.1 Create..................................................................................... 73
6.8.2 Property..................................................................................74
6.8.3 Access Control ......................................................................... 74

6.8.4 Delete.....................................................................................75
6.9 System Tools
................................................................
.76
6.9.1 SNMP Settings ......................................................................... 76
6.9.2 Alert Notification....................................................................... 77
6.9.3 Restart/ Shutdown.................................................................... 77
6.9.4 Hardware Settings....................................................................78
6.9.5 UPS ........................................................................................ 79
6.9.6 System Update......................................................................... 81
6.9.7 Change Logo............................................................................ 83
6.9.8 Remote Replication...................................................................84
6.9.10 Backup/ Restore/ Reset Settings ................................................ 91
6.9.11 USB CD/ DVD Backup/ Restore................................................... 92
6.10 Statistics & Logs
........................................................
....96
6.10.1 Active Users............................................................................. 96
6.10.2 Event Logs............................................................................... 96
6.10.3 DHCP Logs............................................................................... 96
Chapter 7 Access FNS-7000B..............................................................97
7.1 By Microsoft Windows .................................................................... 97
7.2 By Apple MAC OS .......................................................................... 99

7.3 By Linux OS................................................................................ 105
7.4 By Web Browser.......................................................................... 105
7.5 By File Transfer Protocol (FTP)....................................................... 106
Chapter 8 Maintenance.....................................................................109
9.1 Restart/ Shut down Server............................................................ 109
9.2 Reset Administrator Password and Network Settings........................ 110
5.1 Disk Failure or Malfunction............................................................ 111
5.2 Power Outage or Abnormal Shutdown ............................................
111Appendix A Web File
Manager.............................................................112Appendix B Configuring AD
Authentication.........................................117Appendix C Disk Configuration
Status.................................................127
Chapter 1 Overview
1.1 Introduction
Thank you for choosing FNS-7000B Turbo Server. This product has the following key
features:
ٛ
Simple installation, 5-min configuration and user-friendly management interface
for SMB users.
ٛ
High speed SATA HDD, supports hotswap, maximum capacity up to 1.6TB.
ٛ
Dual Gigabit ports for load balance, fail over and standalone settings.
ٛ
Double USB 2.0 ports for network printer sharing & UPS.
ٛ
LCD panel for instant display of IP address and important system info; IP settings
can be configured directly without access to PC.
ٛ
Supports hot redundant power supply to increase system reliability (optional).
ٛ
Provides various practical backup mechanisms. Professional remote replication
to remote NAS USB 2.0 interface for CD/DVD data burning Provides backup software
for Windows users, instant/scheduled backup
can be performed without IT professional
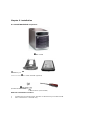
1.2 Package Contents
Your FNS-7000B package contains: FNS-7000B Turbo Server Power cord CD-ROM
(user manual, Quick Install Wizard and software inclusive) Quick Installation Guide
Ethernet cable x 2 Flat head screws x 16

Important Notice: Please back up your disk data periodically to avoid data loss due to
improper operation or disk failure of FNS-7000B. LevelOne is not responsible for any
data loss or recovery.
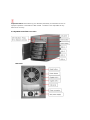
1.3 System Overview Front View

Chapter 2 Installation
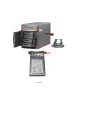
2.1 Install Hard Disk Components:
FNS-7000B
HDD tray x 4
(included in FNS-7000B)
3.5” SATA hard disk (optional)
(included in FNS-7000B)
Screw driver (not included)
Hard Disk Installation Procedure
1 Unfasten the round head screws and take out the disk trays from FNS-7000B.
2 Place a hard disk in a hard disk tray.

Tray front

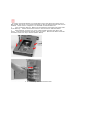
It is highly recommended that you install disks of the same brand and same size on
FNS-7000B. The server may function improperly if disks of different brands and size are
installed. Please refer to Chapter 2.2 for hard disk recommendation list.
1 Turn around the disk tray. Make sure the hard disk screw holes match the holes
of the disk tray. Fasten the flat head screws to lock the disk as indicated below.
2 When finished, open the tray cover of FNS-7000B and insert the disk to the
server. Push the disk towards the end until it is locked. Note that all disks should be
inserted in order from top to bottom (HDD1~HDD4).
5. Fasten the tray with round head screws.

Note: You can install 1~4 hard disks depending on the type of disk configuration you
select for FNS-7000B. If less than 4 disks are installed and the server is turned on, the
system will beep continuously. In such case, please go to Hardware Settings in System
Tools (refer to Chapter 6.9.4) and disable the buzzer. You can then continue to use
FNS-7000B.
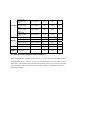
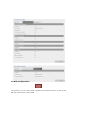
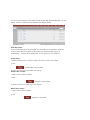
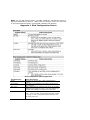
2.2 Hard Disk Recommendation List
The following HDD models are verified by LevelOne that are compatible with FNS7000B.
It is recommended to use the same brand and same size listed here for FNS-7000B if
more than one hard disk is installed. Other HDD brands that are not tested by LevelOne
may or may not work properly with FNS-7000B. For more updated compatible hard disk
information, please visit LevelOne website at
http://www.level1.com
LevelOne disclaims any responsibility for product damage/ malfunction or
data loss/ recovery due to misuse or improper installation of hard disks in any
occasions for any reasons.
Brand Model Name Interface
Capacity
(GB)
Rotational
Speed
(RPM)
Buffer
Size
(MB)
Barracuda
7200.8 SATA
NCQ
SATA 1.5Gb/s 400 7200 8

Barracuda
7200.8 SATA
NCQ
SATA 1.5Gb/s 300 7200 8
Seagate
Barracuda
7200.8 SATA
NCQ
SATA 1.5Gb/s 250 7200 8
Barracuda
7200.7 SATA
NCQ
SATA 1.5Gb/s 160 7200 8
Barracuda
7200.7 SATA
NCQ
SATA 1.5Gb/s 120 7200 8
DiamondMax 10 SATAII 150Mb/s 300 7200 16
Maxtor
MaXLine Plus II SATA 150Mb/s
250 7200 8
DiamondMax 10 SATAII 150Mb/s 200 7200 8
DiamondMax 10 SATA 150Mb/s
120 7200 8
Hitachi Deskstar 7K250
SATA 1.5Gb/s
250 7200 8
Western
Digital
WD Caviar® SE
Serial ATA
SATA 1.5Gb/s
160 7200 8
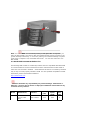
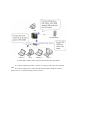
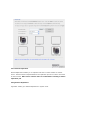
2.3 Connect FNS-7000B to Office Network
When connecting FNS-7000B to office network, it is recommended to install FNS7000B in
LAN with DHCP server. You can use any PC in the same subnet to connect the server by
IE browser. FNS-7000B supports printer sharing which allows users in the local network
to use printing service. You may also connect FNS-7000B to a CD/DVD burner for data
backup and restore.

To install FNS-7000B in office network, please follow the steps below.
ٛ
a. Connect Gigabit port LAN 1 or LAN 2
#
to a switch/ hub/ router by a network
cable.
ٛ
b. Connect USB printer or USB CD/ DVD burner to FNS-7000B for network
printer service
+
or CD/DVD backup/ restore service*.

ٛ
d. Turn on the server.
ٛ
c. Connect the power cord to power supply.
#
To use fail over or load balance function, please connect both LAN 1 and LAN 2 to
switch/ hub/ router. For further details, please refer to Chapter 6.5.1.
+
Network printer service is supported in Windows OS only.
* Optional step. You can skip this step if you are not using printer and CD/DVD
backup/restore service.
Note: To connect FNS-7000B to a PC, please use a network cable to
connect the PC to LAN 1 or LAN 2 of FNS-7000B. Connect the power
supply and turn on the server. For further details about accessing FNS
7000B, please refer to Chapter 6.
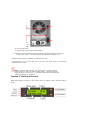
Chapter 3 LCD Panel Control
When FNS-7000B is turned on, the server name, IP address, date, and time will be
shown.

Check System Information
1 Press Down button to view disk information, i.e. number of disks and disk size.
Note that the disk size displayed is the total size of all installed disks but may not be the
actual disk size you can use. If you configure the disks as RAID 1 disk volume, your
actual disk size you can use is smaller than the displayed disk size on the panel.
2 Press Down button again to view system temperature and system fan speed.
3 Press Down button again to view CPU temperature and CPU fan speed.
4. Press Down button again to view model number and version information.
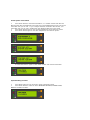
System Setting Function
1 Press Enter button for two seconds to enter configuration page.
2 Press Down button to select an item: NETWORK SETTINGS, POWER DOWN,
REBOOT SYSTEM, and EXIT.

Network Settings
Enter NETWORK SETTINGS configuration page and press Down button to select one of
the following options. The one marked with * means it is being used for connection.
ٛ
DHCP DHCP will obtain IP address automatically.
ٛ
STATIC IPPress Enter button to select STATIC IP. Then configure the IP address.
ٛ
SET STATIC IP Press Down button to enter 0~255 and press Enter button to set
the next number for the IP address.
ii. SET NETMASKFollow the above procedure to set the netmask address.
iii. SET GATEWAY Follow the above procedure to set the gateway address.
iv. SELECT STATIC IP Press Down button to select YES or NO. When YES is selected,
you will be asked to restart the system.
• EXITTo return to the previous menu.
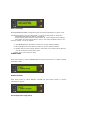
POWER DOWN
Press Down button to select POWER DOWN and press Enter button to confirm shutting
down FNS-7000B.
REBOOT SYSTEM
Press Down button to select REBOOT SYSTEM and press Enter button to confirm
restarting the system.
Exit Configuration Page (EXIT)

Press Enter button and select EXIT, then press the button again to confirm exiting the
configuration page.
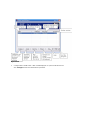
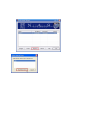
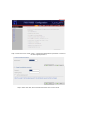
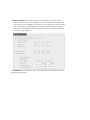
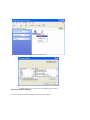
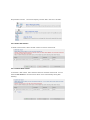
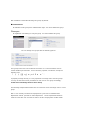
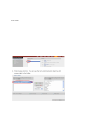
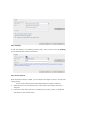
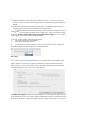
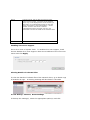
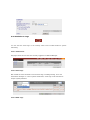
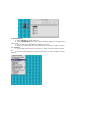
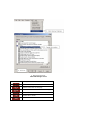
Chapter 4 Quick Install Wizard
Quick Install Wizard enables you to search for all available FNS-7000B within the local
network, and view the server name, IP address, and workgroup etc. You can also
configure the disk name, date and time, etc. via Quick Install Wizard.
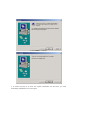
To use Quick Install Wizard, run FNS-7000B CD-ROM in your PC and install the
program.
Run Quick Install shortcut on the desktop, the following screen will be shown.
Comment[k1]:

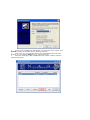
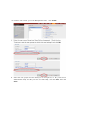
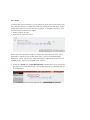
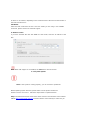
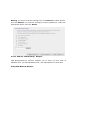
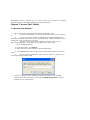
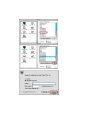
Operation
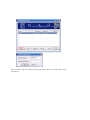
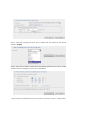
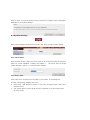
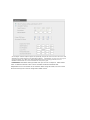
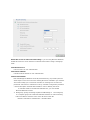
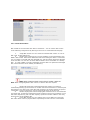
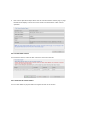
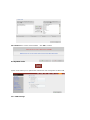
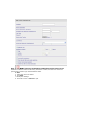
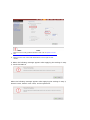
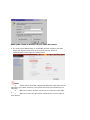
1. Configure FNS-7000B Select a FNS-7000B displayed on Quick Install Wizard and
click Configure. Enter the administrator password.

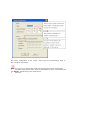
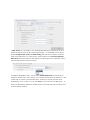
Upon successful login, the following screen will appear. Enter the configuration values
and click OK.

For further configuration of the system, please login the administration page of
FNS-7000B via web browser.
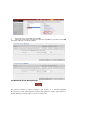
Note: You may have to restart FNS-7000B after changing the network configuration.
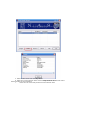
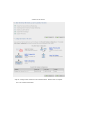
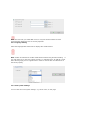
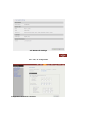
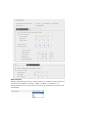
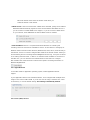
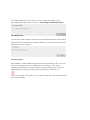
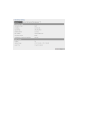
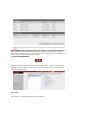
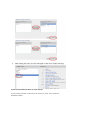
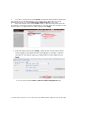
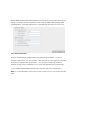
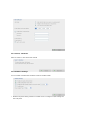
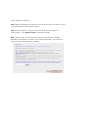
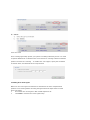
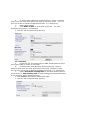
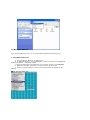
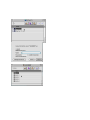
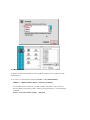
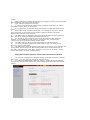
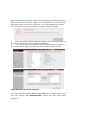
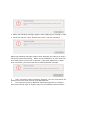
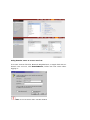
1 View FNS-7000B details Select a FNS-7000B available on Quick Install Wizard and
click Details. The following screen will be shown:
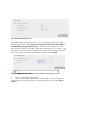
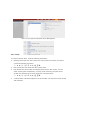
2 Map drive
Page is loading ...
Page is loading ...
Page is loading ...
Page is loading ...
Page is loading ...
Page is loading ...
Page is loading ...
Page is loading ...
Page is loading ...
Page is loading ...
Page is loading ...
Page is loading ...
Page is loading ...
Page is loading ...
Page is loading ...
Page is loading ...
Page is loading ...
Page is loading ...
Page is loading ...
Page is loading ...
Page is loading ...
Page is loading ...
Page is loading ...
Page is loading ...
Page is loading ...
Page is loading ...
Page is loading ...
Page is loading ...
Page is loading ...
Page is loading ...
Page is loading ...
Page is loading ...
Page is loading ...
Page is loading ...
Page is loading ...
Page is loading ...
Page is loading ...
Page is loading ...
Page is loading ...
Page is loading ...
Page is loading ...
Page is loading ...
Page is loading ...
Page is loading ...
Page is loading ...
Page is loading ...
Page is loading ...
Page is loading ...
Page is loading ...
Page is loading ...
Page is loading ...
Page is loading ...
Page is loading ...
Page is loading ...
Page is loading ...
Page is loading ...
Page is loading ...
Page is loading ...
Page is loading ...
Page is loading ...
Page is loading ...
Page is loading ...
Page is loading ...
Page is loading ...
Page is loading ...
Page is loading ...
Page is loading ...
Page is loading ...
Page is loading ...
Page is loading ...
Page is loading ...
Page is loading ...
Page is loading ...
Page is loading ...
Page is loading ...
Page is loading ...
Page is loading ...
Page is loading ...
Page is loading ...
Page is loading ...
Page is loading ...
Page is loading ...
Page is loading ...
Page is loading ...
Page is loading ...
Page is loading ...
-
 1
1
-
 2
2
-
 3
3
-
 4
4
-
 5
5
-
 6
6
-
 7
7
-
 8
8
-
 9
9
-
 10
10
-
 11
11
-
 12
12
-
 13
13
-
 14
14
-
 15
15
-
 16
16
-
 17
17
-
 18
18
-
 19
19
-
 20
20
-
 21
21
-
 22
22
-
 23
23
-
 24
24
-
 25
25
-
 26
26
-
 27
27
-
 28
28
-
 29
29
-
 30
30
-
 31
31
-
 32
32
-
 33
33
-
 34
34
-
 35
35
-
 36
36
-
 37
37
-
 38
38
-
 39
39
-
 40
40
-
 41
41
-
 42
42
-
 43
43
-
 44
44
-
 45
45
-
 46
46
-
 47
47
-
 48
48
-
 49
49
-
 50
50
-
 51
51
-
 52
52
-
 53
53
-
 54
54
-
 55
55
-
 56
56
-
 57
57
-
 58
58
-
 59
59
-
 60
60
-
 61
61
-
 62
62
-
 63
63
-
 64
64
-
 65
65
-
 66
66
-
 67
67
-
 68
68
-
 69
69
-
 70
70
-
 71
71
-
 72
72
-
 73
73
-
 74
74
-
 75
75
-
 76
76
-
 77
77
-
 78
78
-
 79
79
-
 80
80
-
 81
81
-
 82
82
-
 83
83
-
 84
84
-
 85
85
-
 86
86
-
 87
87
-
 88
88
-
 89
89
-
 90
90
-
 91
91
-
 92
92
-
 93
93
-
 94
94
-
 95
95
-
 96
96
-
 97
97
-
 98
98
-
 99
99
-
 100
100
-
 101
101
-
 102
102
-
 103
103
-
 104
104
-
 105
105
-
 106
106


LevelOne FNS-7000B User manual
- Category
- NAS & storage servers
- Type
- User manual
Ask a question and I''ll find the answer in the document
Finding information in a document is now easier with AI
Related papers
-
LevelOne FPS-2112 User manual
-
-
-
-
LevelOne WPS-0100 User manual
-
-
-
LevelOne 5000 User manual
-
-
Other documents
-
Panasonic DMPBD65 Operating instructions
-
Universal-Tech MyXerver MX3600 User guide
-
APC NAS-2100 User manual
-
Intellinet Gigabit SATA NAS 1TB User manual
-
Barracuda Networks Load Balancer 340 & 3 year Energize Updates Subscription User manual
-
Seagate Maxtor Shared Storage User guide
-
Barracuda Networks Backup Server 1090 + 1Y EU+IR Specification
-
Planet 2-Bay User manual
-
Xtreamer Media player Network Setup Manual
-
QNAP TS-101 User manual