KRAUS KCC-1300 User manual

Type
User manual

KRAUS KCC-1300 is an all-in-one kitchen set that includes a sink, faucet, soap dispenser, cutting board, rolling mat, drain, and drain cap. The sink is made of stainless steel and features a 33" x 22" x 9" basin with a 3 1/2" drain opening. The faucet has a pull-down sprayer and a 1.8 GPM flow rate. The soap dispenser holds 12 ounces of liquid soap and features a push-button operation. The cutting board is made of bamboo and measures 10" x 12". The rolling mat is made of silicone and measures 10" x 16". The drain is made of stainless steel and has a 1 1/2" tailpiece.

KRAUS KCC-1300 is an all-in-one kitchen set that includes a sink, faucet, soap dispenser, cutting board, rolling mat, drain, and drain cap. The sink is made of stainless steel and features a 33" x 22" x 9" basin with a 3 1/2" drain opening. The faucet has a pull-down sprayer and a 1.8 GPM flow rate. The soap dispenser holds 12 ounces of liquid soap and features a push-button operation. The cutting board is made of bamboo and measures 10" x 12". The rolling mat is made of silicone and measures 10" x 16". The drain is made of stainless steel and has a 1 1/2" tailpiece.

KCC-1300
All-In-One
Kitchen Set
www.kraususa.com I Toll Free: 1.800.775.0703 I © 2018 Kraus USA Inc. I REV. December 31, 2020
R
INSTALLATION MANUAL
2
Congratulations on the purchase of your new Kraus plumbing fixture!
Please keep the box and packaging materials until your product is completely installed. If you have any
questions, require technical assistance or have any problems with your product:
Felicitaciones por la compra de su nuevo accesorio de plomería Kraus!
Guarde la caja y los materiales de embalaje hasta que su producto esté completamente instalado. Si tiene alguna
pregunta, necesita asistencia técnica o tiene algún problema con su producto
Please contact our Customer Service Team
1-800-775-0703 / [email protected]
Have the model number available and retain a copy of your receipt with purchase date for
reference.
If for any reason this product does not meet your expectations, please be sure to repack this
product in the original box and packaging material to avoid damage during transit.
DO NOT RETURN TO STORE
STOP
NO DEVUELVA A LA TIENDA
Por favor, póngase en contacto con nuestro equipo de atención
1-800-775-0703 / [email protected]
Tenga a la mano el número de modelo y conserve una copia de su recibo con la fecha de compra
como referencia.
Si por alguna razón este producto no cumple con sus expectativas, asegúrese de volver a embalar
este producto en la caja y el material de embalaje originales para evitar daños durante el tránsito.
DETENER
3
Prior to Installation /
Antes de Installacion
:
· Make sure you have all necessary parts by checking the diagram and parts list. If any part is missing or
damaged, please contact Kraus Customer Service at 800-775-0703 for a replacement.
· Inspect the sink prior to installation to make sure that it has not been damaged or during shipping
· Use the cut-out template provided by Kraus
· Observe all plumbing and building codes according to your state requirements
· Turn off the cold and hot water at the angle stops and turn on the old faucet to release and built up pressure
· Flush angle stops to release any debris prior to installation
· Pre-drilled hole size requirement: 1 3/8" (min) - 1 1/2" (max) if installed on a countertop
· Max countertop thickness: 1 1/2"
· Asegúrese de contar con todas las piezas necesarias consultando la lista de piezas y el diagrama. Si falta alguna
pieza o se encuentra dañada, póngase en contacto con el servicio de atención al cliente de Kraus al
800-775-0703 para obtener un repuesto.
· Inspeccione el fregadero antes de la instalación para asegurarse de que no se haya dañado o durante el envío.
· Utilice la plantilla recortada proporcionada por Kraus
· Observe todos los códigos de plomería y construcción de acuerdo con los requisitos de su estado.
· Apague el agua fría y caliente en las paradas de ángulo y abra el grifo viejo para liberar y acumular presión
· Topes de ángulo de descarga para liberar cualquier residuo antes de la instalación
· Requisito de tamaño de orificio perforado: 1 3/8"(min) - 1 1/2" (max) si se instala en una encimera
· Espesor máximo de la encimera: 1 1/2"
44
Make sure to check off that you have all of the following items. / Asegúrese de
marcar que tiene todos los elementos siguientes.
Kitchen Sink / Fregadero de cocina - KHT400-33
Kitchen Faucet / Grifo de la cocina - KPF-2631SFS
Cut-Out Template / Plantilla de recorte
Undermounting Hardware / Hardware de desmontaje
Top Mount Hardware / Hardware de montaje superior
Bottom Grid / Rejilla inferior - KBG-T400-33
Drain / Desagüe - ST-1
Drain Cap / Tapón de drenaje - STC-2
Soap Dispenser / Dispensador de jabón - KSD-53SFS
Rolling Mat / Estera del balanceo - KRM-10BLACK
Cutting Board / Tabla de cortar - KCB-102BB
Tools you will need / Herramientas que necesitará:
NOTE: Specialized tools may be necessary to install Kraus
Stainless Steel Kitchen sinks with countertop materials
other than wood, marble or granite.
NOTA: Tal vez requiera de herramientas especializadas
para instalar fregaderos superiores de acero inoxidable
Kraus con materiales de encimera que no sean de
madera, mármol o granito.
Safety Goggles
Gafas protectoras
Silicone Adhesive
Adhesivo de silicona
Jig Saw
Sierra caladora
Phillips Screwdriver
Destornillador de estrella (Phillips)
Putty Knife
Espátula
Tape Measure
Cinta métrica
Pencil
Lápiz
Scissors
Tijeras
Screwdriver
Destornillador
Drill
Taladro
Bucket
Cangilón
Adjustable Wrench
Llave ajustable
55
Model #: KHT400-33
Sink Dimensions: 33” x 22” x 9”
Min Cabinet Size: 36”
Matching Grid: KBG-T400-33
Drain Model #: ST-1
Drain Cap #: STC-2
Dimensions / Dimensiones:
33"
(838.2mm)
30 1/2"
(774.7mm)
22"
(558.8mm)
17"
(431.8mm)
3 1/2"
(90mm)
1 3/8"
(35mm)
3 1/2"
(88.9mm)
2"
(50.8mm)
4 1/2"
(114.3mm)
1 1/4"
(31.8mm)
3/8"
(10mm)
9"
(228.6mm)
3/8"
(10mm)
Modelo #: KHT400-33
Dimensiones del fregadero: 33” x 22” x 9”
Tamaño mínimo del gabinete: 36”
Rejilla inferior: KBG-T400-33
Desagüe Modelo #: ST-1
Tapón de drenaje #: STC-2
Kitchen Sink Installation / Instalación de fregadero de cocina
66
Topmount Installation / Instalación de montaje superior
Step 1. Position Template / Coloque la plantilla
· Check the cut-out template against the actual sink to ensure a proper
sized cut-out.
· Place the cut-out template in the desired location on the countertop.
· Compare la plantilla de recorte con el fregadero real para asegurar un
recorte del tamaño adecuado.
· Coloque la plantilla de recorte en la ubicación deseada en la encimera.
Step 2. Trace Template / Siga el contorno de la plantilla
· Trace template on countertop with a pencil.
· Trace la plantilla en la encimeracon un lápiz.
Paper Template
Paper Template
NOTE: Make sure clearance is suitable for backsplash, faucet and plumbing for the sink.
NOTA: Asegúrese de que el espacio libre sea adecuado para el protector contra salpicaduras, el grifo y la tubería del
fregadero.
7
Step 3. Cut Countertop / Corte la encimera
· Cut the opening in the countertop by carefully following the traced line.
· Corte la abertura en la encimera siguiendo cuidadosamente la línea trazada.
NOTE: Please use the appropriate saw that best fits your countertop material.
NOTA: utilice la sierra adecuada que se adapte mejor a su material de encimera.
8
Step 4. Attach Mounting Hardware/ Fije los accesorios de montaje
· Attach mounting hardware to the prongs protruding from the underside of the sink rim.
· Make sure the hooked side of the mounting clip is facing away from the sink.
· Fije los accesorios de montaje a las puntas que sobresalen de la parte inferior del borde del fregadero.
· Asegúrese de que el lado con gancho de la abrazadera de montaje esté viendo hacia el lado contrario del fregadero.
Insert / Insertar
9
Step 5. Apply Silicone or Plumber's Putty/ Aplique masilla de silicona o de
plomería
· Clean and dry the surface around the opening of the sink.
· Turn the unit upside down to apply sealant. Apply silicone-based sealant (not included) underneath the edge of the
sink.
· Limpie y seque la superficie alrededor de la abertura del fregadero.
· Ponga la unidad boca abajo para aplicar sellador. Aplique sellador a base de silicona (no incluido) debajo del borde del
fregadero.
10
Step 6. Secure Sink to Countertop/ Asegure el fregadero a la encimera
· Insert the sink into the opening, check the alignment of the sink to the cutout in the countertop and press firmly.
· Tighten the screws in the front of the sink, followed by the ones in the back and on the sides of the sink.
· Remove excess silicone-based sealant.
· Allow sealant to set for 30-60 minutes.
· Inserte el fregadero en la abertura, verifique la alineación del fregadero con el recorte en la encimera y presione
firmemente.
· Apriete los tornillos en la parte delantera del fregadero, seguidos por los que están en la parte posterior y en los
laterales del fregadero.
· Retire el exceso de sellador a base de silicona.
· Permita que el sellador se fije durante 30 a 60 minutos.
Sealant or Putty /
Sellador o masilla
Sink /
Fregadero
Countertop / Encimera
Fasten the Screw /
Apriete el tornillo
11
Step 7. Install Plumbing Fixtures/ Instale los accesorios de plomería
· Connect drain to sink. Connect trap to drain. Connect water supply connections to faucet according to manufacturer’s
instructions
· Run water into sink and check for leaks
· Note: Before installation, please check that the drain kit complies with ASME A112.18.2/CSA B125.2 and with CUPC
certification.
· Conecte las conexiones de suministro de agua al grifo de acuerdo con las instrucciones del fabricante
· Haga correr agua en el fregadero y verifique si hay fugas
· Nota: Antes de la instalación, verifique que el kit de drenaje cumpla con ASME A112.18.2 / CSA B125.2 y con la
certificación CUPC.
12
Undermount Installation / Instalación bajo encimera
Step 1. Determine reveal type / Determine el tipo de ranura
· Use scissors to cut along the line of the paper template for your desired reveal type (Negative, Positive, or Flush
Reveal)
· Use tijeras para cortar a lo largo de la línea de la plantilla de papel para el tipo de ranura deseado (negativa, positiva o
al ras)
KRAUS Recommended Installation Type / Tipo de instalación recomendada por KRAUS
3/8” Positive Reveal / Ranura positiva de 3/8“
Flush/Zero Reveal / Ranura al ras/cero
1/8” Negative Reveal / Ranura negativa de 1/8“
3/8” POSITIVE / POSITIVA DE 3/8 “
1/8” NEGATIVE / NEGATIVA DE 1/8“
FLUSH / ZERO / AL RAS / CERO
CENTERLINE / LÍNEA CENTRAL
13
· Check the cut-out template against the actual sink to ensure a proper
sized cut-out.
· Place the cut-out template in the desired location on the countertop.
· Compare la plantilla de recorte con el fregadero real para asegurar un
recorte del tamaño adecuado.
· Coloque la plantilla de recorte en la ubicación deseada en la encimera.
Step 2. Position template / Coloque la plantilla
Paper Template
Step 3. Trace Template / Siga el contorno de la plantilla
· Trace template on countertop with a pencil.
· Trace la plantilla en la encimeracon un lápiz.
Paper Template
NOTE: Make sure clearance is suitable for backsplash, faucet and plumbing for the sink.
NOTA: Asegúrese de que el espacio libre sea adecuado para el protector contra salpicaduras, el grifo y la tubería del
fregadero.
14
· Cut the opening in the countertop by carefully following the traced
line.
· Corte la abertura en la encimera siguiendo cuidadosamente la línea
trazada.
Step 4. Cut Countertop / Corte la encimera
· Turn countertop over and align sink with countertop. Decide location
for mounting brackets.
· Mounting holes should be 1/2" from edge of sink.
· Voltee la encimera y alinee el fregadero con la encimera. Decida la
ubicación para los soportes de montaje.
· Los orificios de montaje deben estar a 1/2" del borde del fregadero.
Step 5. Set up mounting brackets/ Configure los soportes de montaje
NOTE: Please use the appropriate saw that best fits your countertop
material.
NOTA: utilice la sierra adecuada que se adapte mejor a su material de
encimera.
1/2"
(13mm)
15
Step 6. Drill hole in countertop / Taladre el orificio en la encimera
· Insert anchors into drilled holes and lightly tap with a hammer until flush.
· Inserte los anclajes en los agujeros taladrados y golpee suavemente con un
martillo hasta que queden al ras.
Step 7. Install anchors / Instale los anclajes
· Drill 3/8" diameter x 1/2" deep hole in the countertop.
· Taladre un orificio de 3/8 "de diámetro x 1/2" de profundidad en la encimera.
3/8
1/2
16
· Use a bead of silicone (or preferred adhesive) around the rim of the
sink. Check the alignment of the sink to the cutout in the countertop.
Place sink over cutout hole and press firmly.
· Use un cordón de silicona (o adhesivo preferido) alrededor del borde
del fregadero. Verifique la alineación del fregadero con el corte en la
encimera. Coloque el fregadero sobre el orificio recortado y presione
firmemente.
Step 8. Secure sink to countertop / Asegure el fregadero a la encimera
Step 9. Attach mounting hardware / Fije los accesorios de montaje
· Attach mounting hardware to secure bowl. Remove excess sealant
from inside lip.
· Allow sealant to set for 30 - 60 minutes.
· Fije los accesorios de montaje para asegurar el recipiente.Retire el
exceso de sellador del borde interno.
· Permita que el sellador se fije durante 30 a 60 minutos.
NOTE: Use acetone or rubbing alcohol to remove any excess sealant.
NOTA: use acetona o alcohol para eliminar cualquier exceso de sellador.
17
· Connect drain to sink. Connect trap to drain. Connect water supply connections to faucet according to manufacturer’s
instructions
· Run water into sink and check for leaks
· Note: Before installation, please check that the drain kit complies with ASME A112.18.2/CSA B125.2 and with CUPC
certification.
· Conecte las conexiones de suministro de agua al grifo de acuerdo con las instrucciones del fabricante
· Haga correr agua en el fregadero y verifique si hay fugas
· Nota: Antes de la instalación, verifique que el kit de drenaje cumpla con ASME A112.18.2 / CSA B125.2 y con la
certificación CUPC.
Step 10. Install Plumbing Fixtures/ Instale los accesorios de plomería
Maintenance / Mantenimiento
Clean your sink on a regular basis with warm soapy water. Rinse the sink after using cleaning products. Wipe the sink
surface with a soft cloth to remove any liquid residue. Do not cut food directly on the surface of the sink. Do not leave
sharp objects on the surface of the sink for an extended period of time. Do not use abrasive cleaning products, sanding
tools, steel wool or bleaching products.
Limpie su fregadero de forma regular con agua tibia y jabón. Enjuague el fregadero después de usar productos de
limpieza. Limpie la superficie del fregadero con un paño suave para eliminar cualquier residuo líquido. No corte los
alimentos directamente en la superficie del fregadero. No deje objetos filosos en la superficie del fregadero durante un
período prolongado de tiempo. No use productos de limpieza abrasivos, herramientas de lijado, lana de acero o productos
blanqueadores.
18
Diagram and Parts List / Diagrama y lista de piezas
B
A
H
I
D
C
E
F
G
Kitchen Faucet Installation / Instalación de grifos de cocina
A. Spray Head / Cabezal de aspersión
B. Faucet Body / Cuerpo del grifo
C. Supply Hose / Manguera de
suministro
D. Hot & Cold Waterlines / Líneas
de agua caliente y agua fría
E. Spray Hose / Manguera de
pulverización
F. Weight / Peso
G. Quick Connect / Conexión rápida
H. Hex Wrench / Llave hexagonal
H1. 2.5mm
H2. 4mm
I. Base / Base
19
Faucet Dimensions / Dimensiones del grifo
Installer Tip / Consejo del instalador
Shut off main water supply before installing new faucet / Cierre el suministro de agua principal antes de instalar un nuevo grifo
11"
279mm
4 1/4"
106.5mm
9 1/4"
233mm
1 3/8"
Ø35mm
9/16-24UNEF-2B
25°
65°
21 3/4”
551mm
1 1/2"
38.1mm
6 3/4"
170mm
8 1/4"
211.6mm
1 7/8"
Ø48mm
20
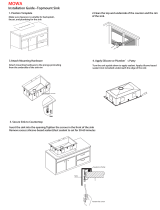
Step 1: Install base / Instale la base
· Insert base (I) into sink or countertop with “FR↑NT”
facing forward. Tighten screws on base (I) with 4mm
hex wrench (H2) until base is secure on sink or
countertop.
· Inserte la base (I) en el fregadero o la encimera con
la indicación "FR↑NT" hacia adelante. Apriete los
tornillos en la base (I) con una llave hexagonal de 4
mm (H2) hasta que la base esté asegurada en el
fregadero o la encimera.
I
Half Moon Locking Nuts /
Tuerca medialuna de bloqueo
H2
Installer Tip: Rotate the two half-moon
shaped locking nuts inward before inserting
base (I) into sink or countertop.
Consejo para el instalador: Gire hacia adentro
las dos tuercas medialuna de bloqueo antes
de insertar la base (I) en el fregadero o la
encimera.
Step 2: Install faucet / Instale el grifo
· Remove Quick Connect (G) from spray hose (E). Insert
spray hose (E) into small hole of base (I). Insert hot &
cold waterlines (D) and supply hose (C), one by one, in
large hole of base.
· Retire la conexión rápida (G) de la manguera rociadora
(E). Inserte la manguera rociadora (E) en el pequeño
orificio de la base (I). Inserte los conductos de agua
caliente y fría (D) y la manguera de suministro de agua
(C), de a uno, en el orificio grande de la base.
D
D
D
E
D
E
C
C
  • Page 1 1
  • Page 2 2
  • Page 3 3
  • Page 4 4
  • Page 5 5
  • Page 6 6
  • Page 7 7
  • Page 8 8
  • Page 9 9
  • Page 10 10
  • Page 11 11
  • Page 12 12
  • Page 13 13
  • Page 14 14
  • Page 15 15
  • Page 16 16
  • Page 17 17
  • Page 18 18
  • Page 19 19
  • Page 20 20
  • Page 21 21
  • Page 22 22
  • Page 23 23
  • Page 24 24
  • Page 25 25
  • Page 26 26
  • Page 27 27
  • Page 28 28
  • Page 29 29
  • Page 30 30
  • Page 31 31
  • Page 32 32
  • Page 33 33

KRAUS KCC-1300 User manual

Type
User manual

KRAUS KCC-1300 is an all-in-one kitchen set that includes a sink, faucet, soap dispenser, cutting board, rolling mat, drain, and drain cap. The sink is made of stainless steel and features a 33" x 22" x 9" basin with a 3 1/2" drain opening. The faucet has a pull-down sprayer and a 1.8 GPM flow rate. The soap dispenser holds 12 ounces of liquid soap and features a push-button operation. The cutting board is made of bamboo and measures 10" x 12". The rolling mat is made of silicone and measures 10" x 16". The drain is made of stainless steel and has a 1 1/2" tailpiece.

Ask a question and I''ll find the answer in the document

Finding information in a document is now easier with AI

in other languages