Behringer X1222USB User manual

Category
Audio mixers
Type
User manual

This manual is also suitable for

behringer.com
Quick Start Guide
Check out behringer.com for expanded Owner Manuals
XENYX
X1222USB/X1832USB
Premium 16/18-Input 2/2 and 3/2-Bus Mixer with XENYX
Mic Preamps & Compressors, British EQs, 24-Bit Multi-FX
Processor, USB/Audio Interface and energyXT2.5 Compact
BEHRINGER Edition Music Production Software
A50-00000-13328
behringer.com
2 XENYX X1222USB/X1832USB
behringer.com
3Quick Start Guide
Terminals marked with this symbol carry
electrical current of su cient magnitude to
constitute risk of electric shock. Use only
high-quality commercially-available speaker cables with
¼" TS plugs pre-installed. All other installation or
modifi cation should be performed only by
qualifi ed personnel.
This symbol, wherever it appears, alerts you
to the presence of uninsulated dangerous
voltage inside the enclosure - voltage that
may be suffi cient to constitute a risk of shock.
This symbol, wherever it appears, alerts you
to important operating and maintenance
instructions in the accompanying literature.
Please read the manual.
Caution
To reduce the risk of electric shock, do not
remove the top cover (or the rear section).
No user serviceable parts inside. Refer servicing to
qualifi ed personnel.
Caution
To reduce the risk of fi re or electric shock,
do not expose this appliance to rain and
moisture. The apparatus shall not be exposed to dripping
or splashing liquids and no objects lled with liquids, such
as vases, shall be placed on the apparatus.
Caution
These service instructions are for use
by quali ed service personnel only.
To reduce the risk of electric shock do not perform any
servicing other than that contained in the operation
instructions. Repairs have to be performed by quali ed
service personnel.
Read these instructions.1.
Keep these instructions.2.
Heed all warnings.3.
Follow all instructions.4.
Do not use this apparatus near water.5.
Clean only with dry cloth.6.
Do not block any ventilation openings. Install in 7.
accordance with the manufacturer’s instructions.
Do not install near any heat sources such as 8.
radiators, heat registers, stoves, or other apparatus
(including amplifi ers) that produce heat.
Do not defeat the safety purpose of the polarized 9.
or grounding-type plug. A polarized plug has two blades
with one wider than the other. A grounding-type plug
has two blades and a third grounding prong. The wide
blade or the third prong are provided for your safety. If the
provided plug does not t into your outlet, consult an
electrician for replacement of the obsolete outlet.
Protect the power cord from being walked on or 10.
pinched particularly at plugs, convenience receptacles,
and the point where they exit from the apparatus.
Use only attachments/accessories specifi ed by 11.
the manufacturer.
Use only with the 12.
cart, stand, tripod, bracket,
or table specifi ed by the
manufacturer, or sold with
the apparatus. When a cart
is used, use caution when
moving the cart/apparatus
combination to avoid
injury from tip-over.
Unplug this apparatus during lightning storms or 13.
when unused for long periods of time.
Refer all servicing to qualifi ed service personnel. 14.
Servicing is required when the apparatus has been
damaged in any way, such as power supply cord or plug
is damaged, liquid has been spilled or objects have fallen
into the apparatus, the apparatus has been exposed
to rain or moisture, does not operate normally, or has
been dropped.
The apparatus shall be connected to a MAINS socket 15.
outlet with a protective earthing connection.
Where the MAINS plug or an appliance coupler is 16.
used as the disconnect device, the disconnect device shall
remain readily operable.
Technical specifi cations and appearance are subject to change without
notice. The information contained herein is correct at the time of printing.
All trademarks are the property of their respective owners. MUSIC Group
accepts no liability for any loss which may be suff ered by any person
who relies either wholly or in part upon any description, photograph or
statement contained herein. Colors and specifi cations may vary slightly from
product. BEHRINGER products are sold through authorized dealers only.
Distributors and dealers are not agents of MUSIC Group and have absolutely
no authority to bind MUSIC Group by any express or implied undertaking
or representation. This manual is copyrighted. No part of this manual may
be reproduced or transmitted in any form or by any means, electronic or
mechanical, including photocopying and recording of any kind, for any
purpose, without the express written permission of Red Chip Company Ltd.
ALL RIGHTS RESERVED.
© 2010 Red Chip Company Ltd.
Trident Chambers, Wickhams Cay, P.O. Box 146,
Road Town, Tortola, British Virgin Islands
Warranty§ 1
This limited warranty is valid only if you purchased [1]
the product from a BEHRINGER authorized dealer in the
country of purchase. A list of authorized dealers can be
found on BEHRINGER’s website behringer. com under
“Where to Buy“, or you can contact the BEHRINGER offi ce
closest to you.
MUSIC Group* warrants the mechanical and [2]
electronic components of this product to be free of defects
in material and workmanship if used under normal
operating conditions for a period of one (1) year from
the original date of purchase (see the Limited Warranty
terms in § 4 below), unless a longer minimum warranty
period is mandated by applicable local laws. If the product
shows any defects within the specifi ed warranty period
and that defect is not excluded under § 4, MUSIC Group
shall, at its discretion, either replace or repair the product
using suitable new or reconditioned product or parts.
In case MUSIC Group decides to replace the entire product,
this limited warranty shall apply to the replacement
product for the remaining initial warranty period, i.e.,
one (1) year (or otherwise applicable minimum warranty
period) from the date of purchase of the original product.
Upon validation of the warranty claim, the repaired [3]
or replacement product will be returned to the user freight
prepaid by MUSIC Group.
Warranty claims other than those indicated above [4]
are expressly excluded.
PLEASE RETAIN YOUR SALES RECEIPT. IT IS YOUR PROOF
OF PURCHASE COVERING YOUR LIMITED WARRANTY.
THIS LIMITED WARRANTY IS VOID WITHOUT SUCH PROOF
OF PURCHASE.
Online registration§ 2
Please do remember to register your new BEHRINGER
equipment right after your purchase at behringer. com
under “Support” and kindly read the terms and conditions
of our limited warranty carefully. Registering your
purchase and equipment with us helps us process
your repair claims quicker and more effi ciently.
Thank you for your cooperation!
Return materials authorization§ 3
To obtain warranty service, please contact the [1]
retailer from whom the equipment was purchased.
Should your BEHRINGER dealer not be located in your
vicinity, you may contact the BEHRINGER distributor for
your country listed under “Support at behringer. com.
If your country is not listed, please check if your problem
can be dealt with by our “Online Support” which may
also be found under “Support” at behringer. com.
Alternatively, please submit an online warranty claim at
behringer. com BEFORE returning the product. All inquiries
must be accompanied by a description of the problem
and the serial number of the product. After verifying
the product’s warranty eligibility with the original sales
receipt, MUSIC Group will then issue a Return Materials
Authorization (“RMA”) number.
Legal Disclaimer
Limited Warranty
Important Safety
Instructions
Limited Warranty
Legal Disclaimer
Important Safety
Instructions
Subsequently, the product must be returned in [2]
its original shipping carton, together with the return
authorization number to the address indicated by
MUSIC Group.
Shipments without freight prepaid will not [3]
be accepted.
Warranty Exclusions§ 4
This limited warranty does not cover consumable [1]
parts including, but not limited to, fuses and batteries.
Where applicable, MUSIC Group warrants the valves or
meters contained in the product to be free from defects in
material and workmanship for a period of ninety (90) days
from date of purchase.
This limited warranty does not cover the product [2]
if it has been electronically or mechanically modifi ed
in any way. If the product needs to be modifi ed or
adapted in order to comply with applicable technical
or safety standards on a national or local level, in any
country which is not the country for which the product
was originally developed and manufactured, this
modifi cation/adaptation shall not be considered a defect
in materials or workmanship. This limited warranty does
not cover any such modifi cation/adaptation, regardless
of whether it was carried out properly or not. Under the
terms of this limited warranty, MUSIC Group shall not
be held responsible for any cost resulting from such a
modifi cation/adaptation.
This limited warranty covers only the product [3]
hardware. It does not cover technical assistance for
hardware or software usage and it does not cover
any software products whether or not contained in
the product. Any such software is provided AS IS”
unless expressly provided for in any enclosed software
limited warranty.
This limited warranty is invalid if the factory-[4]
applied serial number has been altered or removed from
the product.
Free inspections and maintenance/repair work [5]
are expressly excluded from this limited warranty, in
particular, if caused by improper handling of the product
by the user. This also applies to defects caused by normal
wear and tear, in particular, of faders, crossfaders,
potentiometers, keys/buttons, guitar strings, illuminants
and similar parts.
Damage/defects caused by the following conditions [6]
are not covered by this limited warranty:
improper handling, neglect or failure to operate the •
unit in compliance with the instructions given in
BEHRINGER user or service manuals;
connection or operation of the unit in any way •
that does not comply with the technical or safety
regulations applicable in the country where the
product is used;
damage/defects caused by acts of God/Nature •
(accident, fi re, fl ood, etc) or any other condition that
is beyond the control of MUSIC Group.
Any repair or opening of the unit carried out by [7]
unauthorized personnel (user included) will void the
limited warranty.
If an inspection of the product by MUSIC Group [8]
shows that the defect in question is not covered by the
limited warranty, the inspection costs are payable by
the customer.
Products which do not meet the terms of this [9]
limited warranty will be repaired exclusively at the buyer’s
expense. MUSIC Group or its authorized service center will
inform the buyer of any such circumstance. If the buyer
fails to submit a written repair order within 6 weeks after
notifi cation, MUSIC Group will return the unit C.O.D. with
a separate invoice for freight and packing. Such costs will
also be invoiced separately when the buyer has sent in a
written repair order.
Authorized BEHRINGER dealers do not sell new [10]
products directly in online auctions. Purchases made
through an online auction are on a “buyer beware basis.
Online auction confi rmations or sales receipts are not
accepted for warranty verifi cation and MUSIC Group will
not repair or replace any product purchased through an
online auction.
Warranty transferability§ 5
This limited warranty is extended exclusively to the
original buyer (customer of authorized retail dealer) and
is not transferable to anyone who may subsequently
purchase this product. No other person (retail dealer, etc.)
shall be entitled to give any warranty promise on behalf
of MUSIC Group.
Claim for damage§ 6
Subject only to the operation of mandatory applicable
local laws, MUSIC Group shall have no liability to the buyer
under this warranty for any consequential or indirect
loss or damage of any kind. In no event shall the liability
of MUSIC Group under this limited warranty exceed the
invoiced value of the product.
Limitation of liability§ 7
This limited warranty is the complete and exclusive
warranty between you and MUSIC Group. It supersedes
all other written or oral communications related to this
product. MUSIC Group provides no other warranties for
this product.
Other warranty rights and § 8
national law
This limited warranty does not exclude or limit the [1]
buyer’s statutory rights as a consumer in any way.
The limited warranty regulations mentioned herein [2]
are applicable unless they constitute an infringement of
applicable mandatory local laws.
This warranty does not detract from the seller’s [3]
obligations in regard to any lack of conformity of the
product and any hidden defect.
Amendment§ 9
Warranty service conditions are subject to change without
notice. For the latest warranty terms and conditions
and additional information regarding MUSIC Group’s
limited warranty, please see complete details online at
behringer. com.
* MUSIC Group Macao Commercial Off shore Limited of
Rue de Pequim No. 202-A, Macau Finance Centre 9/J, Macau,
including all MUSIC Group companies
8 XENYX X1222USB/X1832USB
behringer.com
9 Quick Start Guide
behringer.com
Step 1: Hook-Up
Paso 1: Conexión
Etape 1 : Connexions
XENYX X1222USB/X1832USB Hook-Up
B215D
Project studio
Estudio de grabacn
Project studio
Band or small church with stage monitors
Banda o iglesia pequeña con monitores de escenario
Groupe ou petite église avec retours sur scène
10 XENYX X1222USB/X1832USB
behringer.com
11 Quick Start Guide
behringer.com
Step 1: Hook-Up
Paso 1: Conexión
Etape 1 : Connexions
XENYX X1222USB/X1832USB Hook-Up
Business/ multimedia presentation
Presentación de negocio/multimedia
Présentation commerciale/multimédia
Band or small church with external effects
Banda o iglesia pequeña con efectos externos
Groupe ou petite église avec effets externes
12 XENYX X1222USB/X1832USB
behringer.com
13 Quick Start Guide
behringer.com
Step 2: Controls
Paso 2: Controles
Etape 2 : Réglages
XENYX X1222USB/X1832USB Controls
GAIN knob adjusts the
sensitivity of the MIC and/or
LINE inputs.
GAIN, este control ajusta la
sensibilidad de las entradas
MIC y/o LINE.
Le potentiomètre GAIN
règle la sensibilité des entes
MIC et/ou LINE.
CHANNEL FADER adjusts the
channel volume.
CHANNEL FADER ajusta el
volumen del canal.
Le FADER DE CANAL
permet de régler le volume
du canal.
COMP knob adjusts the
amount of compression effect
on the channel.
COMP, este control ajusta
la cantidad de efecto de
compresión en el canal.
Le potentiomètre COMP gle
l'effet de compression sur
le canal.
EQ knobs adjust the high, mid
and low frequencies of the
channel. Adjust the FREQ knob
on the X1832USB to select the
specific frequency adjusted by
the MID knob.
EQ, estos controles ajustan
las frecuencias alta, media
y baja del canal. Ajuste el
control FREQ en el X1832USB
para seleccionar la frecuencia
específica regulada con el
control MID.
Les potentiomètres EQ
règlent les fréquences
aiguës, médiums et
graves du canal. Réglez le
potentiomètre FREQ du
X1832USB pour sélectionner
la fréquence modifiée par le
potentiomètre MID.
MON knob adjusts how much
of the channel’s signal routes
to the MON SEND/OUT jack.
MON, este control ajusta q
parte de la señal del canal se
dirige al jack MON SEND/OUT.
Le potentiomètre MON
règle le volume du signal du
canal envoyé au jack MON
SEND/OUT.
FX knob adjusts how much
of the channel’s signal routes
to the internal multi-FX
processor or the AUX SEND 2/
FX SEND jack.
FX, este control ajusta qué
parte de la señal del canal
se dirige al procesador
multiefectos interno o al jack
AUX SEND 2/FX SEND.
Le potentiomètre FXgle le
volume du signal du canal
envoyé au processeur multi-
effet interne ou au jack AUX
SEND 2/FX SEND.
AUX 1 knob (X1832USB only)
adjusts how much of the
channel’s signal routes to
the AUX 1 jack. Press the PRE
button when using AUX 1 as
an extra monitor send.
AUX 1, este control (sólo
modelo X1832USB) ajusta
qué parte de la señal del
canal se dirige al jack AUX 1.
Pulse el botón PRE al usar
AUX 1 como una señal de
monitor adicional.
Le potentiomètre AUX 1
(X1832USB uniquement)
règle le volume du signal du
canal envoyé au jack AUX 1.
Appuyez sur la touche PRE
lorsque la sortie AUX SEND 1
est utilisée pour un haut-
parleur supplémentaire.
PAN/BAL knob positions the
channel in the stereo field.
PAN/BAL, este control sitúa el
canal en el campo estéreo.
Le potentiomètre
PAN/BAL détermine la
position du canal dans le
champ stéréo.
MUTE button mutes
the channel.
MUTE, este botón silencia
el canal.
La touche MUTE permet de
désactiver le volume sonore
du canal.
CLIP LED lights when the
channel signal overloads.
CLIP, estos LED se iluminan
cuando la señal del canal
se sobrecarga.
La LED CLIP s'allume
lorsqu'une surcharge apparaît
dans le signal du canal.
14 XENYX X1222USB/X1832USB
behringer.com
15 Quick Start Guide
behringer.com
Step 2: Controls
Paso 2: Controles
Etape 2 : Réglages
XENYX X1222USB/X1832USB Controls
MODE button determines
whether the channels’ SOLO
button operates as ‘Solo in
Place’ (button out) or ‘Pre-
Fader Listen’ (button in).
PFL is preferred for gain
setting purposes.
MODE, este botón determina
si el botón SOLO de los canales
funciona como ‘Solo in Place
(botón sin pulsar) o ‘Pre-Fader
Listen’ (botón pulsado).
Es preferible la escucha pre-
fader para ajustar la ganancia.
La touche MODE permet
de choisir si la touche SOLO
des canaux doit fonctionner
comme SOLO (« Solo in
Place », touche relâchée)
ou comme PFL (« Pre-Fader
Listen », touche enfoncée).
Sélectionnez PFL pour régler
le gain.
MON SEND fader adjusts the
amount of signal sent to
a monitor speaker via the
MON OUT jack.
MON SEND, este fader ajusta
la cantidad de señal que se
envía hasta un altavoz de
monitoreo a través del jack
MON OUT.
Le fader MON SEND règle le
volume du signal envoyé à un
haut-parleur de retour via le
jack MON OUT.
FX SEND knob adjusts the
amount of signal sent to the
internal multi-FX processor or
an external effects processor
via the FX SEND jack.
FX SEND, este control ajusta
la cantidad de señal que
se envía al procesador de
multiefectos interno o a un
procesador de efectos externo
a través del jack FX SEND.
Le potentiomètre FX SEND
règle le volume du signal du
canal envoyé au processeur
multi-effet interne ou à un
processeur d'effets externe
via le jack FX SEND.
FX/AUX2 RET fader adjusts
the amount of internal or
external effects included in
the mix.
FX/AUX2 RET, este fader
ajusta la cantidad de efectos
internos o externos incluida
en la mezcla.
Le fader FX/AUX2 RET règle
le volume du signal d'effets
interne ou externe inclus dans
le mix.
MAIN MIX faders adjust the
overall output of the mixer.
MAIN MIX, estos faders
ajustan la salida general de la
mesa de mezclas.
Les faders MAIN MIX règlent
la sortie globale de la console.
SUB 1-2 faders adjust
the output of the
SUB OUTPUT jacks.
SUB 1-2, estos faders ajustan la
salida de los jacks SUB OUTPUT.
Les faders SUB 1-2 règlent la
sortie des jacks SORTIE SUB.
VU METER displays the
MAIN OUTPUT signal
level. Press the MODE
button to switch between
SOLO (normal) and PFL
(pre-fader listen) for level
setting purposes.
VU METER muestra el nivel de
señal MAIN OUTPUT. Pulse el
botón MODE para alternar
entre SOLO (normal) y PFL
(escucha pre-fader) al realizar
los ajustes de nivel.
Le VU-METRE affiche le
niveau du signal de la
SORTIE MAIN. Appuyez sur la
touche MODE pour passer de
Solo (normal) à PFL (Pre-Fader
Listen) lors du réglage
des niveaux.
VOICE CANCELLER button
filters out vocal frequencies
from audio plugged into the
2-TRACK INPUT, enabling
your mixer to act as a
karaoke machine.
VOICE CANCELLER, este
botón filtra las frecuencias
vocales del audio conectado
a la entrada 2-TRACK,
permitiendo a la mesa de
mezclas funcionar como un
equipo de karaoke.
La touche VOICE CANCELLER
élimine les fquences
vocales des sources audio
branchées sur l'ENTREE
2-TRACK, permettant ainsi à
votre console de jouer le rôle
de karaoké.
XPQ SURROUND knob
adjusts the amount of stereo
enhancement on the mix.
Press the XPQ TO MAIN button
to activate the effect.
XPQ SURROUND, este control
ajusta la cantidad de mejora
estéreo de la mezcla. Pulse
el botón XPQ TO MAIN para
activar el efecto.
Le potentiomètre
XPQ SURROUNDgle le
volume d'accroissement
stéo du mix. Appuyez sur
la touche XPQ TO MAIN pour
activer cet effet.
GRAPHIC EQ adjusts
specific frequencies in the
sound spectrum.
GRAPHIC EQ ajusta las
frecuencias espeficas en el
espectro sonoro.
GRAPHIC EQ règle les
fréquences scifiques du
spectre sonore.
PHONES/CTRL ROOM knob
adjusts the headphone or
studio monitor volume.
PHONES/CTRL ROOM, este
control ajusta el volumen de
los auriculares o del monitor
de estudio.
Le potentiomètre
PHONES/CTRL ROOM règle
le volume du casque ou du
haut-parleur studio.
MULTI-FX PROCESSOR adds
a selected sound effect to any
channels whose FX knob is
turned up. See the Multi-FX
Processor section for details.
MULTI-FX PROCESSOR
añade un efecto de sonido
seleccionado a cualquier
canal en el que esté activado
el control FX. Consulte la
informacn detallada
en la seccn Procesador
de multiefectos.
Le PROCESSEUR MULTI-EFFET
ajoute l'effet sonore
sélectionné aux canaux dont
le potentiotre FX est activé.
Reportez-vous à la section
Processeur multi-effet pour en
savoir plus.
X1832USB
16 XENYX X1222USB/X1832USB
behringer.com
17 Quick Start Guide
behringer.com
Step 2: Controls
Paso 2: Controles
Etape 2 : Réglages
XENYX X1222USB/X1832USB Controls
MON SEND fader adjusts
the amount of signal sent
to a monitor speaker via the
MON SEND jack.
MON SEND, este fader ajusta
la cantidad de señal que se
envía hasta un altavoz de
monitoreo a través del jack
MON SEND.
Le fader MON SEND règle le
volume du signal envoyé à un
haut-parleur de retour via le
jack MON SEND.
FX SEND fader adjusts the
amount of signal sent to the
internal multi-FX processor or
an external effects processor
via the FX SEND jack.
FX SEND, este fader ajusta la
cantidad de señal que se envía
al procesador de multiefectos
interno o a un procesador de
efectos externo a través del
jack FX SEND.
Le fader FX SENDgle le
volume du signal du canal
envoyé au processeur
multi-effet interne ou à un
processeur d'effets externe
via le jack FX SEND.
2-TR/USB RTN fader adjusts
the level of the 2-track RCA
inputs or USB input.
2-TR/USB RTN, este fader
ajusta el nivel de las entradas
2-track RCA o entrada USB.
Le fader 2-TR/USB RTNgle
le niveau des entrées RCA
2-track ou de l'ente USB.
MAIN MIX faders adjust the
overall output of the mixer.
MAIN MIX faders adjust the
overall output of the mixer.
Les faders MAIN MIX
règlent la sortie globale de
la console.
FX TO MON and FX TO MAIN
knobs adjust the amount
of signal from the internal
multi-FX processor or an
external effects processor
that is included in the main or
monitor mix.
FX TO MON y FX TO MAIN,
estos controles ajustan
la cantidad de señal del
procesador de multiefectos
interno o de un procesador
de efectos externo incluido
en la mezcla principal o
del monitor.
Les potentiomètres
FX TO MON et FX TO MAIN
règlent le volume du signal
provenant du processeur
multi-effet interne ou d'un
processeur d'effets externe
inclus dans le mix principal ou
dans le mix de retour.
VOICE CANCELLER button
filters out vocal frequencies
from audio plugged into the
2-TRACK INPUT, enabling
your mixer to act as a
karaoke machine.
VOICE CANCELLER, este
botón filtra las frecuencias
vocales del audio conectado
a la entrada 2-TRACK,
permitiendo a la mesa de
mezclas funcionar como un
equipo de karaoke.
La touche VOICE CANCELLER
élimine les fquences
vocales des sources audio
branchées sur l'ENTREE
2-TRACK, permettant ainsi
à votre console de jouer le rôle
de karaoké.
XPQ SURROUND knob
adjusts the amount of stereo
enhancement on the mix.
Press the XPQ TO MAIN button
to activate the effect.
XPQ SURROUND, este control
ajusta la cantidad de mejora
estéreo de la mezcla. Pulse el
botón XPQ TO MAIN para
activar el efecto.
Le potentiomètre
XPQ SURROUNDgle le
volume d'accroissement
stéo du mix. Appuyez sur
la touche XPQ TO MAIN pour
activer cet effet.
STANDBY button mutes all
microphone channels.
STANDBY, este botón
silencia todos los canales
de microfono.
La touche STANDBY
permet de désactiver le
volume sonore de tous les
canaux microphone.
PHONES knob adjusts the
headphone volume.
PHONES, este control
ajusta el volumen de
los auriculares.
Le potentiomètre PHONES
règle le volume du casque.
GRAPHIC EQ adjusts
specific frequencies in the
sound spectrum.
GRAPHIC EQ ajusta las
frecuencias espeficas en el
espectro sonoro.
GRAPHIC EQ règle les
fréquences scifiques du
spectre sonore.
MULTI-FX PROCESSOR
adds a selected sound effect
to any channels whose FX
knob is turned up. See the
Multi-FX Processor section
for details.
MULTI-FX PROCESSOR
añade un efecto de sonido
seleccionado a cualquier
canal en los que es
activado el control FX.
Consulte la información
detallada en la sección
Procesador de multiefectos.
Le PROCESSEUR
MULTI-EFFET ajoute
l'effet sonore sélectionné
aux canaux dont le
potentiomètre FX est activé.
Reportez-vous à la section
Processeur multi-effet pour
en savoir plus.
VU METER displays the
MAIN OUTPUT signal level.
VU METER muestra el nivel
de la señal MAIN OUTPUT.
Le VU-METRE affiche
le niveau du signal de la
SORTIE MAIN.
18 XENYX X1222USB/X1832USB
behringer.com
19 Quick Start Guide
behringer.com
Step 2: Controls
Paso 2: Controles
Etape 2 : Réglages
XENYX X1222USB/X1832USB Controls FBQ FEEDBACK DETECTION
AC IN accepts the included
power cable for connection to
a mains outlet.
ENTRADA DE AC acepta el
cable de alimentacn que se
incluye para la conexión a una
toma de corriente.
AC IN permet de connecter
le câble d'alimentation inclus
à l'alimentation secteur.
PHANTOM ON switch sends
48 V to the XLR inputs for use
with condenser microphones.
PHANTOM ON, este
interruptor envía 48 V a las
entradas XLR para usarlas con
micfonos de condensador.
Le commutateur
PHANTOM ON envoie 48 V
aux entrées XLR, dans le
cas de l'utilisation de
microphones électrostatiques.
POWER ON switch turns
the mixer on and off.
POWER ON, este
interruptor enciende
y apaga la mesa
de mezclas.
POWER ON permet
d'allumer ou d'éteindre
la console.
If feedback occurs,
press the EQ IN and
FBQ FEEDBACK DETECTION
buttons. Press the MAIN MIX/
MONITOR button to assign
the graphic EQ to the mains or
monitor speakers.
Si se produce realimentación,
pulse los botones EQ IN y
FBQ FEEDBACK DETECTION.
Pulse el botón MAIN MIX/
MONITOR para asignar el
ecualizador gráfico a la
corriente eléctrica o a los
altavoces de monitoreo.
En cas de larsen, appuyez
sur les touches EQ IN et
FBQ FEEDBACK DETECTION.
Appuyez sur la touche
MAIN MIX/MONITOR pour
affecter l’égaliseur graphique
aux haut-parleurs principaux
ou aux haut-parleurs
de retour.
An LED will light on the EQ
slider that corresponds with
the feedback frequency.
Se encenderá un LED en el
control del ecualizador que
corresponde a la frecuencia
de realimentacn.
Une LED s’allume sur le
curseur EQ correspondant à la
fréquence de larsen.
Lower the lit EQ slider until
feedback stops.
Deslice hacia abajo el
control de dicho ecualizador
hasta que se detenga
la realimentación.
Abaissez le curseur EQ
allumé jusqu’à ce que le
larsen s’interrompe.
20 XENYX X1222USB/X1832USB
behringer.com
21 Quick Start Guide
behringer.com
Step 3: Getting started
Paso 3: Puesta en
marcha
Etape 3 : Mise en
oeuvrev
XENYX X1222USB/X1832USB Getting started
Make sure the power to all devices is
turned off!
¡Asegúrese de que la alimentación de
todos los dispositivos esté apagada!
Vérifiez que tous les appareils sont hors tension.
Connect all the appropriate power, audio
and USB cables to the mixer.
Conecte todos los cables de alimentación,
audio y USB adecuados a la mesa de mezclas.
Branchez les câbles dalimentation, audio et USB
appropriés à la console.
Set all controls as shown above (EQ and
PAN/BAL centered, GRAPHIC EQ sliders
centered, all others down/off).
Establezca todos los controles tal y como se indica
más arriba (EQ y PAN/BAL centrados, controles
deslizantes GRAPHIC EQ centrados y el resto
abajo/apagados).
Réglez toutes les commandes comme sur la figure
(EQ et PAN/BAL au centre, curseurs GRAPHIC EQ au
centre, tous les autres éteints/en butée gauche).
Turn the mixer on.
Encienda la mesa
de mezclas.
Mettez la console en marche.
Set the GAIN for each channel. See the
Gain Setting section for details.
Establezca GAIN para cada canal.
Consulte los detalles en la sección Ajuste de la ganancia.
Réglez le GAIN de chaque canal. Reportez-vous à la
section Réglage du gain pour en savoir plus.
With the MAIN MIX faders and PHONES/
CTRL ROOM knob all the way down, turn
your PA system or powered monitors on.
Con los faders MAIN MIX y el control PHONES/
CTRL ROOM situados hacia abajo por completo,
encienda su amplificador de potencia o monitores
con alimentación.
Laissez les faders MAIN MIX et le potentiomètre
PHONES/CTRL ROOM au minimum et allumez
votre amplificateur de puissance ou vos haut-
parleurs actifs.
Slowly raise the
MAIN MIX faders
or PHONES/
CTRL ROOM knob to 0 or to
desired level.
Eleve lentamente los faders
MAIN MIX o el control
PHONES/CTRL ROOM hasta
0, o hasta el nivel deseado.
Montez lentement les
faders MAIN MIX ou le
potentiomètre PHONES/
CTRL ROOM pour les placer
sur 0 ou sur le niveau désiré.
On the X1832USB, press the MAIN button
on each channel to assign the channel to
the MAIN MIX.
En el X1832USB, pulse el botón MAIN de cada canal
para asignar el canal a MAIN MIX.
Sur le X1832USB, appuyez sur la touche MAIN de
chaque canal pour affecter le canal au MAIN MIX.
Adjust the relative
level of various
microphones and
instruments by raising each
CHANNEL FADER.
Ajuste el nivel relativo de
los diversos micrófonos e
instrumentos elevando cada
CHANNEL FADER.
Réglez le niveau relatif des
microphones et des
instruments en montant chaque FADER DE CANAL.
Adjust the left-right position of a channel
in the stereo field if necessary by turning
the channel’s PAN or BAL knob.
Ajuste la posición izquierda-derecha de un canal en el
campo estéreo si es necesario girando el control PAN
o BAL del canal.
Le cas échéant, réglez la position droite-gauche des
canaux dans le champ stéréo en tournant le
potentiomètre PAN ou BAL correspondant.
Adjust the COMP knob to add compression
to an input if necessary.
Ajuste el control COMP para añadir
compresión a una entrada si es necesario.
Le cas échéant, réglez le potentiomètre COMP pour
ajouter une compression à une entrée.
For live applications, adjust the overall
output from the mixer to the power amp
or powered speakers by raising the
MAIN MIX fader. If the red CLIP LEDs on the VU METER
light, lower the MAIN MIX fader.
Para las aplicaciones en directo, ajuste la salida
general desde la mesa de mezclas hasta el
amplificador de potencia o los altavoces alimentados
elevando el fader MAIN MIX. Baje el fader MAIN MIX
si los LED CLIP en el VU METER se encienden.
Pour les applications live, réglez la sortie globale de
la console vers l’amplificateur de puissance ou les
haut-parleurs actifs en montant le fader MAIN MIX.
Si les LED rouge CLIP du VU-METRE s’allument,
baissez le fader MAIN MIX.
Use the channel MON knobs and MON
SEND fader to send the channel signals
to a monitor speaker connected to the
MON SEND/OUT jack.
Utilice los controles MON del canal y el fader
MON SEND para enviar las señales del canal
a un altavoz de monitoreo conectado al jack
MON SEND/OUT.
Utilisez les potentiomètres MON et le fader
MON SEND pour envoyer les signaux du canal
au haut-parleur de retour branché au jack
MON SEND/OUT.
Use the channel FX knobs and FX SEND
fader/knob to send the channel
signals to an effects processor
connected to the FX SEND jack. Connect the
returning signal from the processor to the AUX
RETURN jacks.
Utilice los controles FX del canal y el fader/control
FX SEND para enviar las señales del canal a un
procesador de efectos conectado al jack FX SEND.
Conecte la señal que retorna del procesador a los
jacks AUX RETURN.
Utilisez les potentiomètres FX et le fader/
potentiomètre FX SEND pour envoyer les signaux
du canal au haut-parleur de retour branché au
jack
FX SEND. Reliez le signal de retour du processeur
aux jacks AUX RETURN.
F1220A
22 XENYX X1222USB/X1832USB
behringer.com
23 Quick Start Guide
behringer.com
XENYX X1222USB/X1832USB Getting started Multi-FX Processor
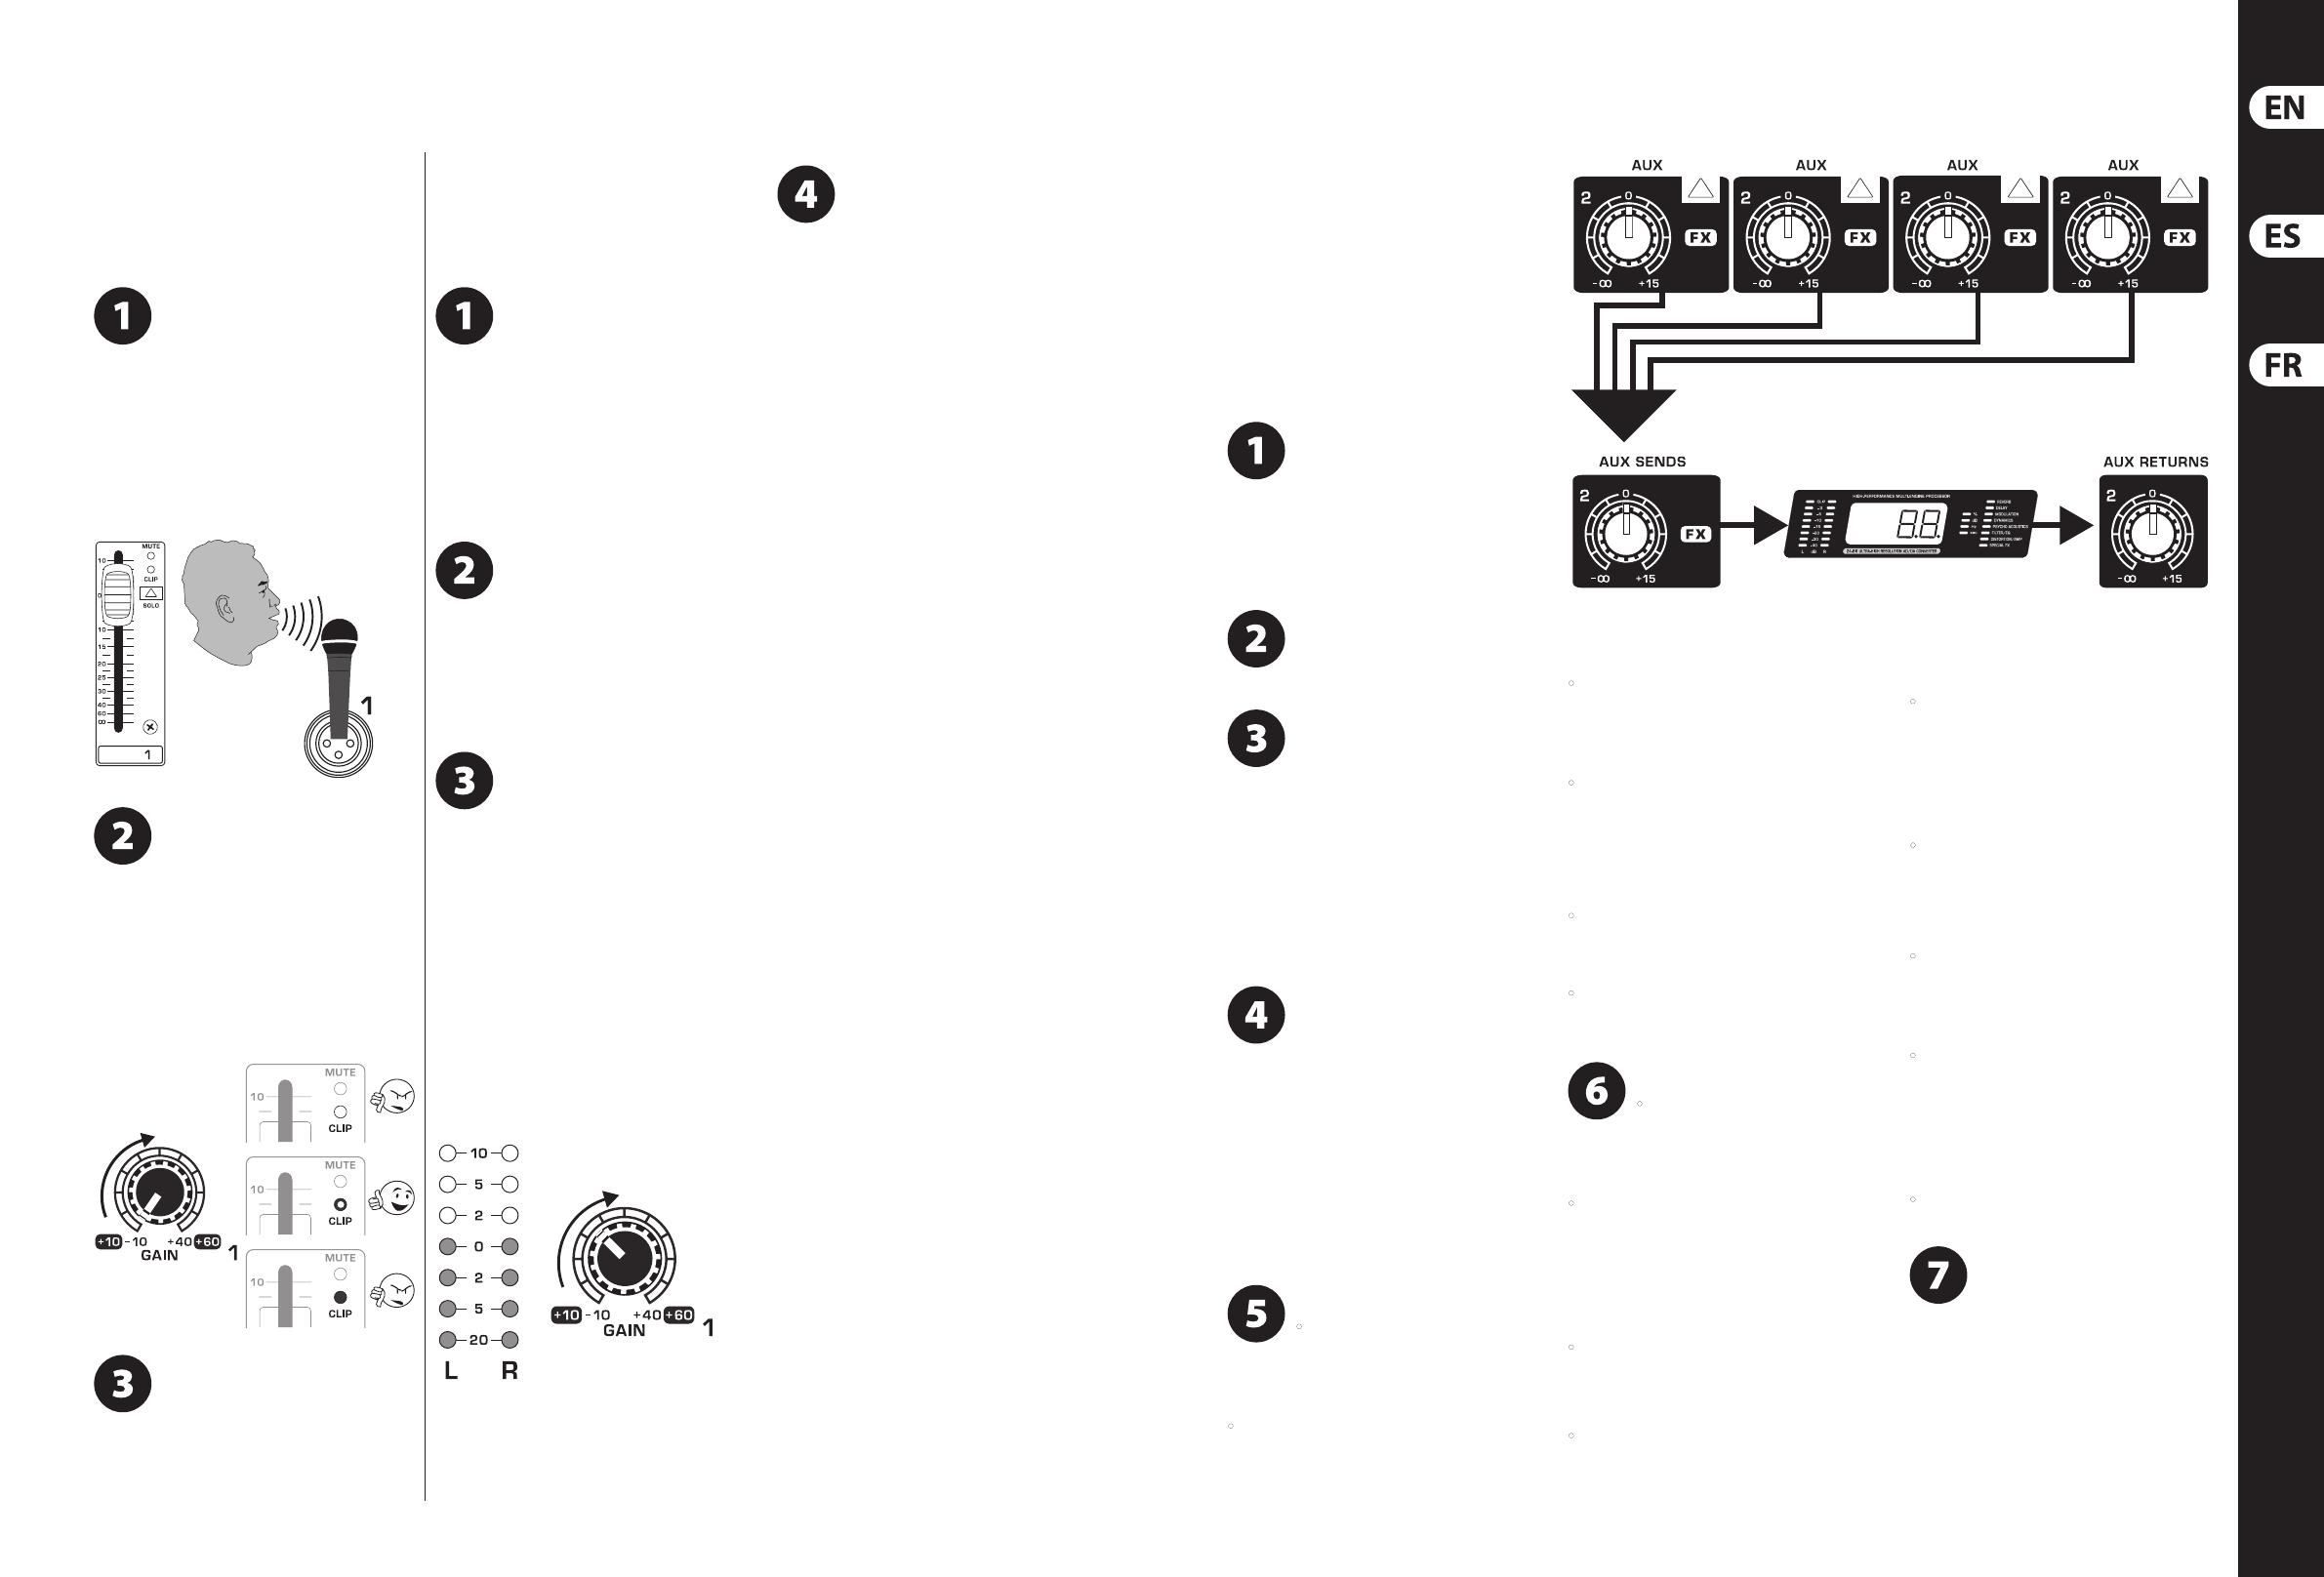
Setting the channel gain for the X1832USB:
Ajuste de la ganancia del canal para
el X1832USB:
Réglage du gain du canal sur le X1832USB :
Press the Channel 1 SOLO button.
Press the MODE button next to the
VU METER to allow the METER to operate
in PFL (pre-fader listen) mode.
Pulse el botón SOLO del Canal 1. Pulse el botón
MODE junto al VU METER para permitir que el METER
funcione en modo PFL (escucha pre-fader).
Appuyez sur la touche SOLO du canal 1. Appuyez sur
la touche MODE en regard du VU-METRE pour que ce
dernier fonctionne en mode PFL (Pre-Fader Listen).
Sing, speak or play at a normal level
through the microphone or instrument
connected to Channel 1.
Cante, hable o toque a un nivel normal a través del
micrófono o instrumento conectado al Canal 1.
Chantez, parlez ou jouez à un niveau normal dans
le microphone ou avec l’instrument connec
au canal 1.
While singing or playing, turn Channel 1’s
GAIN control. The VU METER will display
the signal level. Set the GAIN control so
that the loudest peaks reach 0 on the VU METER.
Press the Channel 1 SOLO button again.
Mientras esté cantando o tocando, gire el control
GAIN del Canal 1. El VU METER mostrará el nivel de
señal. Establezca el control GAIN de forma que los
picos más altos lleguen a 0 en el VU METER. Pulse de
nuevo el botón SOLO del Canal 1.
Pendant que vous chantez ou jouez, tournez la
commande GAIN du canal 1. Le VU-METRE affiche le
niveau du signal. Réglez la commande GAIN de sorte
que les pics les plus forts atteignent 0 sur le
VU-METRE. Appuyez de nouveau sur la touche SOLO
du canal 1.
Repeat steps 1-3 for any other channels
that will be used. For stereo channels 7/8
through 13/14, start with the +4/-10
button out. If the signal is too low to register on the
VU meters, press the button in to boost the signal.
Repita los pasos 1-3 para el resto de canales que
se vayan a utilizar. Para canales estéreo de 7/8 a
13/14, comience con el botón +4/-10 sin pulsar. Si la
señal es excesivamente baja como para registrarla
en los medidores de volumen, pulse el botón para
potenciar la señal.
Répétez les étapes 1 à 3 pour les autres
canaux utilisés. Pour les canaux stéréo 7/8 à
13/14, commencez en relâchant la touche +4/-10.
Si le signal est trop faible pour apparaître sur
les VU-mètres, appuyez sur cette touche pour
augmenter le signal.
Setting the channel gain for the X1222USB:
Ajuste de la ganancia del canal para
el X1222USB:
Réglage du gain du canal sur le X1222USB :
Raise Channel 1’s fader to 0. Sing,
speak or play at a normal level through
the microphone or instrument connected
to Channel 1.
Eleve el fader del Canal 1 hasta 0. Cante, hable o
toque a un nivel normal a través del micrófono o
instrumento conectado al Canal 1.
Montez le fader du canal 1 sur 0. Chantez, parlez ou
jouez à un niveau normal dans le microphone ou
avec l’instrument connecté au canal 1.
While singing or playing, turn Channel 1’s
GAIN control until the Channel 1 CLIP LED
flashes occasionally, but not constantly.
Mientras esté cantando o tocando, gire el control
GAIN del Canal 1 hasta que el LED CLIP del
Canal 1 parpadee ocasionalmente, pero no de
forma constante.
Pendant que vous chantez ou jouez, tournez la
commande GAIN du canal 1 jusqu’à ce que la LED
CLIP du canal 1 clignote de manière irrégulière.
Repeat steps 1 and 2 for devices
connected to channels 2-12.
Repita los pasos 1 y 2 para los dispositivos
conectados a los canales 2-12.
Répétez les étapes 1 et 2 pour les appareils
connectés aux canaux 2 à 12.
Your mixer has a built-in effects processor.
Follow these steps to add an effect to one or
more channels.
Su mesa de mezclas tiene un procesador de
efectos integrado. Siga estos pasos para
añadir un efecto a uno o más canales.
La console est équipée d’un processeur
d’effets intégré. Les étapes suivantes vous
permettront d’ajouter un effet à un ou
plusieurs canaux.
Turn the FX knob up half way on each
channel to which you would like to add
an effect.
Gire el control FX media vuelta en cada canal al que
desee añadir un efecto.
Tournez jusqu’à mi-parcours le potentiomètre FX des
canaux sur lesquels vous souhaitez ajouter un effet.
Adjust the FX SEND fader/knob up to 0.
Ajuste el fader/control FX SEND hasta 0.
Réglez le fader/potentiomètre FX SEND sur 0.
Adjust the FX/AUX2 RET fader (X1832USB)
or FX TO MAIN and FX TO MON knobs
(X1222USB) to 0. You may adjust
them later.
Ajuste el fader FX/AUX2 RET (X1832USB) o los
controles FX TO MAIN y FX TO MON (X1222USB)
hasta 0. Puede ajustarlos más tarde.
Réglez le fader FX/AUX2 RET (X1832USB)
ou les potentiomètres FX TO MAIN et
FX TO MON (X1222USB) sur 0. Vous pourrez les
régler ultérieurement.
Scroll through the effects by turning the
PROGRAM knob. The preset number will
flash in the display. Press the PROGRAM
knob to select the effect.
Gire el control PROGRAM para desplazarse por los
efectos. El número predefinido parpadeará en la
pantalla. Pulse el control PROGRAM para seleccionar
el efecto.
Faites défiler les effets en faisant tourner le
bouton PROGRAM. Le numéro du preset clignote sur
l’affichage. Appuyez sur le bouton PROGRAM pour
sélectionner leffet.
Adjust the effect’s first parameter:
After you have selected a preset •
(step 4), press the PROGRAM knob to
enter Edit Mode. The right LED inside
the display will start blinking.
Turn the PROGRAM knob to adjust the parameter. •
After 5 seconds of inactivity, the mixer exits Edit
Mode and the LED goes out.
Ajuste el primer parámetro del efecto:
Después de seleccionar un preajuste (paso 4), •
pulse el control PROGRAM para entrar en modo de
edición. El LED derecho situado en el interior de la
pantalla comenzará a parpadear.
Gire el control PROGRAM para ajustar el •
parámetro. Después de 5 segundos de inactividad,
la mesa de mezclas sale del modo de edición y el
LED se apaga.
Réglez le premier paramètre de leffet :
Après avoir sélectionné un preset (étape 4), •
appuyez sur le bouton PROGRAM pour entrer dans
le mode Edit. La LED droite de l'affichage clignote.
Tournez le bouton PROGRAM pour régler le •
paramètre. Après 5 secondes d’inactivité,
la console quitte le mode Edit et la LED s’éteint.
Adjust the effect’s second parameter:
If the effects second •
parameter is an on/off or toggled value,
press the TAP button to select between settings.
2 LEDs inside the display will start blinking.
If the effects second parameter is speed-based, •
press the TAP button in rhythm with the desired
tempo. The TAP LED will flash to the current
tempo. If ‘Lo’ is displayed, the tapped tempo is
too slow. If ‘Hi’ is displayed, the tapped tempo is
too fast.
After 5 seconds of inactivity, the mixer exits Edit •
Mode and the LEDs go out.
Ajuste el segundo parámetro del efecto:
Si el segundo parámetro del efecto es un valor •
que alterna entre encendido y apagado, pulse el
botón TAP para seleccionar entre los ajustes.
2 LED situados en el interior de la pantalla
comenzarán a parpadear.
Si el segundo parámetro del efecto depende •
de la velocidad, pulse el botón TAP en ritmo
con el tempo deseado. El LED TAP parpadeará
al tempo actual. Si se muestra ‘Lo’, el tempo de
toque es demasiado lento. Si se muestra ‘‘Hi,
el tempo de toque es demasiado rápido.
Después de 5 segundos de inactividad, la mesa •
de mezclas sale del modo de edición y el LED
se apaga.
Réglez le deuxième paramètre de l’effet :
Si le deuxième paramètre de l'effet correspond •
à une valeur de marche/arrêt ou de bouton,
appuyez sur la touche TAP pour sélectionner un
paramètre. 2 LED de l'affichage clignotent.
Si le deuxième paramètre de l'effet dépend •
d'une vitesse, appuyez sur la touche TAP en
rythme avec le tempo souhaité. La LED TAP
clignote au rythme actuel. Si « Lo » s'affiche,
le tempo est trop lent. Si « Hi » s'affiche,
le tempo est trop rapide.
Après 5 secondes d'inactivité, la console quitte •
le mode Edit et les LED s'éteignent.
Readjust each channel’s FX knob to
make sure the right amount of effect
is added.
Reajuste el control FX de cada canal para garantizar
que se añada la cantidad de efecto correcta.
Réglez le potentiomètre FX de chaque canal pour
vérifier que l’ajout de l’effet est correct.
behringer.com
24 XENYX X1222USB/X1832USB
behringer.com
25Quick Start Guide
SpecificationsMulti-FX Processor Preset Chart
X1222USB X1832USB
Mono inputs
Microphone inputs
(XENYX Mic preamp)
6
Type XLR connector, electronically balanced, discrete input circuit
Mic E.I.N.1 (20 Hz - 20 kHz)
@ 0 Ω source resistance -134 dB 135.7 dB A-weighted
@ 50 Ω source resistance -131 dB 133.3 dB A-weighted
@ 150 Ω source resistance -129 dB 130.5 dB A-weighted
Frequency response
(–1 dB)
<10 Hz - 150 kHz (-1 dB)
Frequency response
(–3 dB)
<10 Hz - 200 kHz (-3 dB)
Gain range +10 dB to +60 dB
Max. input level +12 dBu @ +10 dB GAIN
Impedance 2.6 k Ohms balanced
Signal-to-noise ratio
110 dB A-weighted
(0 dBu In @ +22 dB GAIN)
Distortion (THD + N) 0.005% / 0.004% A-weighted
Phantom Power Switchable, +48 V
Line input
Type ¼" TRS jack, electronically balanced
Impedance
20 k Ohms balanced,
10 k Ohms unbalanced
Gain range -10 dB to +40 dB
Max. input level 30 dBu
Frequency response (Mic In -Main Out)
<10 Hz - 90 kHz +0 dB / -1 dB
<10 Hz - 160 kHz +0 dB / -3 dB
Stereo inputs
Type 4 dual ¼" TRS jacks, balanced
Impedance
20 k Ohms balanced,
10 k Ohms unbalanced
Gain range -20 dB to +20 dB
Max. input level +22 dBu
2-TRACK/USB Input
Type RCA connector
Impedance 10 k Ohms
Max. input level +22 dBu
Equalizer 3-band
Equalizer 3-band
semi-parametric
LOW 80 Hz / +- 15 dB
MID 2.5 kHz / +- 15 dB
Variable
100 Hz - 8 kHz / +- 15 dB
HIGH 12 kHz / +- 15 dB
Equalizer 4-band fixed
LOW 80 Hz / +- 15 dB
LOW MID 500 Hz / +- 15 dB
HIGH MID 3 kHz / +- 15 dB
HIGH 12 kHz / +- 15 dB
Channel inserts
Type 4 x ¼" TRS jacks, unbalanced 6 x ¼" TRS jacks, unbalanced
Max. input level +22 dBu
X1222USB X1832USB
AUX sends/Mon
Type
2 x ¼" mono jack,
unbalanced
3 x ¼" mono jack,
unbalanced
Impedance 120 Ohms
Max. output level +22 dBu
AUX returns
Type 2 dual ¼" TRS connectors, balanced
Impedance
20 k Ohms balanced,
10 k Ohms unbalanced
Max. input level +22 dBu
Main outputs
Type
XLR, electronically
balanced
XLR, ¼", electronically
balanced
Impedance
240 Ohms balanced,
120 Ohms balanced
Max. output level +28 dBu
Control room output
Type ¼" TS connector, unbalanced
Impedance 120 Ohms
Max. output level +22 dBu
Phones output
Type ¼" TRS jack, unbalanced
Max. output level
+19 dBu / 150 Ohms
(+25 dBm)
2-TRACK/USB Output
Type RCA connector
Impedance 1 k Ohms
Max. output level +22 dBu
DSP
Converter
24-bit Delta-Sigma
64/128-times oversampling
Sampling Rate 40 kHz
Main mix system data (Noise)
Main mix @ -∞,
channel fader @ -∞
-105 dB / -108 dB A weighted
Main mix @ 0 dB,
channel fader @ -∞
-95 dB / -97 dB A weighted
Main mix @ 0 dB,
channel fader @ 0 dB
-82.5 dB / -85 dB A weighted
Power supply
Mains voltage 100 - 240 V~, 50/60 Hz
Power consumption 40 W 50 W
Fuse
(100 - 120 V~, 50/60 Hz)
T 1,6 A H 250 V
Fuse
(220 - 230 V~, 50/60 Hz)
T 1,6 A H 250 V
Mains connector Standard IEC receptacle
USB
Audio Stereo In/Out
Connector Type B
Converter 16-bit
Sample Rate 48 kHz
Physical/weight
Dimensions (H x W x D)
3.54 x 14.57 x 13"
90 x 370 x 330 mm
3.54 x 16.93 x 14"
90 x 430 x 355 mm
Weight 8.16 lbs / 3.7 kg 10.22 lbs / 4.64 kg
No. Effect PROGRAM Min. value Max. value Default TAP Min. value Max. value Default TAP LED
REVERB
01 HALL Reverb time
01
(approx. 1.0 sec.)
10
(approx. 8.0 sec.)
03 Brilliance oF on on off/on lighting
02 ROOM Reverb time
01
(approx. 0.5 sec.)
10
(approx. 4.0 sec.)
04 Brilliance oF on oF off/on lighting
03 PLATE Reverb time
01
(approx. 0.5 sec.)
10
(approx. 5.0 sec.)
03 Brilliance oF on on off/on lighting
04 GATED Reverb time
01
(approx. 0.1 sec.)
10
(approx. 1.0 sec.)
02 Brilliance oF on oF off/on lighting
05 REVERSE Reverb time
01
(approx. 0.1 sec.)
10
(approx. 1.0 sec.)
05 Brilliance oF on oF off/on lighting
AMBIENCE / DELAY
06 EARLY REFLECTIONS Room size 01 (small) 10 (extra large) 05 Brilliance oF on oF off/on lighting
07 AMBIENCE Area size 01 (small) 10 (extra large) 05 Brilliance oF on on off/on lighting
08 DELAY
No. of
repetitions
01
(min. feedback)
20
(max. feedback)
04
Time Interval
(BPM)
07
(72 BPM)
60
(600 BPM)
12
(120 BPM)
blinks BPM Tempo
09 ECHO
No. of
repetitions
01
(min. feedback)
40
(max. feedback)
20
Time Interval
(BPM)
07
(72 BPM)
60
(600 BPM)
10
(100 BPM)
blinks BPM Tempo
MODULATION
10 CHORUS
Intensity
(Depth)
01
(1 %)
99
(99 %)
30
Tempo
(LFO-Speed)
02
(24 BPM)
48
(480 BPM)
06
(60 BPM)
blinks mod speed
11 FLANGER
Intensity
(Depth)
01
(1 %)
99
(99 %)
40
Tempo
(LFO-Speed)
02
(24 BPM)
48
(480 BPM)
09
(90 BPM)
blinks mod speed
12 PHASER
Intensity
(Depth)
01
(1 %)
99
(99 %)
60
Tempo
(LFO-Speed)
02
(24 BPM)
48
(480 BPM)
03
(30 BPM)
blinks mod speed
DETUNE / PITCH
13 DETUNE
Detune-
Spreading
01
(1 cent)
99
(99 cent)
25 2nd voice delay
05
(short, 5 ms)
50
(long, 50 ms)
05
(5 ms)
off/on lighting
14 PITCH SHIFT
Semitone
Steps
-12
(1 octave down)
12
(1 octave up)
03
(Minor 3rd)
Detune
oF
(0 Cent)
on
(+25 cent)
oF
(0 Cent)
off/on lighting
COMBINATION FX
15 DELAY + REV Ratio
-9
(90% DLY, 10% REV)
9
(10% DLY, 90% REV)
0
(50%/50%)
DLY Time
(BPM)
11
(116 BPM)
60
(600 BPM)
12
(120 BPM)
blinks BPM Tempo
16 CHORUS + REV Ratio
-9
(90% CH, 10% REV)
9
(10% CH, 90% REV)
0
(50%/50%)
Reverb time
12
(short, 1.2 s)
24
(long, 2.4 s)
12
(short, 1.2 s)
off/on lighting
28 XENYX X1222USB/X1832USB
behringer.com
Other important information
Register online.1. Please register your new
BEHRINGER equipment right after you purchase it by
visiting behringer. com. Registering your purchase using
our simple online form helps us to process your repair
claims more quickly and efficiently. Also, read the terms
and conditions of our warranty, if applicable.
Malfunction.2. Should your BEHRINGER dealer
not be located in your vicinity, you may contact the
BEHRINGER distributor for your country listed under
“Support” at behringer. com. Should your country not
be listed, please check if your problem can be dealt with
by our “Online Support” which may also be found under
“Support” at behringer. com. Alternatively, please submit an
online warranty claim at behringer. com BEFORE returning
the product.
Power Connections.3. Before plugging the unit
into a power socket, please make sure you are using the
correct mains voltage for your particular model. Faulty fuses
must be replaced with fuses of the same type and rating
without exception.
Aspectos importantes
Registro online. 1. Le recomendamos que
registre su nuevo aparato BEHRINGER justo después de
su compra accediendo a la página web behringer. com.
El registro de su compra a través de nuestro sencillo
sistema online nos ayudará a resolver cualquier
incidencia que se presente a la mayor brevedad posible.
Además, aproveche para leer los términos y condiciones de
nuestra garantía, si es aplicable en su caso.
Averías.2. En el caso de que no exista un distribuidor
BEHRINGER en las inmediaciones, puede ponerse en
contacto con el distribuidor BEHRINGER de su país,
que encontrará dentro del apartado “Support” de nuestra
página web behringer. com. En caso de que su país no
aparezca en ese listado, acceda a la sección “Online Support”
(que también encontrará dentro del apartado “Support” de
nuestra página web) y compruebe si su problema aparece
descrito y solucionado allí. De forma alternativa, envíenos a
través de la página web una solicitud online de soporte en
periodo de garantía ANTES de devolvernos el aparato.
Conexiones de corriente.3. Antes de enchufar
este aparato a una salida de corriente, asegúrese de que dicha
salida sea del voltaje adecuado para su modelo concreto.
En caso de que deba sustituir un fusible quemado, deberá
hacerlo por otro de idénticas especificaciones, sin excepción.
Enregistrez-vous en ligne.1. Prenez le
temps d’enregistrer votre produit BEHRINGER aussi vite
que possible sur le site Internet behringer. com. Le fait
d’enregistrer le produit en ligne nous permet de gérer
les réparations plus rapidement et plus efficacement.
Prenez également le temps de lire les termes et conditions
de notre garantie.
Dysfonctionnement.2. Si vous n’avez pas
de revendeur BEHRINGER près de chez vous, contactez le
distributeur BEHRINGER de votre pays : consultez la liste
des distributeurs de votre pays dans la page “Support” de
notre site Internet behringer. com. Si votre pays n’est pas
dans la liste, essayez de résoudre votre problème avec notre
“aide en ligne” que vous trouverez également dans la section
“Support” du site behringer. com. Vous pouvez également
nous faire parvenir directement votre demande de réparation
sous garantie par Internet sur le site behringer. com AVANT de
nous renvoyer le produit.
Raccordement au secteur.3. Avant de relier
cet équipement au secteur, assurez-vous que la tension
secteur de votre région soit compatible avec l’appareil.
Veillez à remplacer les fusibles uniquement par des modèles
exactement de même taille et de même valeur électrique —
sans aucune exception.
Important information Informations importantes
behringer.com
29Quick Start Guide
FEDERAL COMMUNICATIONS
COMMISSION COMPLIANCE
INFORMATION
Responsible party name: BEHRINGER USA, Inc.
Address: 18912 North Creek Parkway,
Suite 200 Bothell, WA 98011,
USA
Phone/Fax No.: Phone: +1 425 672 0816
Fax: +1 425 673 7647
XENYX X1222USB/X1832USB
complies with the FCC rules as mentioned in the following paragraph:
This equipment has been tested and found to comply with the limits for a Class B
digital device, pursuant to part 15 of the FCC Rules. These limits are designed
to provide reasonable protection against harmful interference in a residential
installation. This equipment generates, uses and can radiate radio frequency
energy and, if not installed and used in accordance with the instructions, may cause
harmful interference to radio communications. However, there is no guarantee that
interference will not occur in a particular installation. If this equipment does cause
harmful interference to radio or television reception, which can be determined
by turning the equipment off and on, the user is encouraged to try to correct the
interference by one or more of the following measures:
Reorient or relocate the receiving antenna.•
Increase the separation between the equipment and receiver.•
Connect the equipment into an outlet on a circuit different from that to which the •
receiver is connected.
Consult the dealer or an experienced radio/TV technician for help.•
This device complies with Part 15 of the FCC rules. Operation is subject to the
following two conditions:
(1) this device may not cause harmful interference, and
(2) this device must accept any interference received, including interference that may
cause undesired operation.
Important information:
Changes or modifications to the equipment not expressly approved by BEHRINGER
USA can void the users authority to use the equipment.
XENYX X1222USB/X1832USB
behringer.com
30 XENYX X1222USB/X1832USB
behringer.com
31Quick Start Guide
behringer.com
1 / 1

Behringer X1222USB User manual

Category
Audio mixers
Type
User manual
This manual is also suitable for

Ask a question and I''ll find the answer in the document

Finding information in a document is now easier with AI

Ask the document