HEIDENHAIN IK 5000 QUADRA-CHEK Multisensor User manual
- Category
- Graphics software
- Type
- User manual

English (en)
2/2010
IK 5000
QUADRA-CHEK
(QC 5000)
Operating Instructions
Multisensor Systems


Quadra-Chek® 5000
User’s Guide

Proprietary notice
All information set forth in this document, all rights to such information,
any and all inventions disclosed herein and any patents that might be
granted by employing the materials, methods, techniques or apparatus
described herein are the exclusive property of Metronics Incorporated,
Bedford, New Hampshire.
No part of this document may be reproduced, stored in a retrieval sys-
tem, or transmitted in any form or by any means, electronic, mechanical,
photocopying, recording, or otherwise, without the prior permission of
Metronics Incorporated. The information contained herein is designed
only for use with the Quadra-Chek 5000 Metrology Software. Metron-
ics Incorporated is not responsible for any use of this information as ap-
plied to any other apparatus.
Disclaimer
The information contained in this document is subject to change with-
out notice. Metronics Incorporated assumes no responsibility or liability
for any errors or inaccuracies contained herein, or for incidental or conse-
quential damage in connection with the furnishing, performance, or use
of this guide.
Metronics Inc. shall not be liable to the purchaser of this product or third
parties for damages, losses, costs, or expenses incurred by the purchaser
or third parties as a result of: accident, misuse, or abuse of this product or
unauthorized modifications, repairs, or alterations to this product, or failure
to strictly comply with Metronics Incorporated’s operating and mainte-
nance instructions.
Trademarks
Metronics, Quadra-Chek, Quadra-Chek 5000, and QC5000 are regis-
tered trademarks of Metronics Incorporated.
Other product names used herein are for identification purposes only
and may be trademarks of their respective owners. Metronics Incorpo-
rated disclaims any and all rights to those marks.
Revision
September 2004 Fourth Printing
Revision 3.0
Part Number: 11A10521
Software Version 2.2
Printed in the USA.

Contents
OvOv
OvOv
Overer
erer
ervievie
vievie
vieww
ww
w....................................................................................................................................................
....................................................................................................................................................
..........................................................................1-11-1
1-11-1
1-1
Welcome to the QC-5000 .............................................................................1-1
About This Guide .........................................................................................1-3
Icons and Type Faces .....................................................................................1-4
Warning ..................................................................................................1-4
Caution ..................................................................................................1-4
Note .......................................................................................................1-4
Italics ......................................................................................................1-4
Starting the QC-5000 ...................................................................................1-5
To open the QC-5000 ............................................................................1-5
Windows and Toolbars ..................................................................................1-6
QC-5000 Windows .......................................................................................1-8
DRO ......................................................................................................1-8
The Results Window .....................................................................................1-8
Feature Specifications .............................................................................. 1-8
To move information from the results window to the features list ...........1-9
Locked/unlocked features ......................................................................1-10
To unlock a feature ...............................................................................1-10
To lock a feature ...................................................................................1-10
Feature type diagram /feature stamp .....................................................1-11
To open the feature stamp window .......................................................1-11
The Part View Window ...............................................................................1-12
Single pane part view ............................................................................1-12
Four pane part view ..............................................................................1-13
View Rotator ...............................................................................................1-14
To use the view rotator..........................................................................1-14
Template Windows ......................................................................................1-15
To separate template windows ...............................................................1-15
To nest template windows .....................................................................1-17
Status Bar ....................................................................................................1-18
To add items to the status bar ...............................................................1-18
To delete items from the status bar........................................................1-20
Main Menu Bar...........................................................................................1-22
Toolbars.......................................................................................................1-22
Datum toolbar ......................................................................................1-22
Measure toolbar ....................................................................................1-22
Probe toolbar ........................................................................................1-22
View toolbar .........................................................................................1-22
Tolerance toolbar ..................................................................................1-22
Program toolbar ....................................................................................1-23
File toolbar............................................................................................1-23
VED toolbar .........................................................................................1-23
Custom toolbar .....................................................................................1-23
To place a toolbar on the QC-5000 desktop .........................................1-24
To remove a toolbar from the QC-5000 desktop ..................................1-25
To add buttons to a toolbar................................................................... 1-26
To remove buttons to a toolbar .............................................................1-28
Contents-1

Contents
Contents-2
QQ
QQ
Quick Suick S
uick Suick S
uick Startar
tartar
tartt
tt
t..............................................................................................................................................
..............................................................................................................................................
.......................................................................2-12-1
2-12-1
2-1
Getting Started ..............................................................................................2-1
General Preparation .......................................................................................2-1
To open the QC-5000 software ..............................................................2-1
To set machine zero ................................................................................2-2
To display the feature list ........................................................................2-2
To display the program template .............................................................2-3
To nest the template windows .................................................................2-4
Select the Active Probe ............................................................................2-5
To select the active probe ........................................................................2-5
Probing Technique ........................................................................................2-5
Good probing techniques........................................................................2-5
Bad probing techniques ..........................................................................2-5
Recording the Quick Start Program ..............................................................2-6
Clearance moves .....................................................................................2-6
To insert a clearance move ......................................................................2-7
Creating the Start Point .................................................................................2-8
To record the quick start program ...........................................................2-8
To move the probe to the start point .......................................................2-9
Recording the Part View Window ...............................................................2-10
To record the part view window display ................................................2-10
Creating the Datum ....................................................................................2-11
To create the primary plane ...................................................................2-11
Creating the Secondary Alignment ..............................................................2-14
To create a secondary alignment ............................................................2-14
Creating the Zero Point ...............................................................................2-17
To activate the VED probe group ......................................................... 2-17
To select a magnification .......................................................................2-18
To create an arc tool .............................................................................. 2-18
To re-size a VED probe tool ..................................................................2-21
To create a zero point ............................................................................ 2-22
Save the Reference Frame ............................................................................ 2-30
To save the reference frame ...................................................................2-30
To activate the contact probe group ...................................................... 2-31
Touch Probe Measurement ..........................................................................2-32
To measure a circle ................................................................................ 2-33
Measuring 3-D Features .............................................................................. 2-36
To change the part view perspective ......................................................2-36
To measure a cone................................................................................. 2-38
To measure a cylinder ...........................................................................2-41
To measure a plane ............................................................................... 2-50
2-D Measurement with VED ...................................................................... 2-53
To change the part view perspective ......................................................2-53
To activate the VED probe group ......................................................... 2-55
To create a circle probe tool................................................................... 2-56
To measure circle 3 ...............................................................................2-59
To measure circle 4 ...............................................................................2-61
To construct a bolt hole circle ............................................................... 2-64
To construct a nearest distance .............................................................. 2-66

Quadra-Chek® 5000
Contents-3
To construct a farthest distance .............................................................2-68
To construct a center-to-center distance ................................................2-70
Creating the Second Reference Frame..........................................................2-72
To change the part view ........................................................................2-72
To measure a circle ................................................................................2-74
To create the second reference frame .....................................................2-81
To save a reference frame.......................................................................2-83
To create a duplicate feature .................................................................. 2-84
To construct an angle ............................................................................2-86
To select the active probe ......................................................................2-87
To measure a line ..................................................................................2-88
To measure a line ..................................................................................2-90
To construct an angle ............................................................................2-92
To perform a bi-directional tolerance ....................................................2-93
To perform a true position tolerance .....................................................2-97
To perform a width tolerance ..............................................................2-100
To open the all tolerance template .......................................................2-102
To modify template properties ............................................................2-104
To enter a formula ..............................................................................2-107
Dynamic data exchange ......................................................................2-109
To DDE output to Excel ....................................................................2-109
To export a tab delimited file to a spreadsheet .....................................2-113
To export to a .csv file (comma separated value) .................................2-116
To export Access 2000 ........................................................................2-119
To complete the quick start program...................................................2-122
To run the quick start program ........................................................... 2-123
PP
PP
Prr
rr
robesobes
obesobes
obes ............................................................................................................................................................
............................................................................................................................................................
..............................................................................3-13-1
3-13-1
3-1
Video Edge Detection (VED) .......................................................................3-1
To create a new magnification .................................................................3-1
To delete a magnification ........................................................................3-3
To assign a zoom position for a magnification ........................................3-5
VED Calibrations .........................................................................................3-7
To perform an auto focus teach ...............................................................3-7
To perform an edge teach ......................................................................3-12
Pixel calibration ....................................................................................3-15
To perform a pixel calibration ...............................................................3-15
To perform a camera calibration ...........................................................3-20
Parcentricity calibration ........................................................................3-27
To perform a parcentricity calibration ...................................................3-27
VED Probes ................................................................................................3-34
New probe tool .....................................................................................3-34
To access the new probe tool .................................................................3-34
Hand cursors ........................................................................................3-36
To move a probe tool ............................................................................3-36
To re-size a probe tool ...........................................................................3-38
To rotate a probe tool............................................................................3-40
Simple probe .........................................................................................3-42
To create a simple probe........................................................................3-42
Circle probe ..........................................................................................3-44
To create a circle probe ..........................................................................3-44

Contents
Contents-4
Buffer probe .......................................................................................... 3-46
To create a buffer probe ........................................................................3-46
Average probe .......................................................................................3-48
Nearest probe ........................................................................................3-48
Farthest probe .......................................................................................3-49
Height probe ........................................................................................ 3-49
Width probe .........................................................................................3-50
Blob probe ............................................................................................ 3-50
Pattern probe ........................................................................................3-51
Worm probe .........................................................................................3-52
Video Probes ............................................................................................... 3-57
Crosshair probe..................................................................................... 3-57
Video charts probe ................................................................................ 3-57
Edge Teaching ............................................................................................. 3-58
To perform a simple edge teach .............................................................3-59
To perform an advanced edge teach ...................................................... 3-61
Probe Library...............................................................................................3-64
Probe Families & Groups ............................................................................3-64
TouchProbe group ................................................................................3-65
StarProbe group ....................................................................................3-65
To create a new probe group .................................................................3-66
Probe Calibration ........................................................................................3-68
Master probe tips .................................................................................. 3-69
To teach (qualify) a master probe tip.....................................................3-69
To teach (qualify) a non-master probe tip .............................................3-72
Cross Calibration of Touch Probe and Camera ............................................3-75
To cross calibrate a touch probe to a VED camera ................................3-75
Using a Probe Rack ...............................................................................3-82
Probe Rack Setup ........................................................................................3-82
Probe rack orientation ...........................................................................3-83
+X Orientation .....................................................................................3-83
+Y Orientation .....................................................................................3-84
-X Orientation ...................................................................................... 3-85
-Y Orientation .....................................................................................3-86
Probe Rack Calibration ...............................................................................3-87
Initial clearance: ....................................................................................3-87
Docking distance: .................................................................................3-87
Retract distance:....................................................................................3-87
Dropping in Z: .....................................................................................3-87
Pickup in Z:.......................................................................................... 3-87
Release in Z: .........................................................................................3-87
Approach in Z: .....................................................................................3-87
Port position offset: ............................................................................... 3-88
DATRACK part program .....................................................................3-89
To check probe rack orientation ............................................................3-89
To run the DATRACK program ........................................................... 3-90
To edit the initial settings of the DATRACK program.......................... 3-91
To enter the datum in the DATRACK program ................................... 3-93
To load a probe ..................................................................................... 3-97
To unload a probe .................................................................................3-99

Quadra-Chek® 5000
Contents-5
PP
PP
Prr
rr
rogrammingogramming
ogrammingogramming
ogramming........................................................................................................................................
........................................................................................................................................
....................................................................4-14-1
4-14-1
4-1
Programming Overview ................................................................................4-1
The Program Toolbar ....................................................................................4-2
Record/Edit Program ..............................................................................4-2
Pause Program ........................................................................................4-2
New Run ................................................................................................4-2
Run Program From Current Step ............................................................4-2
Run Just Current Step.............................................................................4-2
Recording a Program .....................................................................................4-3
To create a program ................................................................................4-3
To open a saved program ........................................................................4-5
Running A Program ......................................................................................4-6
To run a program ....................................................................................4-6
Sample Program ............................................................................................4-7
To create a new part file ..........................................................................4-7
To record a program................................................................................4-8
To display the feature list ........................................................................4-9
To display the program template ...........................................................4-10
To record the part view window display ................................................4-11
To insert a clearance move ....................................................................4-12
To measure the primary plane ...............................................................4-13
To measure the secondary line...............................................................4-16
To switch the active probe to VED .......................................................4-19
To create an arc tool ..............................................................................4-20
To measure the zero feature ...................................................................4-23
To create a zero point ............................................................................4-30
To save the reference frame ...................................................................4-31
To measure a circle ................................................................................4-32
To construct a distance..........................................................................4-35
To save a program .................................................................................4-37
To run a program ..................................................................................4-38
Program Properties ......................................................................................4-39
Fixturing tab .........................................................................................4-40
General tab ...........................................................................................4-41
Initial Settings .............................................................................................4-42
Display part view map ..........................................................................4-42
Hide position indicator .........................................................................4-42
Light control .........................................................................................4-42
Probe path data .....................................................................................4-42
Editing Programs.........................................................................................4-44
To edit a wait for point(s) step ..............................................................4-44
To edit a light control statement ...........................................................4-46
To change coordinate of a clearance move or goto position step ............4-48
Creating User Messages ............................................................................... 4-50
To Insert A User Message ......................................................................4-50
Programming Wizards .................................................................................4-51
Grids ..................................................................................................... 4-51
To create a grid .....................................................................................4-51
Polar grids .............................................................................................4-55
To create a polar grid ............................................................................4-55
Palletize .................................................................................................4-60

Contents
Contents-6
To palletize multiple parts .....................................................................4-60
Random Placement ............................................................................... 4-63
To insert reference steps in a part program ............................................ 4-63
To create a random placement...............................................................4-65
To run a parts program with a random placement ................................4-66
To copy and paste special ......................................................................4-67
Expanding the Program Toolbar .................................................................. 4-72
Program Toolbar ..........................................................................................4-74
Toggle Break Point ................................................................................4-74
Program Comment ...............................................................................4-74
Edit Steps ..............................................................................................4-74
If-Goto .................................................................................................4-74
If-Then .................................................................................................4-74
Else .......................................................................................................4-75
Else-If ...................................................................................................4-75
Super Step .............................................................................................4-75
Goto Label ............................................................................................4-75
Offset Positions ..................................................................................... 4-75
To add buttons to a toolbar.................................................................. 4-76
To delete buttons from a toolbar ........................................................... 4-78
Conditional Statements ...............................................................................4-80
Test Conditions ....................................................................................4-80
Actions..................................................................................................4-80
Arithmetic Operators ............................................................................ 4-81
If-Goto Statement .................................................................................4-82
If-Then Statement ................................................................................ 4-83
Else Statement.......................................................................................4-84
Else-If Statement ................................................................................... 4-85
TT
TT
Tolerancing & olerancing &
olerancing & olerancing &
olerancing & TT
TT
Templatesemplates
emplatesemplates
emplates ......................................................................................................
......................................................................................................
...................................................5-15-1
5-15-1
5-1
Tolerancing ....................................................................................................5-1
Tolerance Toolbar ....................................................................................5-1
To view the tolerance toolbar ..................................................................5-1
Bi-directional tolerance (circles, points, arcs, spheres) .............................5-3
To perform a bi-directional tolerance ......................................................5-3
Pass/ Fail Displays ...................................................................................5-5
True position tolerance (circles, points arcs, spheres) ...............................5-5
To perform a true position tolerance .......................................................5-5
To perform a MMC tolerance .................................................................5-8
To perform a LMC ...............................................................................5-11
Concentricity tolerance (circles, arcs) ....................................................5-14
To perform a concentricity tolerance .....................................................5-14
Straightness tolerance (lines) .................................................................5-16
To perform a straightness tolerance (lines) ............................................5-16
Circularity/sphericity tolerance (circles, spheres) ...................................5-18
To perform a circularity tolerance .........................................................5-18
To perform a sphericity tolerance ..........................................................5-20
Cylindricity tolerance (cylinders)...........................................................5-22
To perform a cylindricity tolerance ........................................................5-22
Flatness tolerance (planes) .....................................................................5-24
To perform a flatness tolerance ..............................................................5-24

Quadra-Chek® 5000
Contents-7
Perpendicularity tolerance (lines, cylinders, cones) ................................5-26
To perform a perpendicularity tolerance ................................................5-26
Parallelism/Co-planarity tolerance (linear features)................................5-28
To perform a parallelism tolerance ........................................................5-28
To perform a co-planarity tolerance.......................................................5-30
Circular runout tolerance ......................................................................5-32
To perform a circular runout tolerance ..................................................5-32
Angle tolerance .....................................................................................5-34
To perform an angle tolerance ...............................................................5-34
Width tolerance ....................................................................................5-36
To perform a width tolerance ................................................................5-36
Templates ....................................................................................................5-38
Features Template ........................................................................................5-39
To open the features template ...............................................................5-39
Adding Data to Templates ...........................................................................5-41
To drag & drop a results window field to the features list......................5-41
To drag & drop multiple results window fields to the features list .........5-42
Sorting the Features List .......................................................................5-43
To sort data in the features list ..............................................................5-43
Reports Template .........................................................................................5-44
To open the reports template.................................................................5-44
Adding Data to the Reports Template ...................................................5-46
To drag & drop a results window field to the reports template ..............5-46
To drag and drop multiple results window fields to the
reports template ..........................................................................5-47
Sorting Data in the Reports Template ...................................................5-48
To sort data in the reports template.......................................................5-48
Report Headers ............................................................................................5-49
To show a report header ........................................................................5-49
Customizing Report Headers ................................................................5-51
To place a graphic in a report header ...................................................5-51
To arrange text and graphics in a report header .....................................5-52
Automated Text Input & Prompting ...........................................................5-53
Overlays ......................................................................................................5-54
To save a report header as an overlay .....................................................5-54
To place an overlay in a report header ...................................................5-55
Program Template .................................................................................5-56
To open the program template ..............................................................5-56
Template Properties............................................................................... 5-58
To access the template features dialog box .............................................5-58
Template Features Dialog Box ..............................................................5-59
Display tab ...........................................................................................5-59
Filters tab ....................................................................................................5-64
To create a filter ....................................................................................5-64
To modify a filter ..................................................................................5-70
To remove a filter ..................................................................................5-72
Misc tab (miscellaneous) .......................................................................5-73
Column Properties ......................................................................................5-74
Standard column properties ..................................................................5-74
Appearance tab .....................................................................................5-74
Formulas tab .........................................................................................5-74

Contents
Contents-8
Sample Formula .......................................................................................... 5-77
To create the sample formula ................................................................5-77
To modify a formula .............................................................................5-82
To remove a formula .............................................................................5-84
Runs Template............................................................................................. 5-85
To open the runs template ....................................................................5-85
To add data to the runs template ..........................................................5-86
Nesting Template Windows ......................................................................... 5-87
To nest template windows .....................................................................5-87
To separate template windows ............................................................... 5-88
Creating New Templates..............................................................................5-89
To create a new template .......................................................................5-89
UU
UU
User Sser S
ser Sser S
ser Setup Scretup Scr
etup Scretup Scr
etup Screenseens
eenseens
eens ....................................................................................................................
....................................................................................................................
.......................................................... 6-16-1
6-16-1
6-1
Encoder setup program..................................................................................6-2
Configuring analog and TTL encoders ...................................................6-2
Calibrating analog encoders ....................................................................6-3
Setup Tools/Customize screens .....................................................................6-6
Colors screen...........................................................................................6-6
Changing item colors .......................................................................6-6
Color list items .................................................................................6-7
Dark edge and light edge tools .........................................................6-8
DRO axis, digits and window ..........................................................6-8
Feature stamp background, filtered and selected point......................6-9
QC5000 window .............................................................................6-9
Results text and window ................................................................... 6-9
Part view parents, probe indicator, selection border, window .......... 6-10
Pattern finder failure and success .................................................... 6-10
Point stake marks ........................................................................... 6-11
Temporary stake marks ...................................................................6-11
Profile background .........................................................................6-11
Probe selector background, current probe,
new qualification, old qualification and text ............................6-12
Whiskers (used to display profile form errors) ................................6-12
Help screen ...........................................................................................6-12
Misc screen ........................................................................................... 6-14
Errors screen .........................................................................................6-15
System error messages.....................................................................6-15
Statusbar screen.....................................................................................6-17
Toolbars screen...................................................................................... 6-18
Displaying toolbar buttons .............................................................6-18
Adding buttons to a toolbar ...........................................................6-19
Removing buttons from a toolbar ...................................................6-19
Enable/Disable raised edges for toolbar buttons ............................. 6-20
Allows/Prohibit toolbar docking ..................................................... 6-20
Mapping parts to a toolbar .............................................................6-20
Mapping workspaces to toolbar ......................................................6-21
Creating custom toolbars................................................................6-22

Quadra-Chek® 5000
Contents-9
Setup Tools/Options screens .......................................................................6-23
VEDscreen ............................................................................................6-23
Automatic probe alignment and the high accuracy mode ...............6-23
Specifying the advanced teach mode ...............................................6-24
Scaling video charts to magnification .............................................6-25
Specifying pattern search rings........................................................6-26
Specifying search ring overlap .........................................................6-27
Calibrating the display of magnification value................................ 6-28
Allow crosshair probes to rotate ...................................................... 6-30
Allowing video charts to rotate .......................................................6-30
Moving video charts with a mouse .................................................6-31
Moving video charts with the part ..................................................6-31
Specifying video camera image type................................................6-31
Specifying video probe animation rate ............................................6-32
Specifying maximum field of view for worm tool (probe) ...............6-32
Specifying pattern file names ..........................................................6-33
FOV spherical and NLEC corrections ............................................ 6-34
Specifying a larger video window ....................................................6-34
Probes screen .........................................................................................6-36
Specifying probe qualification sphere diameter ............................... 6-36
Debouncing the touch probe..........................................................6-36
Preventing multiple probe hits........................................................6-37
Specifying probe re-qualification across sessions .............................6-37
Adding requalification to the features list .......................................6-37
Specifying maximum form error for qualification ...........................6-37
Specifying indexable probe type ......................................................6-37
Specifying interchangeable probes ..................................................6-38
Specifying the probe requalification interval ...................................6-38
Specifying user prompts for probe position change .........................6-38
Programming screen .............................................................................6-39
Starting program recording automatically .......................................6-39
Including light adjustments in programs ........................................6-40
Including probe qualifications in programs ....................................6-40
Specifying vector probing ...............................................................6-40
Enabling sounds during program execution ...................................6-43
Specifying the minimum percentage of VED points .......................6-43
Specifying CNC movement warnings .............................................6-43
Delaying VED tool firing after CNC moves ..................................6-43
Showing program complete messages .............................................6-44
Showing VED tools in the video window in max speed mode ........ 6-44
Enabling collision avoidance for touch probes ................................6-44
Halting execution for failure to select features ................................6-44
Runs screen ........................................................................................... 6-45
Sounds screen........................................................................................6-46
Locks screen ..........................................................................................6-47
Locking Windows ..........................................................................6-47
Locking programs...........................................................................6-47
Locking templates ..........................................................................6-47
Locking results ...............................................................................6-48
Locking the status bar ....................................................................6-48
Locking the DRO ..........................................................................6-48

Contents
Contents-10
Locking the run mode ....................................................................6-48
Locking part ...................................................................................6-48
Locking supervisor settings .............................................................6-48
Locking user settings ......................................................................6-48
Locking the video window..............................................................6-48
Measure screen ...................................................................................... 6-49
Specifying feature display defaults ..................................................6-49
Specifying distance type..................................................................6-50
Starting Measure Magic automatically ............................................6-50
Pre-selecting features for construction .............................................6-51
Displaying distances as absolute values ...........................................6-51
Enabling magnetic planes ............................................................... 6-51
Automatically complete point measurements ..................................6-51
Specifying the maximum number of measurement points ..............6-52
Part view screen..................................................................................... 6-53
Specifying part view tiles ................................................................6-54
Specifying probe position indicator type .........................................6-54
Specifying point size .......................................................................6-54
Specifying feature selection zones size .............................................6-55
Specifying automatic redraw of part view .......................................6-55
Zooming to view whole part on measurements .............................. 6-55
Zooming to view whole part on constructions ................................ 6-56
Displaying feature numbers and names on part views ....................6-56
Displaying only features .................................................................6-56
Displaying features with numbers ..................................................6-57
Displaying features with numbers and names ................................. 6-58
Highlighting parents of constructed features .................................. 6-60
Saving layers with settings files .......................................................6-61
Displaying grid lines in planes ........................................................ 6-61
Displaying 3-D features as wireframes ............................................6-62
Buttons screen.......................................................................................6-63
Level-based button functions .......................................................... 6-64
Button functions that are invoked only once ..................................6-64
Feature measure functions ..............................................................6-65
View from probe ............................................................................6-65
Axis lock......................................................................................... 6-65
Speed toggle ................................................................................... 6-66
Motors off ......................................................................................6-66
Swap Z joystick ..............................................................................6-66
Swap Z digital positioner ................................................................ 6-66
Swap Q joystick..............................................................................6-66
Go to here ......................................................................................6-66
Pause program ................................................................................6-66
Run program .................................................................................. 6-66
Display screen .......................................................................................6-67
Specifying display resolution...........................................................6-67
Formatting the display of time, date and angles..............................6-67
Displaying the distance to target surfaces for CNC moves .............6-68
Encoder screen ......................................................................................6-69
Specifying encoder resolution .........................................................6-69
Specifying encoder unit of measure ................................................ 6-69
Specifying encoder count direction .................................................6-69

Quadra-Chek® 5000
Contents-11
Specifying encoder reference marks .................................................6-70
Reference offsets .............................................................................6-70
Files screen ............................................................................................6-71
Specifying file locations .................................................................. 6-71
File types ........................................................................................6-72
Backups ..........................................................................................6-72
Exports ...........................................................................................6-72
Imports ..........................................................................................6-72
Overlays .........................................................................................6-72
Parts ...............................................................................................6-72
Templates .......................................................................................6-72
Patterns ..........................................................................................6-72
Saving part files automatically ........................................................6-73
Showing full file names ..................................................................6-73
Performing automatic backups .......................................................6-73
General screen .......................................................................................6-74
User access to settings .....................................................................6-74
Sending coefficient data to the serial port .......................................6-75
Setting machine zero ......................................................................6-75
Moving the datum on alignments ..................................................6-76
Starting Datum Magic automatically .............................................6-77
Displaying results in wide format ...................................................6-77
Opening the last part automatically................................................6-77
Tracking user activity......................................................................6-77
Setup Tools/CNC screens ...........................................................................6-79
Joystick screen .......................................................................................6-79
Enabling/Disabling joystick motion control ...................................6-79
Viewing current position values......................................................6-79
Sharing axes ...................................................................................6-80
Specifying a deadband ....................................................................6-81
Calibrating the joystick ..................................................................6-81
Viewing calibration values ..............................................................6-81
Specifying axis motion direction .....................................................6-81
Specifying normal and fine velocities ..............................................6-82
Specifying the axis motion profile ...................................................6-82
Axis velocity ...................................................................................6-83
Joystick displacement......................................................................6-83
Motion mouse screen ............................................................................6-83
Specifying X and Y axis movement sensitivity ................................ 6-83
Specifying X and Y axis movement direction ..................................6-84
Specifying Z-axis movement sensitivity ..........................................6-84
Specifying Z-axis movement direction ............................................ 6-85
Enabling/disabling the motion mouse ............................................6-85
Probe Rack Settings screen ....................................................................6-86
Probe rack installation ....................................................................6-87
Probe Rack Calibration .................................................................. 6-88
Defining the probe rack type ..........................................................6-88
Probe rack parameters.....................................................................6-88
Initial clearance ..............................................................................6-88
Docking distance ............................................................................6-88
Retract distance ..............................................................................6-88

Contents
Contents-12
Dropping in Z................................................................................6-89
Pickup in Z ....................................................................................6-89
Release in Z ....................................................................................6-89
Approach in Z ................................................................................6-89
Entering port position offset ...........................................................6-89
Checking the probe rack orientation ..............................................6-89
Running the DATRACK part program .......................................... 6-90
Entering the datum in the DATRACK program ............................6-92
AA
AA
Appendix A Pppendix A P
ppendix A Pppendix A P
ppendix A Prr
rr
rofile measurofile measur
ofile measurofile measur
ofile measurementement
ementement
ement ....................................................................
....................................................................
.................................. A-1A-1
A-1A-1
A-1
Operator screens and menus ......................................................................... A-2
The Measure Profile window ........................................................................ A-2
Measure profile menu and toolbar ................................................................ A-3
Conducting manual profile measurements ................................................... A-4
Displaying the Measure toolbar ............................................................. A-5
Initiating a profile measurement ............................................................ A-5
Importing a nominal part profile ........................................................... A-5
Importing for drawing file ............................................................... A-6
Importing from the Features template ............................................. A-7
Measure Profile window functions ................................................................ A-8
Allowing (or prohibiting) data shifts during profile fit analyses .............. A-8
Assigning measurement tolerances ......................................................... A-8
Equal bilateral tolerances ................................................................. A-9
Unequal tolerances .......................................................................... A-9
Entering part data from the Measure Profile window ........................... A-10
Importing part data from the Features template ................................... A-10
Removing the last data point entered ................................................... A-10
Initiating a fit analysis.......................................................................... A-11
Canceling a profile measurement ......................................................... A-11
Resetting the fit results and restoring data points ................................. A-11
Selecting data in the Measure Profile window ...................................... A-11
Displaying the form error of a single data point or whisker .................. A-12
Accessing the Measure Profile menu .................................................... A-12
Completing the profile measurement ................................................... A-13
Measure profile menuand toolbar functions ............................................... A-14
Printing the contents of the Measure Profile window ........................... A-15
Zooming to display all images in the Measure Profile window ............. A-15
Zooming in and out to display more or less detail................................ A-15
Panning to reposition the image in the Measure Profile window .......... A-16
Showing or hiding profile fit information ............................................ A-17
Results ........................................................................................... A-17
Filtered .......................................................................................... A-18
Tolerance ....................................................................................... A-18
Material......................................................................................... A-19
Points ............................................................................................ A-20
Passed ............................................................................................ A-21
Failed ............................................................................................ A-21
Magnifying the display of form error whiskers ..................................... A-22
Fixed magnification ....................................................................... A-22
Automatic magnification ............................................................... A-22
User-defined magnification ........................................................... A-23

Quadra-Chek® 5000
Contents-13
Driving the CNC stage to a selected point location ............................. A-23
Sending (exploding) the profile fit data as points and distances to the
Features template ................................................................................. A-24
Filtering selected points from the part data .......................................... A-25
Filtering the worst (form error) point from the part data ..................... A-25
Unfiltering (restoring) filtered data points ............................................ A-25
Manually fitting part data to the nominal profile ................................. A-26
Clicking and dragging (translating) data points............................. A-26
Clicking and rotating data points .................................................. A-26

Contents
Contents-14

1-1
Chapter 1
Overview
Welcome to the QC-5000
The Quadra-Chek 5000 is an advanced software application for multi-
sensor measurement systems. It features a graphical user interface for
simple point and click operation. Point the cursor to a feature on the
measure toolbar and click.
The QC-5000 measures part features using the simplest geometric com-
ponents: points. Lines can be created from two points, circles from three
points, and cones from six points. Simply probe the points and the QC-
5000 measures the feature.
Once the required number of points are entered the QC-5000 displays
the feature in the part view window.
The QC-5000 continues building the part in the part view window as
features are added.

Chapter 1 Overview
1-2
It is easy to use the QC-5000 because each measurement requires only a
few points. All geometry and mathematics are handled by the software.
Once the basic measuring principles are understood the QC-5000 can be
programmed to handle repetitive measuring tasks. Finally, inspection
and quality reports can be produced to document your results.
Page is loading ...
Page is loading ...
Page is loading ...
Page is loading ...
Page is loading ...
Page is loading ...
Page is loading ...
Page is loading ...
Page is loading ...
Page is loading ...
Page is loading ...
Page is loading ...
Page is loading ...
Page is loading ...
Page is loading ...
Page is loading ...
Page is loading ...
Page is loading ...
Page is loading ...
Page is loading ...
Page is loading ...
Page is loading ...
Page is loading ...
Page is loading ...
Page is loading ...
Page is loading ...
Page is loading ...
Page is loading ...
Page is loading ...
Page is loading ...
Page is loading ...
Page is loading ...
Page is loading ...
Page is loading ...
Page is loading ...
Page is loading ...
Page is loading ...
Page is loading ...
Page is loading ...
Page is loading ...
Page is loading ...
Page is loading ...
Page is loading ...
Page is loading ...
Page is loading ...
Page is loading ...
Page is loading ...
Page is loading ...
Page is loading ...
Page is loading ...
Page is loading ...
Page is loading ...
Page is loading ...
Page is loading ...
Page is loading ...
Page is loading ...
Page is loading ...
Page is loading ...
Page is loading ...
Page is loading ...
Page is loading ...
Page is loading ...
Page is loading ...
Page is loading ...
Page is loading ...
Page is loading ...
Page is loading ...
Page is loading ...
Page is loading ...
Page is loading ...
Page is loading ...
Page is loading ...
Page is loading ...
Page is loading ...
Page is loading ...
Page is loading ...
Page is loading ...
Page is loading ...
Page is loading ...
Page is loading ...
Page is loading ...
Page is loading ...
Page is loading ...
Page is loading ...
Page is loading ...
Page is loading ...
Page is loading ...
Page is loading ...
Page is loading ...
Page is loading ...
Page is loading ...
Page is loading ...
Page is loading ...
Page is loading ...
Page is loading ...
Page is loading ...
Page is loading ...
Page is loading ...
Page is loading ...
Page is loading ...
Page is loading ...
Page is loading ...
Page is loading ...
Page is loading ...
Page is loading ...
Page is loading ...
Page is loading ...
Page is loading ...
Page is loading ...
Page is loading ...
Page is loading ...
Page is loading ...
Page is loading ...
Page is loading ...
Page is loading ...
Page is loading ...
Page is loading ...
Page is loading ...
Page is loading ...
Page is loading ...
Page is loading ...
Page is loading ...
Page is loading ...
Page is loading ...
Page is loading ...
Page is loading ...
Page is loading ...
Page is loading ...
Page is loading ...
Page is loading ...
Page is loading ...
Page is loading ...
Page is loading ...
Page is loading ...
Page is loading ...
Page is loading ...
Page is loading ...
Page is loading ...
Page is loading ...
Page is loading ...
Page is loading ...
Page is loading ...
Page is loading ...
Page is loading ...
Page is loading ...
Page is loading ...
Page is loading ...
Page is loading ...
Page is loading ...
Page is loading ...
Page is loading ...
Page is loading ...
Page is loading ...
Page is loading ...
Page is loading ...
Page is loading ...
Page is loading ...
Page is loading ...
Page is loading ...
Page is loading ...
Page is loading ...
Page is loading ...
Page is loading ...
Page is loading ...
Page is loading ...
Page is loading ...
Page is loading ...
Page is loading ...
Page is loading ...
Page is loading ...
Page is loading ...
Page is loading ...
Page is loading ...
Page is loading ...
Page is loading ...
Page is loading ...
Page is loading ...
Page is loading ...
Page is loading ...
Page is loading ...
Page is loading ...
Page is loading ...
Page is loading ...
Page is loading ...
Page is loading ...
Page is loading ...
Page is loading ...
Page is loading ...
Page is loading ...
Page is loading ...
Page is loading ...
Page is loading ...
Page is loading ...
Page is loading ...
Page is loading ...
Page is loading ...
Page is loading ...
Page is loading ...
Page is loading ...
Page is loading ...
Page is loading ...
Page is loading ...
Page is loading ...
Page is loading ...
Page is loading ...
Page is loading ...
Page is loading ...
Page is loading ...
Page is loading ...
Page is loading ...
Page is loading ...
Page is loading ...
Page is loading ...
Page is loading ...
Page is loading ...
Page is loading ...
Page is loading ...
Page is loading ...
Page is loading ...
Page is loading ...
Page is loading ...
Page is loading ...
Page is loading ...
Page is loading ...
Page is loading ...
Page is loading ...
Page is loading ...
Page is loading ...
Page is loading ...
Page is loading ...
Page is loading ...
Page is loading ...
Page is loading ...
Page is loading ...
Page is loading ...
Page is loading ...
Page is loading ...
Page is loading ...
Page is loading ...
Page is loading ...
Page is loading ...
Page is loading ...
Page is loading ...
Page is loading ...
Page is loading ...
Page is loading ...
Page is loading ...
Page is loading ...
Page is loading ...
Page is loading ...
Page is loading ...
Page is loading ...
Page is loading ...
Page is loading ...
Page is loading ...
Page is loading ...
Page is loading ...
Page is loading ...
Page is loading ...
Page is loading ...
Page is loading ...
Page is loading ...
Page is loading ...
Page is loading ...
Page is loading ...
Page is loading ...
Page is loading ...
Page is loading ...
Page is loading ...
Page is loading ...
Page is loading ...
Page is loading ...
Page is loading ...
Page is loading ...
Page is loading ...
Page is loading ...
Page is loading ...
Page is loading ...
Page is loading ...
Page is loading ...
Page is loading ...
Page is loading ...
Page is loading ...
Page is loading ...
Page is loading ...
Page is loading ...
Page is loading ...
Page is loading ...
Page is loading ...
Page is loading ...
Page is loading ...
Page is loading ...
Page is loading ...
Page is loading ...
Page is loading ...
Page is loading ...
Page is loading ...
Page is loading ...
Page is loading ...
Page is loading ...
Page is loading ...
Page is loading ...
Page is loading ...
Page is loading ...
Page is loading ...
Page is loading ...
Page is loading ...
Page is loading ...
Page is loading ...
Page is loading ...
Page is loading ...
Page is loading ...
Page is loading ...
Page is loading ...
Page is loading ...
Page is loading ...
Page is loading ...
Page is loading ...
Page is loading ...
Page is loading ...
Page is loading ...
Page is loading ...
Page is loading ...
Page is loading ...
Page is loading ...
Page is loading ...
Page is loading ...
Page is loading ...
Page is loading ...
Page is loading ...
Page is loading ...
Page is loading ...
Page is loading ...
Page is loading ...
Page is loading ...
Page is loading ...
Page is loading ...
Page is loading ...
Page is loading ...
Page is loading ...
Page is loading ...
Page is loading ...
Page is loading ...
Page is loading ...
Page is loading ...
Page is loading ...
Page is loading ...
Page is loading ...
Page is loading ...
Page is loading ...
Page is loading ...
Page is loading ...
Page is loading ...
Page is loading ...
Page is loading ...
Page is loading ...
Page is loading ...
Page is loading ...
Page is loading ...
Page is loading ...
Page is loading ...
Page is loading ...
Page is loading ...
Page is loading ...
Page is loading ...
Page is loading ...
Page is loading ...
Page is loading ...
Page is loading ...
Page is loading ...
Page is loading ...
Page is loading ...
Page is loading ...
Page is loading ...
Page is loading ...
Page is loading ...
Page is loading ...
Page is loading ...
Page is loading ...
Page is loading ...
Page is loading ...
Page is loading ...
Page is loading ...
Page is loading ...
Page is loading ...
Page is loading ...
Page is loading ...
Page is loading ...
Page is loading ...
Page is loading ...
Page is loading ...
Page is loading ...
Page is loading ...
Page is loading ...
Page is loading ...
Page is loading ...
Page is loading ...
Page is loading ...
Page is loading ...
Page is loading ...
Page is loading ...
Page is loading ...
Page is loading ...
Page is loading ...
Page is loading ...
Page is loading ...
Page is loading ...
Page is loading ...
Page is loading ...
Page is loading ...
Page is loading ...
Page is loading ...
Page is loading ...
Page is loading ...
Page is loading ...
Page is loading ...
Page is loading ...
Page is loading ...
Page is loading ...
Page is loading ...
Page is loading ...
Page is loading ...
Page is loading ...
Page is loading ...
Page is loading ...
Page is loading ...
Page is loading ...
Page is loading ...
Page is loading ...
Page is loading ...
Page is loading ...
Page is loading ...
Page is loading ...
Page is loading ...
Page is loading ...
Page is loading ...
Page is loading ...
Page is loading ...
Page is loading ...
Page is loading ...
Page is loading ...
Page is loading ...
Page is loading ...
Page is loading ...
Page is loading ...
Page is loading ...
Page is loading ...
Page is loading ...
Page is loading ...
Page is loading ...
Page is loading ...
Page is loading ...
Page is loading ...
Page is loading ...
Page is loading ...
Page is loading ...
Page is loading ...
Page is loading ...
Page is loading ...
Page is loading ...
Page is loading ...
Page is loading ...
Page is loading ...
Page is loading ...
Page is loading ...
Page is loading ...
Page is loading ...
Page is loading ...
Page is loading ...
Page is loading ...
Page is loading ...
Page is loading ...
Page is loading ...
Page is loading ...
Page is loading ...
Page is loading ...
Page is loading ...
Page is loading ...
Page is loading ...
Page is loading ...
Page is loading ...
Page is loading ...
Page is loading ...
Page is loading ...
Page is loading ...
Page is loading ...
Page is loading ...
Page is loading ...
Page is loading ...
Page is loading ...
Page is loading ...
Page is loading ...
Page is loading ...
Page is loading ...
Page is loading ...
Page is loading ...
Page is loading ...
Page is loading ...
Page is loading ...
Page is loading ...
Page is loading ...
Page is loading ...
Page is loading ...
Page is loading ...
Page is loading ...
Page is loading ...
Page is loading ...
Page is loading ...
Page is loading ...
Page is loading ...
Page is loading ...
Page is loading ...
Page is loading ...
Page is loading ...
Page is loading ...
Page is loading ...
Page is loading ...
Page is loading ...
Page is loading ...
Page is loading ...
Page is loading ...
Page is loading ...
Page is loading ...
Page is loading ...
Page is loading ...
Page is loading ...
Page is loading ...
Page is loading ...
Page is loading ...
Page is loading ...
Page is loading ...
Page is loading ...
Page is loading ...
Page is loading ...
Page is loading ...
Page is loading ...
Page is loading ...
Page is loading ...
Page is loading ...
Page is loading ...
Page is loading ...
Page is loading ...
Page is loading ...
Page is loading ...
Page is loading ...
Page is loading ...
Page is loading ...
Page is loading ...
Page is loading ...
Page is loading ...
Page is loading ...
Page is loading ...
Page is loading ...
Page is loading ...
Page is loading ...
Page is loading ...
Page is loading ...
Page is loading ...
Page is loading ...
-
 1
1
-
 2
2
-
 3
3
-
 4
4
-
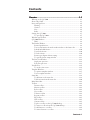 5
5
-
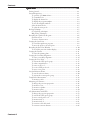 6
6
-
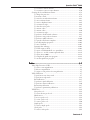 7
7
-
 8
8
-
 9
9
-
 10
10
-
 11
11
-
 12
12
-
 13
13
-
 14
14
-
 15
15
-
 16
16
-
 17
17
-
 18
18
-
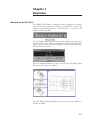 19
19
-
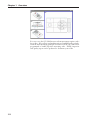 20
20
-
 21
21
-
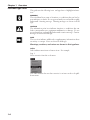 22
22
-
 23
23
-
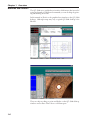 24
24
-
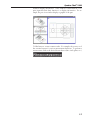 25
25
-
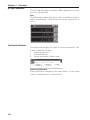 26
26
-
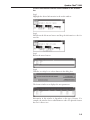 27
27
-
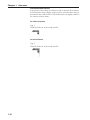 28
28
-
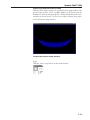 29
29
-
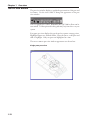 30
30
-
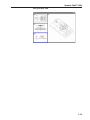 31
31
-
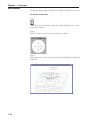 32
32
-
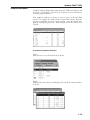 33
33
-
 34
34
-
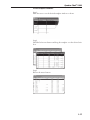 35
35
-
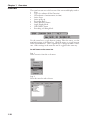 36
36
-
 37
37
-
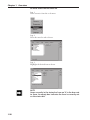 38
38
-
 39
39
-
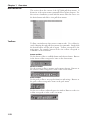 40
40
-
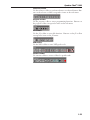 41
41
-
 42
42
-
 43
43
-
 44
44
-
 45
45
-
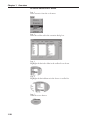 46
46
-
 47
47
-
 48
48
-
 49
49
-
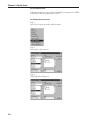 50
50
-
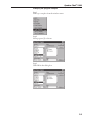 51
51
-
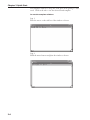 52
52
-
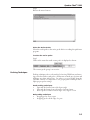 53
53
-
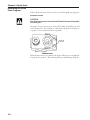 54
54
-
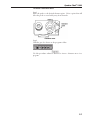 55
55
-
 56
56
-
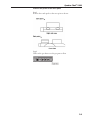 57
57
-
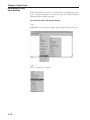 58
58
-
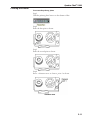 59
59
-
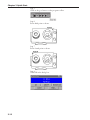 60
60
-
 61
61
-
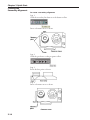 62
62
-
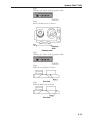 63
63
-
 64
64
-
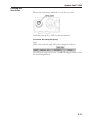 65
65
-
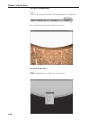 66
66
-
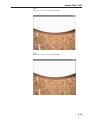 67
67
-
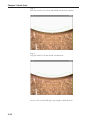 68
68
-
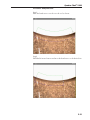 69
69
-
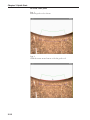 70
70
-
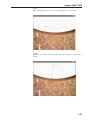 71
71
-
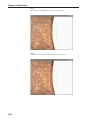 72
72
-
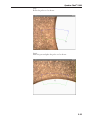 73
73
-
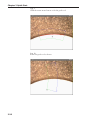 74
74
-
 75
75
-
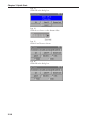 76
76
-
 77
77
-
 78
78
-
 79
79
-
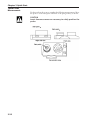 80
80
-
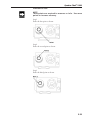 81
81
-
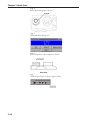 82
82
-
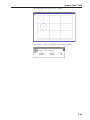 83
83
-
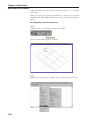 84
84
-
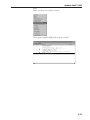 85
85
-
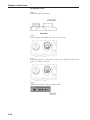 86
86
-
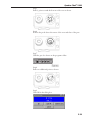 87
87
-
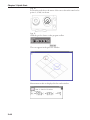 88
88
-
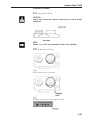 89
89
-
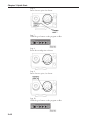 90
90
-
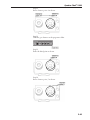 91
91
-
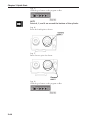 92
92
-
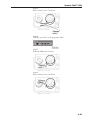 93
93
-
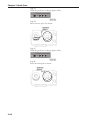 94
94
-
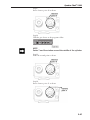 95
95
-
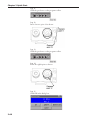 96
96
-
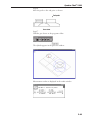 97
97
-
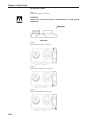 98
98
-
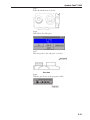 99
99
-
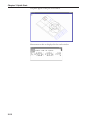 100
100
-
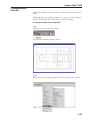 101
101
-
 102
102
-
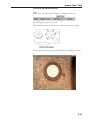 103
103
-
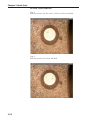 104
104
-
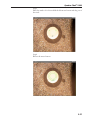 105
105
-
 106
106
-
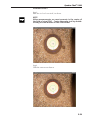 107
107
-
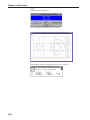 108
108
-
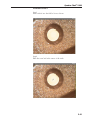 109
109
-
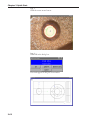 110
110
-
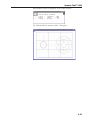 111
111
-
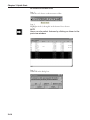 112
112
-
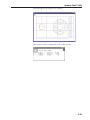 113
113
-
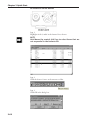 114
114
-
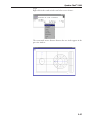 115
115
-
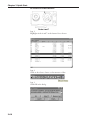 116
116
-
 117
117
-
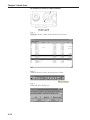 118
118
-
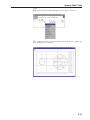 119
119
-
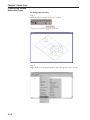 120
120
-
 121
121
-
 122
122
-
 123
123
-
 124
124
-
 125
125
-
 126
126
-
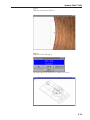 127
127
-
 128
128
-
 129
129
-
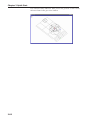 130
130
-
 131
131
-
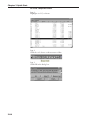 132
132
-
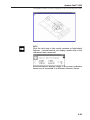 133
133
-
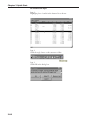 134
134
-
 135
135
-
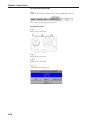 136
136
-
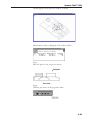 137
137
-
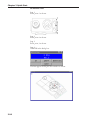 138
138
-
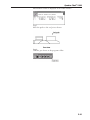 139
139
-
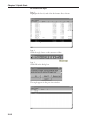 140
140
-
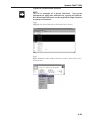 141
141
-
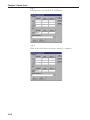 142
142
-
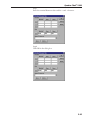 143
143
-
 144
144
-
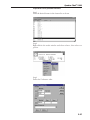 145
145
-
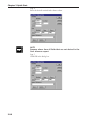 146
146
-
 147
147
-
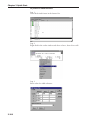 148
148
-
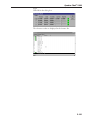 149
149
-
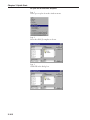 150
150
-
 151
151
-
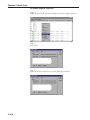 152
152
-
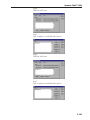 153
153
-
 154
154
-
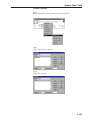 155
155
-
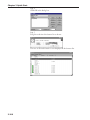 156
156
-
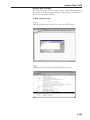 157
157
-
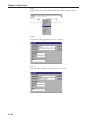 158
158
-
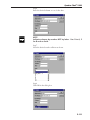 159
159
-
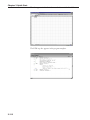 160
160
-
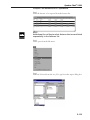 161
161
-
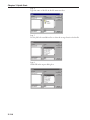 162
162
-
 163
163
-
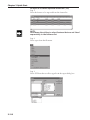 164
164
-
 165
165
-
 166
166
-
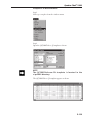 167
167
-
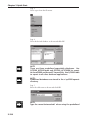 168
168
-
 169
169
-
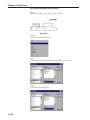 170
170
-
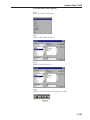 171
171
-
 172
172
-
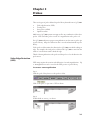 173
173
-
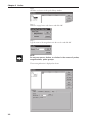 174
174
-
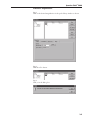 175
175
-
 176
176
-
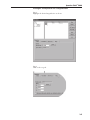 177
177
-
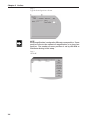 178
178
-
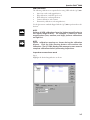 179
179
-
 180
180
-
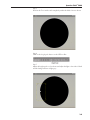 181
181
-
 182
182
-
 183
183
-
 184
184
-
 185
185
-
 186
186
-
 187
187
-
 188
188
-
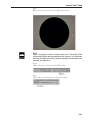 189
189
-
 190
190
-
 191
191
-
 192
192
-
 193
193
-
 194
194
-
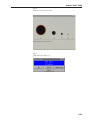 195
195
-
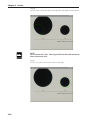 196
196
-
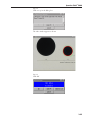 197
197
-
 198
198
-
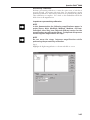 199
199
-
 200
200
-
 201
201
-
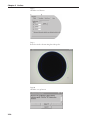 202
202
-
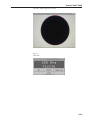 203
203
-
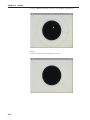 204
204
-
 205
205
-
 206
206
-
 207
207
-
 208
208
-
 209
209
-
 210
210
-
 211
211
-
 212
212
-
 213
213
-
 214
214
-
 215
215
-
 216
216
-
 217
217
-
 218
218
-
 219
219
-
 220
220
-
 221
221
-
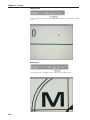 222
222
-
 223
223
-
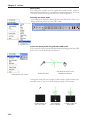 224
224
-
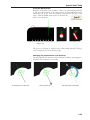 225
225
-
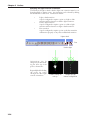 226
226
-
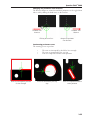 227
227
-
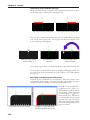 228
228
-
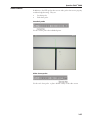 229
229
-
 230
230
-
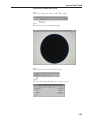 231
231
-
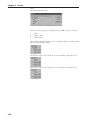 232
232
-
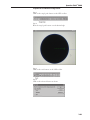 233
233
-
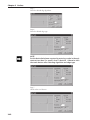 234
234
-
 235
235
-
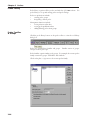 236
236
-
 237
237
-
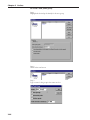 238
238
-
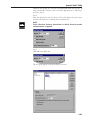 239
239
-
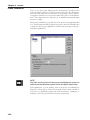 240
240
-
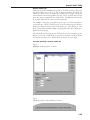 241
241
-
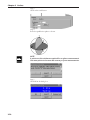 242
242
-
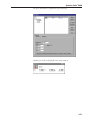 243
243
-
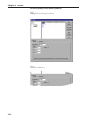 244
244
-
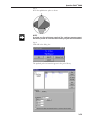 245
245
-
 246
246
-
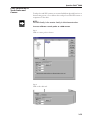 247
247
-
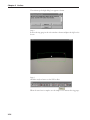 248
248
-
 249
249
-
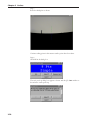 250
250
-
 251
251
-
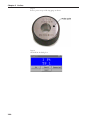 252
252
-
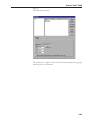 253
253
-
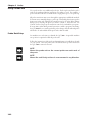 254
254
-
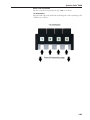 255
255
-
 256
256
-
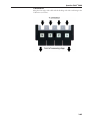 257
257
-
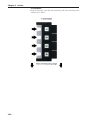 258
258
-
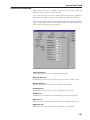 259
259
-
 260
260
-
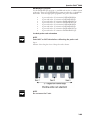 261
261
-
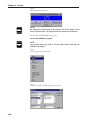 262
262
-
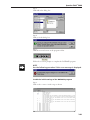 263
263
-
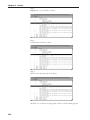 264
264
-
 265
265
-
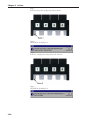 266
266
-
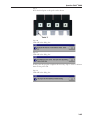 267
267
-
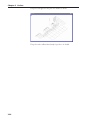 268
268
-
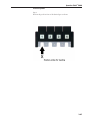 269
269
-
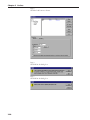 270
270
-
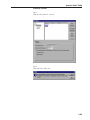 271
271
-
 272
272
-
 273
273
-
 274
274
-
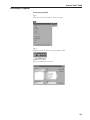 275
275
-
 276
276
-
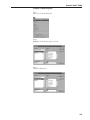 277
277
-
 278
278
-
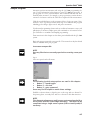 279
279
-
 280
280
-
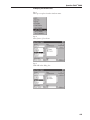 281
281
-
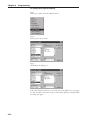 282
282
-
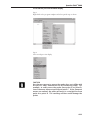 283
283
-
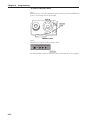 284
284
-
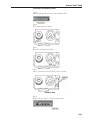 285
285
-
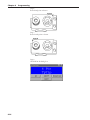 286
286
-
 287
287
-
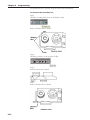 288
288
-
 289
289
-
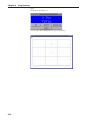 290
290
-
 291
291
-
 292
292
-
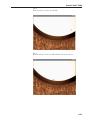 293
293
-
 294
294
-
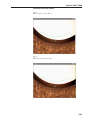 295
295
-
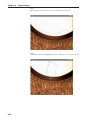 296
296
-
 297
297
-
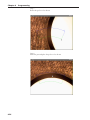 298
298
-
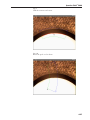 299
299
-
 300
300
-
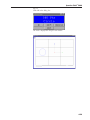 301
301
-
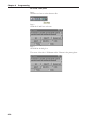 302
302
-
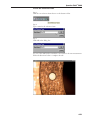 303
303
-
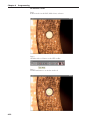 304
304
-
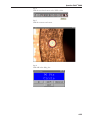 305
305
-
 306
306
-
 307
307
-
 308
308
-
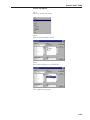 309
309
-
 310
310
-
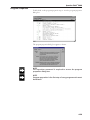 311
311
-
 312
312
-
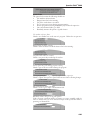 313
313
-
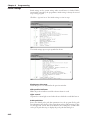 314
314
-
 315
315
-
 316
316
-
 317
317
-
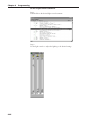 318
318
-
 319
319
-
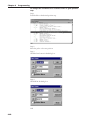 320
320
-
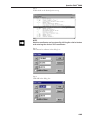 321
321
-
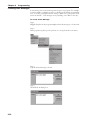 322
322
-
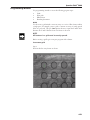 323
323
-
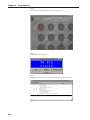 324
324
-
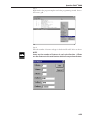 325
325
-
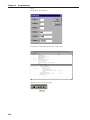 326
326
-
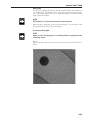 327
327
-
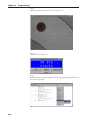 328
328
-
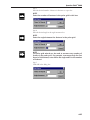 329
329
-
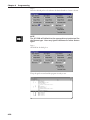 330
330
-
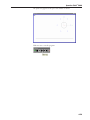 331
331
-
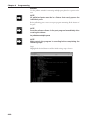 332
332
-
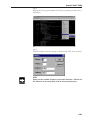 333
333
-
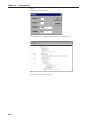 334
334
-
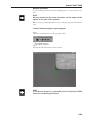 335
335
-
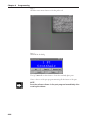 336
336
-
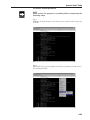 337
337
-
 338
338
-
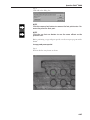 339
339
-
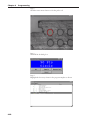 340
340
-
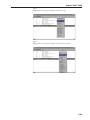 341
341
-
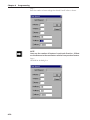 342
342
-
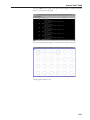 343
343
-
 344
344
-
 345
345
-
 346
346
-
 347
347
-
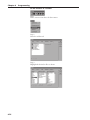 348
348
-
 349
349
-
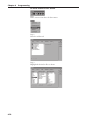 350
350
-
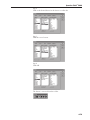 351
351
-
 352
352
-
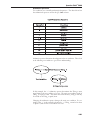 353
353
-
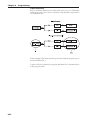 354
354
-
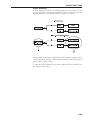 355
355
-
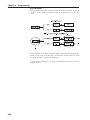 356
356
-
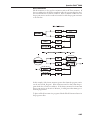 357
357
-
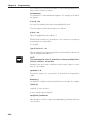 358
358
-
 359
359
-
 360
360
-
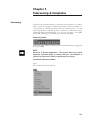 361
361
-
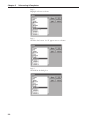 362
362
-
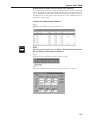 363
363
-
 364
364
-
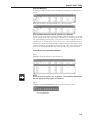 365
365
-
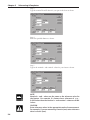 366
366
-
 367
367
-
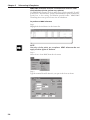 368
368
-
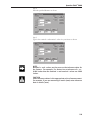 369
369
-
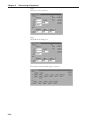 370
370
-
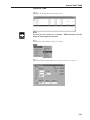 371
371
-
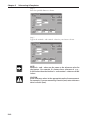 372
372
-
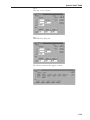 373
373
-
 374
374
-
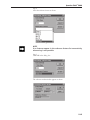 375
375
-
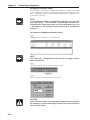 376
376
-
 377
377
-
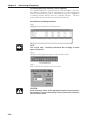 378
378
-
 379
379
-
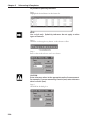 380
380
-
 381
381
-
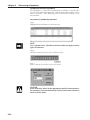 382
382
-
 383
383
-
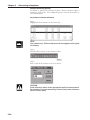 384
384
-
 385
385
-
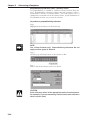 386
386
-
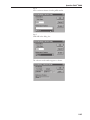 387
387
-
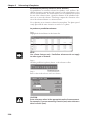 388
388
-
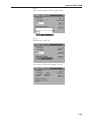 389
389
-
 390
390
-
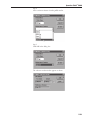 391
391
-
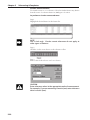 392
392
-
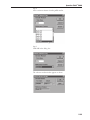 393
393
-
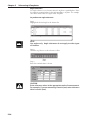 394
394
-
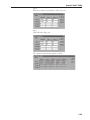 395
395
-
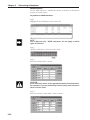 396
396
-
 397
397
-
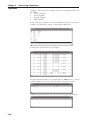 398
398
-
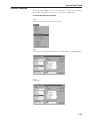 399
399
-
 400
400
-
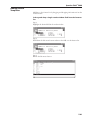 401
401
-
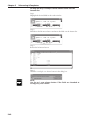 402
402
-
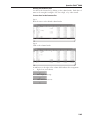 403
403
-
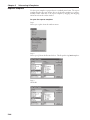 404
404
-
 405
405
-
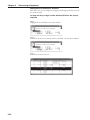 406
406
-
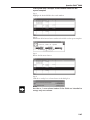 407
407
-
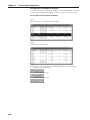 408
408
-
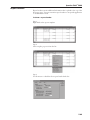 409
409
-
 410
410
-
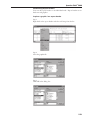 411
411
-
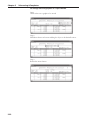 412
412
-
 413
413
-
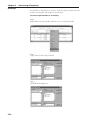 414
414
-
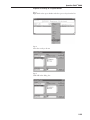 415
415
-
 416
416
-
 417
417
-
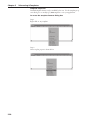 418
418
-
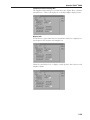 419
419
-
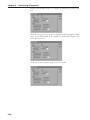 420
420
-
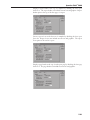 421
421
-
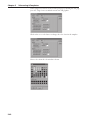 422
422
-
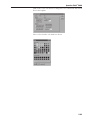 423
423
-
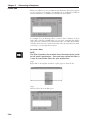 424
424
-
 425
425
-
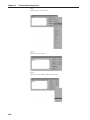 426
426
-
 427
427
-
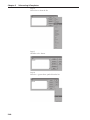 428
428
-
 429
429
-
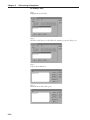 430
430
-
 431
431
-
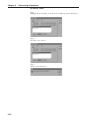 432
432
-
 433
433
-
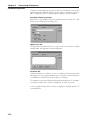 434
434
-
 435
435
-
 436
436
-
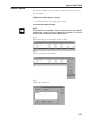 437
437
-
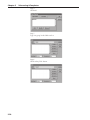 438
438
-
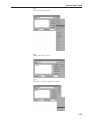 439
439
-
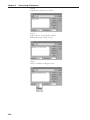 440
440
-
 441
441
-
 442
442
-
 443
443
-
 444
444
-
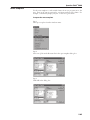 445
445
-
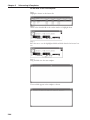 446
446
-
 447
447
-
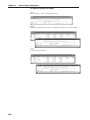 448
448
-
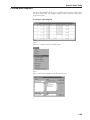 449
449
-
 450
450
-
 451
451
-
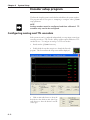 452
452
-
 453
453
-
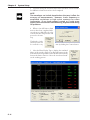 454
454
-
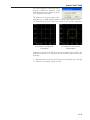 455
455
-
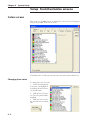 456
456
-
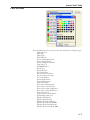 457
457
-
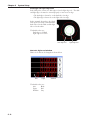 458
458
-
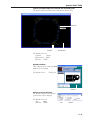 459
459
-
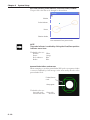 460
460
-
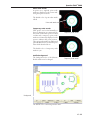 461
461
-
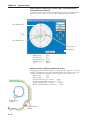 462
462
-
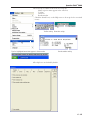 463
463
-
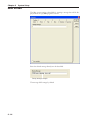 464
464
-
 465
465
-
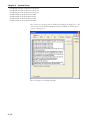 466
466
-
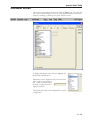 467
467
-
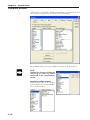 468
468
-
 469
469
-
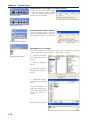 470
470
-
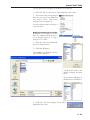 471
471
-
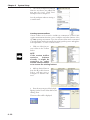 472
472
-
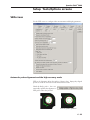 473
473
-
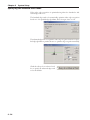 474
474
-
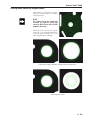 475
475
-
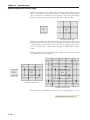 476
476
-
 477
477
-
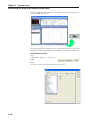 478
478
-
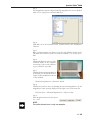 479
479
-
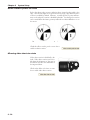 480
480
-
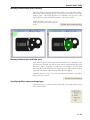 481
481
-
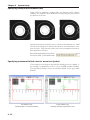 482
482
-
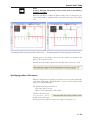 483
483
-
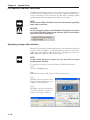 484
484
-
 485
485
-
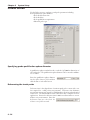 486
486
-
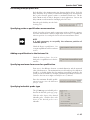 487
487
-
 488
488
-
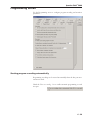 489
489
-
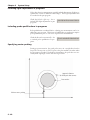 490
490
-
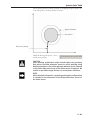 491
491
-
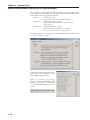 492
492
-
 493
493
-
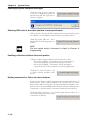 494
494
-
 495
495
-
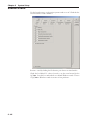 496
496
-
 497
497
-
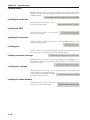 498
498
-
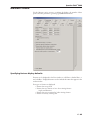 499
499
-
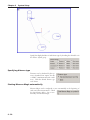 500
500
-
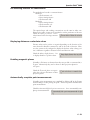 501
501
-
 502
502
-
 503
503
-
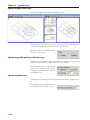 504
504
-
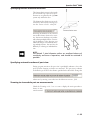 505
505
-
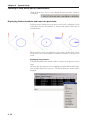 506
506
-
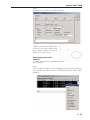 507
507
-
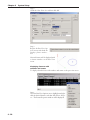 508
508
-
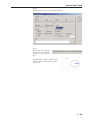 509
509
-
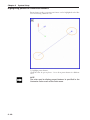 510
510
-
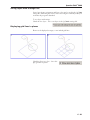 511
511
-
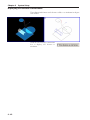 512
512
-
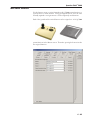 513
513
-
 514
514
-
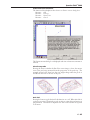 515
515
-
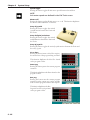 516
516
-
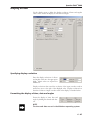 517
517
-
 518
518
-
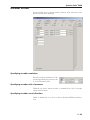 519
519
-
 520
520
-
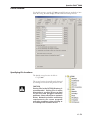 521
521
-
 522
522
-
 523
523
-
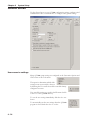 524
524
-
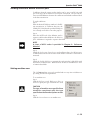 525
525
-
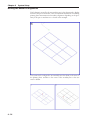 526
526
-
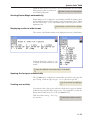 527
527
-
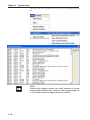 528
528
-
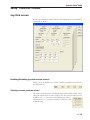 529
529
-
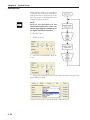 530
530
-
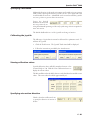 531
531
-
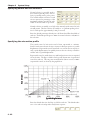 532
532
-
 533
533
-
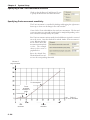 534
534
-
 535
535
-
 536
536
-
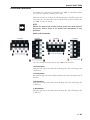 537
537
-
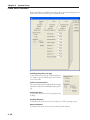 538
538
-
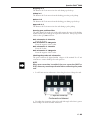 539
539
-
 540
540
-
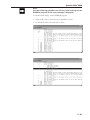 541
541
-
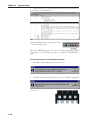 542
542
-
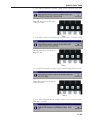 543
543
-
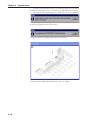 544
544
-
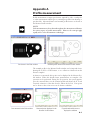 545
545
-
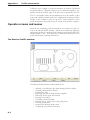 546
546
-
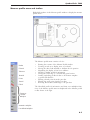 547
547
-
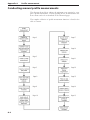 548
548
-
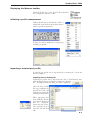 549
549
-
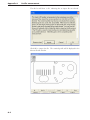 550
550
-
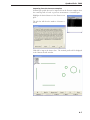 551
551
-
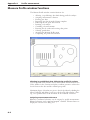 552
552
-
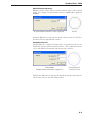 553
553
-
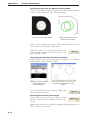 554
554
-
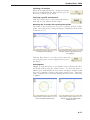 555
555
-
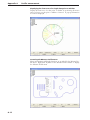 556
556
-
 557
557
-
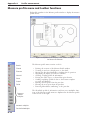 558
558
-
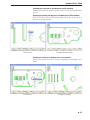 559
559
-
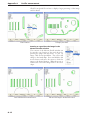 560
560
-
 561
561
-
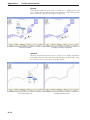 562
562
-
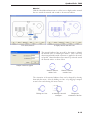 563
563
-
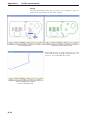 564
564
-
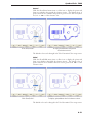 565
565
-
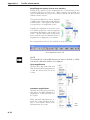 566
566
-
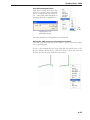 567
567
-
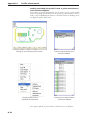 568
568
-
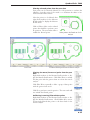 569
569
-
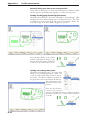 570
570
-
 571
571
-
 572
572
-
 573
573
-
 574
574
-
 575
575
-
 576
576
-
 577
577
-
 578
578
-
 579
579


HEIDENHAIN IK 5000 QUADRA-CHEK Multisensor User manual
- Category
- Graphics software
- Type
- User manual
Ask a question and I''ll find the answer in the document
Finding information in a document is now easier with AI
Related papers
-
HEIDENHAIN QUADRA-CHEK 2000 Operating instructions
-
-
-
-
-
-
-
-
-
Other documents
-
 TESA Power Panel Plus M 00760220 User manual
-
 Carrie Elizabeth Printable Ring Size User guide
-
Accu-Scope Excelis HD Operating instructions
-
Bowers Group Fusion MK4 User manual
-
 Pi Tape Digital Linear for Tape Size 0mm - 1000mm Operating instructions
-
ACU-RITE CNC 3500i User manual
-
Cadence PSPICE SCHEMATIC User manual
-
Roche LightCycler 480 / 1536 User manual
-
 Centroid M39 User manual
-
 Applied Biosystems 7900HT User manual


