Page is loading ...

User’s Guide

Contents of the package
Versatis C650:
The box contains the following elements:
- the base
- the handset
- the line cord
- the power supply
- the battery compartment cover
- the batteries
- the User’s Guide.
Versatis C650 duo/trio:
- the additional handset(s)
- the charger(s)
- the batteries
- the battery compartment cover(s).
Please read this guide carefully to get to know the main features of your Versatis C650 and read the safety instructions
before using it. We would also ask you to share the safety guidelines contained in this guide with all family members, and
especially children.
Parents and those in charge of very young children are reminded that they must always be careful not to let children place
any metallic objects or plastic items or parts in their mouths, except for safe eating utensils.
www.atlinks.com

- Correct / erase a
character
- Intercom call
- Three-way call
External call in progress
New message on operator
voicemail*
Flashing: unanswered calls in
the list*
Flashes when out of range
Battery charge level:
- 3 segments: good
- 2 segments: medium
- 1 segment: needs recharging
Hands-free enabled
Alarm set
Do Not Disturb function
enabled
- Hang up
- Turn handset on / off
(long press)
- Back to previous menu
- Open Phonebook
- Lock keypad
- Open quick-dial memories
(long press)
- Open Received
Calls list*
- Increase/decrease
earpiece or hands-free
volume
- Open Dialled
Numbers list
* Subject to technical availability and subscription from your operator.
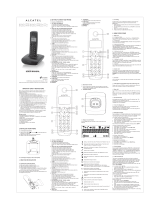
The handset keys
Main screen icons
- In standby mode:
open menu
- In menus:
confirm selection
- During a call, cut the
microphone (Mute)
- Cut incoming call ringer
- Access to operator
services*
- Take call
- Hands free
LED on:
message on
operator
voicemail*
Base key (paging)
- Short press:
page handset
- Long press:
register new handset
Flashing
:
- Incoming call, or call in progress
- New message
- Registering handset
On steady
:
- Handset charging on base
Off
:
- No handset on base
- On:
Do Not Disturb function enabled
(ringer off)
- Do Not Disturb key
Base keys and LEDs

1. FIRST USE . . . . . . . . . . . . . . . . . . . . . . . . . . . . . . . . . . . . . . . . . . . . . . . . . . . . . . . . . . . . . . . . . . . . . . . . . . . . . . . . 2
1.1 Installing the base...................................................................................................................................................... 2
1.2 Installing the handset................................................................................................................................................. 2
1.3 Using the handset...................................................................................................................................................... 3
2. USING THE TELEPHONE . . . . . . . . . . . . . . . . . . . . . . . . . . . . . . . . . . . . . . . . . . . . . . . . . . . . . . . . . . . . . . . . . . . . 4
2.1 Making a call.............................................................................................................................................................. 4
2.2 Answering a call......................................................................................................................................................... 4
2.3 Hands-free mode ....................................................................................................................................................... 4
2.4 Redialling one of the last numbers called.................................................................................................................. 4
2.5 Adjusting the earpiece volume................................................................................................................................... 4
2.6 Do Not Disturb function.............................................................................................................................................. 4
2.7 Secrecy / Mute (microphone off) ............................................................................................................................... 5
2.8 Locating a handset (Paging function) ........................................................................................................................ 5
3. YOUR PHONEBOOK . . . . . . . . . . . . . . . . . . . . . . . . . . . . . . . . . . . . . . . . . . . . . . . . . . . . . . . . . . . . . . . . . . . . . . . . 6
3.1 Using the Phonebook to make calls .......................................................................................................................... 6
3.2 Storing names and numbers...................................................................................................................................... 6
3.3 Inserting a pause in the dialling sequence (of a stored number) .............................................................................. 6
3.4 Modifying names / numbers....................................................................................................................................... 6
3.5 Deleting names / numbers......................................................................................................................................... 7
3.6 Programming direct memory (quick dial) keys .......................................................................................................... 7
4. USING YOUR VERSATIS C650 WITH THE OPERATOR’S VOICEMAIL SERVICE . . . . . . . . . . . . . . . . . . . . . . . 8
4.1 Receiving voicemail messages.................................................................................................................................. 8
4.2 Listening to voicemail messages ............................................................................................................................... 8
5. IDENTIFYING CALLERS . . . . . . . . . . . . . . . . . . . . . . . . . . . . . . . . . . . . . . . . . . . . . . . . . . . . . . . . . . . . . . . . . . . . . 9
5.1 Understanding caller ID data ..................................................................................................................................... 9
5.2 Viewing the Calls list.................................................................................................................................................. 9
5.3 Calls list: storing / deleting / recalling numbers ......................................................................................................... 9
6. CUSTOMIZING YOUR HANDSET . . . . . . . . . . . . . . . . . . . . . . . . . . . . . . . . . . . . . . . . . . . . . . . . . . . . . . . . . . . . . . 10
6.1 Ringer tone ................................................................................................................................................................ 10
6.2 Ringer volume............................................................................................................................................................ 10
6.3 Key tones ................................................................................................................................................................... 10
6.4 Equalizer .................................................................................................................................................................... 10
6.5 Auto-talk..................................................................................................................................................................... 10
6.6 Naming a handset...................................................................................................................................................... 11
6.7 Selecting the language .............................................................................................................................................. 11
6.8 Date and time ............................................................................................................................................................ 11
6.9 Alarm clock ................................................................................................................................................................ 11
6.10 Room monitor (applies only to multi-handset installations) ....................................................................................... 12
6.11 Keypad lock / unlock.................................................................................................................................................. 12
7. BASE SETTINGS . . . . . . . . . . . . . . . . . . . . . . . . . . . . . . . . . . . . . . . . . . . . . . . . . . . . . . . . . . . . . . . . . . . . . . . . . . . 13
7.1 Changing the PIN code.............................................................................................................................................. 13
7.2 Default settings .......................................................................................................................................................... 13
7.3 Line settings............................................................................................................................................................... 13
8. USING YOUR TELEPHONE WITH MULTIPLE HANDSETS . . . . . . . . . . . . . . . . . . . . . . . . . . . . . . . . . . . . . . . . . 15
8.1 Registering a handset................................................................................................................................................ 15
8.2 Deregistering a handset............................................................................................................................................. 15
8.3 Using the intercom feature......................................................................................................................................... 15
8.4 Shuttling calls............................................................................................................................................................. 15
8.5 Transferring an outside call to another handset ........................................................................................................ 16
8.6 Three-way conference (2 internal parties and one external)..................................................................................... 16
8.7 Answering an outside caller during an intercom call ................................................................................................. 16
9. TECHNICAL SPECIFICATIONS . . . . . . . . . . . . . . . . . . . . . . . . . . . . . . . . . . . . . . . . . . . . . . . . . . . . . . . . . . . . . . . 17
10. TROUBLESHOOTING... . . . . . . . . . . . . . . . . . . . . . . . . . . . . . . . . . . . . . . . . . . . . . . . . . . . . . . . . . . . . . . . . . . . . . . 18
11. SAFETY . . . . . . . . . . . . . . . . . . . . . . . . . . . . . . . . . . . . . . . . . . . . . . . . . . . . . . . . . . . . . . . . . . . . . . . . . . . . . . . . . . 19
12. ENVIRONMENT . . . . . . . . . . . . . . . . . . . . . . . . . . . . . . . . . . . . . . . . . . . . . . . . . . . . . . . . . . . . . . . . . . . . . . . . . . . . 20
1

1. FIRST USE
Your Versatis C650 is a DECT™* standard appliance designed to receive and transmit telephone calls.
The Versatis C650 is designed for connection to the public telecommunications network.
It requires an electrical power supply in order to function.
1.1 INSTALLING THE BASE
1.1.1 Precautions
As with all radio communications, the signal quality will depend on the location and environment of the base and handset.
Your DECT cordless telephone must be kept away from sources of excessive heat (radiators, direct sunlight, etc.) and
protected against vibrations and dust. Never allow your telephone to come into contact with water or other liquids, or with
aerosols.
To reduce the risk of interference and optimise reception, take particular care not to install the base in the immediate
vicinity of windows, large metal objects, reinforced concrete, televisions, music centres, halogen lamps or heating devices,
fluorescent lighting, burglar alarms, microwave ovens, computers, etc. If connecting your telephone to a line used by an
ADSL modem, remember to use an ADSL filter.
To clean your set, use an antistatic cloth lightly moistened with water.
1.1.2 Connecting the base
Connect the line cord and the power supply under the base, as shown.
Plug the telephone jack into the wall socket.
Connect the mains adapter to a 100/230 V / 50 Hz power supply.
After a few seconds, the base beeps to confirm the connection.
1.2 INSTALLING THE HANDSET
Fitting the batteries and charging up for the first time
Once the base is connected, insert the batteries in the compartment at the back of the
handset. Follow the signs telling you which way round the batteries go.
Place the handset on the base. The blue light on the base comes on.
4
The battery charging icon on the telephone appears.
Before using for the first time, we recommend that you leave the handset to charge up on
the base for 24 hours in order to optimise battery life and performance.
Check that the handset is registered on the base (icon not flashing) and take the line by
pressing .
The dial tone confirms that the Versatis C650 is working (if not, see Chapter 10).
!
When the telephone is on standby, press any key to activate the handset.
If you remove and replace the batteries, the handset will not restart until it has been placed back on its base
or charger.
!
For better listening quality, remove the protective film around the handset display(s) and earpiece(s).
2
* DECT is a registered trademark of ETSI.
Line
cord
Power
cable

1.3 USING THE HANDSET
1.3.1 Navigating the menus
It's easy to configure and customise your cordless telephone using its scrolling menu feature:
To open the menu, press the menu key .
Use the or keys to scroll through the options to find the one you want.
To confirm an option, press .
To return to the previous menu, press .
1.3.2 Handset on/off
To turn your handset off:
Press (long press).
4
The display is off. You cannot make calls. If a call comes in, the handset will not ring; nor will the base, but the base
LED will flash.
To turn the handset on again:
Press (long press) or place the handset back on its base.
!
Only use rechargeable batteries with exactly the same specifications as those supplied with the product.
Using non-rechargeable or non-conforming batteries can damage the product and could pose a health
hazard (see Chapter 9 “Technical Specifications”).
Failure to comply with this recommendation will invalidate the manufacturer's warranty.
Batteries can split or leak if incorrectly inserted, opened or exposed to heat.
Never dispose of batteries in a fire: they could explode.
3

4
2. USING THE TELEPHONE
2.1 MAKING A CALL
Direct dialling:
Press , then dial the number to be called.
Pre-dialling:
Dial the number, then press .
Press to hang up at the end of the call.
2.2 ANSWERING A CALL
When the telephone rings, pick up the handset and press .
Press to hang up at the end of the call.
- OR -
If the auto-talk option is enabled, remove the handset from the base to take the call immediately.
Note: You can adjust the handset volume by pressing or during a call.
2.3 HANDS-FREE MODE
Note: If you use the hands-free mode, stay close to the handset so that your correspondent can hear you.
To activate hands-free mode, press .
To quit hands-free mode, press again.
To adjust the hands-free volume, use or .
2.4 REDIALLING ONE OF THE LAST NUMBERS CALLED
The last 5 numbers dialled on your telephone are stored in memory.
To recall a correspondent:
Press , then use or to select the number you want to call.
Press to initiate the call.
2.5 ADJUSTING THE EARPIECE VOLUME
During a call, you can adjust the handset volume using the and keys: there are 5 volume settings.
2.6 DO NOT DISTURB FUNCTION
This function allows you to turn off the handset ringer by pressing on the base, even if the ringer volume of the
handset(s) has been preset.
In standby mode, press on the base.
The LED under the key lights up (blue) and the handset display indicates .
To disable the function, press again.
Note: You can press to activate the function immediately, even as a call is coming in.

2.7 SECRECY / MUTE (MICROPHONE OFF)
To put your correspondent on hold while you talk to someone next to you.
Press during the call. The handset display indicates MUTE ON.
Press to cancel and get back to your correspondent.
2.8 LOCATING A HANDSET (PAGING FUNCTION)
Forgotten where you left your handset(s)?
Press the key on the base.
4
The handsets associated with the base will ring for 30 seconds.
4
The line LED on the base flashes.
Press to stop the ringer or press the key on the base again.
5

6
3. YOUR PHONEBOOK
Each handset can hold up to fifty Phonebook entries. Each entry or ‘record’ contains the name and number of a
correspondent.
3.1 USING THE PHONEBOOK TO MAKE CALLS
Press to go to the main menu.
Use or to select PHONE BOOK.
Press to open the Phonebook submenu.
Use or to select VIEW RECORDS.
Press to confirm; all the records appear in alphabetical order.
Press or , or the first letter of the name you are looking for, to view the record.
Press to initiate the call.
3.2 STORING NAMES AND NUMBERS
Press and use or to select PHONE BOOK; press to confirm.
Use or to select ADD RECORDS.
Press to confirm. The display reads ENTER NAME.
Use the keypad to enter a name.
Note: If you make a mistake, press to erase the erroneous character(s).
Press again to save. The display reads ENTER NUMBER.
Use the keypad to enter the telephone number, and press to confirm.
Use or to select one of the 10 ringer options (an extract of each ringtone or melody is played as you scroll
through).
Press to confirm; the records are stored in alphabetical order in the Phonebook.
3.3 INSERTING A PAUSE IN THE DIALLING SEQUENCE (OF A STORED NUMBER)
Press twice in rapid succession on the handset keypad to insert a break in the dialling sequence when a pause is
needed to wait for a dial tone (for example, after dialling 9 for an outside line, or to wait for a computer access tone). Each
pause counts as a digit in the dialling sequence.
3.4 MODIFYING NAMES / NUMBERS
Press , use or to select PHONE BOOK and press to confirm.
Use or to select EDIT RECORDS.
Press to confirm; the records appear on the display.
Use or or enter the first letter of the name you are looking for, and press to confirm.
The display reads ENTER NAME. Modify the name if necessary by pressing and press to confirm.
The display reads ENTER NUMBER. Modify the number if necessary by pressing and re-entering it, then press
to confirm.

7
3.5 DELETING NAMES / NUMBERS
Press , use or to select PHONE BOOK, and press to confirm.
Use or to select DELETE RECORDS.
Press to confirm; the records appear on the display.
Use or or enter the first letter of the name you are looking for, and press . The display reads DELETE ?.
Press to confirm.
Note: If you decide not to delete or modify a record, press , or wait a minute for the menu to close automatically.
3.6 PROGRAMMING DIRECT MEMORY (QUICK DIAL) KEYS
You can store numbers in memory on keys , and .
Press to open the menu.
Select DIALING SETUP and press to confirm.
Select DIRECT MEM and press to confirm.
Select KEY 1, KEY 2 or KEY 3 and press to confirm.
To erase the existing number, press to confirm.
Dial the number to be memorized, and press to confirm.
Using the quick dial keys
A long press (two seconds) on , or automatically dials the stored number.

8
4. USING YOUR VERSATIS C650 WITH THE OPERATOR’S VOICEMAIL
SERVICE*
By subscription to your operator, you can have your calls diverted to a voicemail box when you are absent or already on
the line. New messages are indicated by an icon on the display. For more details, contact your operator.
4.1 RECEIVING VOICEMAIL MESSAGES
When new messages are received, the base and handset LEDs flash and the icon appears on the handset display.
The icon disappears once you have consulted the voicemail.
If this doesn’t happen automatically:
Press to open the menu.
Select RESET SETTINGS and press to confirm.
Select VOICEMAIL and press to confirm.
Select YES and press to confirm.
The icon disappears, and the handset LED goes out, as does the base light.
Note: If you have a Duo or Trio version, the icon will remain on the display on the other handsets. Follow the same
procedure on each handset to make it disappear.
4.2 LISTENING TO VOICEMAIL MESSAGES
When new messages are received, to open your voicemail:
Dial the voicemail server number provided by your operator.
Press .
* Requires subscription to the caller identification service, subject to technical availability.

5. IDENTIFYING CALLERS*
5.1 UNDERSTANDING CALLER ID DATA
If you are subscribed to your operator’s Caller ID service, and if the network transmits the relevant data, the caller's name
or number will be shown on the display as indicated below.
The numbers, dates and times of incoming calls are recorded in the Received Calls list.
During the call, the following messages (from the network) are displayed:
- the caller name and number, if the number is stored in your Phonebook or transmitted by the network;
- the caller number, if not listed in your Phonebook;
- PRIVATE if the caller is using Caller ID Blocking to avoid identification;
- UNAVAILABLE if the name or number cannot be transmitted by the network.
5.2 VIEWING THE CALLS LIST
If the list contains new calls, the icon flashes on the display.
Press .
Scroll through the list using the and keys.
Press to quit the list.
5.3 CALLS LIST: STORING / DELETING / RECALLING NUMBERS
5.3.1 Calling back a correspondent from the Calls list
Press or to select the caller.
Press to initiate the call.
5.3.2 Storing a number from the Calls list in the Phonebook
With the number showing on the display:
Press to display ENTER NAME, confirm or key in the name and press to confirm.
Save the number by pressing to confirm.
Using the navigator, choose the ringtone/melody you want to associate with the contact and press to confirm.
5.3.3 Deleting a record from the Calls list
With the number showing on the display:
Press . The display reads DELETE CALL ID?.
Note: Press to return to the previous menu without deleting the record from the Calls list.
Press to delete the record shown.
5.3.4 Deleting all of the records from the Calls list
Use or to display any record in the Calls list.
Press and hold it down until the display reads DELETE ALL?.
Note: Press to return to the previous menu without deleting all of the records from the Calls list.
Press to delete all of the Calls list records (except the operator voicemail data).
9
* Subject to subscription and technical availability.

10
6. CUSTOMIZING YOUR HANDSET
6.1 RINGER TONE
You can choose between five ringtones and five melodies.
Press .
Use or to select SOUND SETUP and press to confirm.
Press or to select the RINGER TONE submenu.
Press to open the menu. The display reads
4
1/10. The default setting is 7/10.
Use or to select an option (from 1 to 10). An extract of the selected ringtone/melody is played.
Press to save the selection.
6.2 RINGER VOLUME
In the Sound Setup menu:
Press or to select the RINGER VOLUME submenu.
Press to open the menu. The display reads
4
RING VOLUME 5.
Use or to select the desired volume. The default setting is level 5.
Press to save the selection.
Note: If you set the volume to RINGER OFF, the corresponding icon appears on the display.
6.3 KEY TONES
In the Sound Setup menu:
Press or to select the KEY TONE submenu.
Press to open the menu. The display reads > ON/OFF.
Use or to select the preferred option. The default setting is ON.
Press to confirm.
6.4 EQUALIZER
For optimal listening quality, you can increase the bass or treble.
In the SOUND SETUP menu:
Press or to select the EQUALIZER submenu and press to confirm.
Select BASS or TREBLE (the default is NATURAL) and press to confirm.
6.5 AUTO-TALK
This function enables you to pick up calls by lifting the handset off the base, without having to press a button. To end the
call, simply replace the handset on the base.
In the Initial Setup menu:
Press or to select the AUTO TALK submenu.
Press to open the menu. The display reads > NO/YES.
Use or to select the preferred option. The default setting is YES.
Press to confirm your choice.

6.6 NAMING A HANDSET
In the Initial Setup menu:
Press or to select the HANDSET NAME submenu.
Press to open the menu. The display reads HANDSET NAME.
Use the keypad to enter a name.
Note: To make a correction, press .
Press to save the name. The set beeps to confirm and the handset name appears on the display.
6.7 SELECTING THE LANGUAGE
In the Initial Setup menu:
Press to select the LANGUAGE submenu.
Press to open the menu.
Use or to select a language. The default setting is ENGLISH.
Press to save. The set beeps to confirm.
6.8 DATE AND TIME
In the Initial Setup menu:
Press or to open the DATE AND TIME submenu.
Press to open the menu. Use the keypad to enter the year (YEAR:2008), use or to set the date. Enter the
date in dd/mm format.
Press to confirm and move on to the SET TIME submenu.
Use the keypad to enter the hour and minutes (hh:mm format).
Press to save.
6.9 ALARM CLOCK
Press to open the main menu.
Use or to select ALARM CLOCK.
Press to open the menu. The display reads ON > OFF.
Use or to select ON or OFF. Press to confirm.
If ON is selected, the display reads SET ALARM TIME. Use the keypad to enter the alarm time (hh:mm format).
Press to display > ONCE OR DAILY then select ONCE or DAILY with the or keys.
Press to save.
11

6.10 ROOM MONITOR (APPLIES ONLY TO MULTI-HANDSET INSTALLATIONS)
Press to go to the main menu.
Press or to select ROOM MONITOR.
Press to open the ROOM MONITOR menu.
The display reads ROOM MONITOR.
Using the keypad, enter the number of the handset to be monitored.
Note: If you activate the Room Monitor function using handset 1, you need to put handset 2 or 3 in the room you want to
monitor.
Note: For Room Monitor mode to work, the initial handset must NOT be on the base.
Note: In Room Monitor mode, the handsets give off a beep approximately every 5 seconds if a call comes in. Simply press
to quit Room Monitor mode and take the call.
Note: In Room Monitor mode, the initial handset can be switched to acting as a room monitor by pressing once. To
return it to loudspeaker mode, press once.
Note: Press on the handset to quit Room Monitor mode.
6.11 KEYPAD LOCK / UNLOCK
To avoid accidentally pressing keys on the handset when it is not on its base, you can temporarily lock the keypad (you
can still receive calls).
To lock the keypad:
Long press on .
4
KEYPAD LOCKED appears on the display.
To unlock the keypad:
Long press on .
!
Do not place the handsets side by side.
12

7. BASE SETTINGS
7.1 CHANGING THE PIN CODE
The system PIN is used for registering new handsets with your Versatis C650.
Press to open the menu.
Select INITIAL SETUP using the navigation keys and confirm.
Select CHANGE PIN using the navigation keys and press to confirm.
4
The display reads OLD PIN CODE _ _ _ _.
Enter the 4 digits of the current PIN (by default, 0000) and press to confirm.
4
The display reads NEW PIN CODE.
Enter the 4 digits of the new code and press to confirm.
4
The display reads CONFIRM NEW.
Enter the 4 digits of the new code and press to confirm.
7.2 DEFAULT SETTINGS
You can always go back to your telephone’s factory settings.
Press to go to the main menu.
Press or to select RESET SETTINGS.
Press to confirm. The following elements can now be programmed: VOICEMAIL or ALL SETTINGS.
7.2.1 All settings
Once you are familiar with the telephone, you may prefer to use the initial (default) settings. To return to the default
settings, simply:
In the Reset Settings menu
Press or to select the ALL SETTINGS submenu.
Press to open the menu. The display reads YES
4
NO. The default setting is NO.
Use or to select YES or NO.
Note: If you select YES, all the programmable menu settings are restored to their default values.
Press to save.
7.3 LINE SETTINGS
7.3.1 Setting the recall or flash time (R key)
The default recall time value is 600 ms.
Press to open the menu.
Select DIALING SETUP using the navigation keys and confirm.
Select FLASH TIME using the navigation keys and confirm.
Select SHORT (100 ms), MED (270 ms) or LONG (600 ms) using the navigation keys and press to confirm.
13

7.3.2 Call barring
You can prevent certain numbers from being dialled.
Press to open the menu.
Select DIALING SETUP and press to confirm.
Select CALL BARRING and press to confirm.
Enter the code (by default, 0000) and press to confirm.
Use or to select ON and press to confirm (the default value is OFF).
Select CALL BARRING 1, CALL BARRING 2, CALL BARRING 3, CALL BARRING 4 and press to confirm.
Enter the call prefixes (1 to 3 digits) to be barred on outgoing calls and press to confirm.
Note: CANNOT DIAL / NUMBER BARRED appears on the display if a number is dialled that starts with a barred call
prefix.
14

15
8. USING YOUR TELEPHONE WITH MULTIPLE HANDSETS
8.1 REGISTERING A HANDSET
The handset(s) delivered with your Versatis C650 will already be registered on the base, ready to use. You can have up
to 6 handsets associated with (“registered on”) the base of your telephone. To add another handset, follow the registration
procedure below.
In the Initial Setup menu:
Press or to select the REGISTRATION submenu.
Press to open the menu. The display reads YES
4
NO. The default setting is NO.
Use or to select YES.
If YES is selected, press . The display reads HOLD BASE FIND KEY FOR 5 SECS. Press and hold down on
the base; the indicator flashes, then press . (The handset must be close to the base during the registration
process). Enter the PIN (by default, 0000) and press to confirm.
Press . The display reads REGISTERING…, then REGISTERED.
8.2 DEREGISTERING A HANDSET
This procedure must be carried out on a different handset from the one you want to uninstall.
In the Initial Setup menu:
Press or to select the DEREGISTRATION submenu.
Press to open the menu. The display reads YES
4
NO. The default setting is NO.
Utiliser or to select YES.
Press ; the message MOVE NEAR TO THE BASE appears for a few seconds, then YES NO appears on the
display.
Use or to select YES or NO.
If you select YES, press to confirm. Enter the PIN (by default, 0000). The display reads DE-REGISTER... The set
beeps to confirm. Then the display indicates DEREGISTERED to confirm that the handset has been successfully
uninstalled.
Note: Once the deregistration process is finished, the message HANDSET NEEDS REGISTRATION appears on the
display. To use the handset again, you MUST re-register it using the registration process.
8.3 USING THE INTERCOM FEATURE
Press on the handset.
Using the keypad, select the handset you want to call (Trio version only).
The called handset rings. Its display shows PAGING FROM followed by the name of the calling handset.
Press to answer.
When you have finished, press on either handset to quit intercom mode.
8.4 SHUTTLING CALLS
While on the line with an external correspondent, you can call an internal handset:
Press , dial the number of the handset you want to call (Trio version only).
4
The external correspondent is placed on hold.
4
The two internal correspondents can talk to each other.
To get back to the external correspondent, press .

8.5 TRANSFERRING AN OUTSIDE CALL TO ANOTHER HANDSET
You can pass an external call over to another handset.
Press on the handset to put the external call on hold, and dial the number of the handset you want to call (Trio
version only).
When the internal handset answers, press to transfer the call.
8.6 THREE-WAY CONFERENCE (2 INTERNAL PARTIES AND ONE EXTERNAL)
During an external call, press . The display reads PAGING LINE ON HOLD.
Using the keypad, dial the number of the handset you want to call (Trio version only).
When the internal handset answers, press to set up the conference call. The display on the handsets reads
CONFERENCE.
To switch to intercom mode and put the external correspondent on hold, press . To return to 3-way conference mode,
press again.
8.7 ANSWERING AN OUTSIDE CALLER DURING AN INTERCOM CALL
When you are in intercom mode with another handset, you can still take outside calls.
To pick up a call:
Press .
4
The intercom call is interrupted.
Press .
4
You are put through to the outside caller.
16

9. TECHNICAL SPECIFICATIONS
* Value may vary according to environment.
** Depending on initial battery charge.
Free field range Up to 300 meters*
Indoor range Up to 50 meters*
Handset battery life
(average values)
6 hours talktime**
100 hours standby**
Number of handsets Up to 6
Intercom mode Yes
Three-way conference (1 outside correspondent
+ 2 internal correspondents)
Yes
Electrical connection / Base mains adapter /
Charger
Model IA5060G
Input: 100-240 V AC / 50-60 Hz / 0.2 A
Output: 6 V DC / 500 mA
Model DM-SC060050
Input: 100-240 V AC / 50-60 Hz / 0.1 A
Output: 6 V DC / 0.5 A
Or model IA5060B (for UAE & FS versions)
Input: 100-240 V AC / 50-60 Hz / 0.2 A
Output: 6 V DC / 500 mA
Only use the adapters supplied with the telephone.
Single-phase AC, excluding IT installations defined by the EN
60950 standard.
Caution: the network voltage is classified as a hazard by the
criteria of this standard.
Telephone connection Appliance designed for connection to a TNV3 class
(telecommunications network voltage) analogue telephone line
as defined by the EN 60950 standard.
Batteries AAA – 1.2 V – 500 mAh
Only use the batteries supplied with the telephone.
Using any other type of battery presents a risk of explosion.
Used batteries must be disposed of in compliance with current
environmental protection regulations.
Operating temperature From 5 to 40° C
17
/