Page is loading ...

Home » merten » merten 5655 Series ARGUS 220 Remote Control Instruction Manual
Contents
1 merten 5655 Series ARGUS 220 Remote
Control
2 Accessories
3 For your safety
4 ARGUS introduction
4.1 Scope of delivery
5 Using ARGUS with alarm systems
6 Connections, displays, and operating elements
7 Selecting the installation site
8 ARGUS installation
8.1 Installing the ARGUS on the ceiling
9 Connecting the ARGUS
10 Putting ARGUS into operation
11 Setting up the ARGUS manually
11.1 Resetting the ARGUS
12 Setting up the ARGUS via remote control
13 Status LED
14 How to change the battery
15 Technical data
16 Documents / Resources
16.1 References
17 Related Posts
merten 5655 Series ARGUS 220 Remote Control
merten 5655 Series ARGUS 220 Remote Control Instruction
Manual
Manuals+ — User Manuals Simplified.

Accessories
Mounting bracket (Art. no. 56529.)
Remote control for ARGUS 220, remote control (Art. no. 565590)
For your safety
DANGER
Risk of serious damage to property and per-sonal injury, e.g. from fire or electric shock, due to incorrect electrical
installation.
The safe electrical installation can only be ensured if the person in question can prove basic knowl-edge in the
following areas:
Connecting to installation networks
Connecting several electrical devices
Laying electric cables
Outdoor electrical installation
These skills and experience are normally only possessed by skilled professionals who are trained in electrical
installation technology. If these minimum requirements are not met or are disregarded in any way, you will be
solely liable for any damage to property or personal injury.
ARGUS introduction
The ARGUS 220 (referred to below as ARGUS) is a movement detector for indoor and outdoor installation.
Functions:
220° surface monitoring for large house fronts and sections of the house (max. range. 16 m)

360° short-range zone (approx. 4 m radius)
LED function display for fast alignment at the installa-tion site.
Operating elements are protected under the easily accessible cover plate.
It can be installed on walls and ceilings without additional accessories.
Horizontally, vertically and axially adjustable sensor head for optimum adaptation to immediate surroundings
Hide unwanted zones or sources of disturbance (e.g. trees) using the segments supplied.
Remote control for setting and operating the ARGUS conveniently.
Scope of delivery
A ARGUS
B Remote control
Using ARGUS with alarm systems
Movement/presence detectors are not suitable for use as components of an alarm system.
Movement/presence detectors can trigger false alarms if the installation site has been chosen unfavorably.
Movement/presence detectors switch on as soon as they detect a moving heat source. This can be a person, but
also animals, trees, cars or differences in temperature in windows. In order to avoid false alarms, the chosen
installation site should be such that undesired heat sources cannot be detected (see section „Selecting the
installation site“).
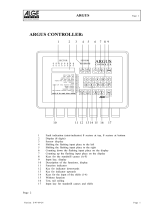
Connections, displays, and operating elements

A Wall connection box
B Top section
C Cover plate
D Sensor head
E Contact pins
F Cable routing for connecting cable from underneath
G Cable routing for connecting cable from behind
H Terminal block for the connecting cable and for locating the contact pins
The ARGUS operating elements are protected under the cover plate. The arrow’s position on the controllers
shows you the set values.
A ARGUS settings controller; Radio operation
B Switching duration controller
C Brightness threshold controller
D Functional display (lights up each time movement is detected)
E Brightness sensor (must not be covered)
F Sensitivity controller

Selecting the installation site
Explanation of the symbols used
Correct
Not optimal
Incorrect
When selecting a suitable installation site, you should take a number of factors into account so that the move-
ment detector operates optimally.
The following figure shows the ranges of the AR-GUS at average temperature conditions and a mounting height
of 2.5 m. The range of a movement detector can vary greatly depending on the temperature.
Inner security zone A: Angle of detection 360° over a radius of approx. 4 m.
Middle-security zone B: Angle of detection 220° with an area of detection of approx. 9 m x 18 m.
Outer security zone C: Angle of detection 220° with an area of detection of approx. 16 m x 28 m.

Mounting height D: 2-3 m. For optimum monitoring, we recommend a height of 2.5 m on a solid and even
base.
Minimum distance E to sources of optical interference: 5 m If necessary, use the segments supplied to
shade the device.
Minimum distance F between luminaire and movement detector: 5 m. If this distance cannot be achieved,
you can use the segments provided to
“mask” the light source from the area of detection.
If possible, install the movement detector sideways to the direction of movement.

To avoid the connected load is switched on due to environmental influences, the ARGUS should be installed so
that it is protected against rain and direct sunlight. A raindrop running over the lens, for example, can activate the
movement detector.
If you wish to attach several movement detectors, install them so that the detection areas of the individual
movement detectors intersect each other.

ARGUS installation
Dismantlement of the top section of the ARGUS
Installing the ARGUS to the wall

Feeding in the connecting cable

Installing the ARGUS on the ceiling
In order to install the ARGUS on the ceiling, you must rotate the sensor head. Change the direction of rotation
once you have reached the end stops.
1. Turn the sensor head upwards as far as it will go.
2. Turn the sensor head clockwise as far as it will go.
3. Align the sensor head.

CAUTION
If not installed correctly, the device can be damaged by condensation
In the case of sloping ceilings, install the device so that the spherical head is pointing down and always at an
angle of 15° – 90°. When the spherical head points downwards, any water from condensation could run down the
device.
Type of protection IP 55 cannot be guaranteed if the mounting bracket is not 15° – 90°.
Installing the ARGUS on corners and fixed pipes
You can attach the ARGUS to inner/outer corners or fixed pipes using the mounting bracket (art. no. 5652..). You
can feed the connecting cable to the device from behind through the mounting bracket.
Connecting the ARGUS

CAUTION
The device can become damaged.
Operation is only possible with sinusoidal mains voltages. Phase control dimmers or inverters with square-
wave or trapezoidal voltage curves will damage the device.
Protect the ARGUS using a 16 A circuit breaker.
When switching inductive loads such as transformers, relays, contactors, or fluorescent lamps, spikes occur
which could lead to the load being switched on again (“maintained light effect”). Connect a capacitor in parallel
to the inductive load to reduce these spikes.
“Through-wiring” to other loads is permitted.
ARGUS permanently connected to the mains
The ARGUS constantly monitors its area
Installation of the top section of the ARGUS

The ARGUS can now be put into operation.
Putting ARGUS into operation
1. Connect the supply voltage.
The load is switched on for approx. 10 s or for the set period. The functional display lights up for approx. 10 s.
2. Teach the remote control.
Conducting a functional test
The brightness sensor must not be covered up.

The functional display lights up each time movement is detected.
Setting up the ARGUS manually
CAUTION
The device could become damaged
The sensor head should only be rotated until it reaches the stop and no further. To achieve an angle “above” the
stop, change the direction of rotation.
1. Align the sensor head in the direction of the area that is to be monitored.
2. From its edge step into the area of detection to see whether the ARGUS switches the load and the functional
display as required.
Setting the sensitivity
Here you can infinitely set the distance up to which AR-GUS detects movements (any distance up to max. 16 m).
Setting the brightness threshold
Here you can infinitely set the ambient brightness level at which the ARGUS detects movements and triggers a
switching procedure.
Moon symbol (night operation): The ARGUS will only detect movements during the hours of darkness (ap-prox.
3 lux).
Sun symbol (day and night operation): The ARGUS detects movements up to approx. 1000 lux.

Setting the switching duration
Here you can set how long the loads connected to AR-GUS are switched on for. When a movement is detected,
the load is switched on and stays switched on until the set period has elapsed. Every further movement restarts
the switching duration.
The ARGUS ignores the light-sensitive switch once the load has been switched on. If the movement detector
does not switch the load off again, the reason probably is that the ARGUS constantly detects further movements
and thus keeps re-starting the switching duration.
Blocking out individual areas
Using the four segments supplied, you can block out unwanted zones and sources of interference from the area of
detection.
Ensure that the brightness sensor A is not covered, as the sensitivity to light is otherwise reduced.
Resetting the ARGUS
Reset to the factory settings
Under certain circumstances, it may be necessary to reset this device to its factory settings and to reconfigure it:
CAUTION Malfunctions can occur!
When re-setting to the factory settings, all the settings and connections for this CONNECT device are deleted.
Maybe the radio system is not working any longer and must be reconfigured (See the separate description of the
CONNECT radio system).
1. Turn controller A on the ARGUS to position C.
2. After approx. 1 s the LED flashes shortly: The device has now been reset to its factory settings.
Setting up the ARGUS via remote control
Resetting to the factory settings
Under certain circumstances, it may be necessary to reset this device to its factory settings and to reconfigure it:

CAUTION
When you reset to the factory settings, all the settings and connections for this device are deleted.
1. Turn controller A on the ARGUS to position C.
2. Wait until the red LED on the ARGUS goes out (approx. 5 s): The device has now been reset to its factory
settings.
Only 1 ARGUS can be taught per remote control!
A Setting: ARGUS operating mode
B Setting: Brightness
C Setting: Overshoot time
D Setting: Sensitivity
E Status LED (red, green)
Activating the remote control
1. Remove the protective foil: The remote control is ready to use immediately!
Teaching the ARGUS for use with remote control

You can use the remote control to adjust the ARGUS simply and conveniently during operation.
Setting the operating mode
Use the buttons to select one of the following statuses:
Press the [ON] button: The local ARGUS is permanently active, regardless of whether or not the movement
is detected (permanent ON).
Press the [OFF] button: The local ARGUS is permanently switched off (permanent OFF).
Press the [AUTO] button: .f the ARGUS is already on, the overshoot time is started (automatic mode).
Otherwise, the ARGUS remains off until a movement is detected.
Setting the brightness threshold
Press the [SET] button: the current brightness value is adopted.
Setting the switching duration
Press the [+30] or the [-30] button: the current over-shoot time is reduced or increased by 30 s per push of the
button.
Setting the sensitivity
Press the [SET] button: ARGUS flashes fast: Teach-ing mode activated (controller F at the ARGUSat
maximum). Then, run across the sensor range of the ARGUS once within 30 s. The sensitivity of the AR-GUS
is set such that the measured movement is detected. You can alter this value afterward using the [+] and [-]
buttons.

Status LED
The red light Remote control is no longer connected to ARGUS
Flashing red light Teaching mode activated
Greenlight Remote control connected to ARGUS
How to change the battery
Always insert the battery with the (+) pole facing upwards.
Reset remote control
Press the [AUTO] button 3 times and hold it down until the green light goes out. The remote control has been
cleared.
Technical data
Remote control
Channels: 1
Radiofrequency: 868 Mhz
Range Free field:
up to 100 m
Indoors: up to 30 m
Battery: 1 lithium button cell (CR 2450N)
Display elements: Status-LED
ARGUS
Nominal voltage: AC 230 V ±10%, 50 Hz

Fuse: Protect the ARGUS using a 16 A circuit breaker.
Max. switching current: 16 A, AC 230 V, cosϕ = 1
Nominal output
Incandescent
lamps: AC 230 V, max. 2000 W
Halogen lamps: AC 230 V, max. 1200 W
Fluorescent lamps: AC 230 V, max. 1200 W, uncompensated
Capacitive load: 35 μF
Transformer load: max. 600 VA
Power consumption: < 1 W
Connecting terminals: for 2×1.5 mm2 or 2×2.5 mm2 rigid conductor, stripped length 14 mm
External diameter of one cable: max. 14.5 mm
Angle of detection: 220°
Range: max. 16 m
Number of levels: 7
Number of zones: 112 with 448 switching segments
Minimum mounting height: 1.7 m
Recommended mounting height: 2.5 m
Sensitivity: infinitely adjustable
Light sensor: infinitely adjustable externally, from approx. 3 lux to approx. 1000 lux
Switching duration: externally adjustable in 6 levels of approx. 1 sec. to approx. 8 min.
Possible settings for sensor head:
Wall mounting: 9° up, 24° down, 12° left/right, ± 12° axial
Ceiling mounting: 4° up, 29° down, 25° left/right, ± 8.5° axial
Type of protection: IP 55 at an angle of inclination from 15° to 90°
EC directives:
Low-voltage guideline 2006/95/EC
EMC directive 2004/108/EC
Schneider Electric GmbH c/o Merten
Gothaer Straße 29, 40880 Ratingen
www.merten.com
www.merten-austria.at
Customer care center:
Phone: +49 2102 – 404 6000
Documents / Resources

merten 5655 Series ARGUS 220 Remote Control [pdf] Instruction Manual
5655 Series, ARGUS 220 Remote Control, 5655 Series ARGUS 220 Remote Control, 5655 Ser
ies Remote Control, Control, ARGUS 220
References
Lösungen für intelligente Gebäude | Merten
merten.com
Lösungen für intelligente Gebäude | Merten
Manuals+,
/