Page is loading ...

7. Install the radiator support bracket with
the supplied 3/8” self tap bolt. Use a
5/16” drill bit to make a starter hole.
8. Repeat steps 4-7 for the passenger side
body mounts.
9. With the new 1” body lift spacers
installed, re-torque all body mount bolts
to factory specications. Do not over-
tighten.
10.Use the supplied transfer case shift link-
age plate to lower the mounting point of
the shift linkage. The bracket faces down
with the supplied 1/4” bolts, and lock
nuts securing the plate to the bracket.
Note: For TJ models 2003
and newer, a new shift
linkage plate may be needed.
Order seperately TeraFlex
part # SLK03.
11.Re-attach the transfer case linkage
bracket to the bottom of the tub. Attach
the linkage with bracket to the transfer
case.
12.To properly re=align the fan shroud it may
be necessary to lower it one-inch to clear
the fan blades. Re-drill new mounting
holes in the shroud at the new position.
13.Re-attach fan shroud and check to see
if fan can rotate without interference.
Check all wires, hoses and fuel ller neck
for clearance of all lines.
14.Check all bolts after the rst 500 miles.
Installation Guide for the TJ 1-inch
body lift kit (BL1T)
Each body lift kit includes:
11 Aluminum body lift spacers
2 Radiator brackets
1 Shift linkage plate
6 Bolts (1/2” x 4.5”)
4 Bolts (7/16” x 3.5”)
1 Bolt (7/16” x 4”)
2 Bolts (1/4” x 3/4”)
2 Self-tapping bolts (3/8” x 1”)
2 Lock nuts (1/4”)
6 Flat washers (1/2”)
5 Flat washers (7/16”)
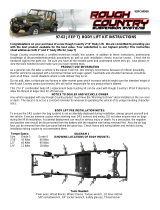
bottom
front
Use these holes
when installing
only a body lift.
Use these holes if
installing a body lift
with a transfer case
lowering kit.
Tera Manufacturing, Inc.
5251 South Commerce Dr.
Murray, Utah 84107
Phone/801.288.2585
Fax/801.713.2313
www.teraex.biz
Preparation/Disassembly
1. Remove the four screws holding the fan
shroud to the radiator. The fan shroud
will be re-installed one inch lower after
the body lift is installed.
2. Disconnect the transfer case shift linkage.
To do this remove the four 10mm screws
on the drivers side oor board (you must
pull up the carpet to access these bolts).
Underneath the vehicle remove the two
10mm bolts that attach the bracket to
the transfer case. Set all of these parts
aside for re-assembly later.
3. Loosen all 11 body mount bolts. Start-
ing with the driver’s side of the vehicle
remove the body mount bolts, including
the front radiator support mount bolt.
Note: For ease of installation, it is recom-
mended that the body lift is installed one
side at a time.
4. With a 2x4 piece of wood and oor
Jack raise the tub up from the frame
enough to t the 1” aluminum spacer in
between the bottom of the tub and the
rubber stock mount (See illustration for
exploded view).
Note: When lifting the body from the frame
be sure to check all wires, hoses and fuel
ller neck to prevent stretching.
6. Replace the stock bolt taken out with the
new included bolt, but do not tighten the
bolts yet.
Note: Radiator/Grill mount uses the 7/
16”x4” bolt. Body mount positions 2, 3 &
4 use the 1/2”x4.5” bolts, and 5 & 6 use
the 7/16”x3.5” bolts.
1" body spacer
Stock mount/sleeve
Stock mount/sleeve
New bolt
Frame mount
INSTALLATION GUIDE
Revised 26 May 05
/