Overland Storage NEO 8000E Quick start guide

Type
Quick start guide

Overland Storage NEO 8000E is an enterprise library designed to provide reliable and scalable data storage and retrieval solutions for demanding IT environments. With its robust construction, flexible configuration options, and advanced features, the NEO 8000E is ideal for organizations seeking a high-performance and versatile storage solution. Here are some of its key capabilities:

  • High Capacity: The NEO 8000E offers massive storage capacity, allowing you to store vast amounts of data in a single system. Its modular design enables easy expansion as your storage needs grow.

  • Fast Data Access: Equipped with high-speed tape drives and intelligent data management algorithms, the NEO 8000E delivers rapid data access, minimizing wait times and improving overall system performance.

10400292-002 05/2013 ©2010-13 Overland Storage, Inc. Page 1 of 4
NEO
®
8000e
Quick Start Guide
Overview
This document describes how to unpack and install a NEO
8000e enterprise library from Overland Storage.
WARNING: To reduce the risk of electric shock or damage
to equipment, always remove any power cords while
working with the unit.
AVERTISSEMENT: pour réduire le risque de choc
électrique ou endommagement de l'équipement, retirez
toujours les cordons électriques en travaillant avec l'appareil.
CAUTION: While working with the unit, observe standard
Electrostatic Discharge (ESD) precautions to prevent
damage to micro-circuitry or static-sensitive devices.
Register First
Before starting, it is essential that you activate your
Overland warranty. Technical and warranty support are not
available until this is done:
1. Go to the Overland Storage web site
(http://www.overlandstorage.com/).
2. Click the
Service & Support
tab.
3. Select
My Products > Register New Product
.
4. At the Site Login, enter your e-mail address and
password (Figure 1).
NOTE: If you are not yet a member, click “New member?” and
follow the instructions given. It’s free and easy!
Figure 1. Support Site Login
5. Fill in the information and click
Submit
.
IMPORTANT: Within three business days, you will receive
an e-mail from Overland with your warranty certificate.
Follow the instructions included to complete the process.
Unpack the Library
WARNING: Exercise care when unpacking and moving the
NEO 8000e Library. Due to its size and weight, it is
recommended that at least two people be involved with the
unpacking process.
AVERTISSEMENT: soyez prudent lors du déballage et du
déménagement de la bibliothèque NEO 8000e. En raison
de sa taille et son poids, il est recommandé qu'au moins deux
personnes aident au déballage.
CAUTION: Read and become familiar with this entire
document before starting this unpacking procedure. Steps
performed out of sequence may cause damage to the library
which voids existing warranties.
NOTE: Retain all packaging materials in a protected place in
case the library needs to be shipped to a different location.
These tools are required to unpack and install the library:
9/16” wrench
10” adjustable wrench
Box knife
#2 Phillips stubby or offset screwdriver
#2 Phillips screwdriver
Level, at least 10 inches long (25cm)
Remove the Outer Carton
1. Position the shipping container on a level surface
with adequate clearance to work around it (Figure 2 on
page 2).
NOTE: The container pallet and box is labeled “RAMP SIDE”
on the removal side.
Allow at least 10 ft. (3.0m) of clearance on the
removal side of the container.
Allow about 3 ft. (1.0m) of clearance around the other
three sides.
Allow at least 8 ft. (2.5m) of vertical clearance.
*10400292-001*
NEO 8000e Quick Start Guide Unpack the Library
10400292-002 05/2013 ©2010-13 Overland Storage, Inc. Page 2 of 4
Figure 2. Unpacking Space Requirements
2. Remove the outside packaging (Figure 3).
a. Cut the shipping straps and remove.
b. Remove the edge boards from the top of the box.
c. Remove the corner boards from the sides of the box.
d. Remove the top cap.
e. Release and remove all of the plastic retainers (on
opposite corners).
f. Remove the two (2) large pieces of cardboard
surrounding the library.
Figure 3. Library Packaging Components (Rear View)
3. Remove the inner packaging (Figure 4).
a. Holding the RAMP and DOOR boxes, remove the two
(2) Top Spacers.
b. Remove the RAMP and DOOR boxes and set them
aside.
c. Remove the plastic bag that covers the library.
Figure 4. Ramp and Door Box Locations
Detach the Pallet
Once the cardboard pieces are removed, you can remove the
hardware that secures the library to the pallet.
1. Remove the ramps from the RAMP box and lay them
down, placing the brackets into the corresponding slots
on the rear of the pallet (Figure 5).
Figure 5. Placing the Ramps in Position
Ramp
Floor
Allow at least 10 ft. in
the rear to remove the
library from the pallet
Allow 3 ft.
around
the library
Allow 8 ft.
vertical
clearance
Plastic
Boards
Corner
Shipping
Retainers
Straps
Top Cap
Boards
Edge
RAMP Box
(Library hidden for clarity)
Front
Top
DOOR Box
Spacers
(Library hidden for clarity)
Slots
Ramps
NEO 8000e Quick Start Guide Unpack the Library
10400292-002 05/2013 ©2010-13 Overland Storage, Inc. Page 3 of 4
2. Remove the rear hardware holding the library on the
pallet:
a. To access the hold-down bolts and leveling legs,
remove the rear crosspiece (Figure 6).
Use a #2 Phillips screw driver to remove the
crosspiece screws. Then, lift and slide to remove.
Figure 6. Removing the Rear Crosspiece
b. Using the 9/16” wrench, remove the two bolts and
hold-down brackets.
c. Use a 10” adjustable wrench to raise the two
leveling legs at least to the wheel tops (Figure 7).
Figure 7. Raising the NEO 8000 Leveling Legs
3. Remove the front hardware holding the library on the
pallet:
a. Using a #2 Phillips screw driver, remove the
crosspiece screws.
b. Lifting one end of the crosspiece at a time, use the 9/
16” wrench to remove the bolts and hold-down
brackets securing the library to the pallet.
c. Using care not to allow the library to come off the
pallet, move the library back just far enough to lift
the front crosspiece out.
d. Use the 10” adjustable wrench to loosen and raise the
two leveling legs at least to the wheel tops
(Figure 7).
4. Verify that all four leveling legs can clear the floor at
the bottom of the ramp and that the library is only
supported by the four caster wheels.
WARNING: Most of the weight of a library is located in
the rear. If the leveling legs are not raised high enough,
they can catch at the bottom of the ramps, tipping over the
library.
AVERTISSEMENT: la plupart des poids d'une
bibliothèque est située à l'arrière. Si les pieds de
nivellement ne sont pas élevés assez haut, ils peuvent
prendre au bas de la rampe et faire basculer la bibliothèque.
5. Using two people, carefully move the library down the
ramps and onto the floor.
CAUTION: To prevent damage, do not pull on the media
drawer handles at any time while moving the library.
Attach the Front Doors
Before moving the library to its final operating position,
attach the doors.
CAUTION: The holes used to attach the NEO 8000e front
doors are self-tapping. Care must be exercised during the
attachment of the front library doors. If the screws are
overtightened, the hole may strip. Hand tighten only.
NOTE: The square, straight end of the door is the top and the
curved end is the bottom.
1. Remove the two doors from the DOOR shipping box
and extract them from their plastic shipping bags.
2. Using the supplied Phillips screws, attach the left door
hinges to the frame (Figure 8).
3. Repeat Step 2 for the right door.
Figure 8. Attaching the Door Hinges
Attach the Optional Rear Door
If the optional rear door was purchased with the library,
follow the instructions that came with the door to install it at
this time.
Remove Rear Crosspiece
Bolts and
(Library hidden for clarity)
Brackets
http://support.overlandstorage.com
You can get additional technical support on the Internet at the Overland Storage Support web page, or by contacting Overland Storage using
the information found on the Contact Us page on our web site.
NEO 8000e Quick Start Guide Position and Level the Library
10400292-002 05/2013 ©2010-13 Overland Storage, Inc. Page 4 of 4
Position and Level the Library
Move the library into its final position and level it:
CAUTION: To prevent damage, do not pull on the media
drawer handles at any time while moving the library.
1. Position the library at its operating location.
2. Run down all four leveling legs by hand until they
contact the floor.
3. Using the 10” adjustable wrench, turn each leveling
leg, one after the other in equal increments, until you
have turned them at least one full turn.
NOTE: Be sure the library has been raised high enough so
none of the casters touch the floor.
4. Place the level, front to rear, on the top side edge of
the library (Figure 9).
5. Note the position of the bubble. Raise both of the front
legs or both of the rear legs the same amount to
achieve a level front-to-rear reading.
6. Place the level across the top front edge of the library.
7. Note the position of the bubble. Raise both of the left
feet or both of the right feet the same amount to
achieve a level side-to-side reading.
8. Recheck the level from front-to-rear and from side-to-
side. Adjust as needed until the library is level.
Figure 9. Positioning the Level
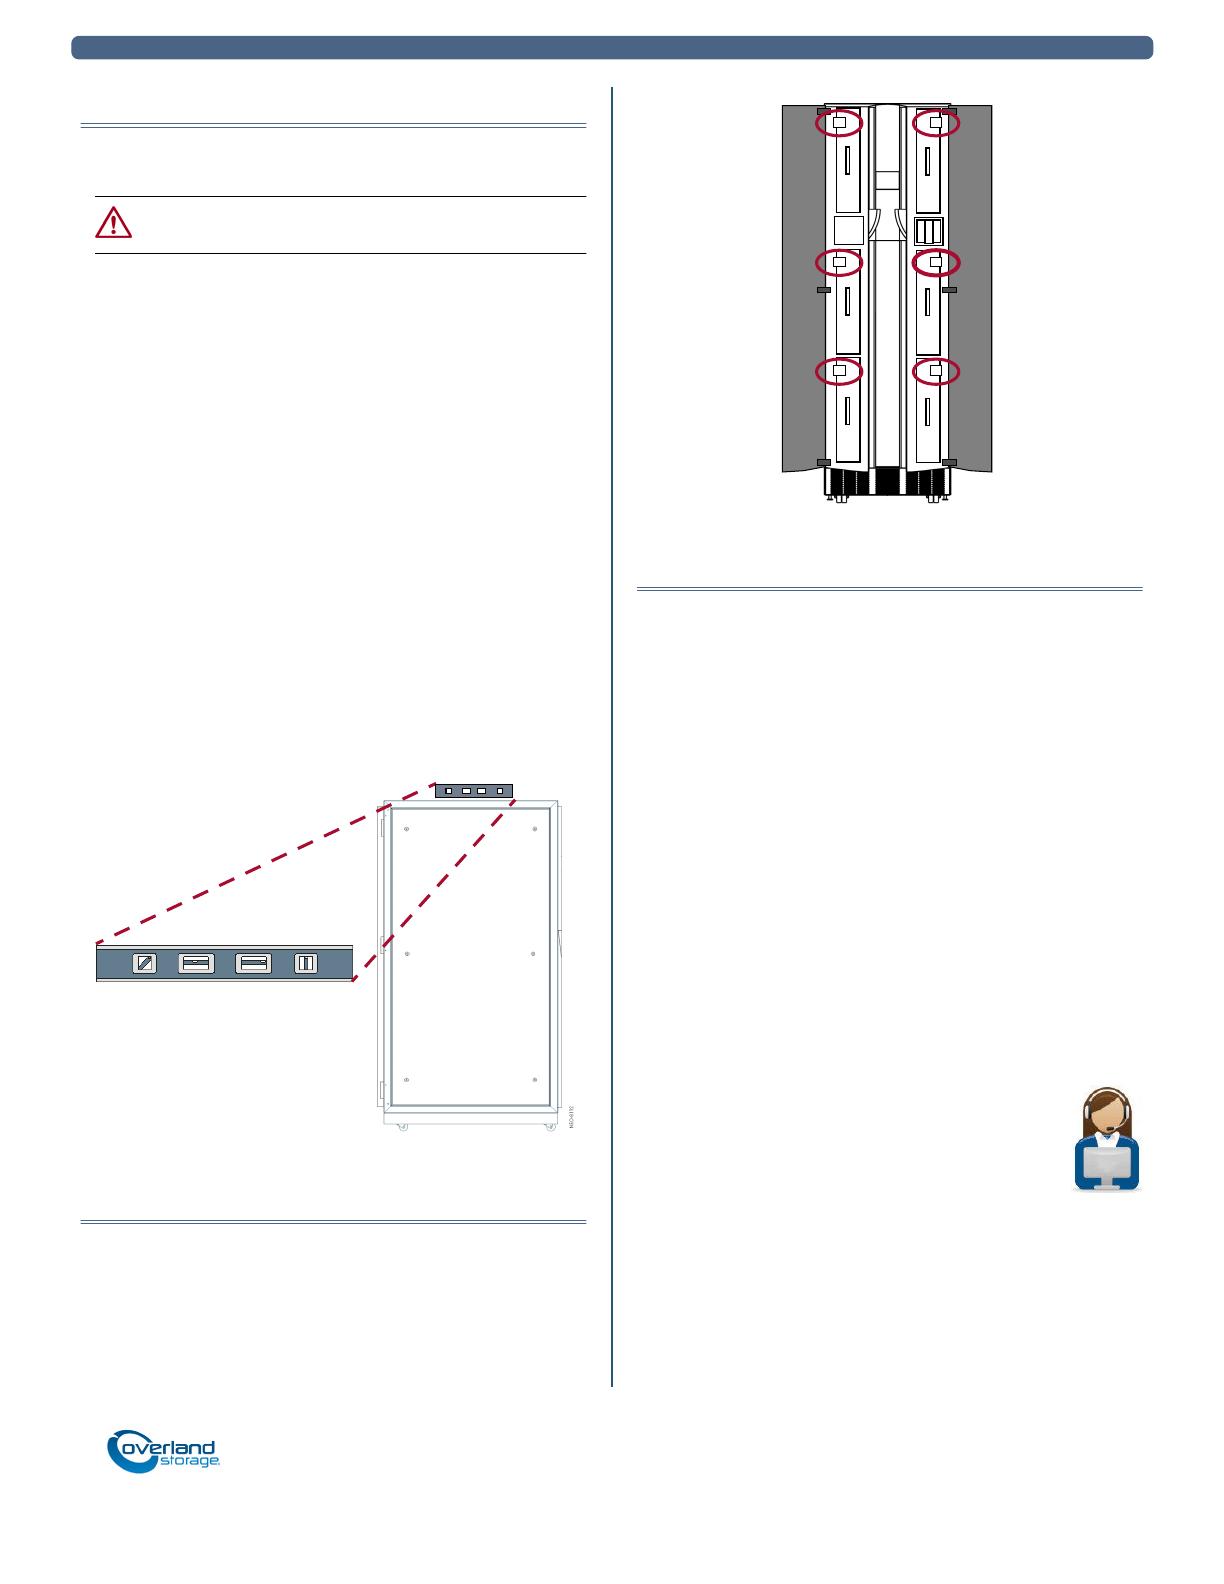
Remove the Drawer Brackets
Once the library is in position, use a #2 Phillips stubby or
offset screwdriver to remove the six drawer shipping
brackets located inside the doors (Figure 10) on the side trim
pieces. Replace the screws back into the trim pieces and
retain the brackets with the shipping carton.
Figure 10. Removing the Drawer Shipping Brackets
Additional Information
Your library is now ready to install and connect the tape
drive assemblies (ordered separately), connect any network
management cables, and power it on.
Follow the instructions that come with the tape drive
assemblies to install them. Additional information and
documentation for the NEO 8000e is available online.
User Guide
For detailed information on configuration and setup of your
library, including expansion and partitioning, refer to the
NEO 8000e User Guide. It is available online at:
http://docs.overlandstorage.com/neo
Warranty and Technical Support
For warranty and technical support information, see our
Contact Us web page:
http://www.overlandstorage.com/company/contact-us/
index.aspx
For information on contacting Overland
Technical Support, see our Contact Support page:
http://docs.overlandstorage.com/support
To search for more service information, visit our
Expert Knowledge Base System:
http://support.overlandstorage.com/kb
If you want to be notified whenever a change is made, click
Watch Category in the Tools box on the upper right on the
Knowledge Base sub-category pages.
  • Page 1 1
  • Page 2 2
  • Page 3 3
  • Page 4 4

Overland Storage NEO 8000E Quick start guide

Type
Quick start guide

Overland Storage NEO 8000E is an enterprise library designed to provide reliable and scalable data storage and retrieval solutions for demanding IT environments. With its robust construction, flexible configuration options, and advanced features, the NEO 8000E is ideal for organizations seeking a high-performance and versatile storage solution. Here are some of its key capabilities:

  • High Capacity: The NEO 8000E offers massive storage capacity, allowing you to store vast amounts of data in a single system. Its modular design enables easy expansion as your storage needs grow.

  • Fast Data Access: Equipped with high-speed tape drives and intelligent data management algorithms, the NEO 8000E delivers rapid data access, minimizing wait times and improving overall system performance.

Ask a question and I''ll find the answer in the document

Finding information in a document is now easier with AI