
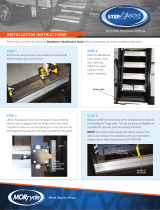
Tools Needed
• ⁄" Wrench
• ⁄" Allen Wrench
• ⁄" Wrench
www.MORryde.com • 574.293.1581
Heavy. Duty. Adventure.
STEP 1
Remove (2) driver-side bolts
from the Spare Tire Carrier
INSTALLATION INSTRUCTIONS
STEP 3
Fasten the driver-side MOLLE
grid bracket to the driver-side
support using (4) supplied
¼"-20 button head bolts.
STEP 4
Install the passenger-side
rack support by inserting
(2) supplied hinge clips into
the right-most holes in the
tailgate hinges.
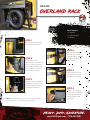
Overland rack
STEP 2
Line up the holes in the
driver-side support with the bolt
holes in the Spare Tire Carrier.
Install the M8-2.5 x 80mm bolts.
Do not tighten the bolts down
until assembly is complete.
JK
YJ
TJ
C
J
JP54-035
STEP 5
Bolt through the support
into the hinge clips using
(2) supplied 5/16"-18 bolts.
NOTE: Heavy Duty Hinges may need to be adjusted after loading
the Overland rack to accommodate the added weight.
STEP 6
Install the Cross-Support
Bracket using (4) supplied
¼”-20 button head bolts
and (4) supplied ¼”-20
nylock nuts.

www.MORryde.com • 574.293.1581
Heavy. Duty. Adventure.
STEP 7
Place the tray on top of the supports. Line up the
bolt holes to ensure that the tray is oriented in the
correct direction. Fasten the tray to the supports
using (9) supplied ¼”-20 button head bolts and
(9) supplied nylock nuts.
STEP 9
Ensure that the Overland Rack Tray is level
to the ground and tighten down the hardware
installed in Step 2.
STEP 8
Add supplied U bracket support strap.
INSTALLATION INSTRUCTIONS
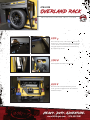
Overland rack
JK
YJ
TJ
C
J
JP54-035
-
 1
1
-
 2
2


Ask a question and I''ll find the answer in the document
Finding information in a document is now easier with AI
Related papers


Other documents
-
 Warrior Products 832 Installation guide
-
 MOR/ryde STP42705H User manual
-
 Addictive Desert Designs ADD-Lander Quick start guide
-
Jeep UNIVERSAL CJ-3A Owner's manual
-
Overland Storage NEO 8000E User manual
-
Overland Storage NEO 8000 Installation guide
-
Go Rhino 5950030T Installation guide
-
 Addictive Desert Designs ADD-Lander Installation Instructions Manual
-
 Willys Ford GPW Technical Manual
-
Blue Ox BX1154 Operating instructions


