Page is loading ...

Motion 701, 501 BTE
English
Deutsch
Français
Italiano
Nederlands

2
English 3
Deutsch 29
Français 55
Italiano 81
Nederlands 109

3
Content
EN
DE
FR
IT
NL
Content
Your Motion BTE hearing instrument 4
Intended use 6
General notes on safety 7
Handling of standard and rechargeable batteries 10
Inserting and removing your hearing instrument 13
Turning your hearing instrument on and off 14
Changing the hearing program 16
Changing the volume 17
Functionalities 18
Maintenance and care 21
Accessories 22
Troubleshooting tips 24
Technical information 25
Disposal information 27

Your Motion BTE hearing instrument
4
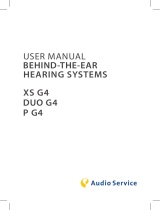
Motion S
optional with LifeTube
battery type: 312
always non-rechargeable
① Earhook
② LifeTube
③ Life Tip
④ Rocker switch*
⑤ Push button*
⑥ Flat cover*
⑦ Microphone openings
⑧ Battery compartment
⑨ Serial number
⑩ Type of hearing instrument
* Alternative to a rocker switch your Hearing Care Profes-
sional can fi t your hearing instrument with a push button
or without control (fl at cover).
Your Motion BTE hearing instru-
ment

Your Motion BTE hearing instrument
5
EN
DE
FR
IT
NL
Motion P
optional with LifeTube
battery type: 13
rechargeable or non-rechargeable
① Earhook
② LifeTube
③ Life Tip
④ Rocker switch
⑤ Push button
⑥ Microphone openings
⑦ Battery compartment
⑧ Charging contacts
⑨ Serial number
⑩ Type of hearing instrument

Intended use
6
Hearing instruments are intended to improve the hearing
of hearing impaired persons. Diagnosis and prescription
of a hearing instrument must be performed by hearing
health specialists, e.g. ENT doctors, audiologists or acous-
ticians.
Read and follow the instructions of this user guide to
avoid injuries or damage to the hearing instruments.
Symbols:
Be aware to information marked with the warning symbol
WARNING, CAUTION or NOTICE!
WARNING points out a situation that could
lead to serious injuries, CAUTION indicates a
situation that could lead to minor and moderate
injuries.
NOTICE
NOTICE indicates possible property damage.
Advice and tips on how to handle your device
better.
Instruction. Indicates that something has to be
done.
Indicates an option that not every hearing
instrument has. Ask your Hearing Care Profes-
sional to check off the relevant information.
Intended use

General notes on safety
7
EN
DE
FR
IT
NL
NOTICE
Your hearing instruments are sensitive to ex-
treme heat, high humidity, strong magnetic fi elds
(>0.1T), X-rays and mechanical stress.
Do not expose your hearing instruments to
extreme temperature or high humidity.
Do not leave them in direct sunlight.
Do not wear them in the shower or when you
apply make-up, perfume, aftershave, hairspray
or suntan lotion.
Do not wear your hearing instruments when
you are exposed to short-waves, a strong mag-
netic fi eld, a high frequency fi eld or X-rays.
Do not place your hearing instruments in a
microwave oven.
WARNING
Hazard of explosion!
Do not use your hearing instruments in areas
where there is a danger of explosions (e.g. min-
ing).
General notes on safety

Intended use
8
WARNING
Choking hazard posed by small parts.
Keep hearing instruments, batteries and acces-
sories out of children‘s reach.
If swallowed consult a physician or hospital im-
mediately.
If infants, small children or mentally disabled
persons need to wear hearing instruments
ensure adequate supervision.
CAUTION
Risk of injury caused by incorrect use of Life Tip.
Always wear the LifeTube with the Life Tip.
Make sure that the Life Tip is completely at-
tached to the Life Tip adapter.
Change the LifeTube or Life Tip when they are
cracked.
Put the LifeTube with the Life Tip carefully and
not too deep into the ear.
Use the LifeTube and Life Tip only in the way
described in this user guide.
If the Life Tip remains in the ear, have it re-
moved by a medical professional.

Intended use
9
EN
DE
FR
IT
NL
In some countries restrictions for the usage of
wireless equipment exist.
Refer to local authorities for further informa-
tion.
NOTICE
Leaking batteries damage the hearing instruments.
Turn the hearing instruments off when not in
use to preserve the battery.
Remove batteries when the instruments are not
in use for a prolonged period of time.
NOTICE
Batteries contain harmful substances that pollute
the environment.
Do not throw used batteries into household
trash.
Dispose batteries according to national regu-
lations or return them to your Hearing Care
Professional.

Handling of standard and rechargeable batteries
10
original size
Always use the right size of batteries.
Charge the rechargeable batteries before fi rst
use.
Remove the tab on standard batteries only
when you are ready to use them.
The positive (+) side of the batteries is always
the smooth side.
Always keep spare batteries with you.
Low battery indicator
Your Hearing Care Professional can activate an acoustic
signal to inform you when the battery is nearly empty. If
you hear an acoustic signal or experience low amplifi ca-
tion power, replace the battery.
Handling of standard and re-
chargeable batteries

Handling of standard and rechargeable batteries
11
EN
DE
FR
IT
NL
Inserting the battery
Open the battery compartment com-
pletely using your fi ngernail as shown
in the illustration.
Insert the proper size battery.
Make sure that the "+" symbol on the
battery points up as shown in the
picture
Close the battery compartment.
Do not force the door shut. If it does not
close easily, check to see if the battery
was inserted properly.
When the battery door is completely
closed, your hearing instrument is ready
for use.

Handling of standard and rechargeable batteries
12
Removing the battery
Open the battery compartment completely.
Normally the battery drops out when
the compartment is completely open.
If the battery does not come out, lightly
tap the instrument or use the magnet
stick available as accessory to remove
the battery.

Inserting and removing your hearing instrument
13
EN
DE
FR
IT
NL
For side recognition ask your Hearing Care
Professional to apply colored markers in the bat-
tery compartment. If the marker in the battery
compartment is in red, the hearing instrument is
intended for the right ear. If the marker is in blue,
the hearing instrument is for the left ear.
Inserting your hearing instrument
Turn your hearing instrument
off.
Hold the earmold / Life Tip
between your thumb and index
fi nger and insert it carefully into
the ear canal.
You may fi nd it helpful to pull
your ear slightly upward or to the back.
Place your hearing instrument behind your ear.
Turn your hearing instrument on.
Removing your hearing instrument
Hold the earmold / LifeTube
between your thumb and index
fi nger and carefully pull it out.
You may fi nd it helpful to lightly
push your ear from the back.
Inserting and removing your
hearing instrument

Turning your hearing instrument on and off
14
Ask your Hearing Care Professional to check off the
relevant information.
Via battery compartment
On
Close the battery compartment.
Off
Open the battery compartment.
Via push button
On
Press the push button for 2
seconds.
Off
Press the push button for 2 seconds.
Via remote control
Refer to the remote control user guide.
Turning your hearing instrument
on and off

Turning your hearing instrument on and off
15
EN
DE
FR
IT
NL
Power-on delay
Your hearing instrument is equipped with a "power-on
delay" feature which can be activated by your Hearing
Care Professional. This allows you to turn the hearing
instrument on with an automatic delay of 6, 12 or 18
seconds, so that you may insert the hearing instrument
into your ear without experiencing unpleasant feedback
(whistling).

Changing the hearing program
16
Ask your Hearing Care Professional to check off the
relevant information.
Via push button
Press the push button to switch to
the next program.
Via rocker switch
Press up to switch to the next
program.
Press down to switch to the previ-
ous program.
Via remote control
Refer to the remote control user guide.
Changing the hearing program

Changing the volume
17
EN
DE
FR
IT
NL
The volume of your hearing instruments is controlled
automatically and there is no need to manually adjust it.
Should you prefer manual volume control, your Hearing
Care Professional can program the hearing instrument for
manual adjustment.
Automatic
The volume is adjusted automatically when in use.
Rocker switch
Press up to increase the volume.
Press down to decrease the
volume.
Via remote control
Refer to the remote control user guide.
Changing the volume

Functionalities
18
Your Hearing Care Professional can activate the following
functionalities.
e2e wireless
■ Allows the use of a remote control.
■ Automatically adjusts both hearing instruments
simultaneously to change the instrument set-
tings, e.g. volume or program.
The performance of the e2e wireless func-
tion may be affected by electromagnetic
interference – e.g. from a computer monitor
or fl uorescent lamp system.
Move away from the source of interfer-
ence if you experience diffi culty.
Automatic telephone program
Hold a telephone near your hearing instrument
(*).
The hearing instrument automatically switches
to the telephone program.
Move the telephone away from your hearing
instrument.
The hearing instrument switches back to the
previously used program.
Functionalities

Functionalities
19
EN
DE
FR
IT
NL
You can also select the telephone program
manually by using the program button.
When operating the hearing instrument in
telecoil mode, the wireless function may cause
a pulsing noise. This is due to the pick-up of the
transmission signal. When your hearing instru-
ment is in telecoil mode please use the remote
control only with a distance greater than 10 cm
(4 inches).
(*) AutoPhone magnet accessory
Not all telephones produce a magnetic fi eld strong
enough to activate the AutoPhone function. In this case,
use the Siemens AutoPhone magnet, which is available
as accessory, and attach it to the telephone receiver to
activate the AutoPhone function.
See the AutoPhone magnet user guide for
instructions on how to position the magnet.
Use only the Siemens magnet. Ask your Hearing
Care Professional for this accessory.

Functionalities
20
NOTICE
Magnets can disturb electrical devices and delete
stored data.
Keep magnets away from computers, color
monitors, television sets, fl oppy discs, video-
and audio discs and other electronic equipment/
devices.
WARNING
Magnets may interfere with the operation of life
supporting systems (e. g. pacemakers, magnetic
valves).
Use a magnet only if not in doubt about the safe
distance. The safe distance between pacemaker
and magnet should be at least 10 cm (4 inches).
/