Page is loading ...

iBEAM Vehicle Safety Systems
®
iBEAMUSA.com © COPYRIGHT 2021 METRA ELECTRONICS CORPORATION
REV. 1/21/2021 INSTTE-JEEP-BU-2
TE-JEEP-BU-2
INSTALL ATION INSTRUCTIONS
Attention! Let the vehicle sit with the key
out of the ignition for a few minutes before
removing the factory radio. When testing the
aftermarket equipment, ensure that all factory
equipment is connected before cycling the
key to ignition.
TOOLS REQUIRED
• Lug Wrench • 9/32" screwdriver
• Cutting tool • Tape • Pry tool
TABLE OF CONTENTS
Camera Installation ........................................... 2-5
App Configuration .................................................6
Camera Specifications ...........................................7
Jeep Wrangler Multi-adjustable bracket
2007-2018* *2018 JK trim level only
Visit
iBeamUSA.com for more detailed information about the product and up-to-date vehicle specific
applications
KIT COMPONENTS
• A) Camera and wiring (2) • B) Bracket and push nuts (2) • C) AX-ADDCAM and harnessing A
A C B C
INTERFACE FEATURES
• Ability to work with multiple cameras (up to 4)
• CAN-data Controlled Triggers
• Analog triggers also available

1.800.221.0932
|
iBEAMUSA.com
2
Tire removal and camera Installation:
1. Remove the spare tire, then run the wire
for the camera through the bracket. But
DO NOT pop in the camera until installed
and visually verified working. Run the
wire through the spare tire mount and
through the grommet following the
factory brake light wiring. (Figures A & B)
2. Install the (2) push nuts provided onto
the top two spare tire studs to hold the
bracket in place without the tire being
installed. (Figure C)
3. Remove the panel from the tailgate, then
run the camera wire into the vehicle,
following the factory brake wire loom.
(Figure D)
4. Once the camera wire is secure and zip
tied to the factory wiring, re-install the
panel back to the tailgate.
5. Route the camera wiring through the
vehicle and onto the radio cavity.
Continued on the next page
CAMERA INSTALLATION
(Figure A) (Figure C)
(Figure B)
(Figure D)

REV. 4/1/2019 I
NSTTE-JEEP-BU-2 3
Radio removal - Wrangler 2011-up:
6. Unclip and remove the power window
switches then remove the (1) 9/32"
screw from underneath. (Figure E)
7. Unclip and remove the panel below the
steering column.
8. Remove (2) 9/32" screws from the
bottom edge of the radio/instrument
cluster trim panel on either side of the
steering column. (Figure G)
9. Remove the pad in the pocket on top
center of dash then remove (1) 9/32"
screw underneath. Remove dash panel
from around radio and instrument
panel. (Figure H)
R
emove (2) 9/32" screws from the
bottom edge of the radio/instrument
cluster trim panel on either side of the
steering column. (Figure G)
Remove the pad in the pocket on top
center of dash then remove (1) 9/32"
screw underneath. Remove dash panel
from around radio and instrument
panel. (Figure H)
CAMERA INSTALLATION (CONT.)
(Figure E) (Figure G)
(Figure F) (Figure H)

4
Continue to the next page
CAMERA INSTALLATION (CONT.)
(Figure I)
(Figure J)
1
2
3
54
6
Radio removal Wrangler - 2007-2010:
10. Unclip and remove the Lower center trim
below A/C controls. (Figure I)
11. Remove (2) Phillips screws exposed behind
lower center panel. (Figure I)
12. Unclip and remover the upper center trim
starting towards the rear of the panel.
(Figure I)
13. Remove (2) Phillips screws exposed behind
upper center panel. (Figure I)
14. Unclip and remove entire panel surrounding
radio and climate controls, including A/C
vents.
15. Remove (4) 7mm screws securing the radio.
(Figure J)
1.800.221.0932
|
iBEAMUSA.com

5
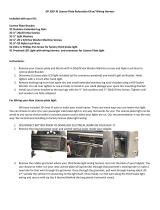
CAMERA INSTALLATION (CONT.)
(Figure K)
(Figure M)
(Figure L)
20in
22ft
16. Connect the power wire from the camera harness to
the RED wire on the AX-ADDCAM interface harness
labeled "Camera 12V"
NOTE: Make sure when configuring the interface, the
"Switched 12V with" option is set to
"Camera active". This will activate that wire when
the vehicle is in reverse. (Figure K)
17. Connect the BLACK wire from the camera harness to
chassis ground. (Figure K)
18. Connect the YELLOW RCA from the camera harness
to Yellow RCA labeled "Camera 1" from the AX-
ADDCAM harness.
19. Unplug the radio harnesses, then install the T-
harness. Some models-depending on features-may
not have a White 22-pin connector. The White 22-
pin connector from the T-harness still needs
connected to the radio though. (Figure's L & M)
20. Connect the female Yellow RCA from the T-harness
labeled "Camera Input" to the male Yellow RCA from
the AX-ADDCAM harness labeled" Camera Output". If
any additional cameras are being installed such as a
side view or front camera, connect them to the
Yellow female RCA jack.
REV. 4/1/2019 INSTTE-JEEP-BU-2

1.800.221.0932
|
iBEAMUSA.com
6
APP CONFIGURATION
1
.
Download and install the Axxess Updater
from www.
axxessinterfaces.com
. Open the app, then select Add-Cam Configuration.
(Figure A)
2. Select the year and screen size of the vehicle from the drop down menus,
then click the Configuration tab at the top. (Figure B)
Note: The Configuration
tab will be shown once the vehicle is selected.
3. Assign the camera inputs as they were wired in the vehicle. (Figure C)
4. The trigger assignments should be:
• Reverse.(Multiple cameras can be added)
5. If the cameras are wired to the red 12V “Camera Power” wire from the
AX-ADDCAM: From within the “Other Settings” section, use the drop
down menu to change Switched 12V with “Accessory Out”
6. Click “Write to Conf iguration”, then plug the interface into the T-harness.
7. These vehicles, since not equipped with a factory backup camera, will
require two 5-minutes key cycles for the radio to accept the AX-ADDCAM
interface. Programming will be complete after the second 5-minutes key
cycle.
• With all the doors of the vehicle shut, wait until the dome light goes
out, then cycle the key (or push-to-start button) to the ignition
position for 30-seconds.
• Cycle the key (or push-to-start button) off and wait until the dome
light goes out, then wait 5-minutes.
• Cycle the key (or push-to-start button) to the ignition position for 30-
seconds.
• Cycle the key (or push-to-start button) off and wait until the dome
light goes out, then wait 5-minutes.
• Turn the key (or push-to-start button) to the ignition position and test
all functions of the installation for proper operation.
(Figure A)
(Figure
C)
(Figure
B)

REV. 4/1/2019 INSTTE-JEEP-BU-2 7
CAMERA AND BRACKET SPECS

iBEAM Vehicle Safety Systems
®
iBEAMUSA.com © COPYRIGHT 2019 METRA ELECTRONICS CORPORATION
REV. 4/1/19 INSTTE-JEEP-BU-2
TE-
JEEP-BU-2
INSTALL ATION INSTRUCTIONS
KNOWLEDGE IS POWER
Enhance your installation and fabrication skills by
enrolling in the most recognized and respected
mobile electronics school in our industry.
Log onto www.installerinstitute.com or call
800-354-6782 for more information and take steps
toward a better tomorrow.
®
Metra recommends MECP
certified technicians
/