Smeg CPF30UGGR Operating instructions

Type
Operating instructions
Important Safety Instructions
3
EN
IMPORTANT SAFETY INSTRUCTIONS
WARNING: If the instructions contained in this manual are not followed
precisely, fire or explosion may result causing property damage, personal
injury or loss of life.
• Do not store or use gasoline or other flammable vapors or liquids near
this or any other appliance.
WHAT TO DO IF YOU SMELL GAS
• Do not try to light any appliance.
• Do not touch any electrical switches.
• Do not use any telephones in your building.
• Immediately call your gas supplier from a neighbor’s phone. Follow the
gas supplier’s instructions.
• If you cannot reach your gas supplier, call the fire department.
• Installation and service must be performed by a qualified installer,
service company or gas supplier.
READ AND SAVE THESE INSTRUCTIONS - Your safety and the safety of
others are very important.
We have provided many important safety messages throughout this manual and
on the appliance.
Read all the instructions before using the appliance and always obey all safety
messages.
RECOGNIZE SAFETY INFORMATION
This is a safety alert symbol. This symbol alerts you to potential hazards that can
result in severe personal injury or loss of life.
UNDERSTAND SIGNAL WORDS
A signal word - DANGER, WARNING or CAUTION - is used with the safety alert
symbol. DANGER denotes the most serious hazards. It means you could lose your
life or be seriously injured if you do not immediately follow the instructions.
WARNING means you could lose your life or be seriously injured if the instructions
are not followed. CAUTION indicates a potentially hazardous situation which, if
not avoided, could result in minor to moderate injury.
Important Safety Instructions
4
The safety messages will inform you of potential hazards, on how to avoid the risk of
injury and what can occur if the instructions are not followed.
IMPORTANT: Observe all codes and ordinances in force.
WARNING: For your safety, the instructions contained in this manual must be
followed to minimize the risk of fire or explosion and to prevent property damage,
personal injury or loss of life.
This conversion kit must be installed by a qualified service agency in accordance
with the manufacturer's instructions and all applicable codes and requirements of
the authority having jurisdiction.
• If the information in these instructions is not followed exactly, a fire, an explosion
or production of carbon monoxide may result causing property damage,
personal injury or loss of life.
The qualified service agency is responsible for the proper installation of this kit.
The Installation is not correct and complete until the operation of the converted
appliance is checked as specified in the manufacturer’s instructions supplied with
the kit.
• For an installation at altitudes above 2000 ft (610 mt) contact the Service Centre.
Installation shall not be considered correct and complete until the operation of the
converted appliance is checked as specified in the manufacturer's instructions
supplied with this kit.
WARNING
FIRE HAZARD
Securely tighten all gas connections. lf connected to LP, have a
qualified technician ensure that the gas pressure does not
exceed a 14” W.C.P. Examples of qualified technicians include
licensed heating personnel, authorized gas company personnel
and authorized service personnel.
FAILURE TO DO SO CAN RESULT IN LOSS OF LIFE,
EXPLOSION, OR FIRE.
Caution: Before proceeding with the conversion, the gas supply must be shut off
prior to disconnecting the electrical power.
Conversion Kit
5
EN
1 List of components
This conversion kit consists of the following
components:
• One label for LPG injectors
• One injector Ø 0.60 mm for
the Auxiliary burners.
• One injector Ø 0.80 mm for
the Semi-rapid burner.
• One injector Ø 0.54 mm for
the Ultra-rapid burner (internal crown).
• One injector Ø 1.10 mm for the Ultra-
rapid burner (external crown)
• One injector Ø 0.54 mm for the Ultra-
rapid Dual burner (internal crown).
• One injector Ø 1.10 mm for the Ultra-
rapid Dual burner (external crown).
• One injector Ø 1.20 mm for the Oven
burner.
• One injector Ø 1.05 mm for the Broiler
burner.
• One warning label change injectors
• One seal gasket
12.5x18.5x2 (mm).
2 Gas connection
Check that the main gas supply line to the
range is shut off and that the power supply
cord is disconnected.
Conversion Kit
6
3 Adaptation to different types of gas
To adapt the regulator to the type of gas used,
the following must be done:
1. Unscrew the cover of the pressure
regulator.
2. Unscrew the spring retainer from the cover.
3. Screw the spring retainer back on
according to the type of gas used (see the
following illustrations).
Natural Gas: Set pressure to 5” W.C.P.
Incoming line pressure of 6” - 10 1/2”
W.C.P maximum.
LP Gas: Set pressure to 10” W.C.P.
Incoming line pressure 11”- 13” W.C.P.
maximum.
Incoming line pressure upstream from the
regulator must be 1” (2.5 cm) W.C.P.
higher than the manifold pressure in
order to check the regulator.
The range must be isolated from the gas
supply piping system by turning off the
respective manual shut-off valve during any
pressure testing of the gas supply piping
system at test pressures equal to or greater
than 1/2 PSIG (3.5 kPa).
4 Replacing the rangetop's burners
nozzles:
1. Remove all the grates and all the burner
caps (1) and heads (2);
2. Unscrew the burner nozzles with a 7 mm
socket wrench;
Conversion Kit
7
EN
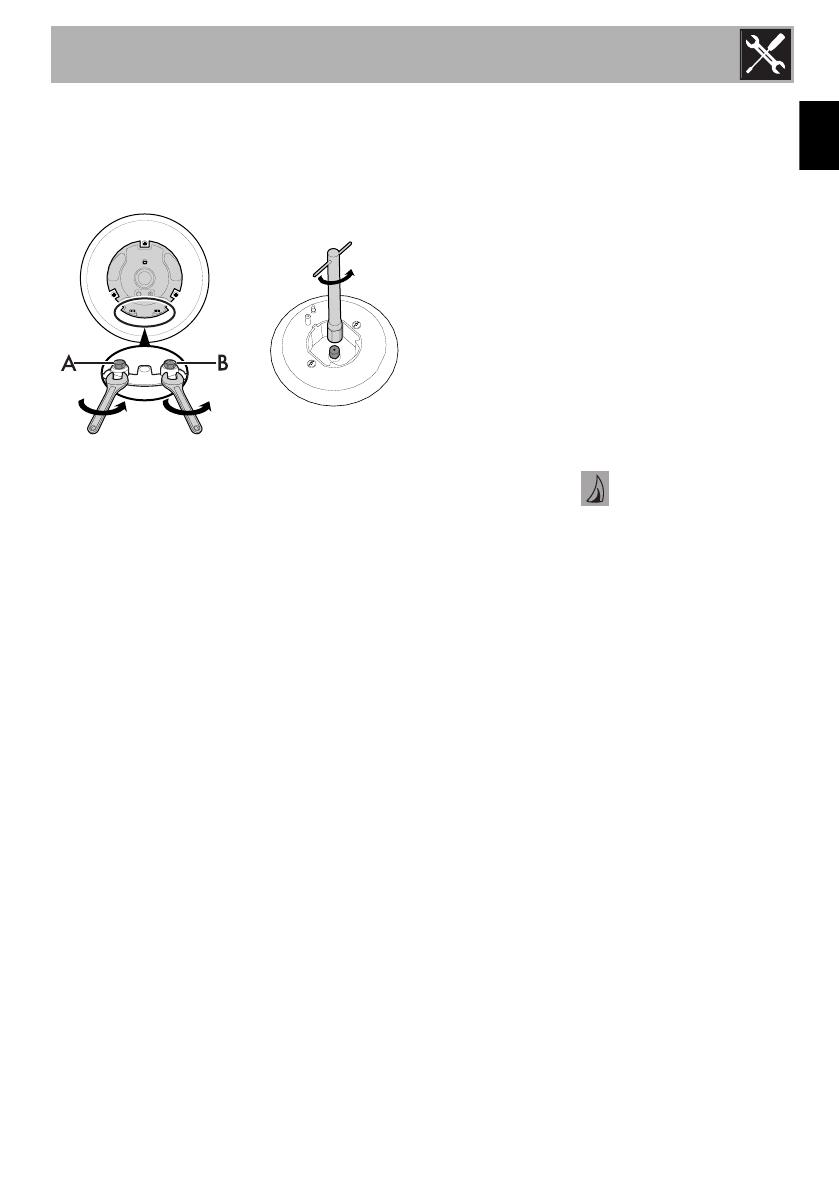
3. Replace the nozzles according to the
type of gas to be used and the
description in section 3.2 “Burner and
nozzle characteristics table”.
Ultra-rapid Dual burner
(A) Internal crown - (B) External crown
4. Put the burners back in their correct
position. Make sure that the holes of the
flame-spreader crowns are aligned with
the thermocouples (3) and igniters (4).
5 Test the appliance
Follow these instructions to leak test the
appliance:
Use a brush and liquid detergent to test all
gas connections for leaks. Bubbles around
connections indicate a leak. If a leak
appears, shut off the gas valve controls and
adjust the connections. Then check the
connections again. Remove all the
detergent product from the range. Replace
the parts on the burner and turn the knobs
on the gas tap valves.
NEVER TEST FOR GAS LEAKS WITH A
MATCH OR OTHER FLAMES.
Check that the flame at the maximum flame
position has a blue color. It should be clean
and soft in character. No blowing or lifting
of flame should occur. Occasional orange
flashes are normal and reflect different
elements in the air or gas.
Wipe away all the detergent product from
the range.
Replace the parts on the burner and turn the
knobs on the gas tap valves.
6 Minimum adjustment
For natural Gas:
Light the burner and turn the knob to the
minimum position . Remove the gas tap
knob and turn the adjustment screw at the
side of the tap rod until the desired minimum
flame is achieved.
Refit the knob and verify that the burner
flame is stable (when turning the knob
rapidly from the maximum to the minimum
position the flame must not go out).
Repeat this operation on the remaining gas
taps on the cooktop.
For LP Gas:
Turn off the burners and unplug the
appliance from the electrical power supply.
For regulating the minimum with LP, the
screws at the side of the tap rod must be
turned clockwise all the way. Once the
regulation has been completed, replace the
seal on the by-passes using paint or similar
materials. Follow the instructions given in
point 9 to locate the adjustment screws.
Conversion Kit
8
7 Burner and nozzle characteristics tables
To adjust the range for LP gas or to return to Natural Gas use, refer to the charts below.
Natural Gas AUX SR UR DUAL int DUAL est OVEN BROILER
QT (BTU)
4500 8000 20000 4500 15500 16500 13000
Injector Ø (mm)
0.90 1.20
0.90+1.80
0.90 1.75 1.80 1.60
QR (BTU)
1200 1600 5200 800 4200 - -
LP AUX SR UR DUAL int DUAL est OVEN BROILER
QT (BTU)
4200 7500 18000 4000 14000 16500 12500
Injector Ø (mm)
0.60 0.80
0.54+1.10
0.54 1.10 1.20 1.05
QR (BTU)
1200 1600 5200 800 4200 - -
By-pass (mm)
0.33 0.39 0.70 0.30 0.63 - -
NOTE: Save the nozzles that were removed from the appliance along with these
instructions for possible future use.
WARNING
FIRE HAZARD
Use a soapy solution to check that it is leak-tight.
Never test for gas leaks with a match or other flames.
Failure to follow this instruction can result in loss of life or fire.
Conversion Kit
9
EN
8 Combustion products
The combustion products may be extracted
by means of hoods connected to a natural
draught chimney whose efficiency is certain
or via forced extraction. An efficient
extraction system requires precision
planning by a specialist qualified in this
area and must comply with the positions
and distances indicated by the applicable
standards.
When the job is complete, the installer must
issue a certificate of conformity.
1 Extraction using a hood
2 Extraction without a hood
A Single natural draught chimney
B Single chimney with extractor fan
C Directly outdoors with wall- or window-
mounted extractor fan
D Directly outdoors through wall
Air
Combustion products
Extractor fan
Conversion Kit
10
9 Final operations
• Completely fill out the conversion label
(part no. 92849A078) and attach it to
the rear of the appliance. Do not cover
any other labels with the conversion
label.
• Over time the gas taps may become
difficult to turn and get blocked. Clean
them internally and replace the
lubrication grease.
• Save the nozzles removed from the unit
along with these instructions for possible
future use.
• For installation of the appliance at high
altitude, please consult your local gas
company for their recommendation on
the correct orifice sizes and any other
necessary adjustments that will provide
proper gas combustion at specified
altitudes.
10 Natural Gas
To convert back to Natural Gas, follow
steps 1 through 7 and replace the nozzles
in the order in which they were removed.
Lubrication of the gas taps should
be performed by a specialized
technician.
  • Page 1 1
  • Page 2 2
  • Page 3 3
  • Page 4 4
  • Page 5 5
  • Page 6 6
  • Page 7 7
  • Page 8 8

Smeg CPF30UGGR Operating instructions

Type
Operating instructions

Ask a question and I''ll find the answer in the document

Finding information in a document is now easier with AI