Page is loading ...

There are videos on https://wrensports.com/tech-resources/ that show how to service
and adjust the Wren fork.
All Wren forks can be adjusted for travel only or, AC (axle-to-crown length) and travel together and equally in
10 mm increments. We include the necessary travel clips with each fork. All adjustment is done on the air side
only.
The adjustment range for travel only is:!
110 mm travel forks can be reduced to 100, 90 or 80 mm of travel!
150 mm travel forks can be reduced to 140, 130 or 120 mm of travel
The adjustment range for AC / travel together is:!
530 mm AC / 110 mm travel forks can be reduced to 520 / 100, 510 / 90 or 500 / 80!
570 mm AC / 150 mm travel forks can be reduced to 560 / 140, 550 / 130 or 540 / 120
Travel only adjustment instructions:!
!
Place your bike in a work stand and remove the front wheel.
1. Remove the blue air cap from the left leg. You do not have to release all air from the fork for TRAVEL
ONLY adjustments.
2. Loosen and carefully remove the air spring assembly nut (large silver nut below the blue air cap) with a 26
mm socket. This nut is low profile and care should be taken to firmly engage the socket. Flat bottom
sockets are recommended. DO NOT remove the red air spring assembly cap.
3. Unscrew the collar on the stanchion by hand. A piece of old tube can be used as a grip. Now the air spring
can be pulled out including the air side stanchion from the bottom of the fork.
4. The rod you see on top of the stanchion is the top of the air spring. You will see a black clip already
attached to the top of the rod. This is a safety clip to prevent damage to the fork should you bury the fork
off a big jump. This clip ALWAYS remains in the top position on the rod.
5. Install the 10 mm, or 20 mm, or both clips for 30 mm of reduction directly below the black safety clip. You
do this by “clipping” it on the rod through the cutout on the side of the clip. That’s all there is to it!
6. Before inserting the stanchion back into the upper tube, check that the upper bushing cap that locks the
air spring into the stanchion is tight. Use a pin wrench in the 2 small holes on top of the cap. Also, check
that the bushings and keys are properly greased.
7. Now slide the stanchion back up into the upper tube. Push up on the bottom of the stanchion so you can
fully engage the 26 mm nut onto the air spring threads and tighten to 10 Nm with a torque wrench.
8. Slide the lower bushing into the upper tube so it is flush with the bottom of the upper tube. Slide the
stanchion collar up and tighten as much as possible by hand using a piece of old tube for grip.
Suspension Fork Travel and
AC/Travel Adjustments

AC and Travel adjustment instructions:
Warning: At this stage, please absolutely make sure that all the air has been released from the air
spring unit to avoid severe or fatal injuries. TwinAir forks must be emptied top and bottom.
Place your bike in a work stand and remove the front wheel.
1. Remove the blue air cap from the left leg. Be sure all air is released from the fork.
2. Loosen and carefully remove the air spring assembly nut (large silver nut below the blue air cap) with a 26
mm socket. This nut is low profile and care should be taken to firmly engage the socket. Flat bottom
sockets are recommended. DO NOT remove the red air spring assembly cap.
3. Unscrew the collar on the stanchion by hand. A piece of old tube can be used as a grip. Now the air spring
can be pulled out including the air side stanchion from the bottom of the fork.
4. The rod you see on top of the stanchion is the top of the air spring. The rod goes through the stanchion
assembly cap on top of the stanchion. This cap has two holes. Use a pin wrench in these two holes to
loosen and remove this cap from the stanchion.
5. Grab the rod by hand and pull the air spring assembly out of the stanchion. This may take a little effort.
6. For this adjustment, the clip is placed on the bottom of the air spring rod below both springs and above
the white piston. Install the 10 mm, or 20 mm, or both clips for 30 mm of reduction in this position. You do
this by “clipping” it on the rod through the cutout on the side of the clip. That’s all there is to it!
7. Before inserting the air spring back into the stanchion, if you have been riding the fork, check that the coil
springs and o-rings on the piston are properly greased.
8. Insert the air spring back into the stanchion white piston first. You will have to release air through the top
valve as you push the air spring back into the stanchion. CAREFULLY thread the stanchion assembly cap
back into the stanchion making sure not to cross-thread the cap and securely tighten with the bent nose
pliers.
9. Before inserting the stanchion back into the upper tube, check that the bushings and keys are properly
greased.
10. Now slide the stanchion back up into the upper tube. Push up on the bottom of the stanchion so you can
fully engage the 26 mm nut onto the air spring threads and tighten to 10 Nm with a torque wrench.
11. Slide the lower bushing into the upper tube so it is flush with the bottom of the upper tube. Slide the
stanchion collar up and tighten as much as possible by hand using a piece of old tube for grip.
Should you ever have any questions or need any parts for your fork, please visit https://wrensports.com/
Thank you for riding Wren!

Wren HQ: 1329 Glenn Street, Vallejo, CA 94590 - 707-652-2737 - www.wrensports.com
Wren East: 9 Howard Court, Lebanon, NJ 08833 - 201-588-5949
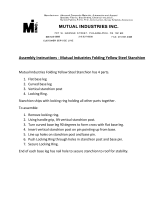
Travel Clip - position for adjusting travel only
Rubber Bumper
Upper Bushing Cap
Limiter Tube Washer
Gray Limiter Tube
Limiter Tube Washer
White Air Spring Piston
Position travel clip under small spring for
adjusting travel and AC together

/